background image

2

Important Usage Instructions

WARNING
TO REDUCE THE RISK OF FIRE OR ELECTRIC SHOCK, DO NOT EXPOSE THIS PRODUCT TO 
RAIN OR MOISTURE.

COPYRIGHT WARNING:
Unauthorized recording of copyrighted materials may infringe on the rights of copyright 
owners and be contrary to copyright laws.

The Mains plug is used as the disconnect device. The Mains plug shall remain readily 
operable to disconnect the plug in case of an accident.

CAUTION:
• Danger of explosion if the wrong type of batteries are attached. Use only the same type of 

batteries.

• Do not expose batteries or product to excessive heat such as the inside of a car under 

direct sunlight, fire, etc.

While using the compact power adapter, do not wrap it or cover it with a piece of cloth, 
and do not place it in confined narrow spaces.

CAUTION:
TO REDUCE THE RISK OF ELECTRIC SHOCK, DO NOT REMOVE COVER (OR BACK). NO USER-
SERVICEABLE PARTS INSIDE. REFER SERVICING TO QUALIFIED SERVICE PERSONNEL.

CAUTION

RISK OF ELECTRIC SHOCK

DO NOT OPEN

The lightning flash with arrowhead symbol, within an equilateral triangle, is intended to alert 
the user to the presence of uninsulated “dangerous voltage” within the product’s enclosure, 
that may be of sufficient magnitude to constitute a risk of electric shock to persons.

The exclamation point, within an equilateral triangle, is intended to alert the user to the 
presence of important operating and maintenance (servicing) instructions in the literature 
accompanying the product.

COP

Y

Summary of Contents for VIXIA HF R40

Page 1: ...PUB DIM 1063 000 English Fran ais Espa ol HD Camcorder Quick Guide Cam scope HD Guide rapide Videoc mara HD Gu a breve 6 4 COPY...

Page 2: ...light fire etc While using the compact power adapter do not wrap it or cover it with a piece of cloth and do not place it in confined narrow spaces CAUTION TO REDUCE THE RISK OF ELECTRIC SHOCK DO NOT...

Page 3: ...s to the equipment unless otherwise specified in the manual If such changes or modifications should be made you could be required to stop operation of the equipment Model ID0019 including WLAN Module...

Page 4: ...lked on or pinched particularly at plugs convenience receptacles and the point where they exit from the apparatus 9 Only use attachments accessories specified by the manufacturer 10 Unplug this appara...

Page 5: ...ith the radio signal regulations of the regions listed below For details on other regions where they can be used make inquiries with the contacts listed on the back side of this instruction manual Imp...

Page 6: ...s and is used under license The Twitter name and marks are trademarks of Twitter Inc Wi Fi is a registered trademark of the Wi Fi Alliance Wi Fi Certified WPA WPA2 and the Wi Fi Certified logo are tra...

Page 7: ...r cord in Asia BP 718 Battery Pack HTC 100 S High Speed HDMI Cable 2 IFC 300PCU S USB Cable 3 6 4 Wi Fi Basic Setup Guide Transfer Utility LE Setup Guide VIXIA CD ROM Contains the full version Instruc...

Page 8: ...mcorder to get you started And you have the complete information in the full version Instruction Manual PDF file About the Camcorder s PDF Instruction Manual This guide will get you started and show y...

Page 9: ...e installer panel appears 2 In the installer panel click Instruction Manual of the Camcorder and select your language 3 When the installation is complete click OK then Exit The installer will save the...

Page 10: ...23 4 Total number of scenes Total recording time 5 Memory operation 157 6 Intelligent IS 45 7 Remaining battery charge When the battery charge becomes low replace the battery pack with a fully charge...

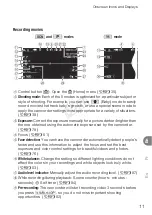
Page 11: ...osure set by the camcorder 79 A f Focus 81 A g Face detection You can have the camcorder automatically detect people s faces and use this information to adjust the focus and set the best exposure and...

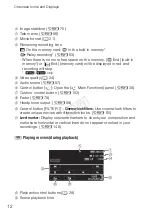
Page 12: ...f Video quality A 24 S g Audio scene 87 S h Control button Open the Main Functions panel 38 S j Custom control button 152 S k Fader 78 S l Headphone output 89 D q Control button FILTER 1 Cinema look f...

Page 13: ...Icons and Displays 13 En Fr Es D f Scene number D g Date Time 148 D h Volume and background music balance controls 52 96 D j Decoration Add a fun personal touch using stamps drawings image mix and mor...

Page 14: ...anel 146 D l Current photo Total number of photos F q File number 152 F a Control button h Photo jump 55 F s Control button Slideshow Play back a slideshow of your photos and use your favorite backgro...

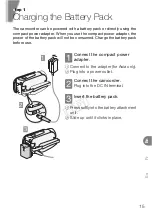
Page 15: ...adapter the power of the battery pack will not be consumed Charge the battery pack before use 1Connect the compact power adapter 1 Connect to the adapter for Asia only 2 Plug into a power outlet 2Con...

Page 16: ...for details IMPORTANT The battery pack will be charged only when the camcorder is off Do not connect to the camcorder s DC IN terminal or to the compact power adapter any electrical equipment that is...

Page 17: ...issue you can power the camcorder using the compact power adapter so the battery pack will not be consumed Charged battery packs continue to discharge naturally Therefore charge them on the day of us...

Page 18: ...order and adjust the LCD panel 1 When you open the LCD panel the camcorder will turn on and the initial setup screen will appear Perform the setup after you adjust the LCD panel s angle and if necessa...

Page 19: ...e indicator is off 2Open the memory card slot cover 3Insert the memory card at a slight angle all the way into the memory card slot until it clicks Then close the memory card slot cover 1 Push the mem...

Page 20: ...the camcorder For important information regarding the use of SDXC memory cards be sure to refer to SDXC Memory Cards 27 Initialize memory cards when you use them with this camcorder for the first tim...

Page 21: ...appear 2Select your preferred date time format and then touch After you select the date format the Date Time screen will appear with the first field selected 3Change the date time 1 Touch a field you...

Page 22: ...y or memory card and then touch After you select the memory to which you want to record movies the Rec Media for Photos screen will appear 6Touch built in memory or memory card and then touch 7Touch O...

Page 23: ...ove the lens cover switch down to 2Start recording movies Press to start recording Press again to pause the recording and record the video on the memory as one scene 3Take a photo Touch PHOTO on the s...

Page 24: ...ality or 4 Mbps for smaller file sizes and quicker uploads See Selecting the Video Quality 60 for approximate recording times You can use your smartphone to remotely control the camcorder While you vi...

Page 25: ...ons etc See About the Smart AUTO function 43 for details Intelligent IS In mode the camcorder will automatically select the best IS setting for the situation See Intelligent IS 45 for details Use or m...

Page 26: ...1 6 ft at full telephoto The minimum focusing distance at full wide angle is 1 cm See Tele Macro 86 for details Make sure the camcorder has finished writing the scenes or photos on the memory before...

Page 27: ...the recording you want to play back See Playing Back Video 50 and Viewing Photos 54 for details 1Press to set the camcorder to playback mode 2Change the index screen if necessary Movies Touch the inde...

Page 28: ...next previous index page 4Touch the desired scene or photo to play back Movies The selected scene is played back Playback continues until the end of the last scene in the index screen Touch the scree...

Page 29: ...inger left right to browse through the photos one by one Touch the screen to display the playback controls You can wirelessly share and view your recordings on the Web view the camcorder s recordings...

Page 30: ...TV The HDMI connection has higher picture quality HD than the composite video connection SD 2Turn on the TV and then the camcorder Press to turn on the camcorder directly in playback mode 3Play back y...

Page 31: ...16 9 movies on standard TV sets with a 4 3 aspect ratio the TV set will switch automatically to widescreen mode if it is compatible with the Video ID 1 system Otherwise change the aspect ratio of the...

Page 32: ...nage MP4 movies and photos Refer to Saving MP4 Movies and Photos Windows Mac OS 113 for details about installing the software Easily save the whole content of the memory onto an external hard drive co...

Page 33: ...details Optional Accessories Use of genuine Canon accessories is recommended This product is designed to achieve excellent performance when used with genuine Canon accessories Canon shall not be liabl...

Page 34: ...non Canon brand items is given by the manufacturer or producer thereof If the Equipment contains a hard disk drive Canon USA recommends that data stored on that drive be duplicated or backed up to pr...

Page 35: ...O USE THE EQUIPMENT REGARDLESS OF THE LEGAL THEORY ON WHICH THE CLAIM IS BASED AND EVEN IF CANON USA HAS BEEN ADVISED OF THE POSSIBILITY OF SUCH DAMAGES NOR SHALL RECOVERY OF ANY KIND AGAINST CANON US...

Page 36: ...ish of the Equipment media nor does it apply to Equipment purchased outside Canada If the Equipment contains a hard disk drive Canon Canada recommends that data stored on that drive be duplicated or b...

Page 37: ...L DE CV Blvd Manuel vila Camacho No 138 Piso 17 Col Lomas de Chapultepec C P 11000 M xico D F M xico CANON U S A INC NEW JERSEY OFFICE 100 Jamesburg Road Jamesburg NJ 08831 USA CENTRO Y CANON LATIN AM...

Reviews: