background image

Intelligent Function 

S

etting Tool

103

6

Adm

in T
ools

Caution

Notes on Use of This Camera

The intelligent functions are not suitable for applications where high reliability is required. If constant and maximum 
reliability is required for surveillance it is not recommended that you use this function. Canon shall assume no 
liability for any accident, loss or other undesirable outcomes resulting from intelligent function operations. 

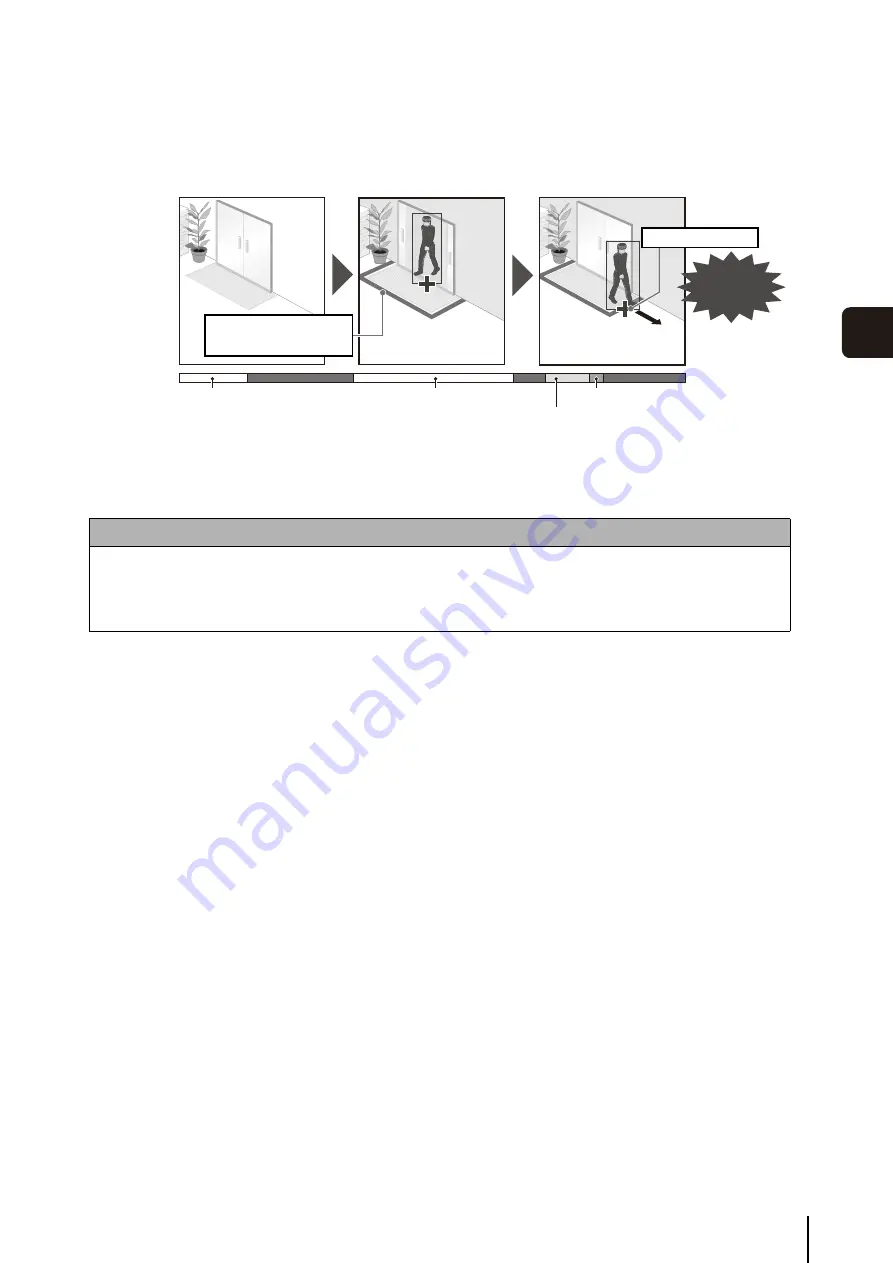
Passing Detection

Detect when a person or moving object crosses a specified line.

It determines that an object is passing when the decision point of the object detection frame 

crosses a detection line.

Passing detected.

Background Image 

Generated

Alert

Video Area Changes

Analysis

Passing Detected

Detection begins when 
decision point of object 
crosses detection line.

Volume Detection

Detect specified volume levels. For setting details, see “Chapter 

5

Setting Page” [Event] > 

[Volume Detection] (p. 62).

Summary of Contents for VB-H610D

Page 1: ...ENGLISH Network Camera Network Camera Operation Guide Be sure to read this Operation Guide before using the network camera ...

Page 2: ... USE OF THIS MATERIAL OR THE CAMERA Notes 1 All rights reserved 2 The contents of this guide are subject to change without any prior notice 3 This document has been prepared with the utmost attention to accuracy If you have any comments however please contact a Canon sales representative 4 Canon shall assume no liability for any outcome of using this product regardless of Items 2 and 3 above Notes...

Page 3: ...ctive this indicates that a heavy metal Hg Mercury Cd Cadmium Pb Lead is present in this battery or accumulator at a concentration above an applicable threshold specified in the Battery Directive This product should be handed over to a designated collection point e g on an authorized one for one basis when you buy a new similar product or to an authorized collection site for recycling waste electr...

Page 4: ...der on the Setup CD ROM Each module s license conditions are also available in the same folder Software under GPL and LGPL If you would like to obtain the source code under GPL LGPL please contact the dealer or sales agent where you purchased the product Security Export Control This product is subject to security export control Therefore to export or carry it overseas may require an authorization ...

Page 5: ...uld reference in this guide will be marked Installation Guide along with the name of the reference items Operation Guide This Document VBH467OG_E pdf This document explains the initial camera settings Camera Angle Setting Tool Admin Tools settings viewer operations and troubleshooting etc This document is included in the Setup CD ROM Network Video Recording Software RM Lite Administrator Manual RM...

Page 6: ...ence received including interference that may cause undesired operation Note This equipment has been tested and found to comply with the limits for a Class B digital device pursuant to Part 15 of the FCC Rules These limits are designed to provide reasonable protection against harmful interference in a residential installation This equipment generates uses and can radiate radio frequency energy and...

Page 7: ...due to video delay or loss Canon will assume no liability for any accident or damage resulting from use of the camera in the aforementioned devices or systems Caution Do not capture the sun halogen lamps and other very bright light sources or subjects Do not expose the camera to strong impact or vibration Do not carry the network camera by the camera head Do not forcibly turn the rotating parts of...

Page 8: ...era in the Installation Guide included with the indoor dome housing and remove the dome See steps in Installing the Camera in the Installation Guide included with the camera to remove the dome case See Using Camera Housing in the Installation Guide included with the camera to remove the front cover 2 Dampen a soft cloth with water or diluted neutral detergent and wipe away the grime gently 3 Wipe ...

Page 9: ...ns 5 Safety Precautions 6 Maintenance 8 Chapter 1 Before Use Features 14 Common Features 14 VB H41 Features 14 VB H610VE VB H610D VB H710F Features 14 Camera Software 16 Installed Software 16 Included Software 16 Network Video Recording Software Sold Separately 16 User Support Tool 17 RM Lite See the Administrator Manual 18 Operating Environment 19 VB Initial Setting Tool Camera Angle Setting Tool...

Page 10: ...ra 42 Accessing the Top Page of the Camera 42 User Authentication 42 Chapter 5 Setting Page Setting Menu 44 Accessing the Setting Menu 45 Setting Menu 45 Items Common to All Setting Pages 45 Network Setting Administrator Password LAN IP Address DNS etc 47 Date and Time Setting Date and Time 50 Camera Setting Initial Camera Settings and External Device Name 51 Video Setting Video Size Quality and F...

Page 11: ...rom Image Files Saving as Image Files 89 View Restriction Setting Tool 90 Display Screens of View Restriction Setting Tool 91 Setting View Restrictions 92 Preset Setting Tool 94 Display Screens of Preset Setting Tool 95 Setting the Preset 96 Preset Tour 99 Intelligent Function Setting Tool 101 Display Screen of Intelligent Function Setting Tool 104 Flow of Intelligent Function Setting 105 Setting ...

Page 12: ...igital PTZ 130 Setting Video and Audio 132 Checking Information 134 Performing Operations and Settings in the Admin Viewer 135 Transmitting Audio 135 Magnifying Part of the Image Viewer PTZ 135 Using Control for Admin 136 Displaying Event Status 141 Recording to an SD Memory Card Manually 142 Chapter 8 Appendix SD Memory Card Access 144 Modifiers 147 Troubleshooting 149 List of Log Messages 151 Lo...

Page 13: ...Chapter 1 Before Use Camera Features Software Information Operating Environment and Precautions ...

Page 14: ...mer and event recording are supported Recorded Video Utility in Admin Tools allows you to search and play back recorded video Intelligent Functions The camera boasts a variety of intelligent functions that offer the wide array of detection options Moving object detection abandoned object detection removed object detection tempering detection passing detection volume detection Small Scale Video Mon...

Page 15: ... only The camera complies with the demanding IP66 dustproof waterproof specifications and can be installed outdoors such as underneath eaves without any housing The separately sold genuine heater lets you use the camera in low temperature environments as cold as 30 C 22 F ...

Page 16: ...See Chapter 3 Camera Angle Setting Tool With this tool you can operate the camera during installation while you view video over the network on a PC NET Framework 3 5 SP1 This execution environment is required to use the software included in the camera RM Lite p 18 This software displays and records images from up to four cameras in real time Proxy Authentication Admin Viewer Admin Tools This softw...

Page 17: ...ol can be installed for use on a PC Backup and Restore Tools The Backup and Restore tools back up camera setting information to the PC Information from multiple cameras can be saved at the same time The tools can also restore information saved on the PC to the camera ...

Page 18: ... JPEG H 264 captured by the camera Up to four cameras can be registered for the viewer 1 license Supported cameras VB H41 VB H610VE VB H610D VB H710F VB M40 VB M600VE VB M600D VB M700F VB C60 VB C500VD VB C500D VB C300 VB C50i VB C50iR VB C50FSi VB C50Fi Important To add the RM Lite Viewer purchase RM Lite V sold separately The VB H41 VB H610VE VB H610D VB H710F VB M40 VB M600VE VB M600D VB M700F ...

Page 19: ... Selecting Easy Installation will install it automatically depending on the OS RM Lite For operating environment details refer to Operating Environment in the Administrator Manual Operating Environment CPU Intel Core i7 2600 Operating Systems Windows XP Home Professional SP3 32 bit Windows Server 2003 Standard SP2 32 bit Windows Server 2003 R2 Standard SP2 32 bit Windows Vista Ultimate Business En...

Page 20: ...lorer 9 or greater Windows Server 2003 and Windows Server 2008 the security level for Internet sites and intranet sites on Internet Explorer is set to High by default Thus when accessing the VB H41 610 710 Viewer the camera s Setting Page or the Admin Tools a content block dialog box appears and the page fails to display correctly To correct this problem follow the procedure below to register the ...

Page 21: ...made from a web browser Internet Explorer 9 in Windows Server 2008 or Windows Server 2008 R2 the following operations may display the content block dialog box and prevent further operation Startup of Admin Tools or Admin Viewer Audio reception from VB Viewer This happens when Internet Explorer Enhanced Security Configuration IE ESC is enabled in Internet Explorer 9 Use the procedures below to chan...

Page 22: ... with Windows Vista or Windows 7 RM Lite For important information on the RM Lite operating environment see the Administrator Manual Important Note that when IE Enhanced Security Configuration is turned back on the Do not save encrypted pages to disk checkbox also becomes enabled 1 Open Control Panel and click Hardware 2 Click Sound 3 When the Audio Service Not Running message appears click Yes 4 ...

Page 23: ...Chapter 2 Initial Settings Preparing the Camera for Use Initial Setting Tool Installation Initial Settings ...

Page 24: ...mera to suit the operating environment it will be used in Installation Guide Setting the Camera Angle Use the Camera Angle Setting Tool to set the camera angle via PC operation Installing the Necessary Software p 26 Chapter 3 Camera Angle Setting Tool Configuring the Camera from the Setting Page The setting page lets you configure basic camera settings network operations user registration and acce...

Page 25: ...B viewer to check distribution to guest users and Admin Viewer to check all operations Chapter 7 Admin Viewer VB Viewer Operating If an error message appears or the camera fails to operate correctly see the error message and log message information in Chapter 8 Appendix Chapter 8 Appendix Important Before starting operations make sure that the setting page and Admin Tools settings are functioning ...

Page 26: ...all the software with Easy Installation the Camera Angle Setting Tool that is not used with VB H41 is also installed If you do not want to install the Camera Angle Setting Tool because you are using only VB H41 cameras perform a Custom Installation and clear the checkbox for the Camera Angle Setting Tool The installation screen appears Easy Installation VB Initial Setting Tool Admin Tools certific...

Page 27: ...t block dialog box does not appear JavaScript is sometimes disabled under the standard security settings which may limit operations on the setting page and the VB H41 610 710 Viewer Register the page as a trusted site as this automatically enables JavaScript settings If the content block dialog box does not appear follow the procedure below to display the Trusted Sites dialog box The Trusted sites...

Page 28: ...e camera and PC to the network and turn on the camera Installation Guide Connecting the Camera 2 Launch the VB Initial Setting Tool Important Twenty minutes after the camera is turned on it will stop issuing IP address assignments requests and VB Initial Setting Tool detection will be disabled In such cases turn the camera off and on again There may be cautionary information depending on your oper...

Page 29: ...p 149 in Chapter 8 Appendix Checking the Camera Image 1 Click to select the camera s MAC address which will be checked and then click Settings 2 This will launch the web browser and display the top page of the camera Click VB Viewer Important The camera image cannot be checked until the network settings in the PC are configured for the IP address and subnet that are set in the camera Do not change...

Page 30: ...30 ...

Page 31: ...Chapter 3 Camera Angle Setting Tool Camera Angle Setting Method Creating a Camera Specification File to Manage Multiple Cameras ...

Page 32: ...unications Normally SSL communications are not used factory default setting p 72 Port Set the HTTP port number to 80 443 or in the range of 1024 to 65535 Normally 80 factory default setting is used p 61 Setting the Camera Angle Important The Camera Angle Setting Tool is included for angle adjustment during camera installation only and is not intended for daily use Overuse may cause the camera to m...

Page 33: ...ou can easily connect to multiple cameras without having to enter the camera information for each one See Creating a Camera Specification File p 39 for information on how to create a camera specification file Loading a Camera Specification File The Select Camera dialog box will appear 3 Click Yes at the following message Important Access to one camera is restricted to 30 minutes The Camera Angle S...

Page 34: ...is shut down Load the camera specification file the next time you launch the Camera Angle Setting Tool Connecting to the Camera From the camera list select the camera to connect to and click Connect Connecting to the Next Camera on the List Click Next to disconnect the camera currently connected and connect to the next camera on the list Note In Detailed Information information for the camera sele...

Page 35: ...3 Camera Angle Setting Tool Disconnecting from the Camera Shutting Down 1 Click Disconnect from the File menu to disconnect the currently connected camera 2 Click Exit from the File menu to shut down the Camera Angle Setting Tool ...

Page 36: ... operation The camera angle cannot be changed to positions with no dotted lines 4 Pan button Control the camera s pan operation 5 Tilt button Control the camera s tilt operation 6 Rotation button Control the camera s rotation operation 7 Rotation slider You can click on the slider or drag the knob to control the camera s rotation operation 8 Optical telephoto end icon This is displayed when Enable...

Page 37: ... slider and the digital zoom operation becomes possible The higher the digital zoom ratio the lower the image quality becomes 15 Image Flip selection box Select the orientation of the camera image If Enable is selected the image will be rotated 180 degrees 16 Focus You can control the focus 17 Exposure Compensation slider You can control the exposure Setting the Camera Angle You can operate pan ti...

Page 38: ...turn to manual focus Fixed at Infinity You can set the focus so that it is fixed near infinity Note One shot AF may not focus properly on the following subjects Subjects Difficult to Focus On After rebooting the camera it is recommended that you check whether the camera is focusing correctly Focus ranges rough guide are shown in the table below Setting the Exposure You can set any of nine levels o...

Page 39: ...on Host Name The camera s host name or IP address Port Number The camera s HTTP port factory default setting is 80 Administrator User Name The camera s administrator user name factory default setting is root Administrator Password The camera s administrator password factory default setting is camera SSL Communications SSL communications 1 No SSL communications 0 factory default setting is 0 Regist...

Page 40: ...camera3 0 2Fa VB H610D 192 168 100 4 80 root camera4 0 2Fb VB H610D 192 168 100 5 80 root camera5 0 3Fa VB H710F 192 168 100 6 80 root camera6 0 R VB H610VE 192 168 100 7 443 root camera7 0 Important Enter the actual administrator passwords in the camera specification file Handle the camera specification file with sufficient care If the camera specification file includes delimiters other than comm...

Page 41: ...Chapter 4 Top Page of the Camera Accessing the Setting Page Admin Tools and Viewer ...

Page 42: ...name root Accessing the Top Page of the Camera 1 Launch the web browser 2 Enter the IP address you specified in the Initial Setting Tool Important This Operation Guide explains relevant operations using the IP address 192 168 100 1 factory default setting You need to enter the actual IP address set for the camera when following instructions 1 2 3 4 5 Important To ensure system security be sure to ...

Page 43: ...E mail Notification Settings Video Server Audio Server and HTTP Server Settings Settings Related to Events User Registration Authorities and Access Restriction Settings IPsec Settings HTTP Communication Encryption SSL TLS Settings SD Memory Card Operations and Displaying Information Settings for Items Requiring Rebooting Maintenance Displaying Log and Setting Information Rebooting Factory Default ...

Page 44: ...tings volume detection external device output external device input timer and sound clip upload p 62 Access Control Authorized user account user authorities host access restriction settings p 66 IPsec IPsec settings p 68 SSL TLS Certificate creation administrative settings and encrypted communication settings p 71 Memory Card SD memory card operations and information display p 73 Reboot Item Setti...

Page 45: ...ing effective Click Clear to restore the previous setting Setting Changes Requiring Rebooting Items that require the camera to be rebooted in order to change settings are flagged with an orange mark When any item accompanied by an orange mark is changed the Apply shown at the top right and bottom right of each setting page changes to Apply and reboot Click Apply and reboot to confirm the new setti...

Page 46: ...any item to display a detailed explanation of that setting item Important Do not open multiple setting pages at one time and try to change the settings of a single camera Do not use the Back or Forward buttons in the web browser to navigate between setting pages The changed settings may return to the original settings or unwanted setting changes may be applied ...

Page 47: ...1 enter a fixed IP address 3 Subnet Mask If Manual is specified in 1 enter the designated subnet mask values for each network 4 IPv4 Default Gateway Address Enter an appropriate value if Manual is specified in 1 Be sure to set when connecting the camera to a different subnet from that of the viewer Network Setting Administrator Password LAN IP Address DNS etc The following can be set here Administ...

Page 48: ...ddress using a name server automatically obtained from DHCP otherwise select Disable To select Enable specify Auto DHCP in IPv4 Address Setting Method 3 Host Name You can register the host name of the camera in the name server Characters A to Z a to z 0 to 9 hyphen _ underscore and period may be used up to 63 single byte characters in length Important Contact your System Administrator for the IPv4...

Page 49: ...s 2 will be accessed However the name server address 2 must be set in advance SNMP 1 SNMP Set SNMP use to Disable or Enable Camera information can be referenced by the SNMP Manager if Enable is specified 2 Community Name Set a community name for SNMP It is recommended that you change the community name to ensure system security 3 Administrator Contact Information Set contact information e mail add...

Page 50: ...eived from the NTP server Synchronize with computer time The camera will synchronize with the date and time of the computer currently accessing the camera The time zone will also be selected automatically 3 Time Zone Select from the list the appropriate time difference from the Greenwich Mean Time 4 Daylight Saving Time Select Enable to automatically adjust the daylight saving time according to th...

Page 51: ...e Select a desired shutter speed from the 16 levels from 1 2 to 1 16000 When capturing a moving subject selectinga higher shutterspeedcan reduce blurryimage capture 2 Exposure Compensation The exposure compensation when the camera starts can be set in the range of 4 Dark to 4 Bright To brighten the image set a positive value To darken the image set a negative value 3 Metering Mode Set the metering...

Page 52: ...ting Mercury Lamp Select this option to capture video under mercury lamps Sodium Lamp Select this option to capture video under orange sodium lamps Halogen Lamp Select this option to capture video under halogen lamps or incandescent bulbs Note See Subjects Difficult to Focus On p 38 Focus ranges rough guide are shown in the following table according to the settings of Day Night p 53 etc When using...

Page 53: ...Mode if brightness remains above or below the level set in 2 for the number of seconds specified Select 30 or 60 if brightness changes frequently such as when a light source passes in front of the camera Select 5 or 10 if change in brightness is minimal Degree of blurriness corrected Viewing angle ratio Effective pixels Disable 100 Approx 2 07 megapixels On1 Small 83 Approx 1 44 megapixels On2 Lar...

Page 54: ...a control preset to No Restriction or Preset Only The administrator can limit camera control by non administrators to preset angles by selecting Preset Only 2 Camera Position without Control Select either Do not return to Home Position or Return to Home Position as the action when no control privileges are requested by users and the home position has already been set When Return to Home Position i...

Page 55: ...ps If Use bit rate control is selected in 1 select 64 to 8192 total 13 levels for the target bit rate 3 Video Quality If Do not use bit rate control is selected in 1 select a desired quality from 1 to 5 total 5 levels for H 264 video transmission Greater values have higher quality 4 Video Size Select 480x270 960x540 or 1920x1080 for the size of video transmitted 5 Frame Rate fps Select 30 15 10 6 ...

Page 56: ...ct Black Blue Cyan Green Yellow Red Magenta or White for the color of text to be displayed over the image 10 Color of text outline Select Black Blue Cyan Green Yellow Red Magenta or White for the color of text outline 11 Color depth of text and outline Select Fill text and outline Make text only transparent Make text only translucent or Make text and outline translucent for the color depth of text...

Page 57: ...TP Upload and E mail Notification The following can be set here General Upload Set the upload operation to be performed and the image buffer HTTP Upload Set HTTP connection uploads FTP Upload Set FTP connection uploads E mail Notification Set event information and image e mail notifications Important If the upload function is used either the Event menu must be set p 62 or the Event tab in the Inte...

Page 58: ...ploaded It is not necessary to click Apply For a password first click Exec then Apply the password FTP Upload 1 Notification The content of notification is set to Video data upload with FTP 2 FTP Server Enter the host name or IP address of the FTP server using up to 63 characters 3 User Name Password Enter the user name and password required for authentication 4 PASV Mode Select Disable or Enable ...

Page 59: ...et the e mail address of the sender using up to 63 characters 5 Recipient To Set the e mail address of the recipient using up to 63 characters 6 Authentication Select None POP before SMTP or SMTP AUTH for the e mail authentication method Set an appropriate method according to the authentication method used by the SMTP server to send to User Name Password POP Server If POP before SMTP is selected a...

Page 60: ...me Set the volume of input for the microphone connected to the camera in the range of 1 to 100 The greater the value the larger the input volume becomes 3 Voice Activity Detection If Enable is selected the audio transmission is stopped temporarily when no audio is output This way the load of the applicable network can be reduced 4 Audio Reception from Viewer If Enable is selected the audio receive...

Page 61: ...io is received from the camera the video frame rate may slow down and the sound may drop out The volume sound quality etc may change depending on the characteristics of the microphone used If Input Volume or Echo Canceller settings are changed after setting volume detection check the detection setting again Connect a speaker with amplifier to the camera Installation Guide Audio Input Output Termin...

Page 62: ...he operation to be performed upon an OFF event If Enable is selected 7 Preset 8 Video Record and 9 E mail Notification will be executed according to their settings upon an OFF event 7 Preset If a preset is specified the camera will orient automatically to the specified preset position when a volume detection event occurs To use presets it is necessary to set the presets with the Preset Setting Too...

Page 63: ...output format 3 Pulse Output Time sec Enter the pulse output time in the range of 1 to 120 sec This setting is available when Active Output Format is Pulse Note Normally Open means that the contacts are normally in the open state that the circuit is non conductive and Normally Close means that the contacts are normally in the closed state that the circuit is conductive External Device Input 1 Exte...

Page 64: ...ected the audio designated in Sound Clip will playback when the external device input becomes active 11 Audio Playback at Inactive Event Select the audio playback operation to be performed upon an inactive event If Enable is selected the audio designated in Sound Clip will playback when the external device input becomes inactive 12 Sound Clip Select the sound clip to be played For registration of ...

Page 65: ...elect Disable to disable Day Night Mode switching Sound Clip Upload 1 Browse File Specify the audio file you want to register as the sound clip and then click Add 2 Sound Clip Name Set a name for the audio file to be registered as sound playback up to 15 alphanumeric characters If a blank field is applied the sound clip will be deleted To delete a registered audio file click Delete next to the sou...

Page 66: ...Access Restrictions Set IPv4 host access restrictions to Disable or Enable 2 Default Policy If IPv4 host access restrictions are applied select Authorize Access or Prohibit Access for the default policy 3 Network Address Subnet Create a list of permitted hosts and restricted hosts and set IPv4 address access for each host to Yes or No You can specify the subnet and set access restrictions by netwo...

Page 67: ...ult Policy If IPv6 host access restrictions are applied select Authorize Access or Prohibit Access for the default policy 3 Prefix Prefix Length Create a list of permitted hosts and restricted hosts and set IPv6 address access for each host to Yes or No You can specify the prefix length and set access restriction by network or host If access is prohibited access to all ports is restricted ...

Page 68: ...ing is 480 IPsec Set Auto Key Exchange IPsec Sets 1 to 5 are available and you can specify IPsec settings for one communication device for each IPsec Set 1 IPsec Set Set IPsec Set to Disable Enable in IPv4 or Enable in IPv6 2 IPsec Mode Set IPsec mode to Tunnel Mode or Transport Mode 3 Destination IPv4 Address Destination IPv6 Address Enter the IP address of the connection destination 4 Source IPv...

Page 69: ...thm Set the ESP encryption algorithm to AES 3DES DES or NULL according to the encryption algorithm supported by the device to connect to Normally AES or 3DES is recommended 9 SA ESP Authentication Algorithm Set the ESP authentication algorithm to HMAC_SHA1_96 HMAC_MD5_96 or No Authentication according to the authentication algorithm supported by the device to connect to If ESP is used alone No Aut...

Page 70: ...MAC_SHA1_96 or HMAC_MD5_96 was selected in 16 set a 160 bit or 128 bit hexadecimal respectively 20 SA AH SPI inbound Set the SA SPI value for inbound Set a desired value in the range of 256 to 4294967295 Since this setting is used as an ID for identifying the SA be careful not to specify an inbound SPI whose value is already used in the SPI for another AH Note If IPsec is used video transmission p...

Page 71: ...te Signing Request Details Click Exec to view the details of the certificate signing request 3 Install Server Certificate Perform this operation to install a server certificate Click Browse to select the certificate file for installation then click Exec The certificate installed will take effect after rebooting 4 Install Intermediate Certificate Perform this operation to install an intermediate ce...

Page 72: ... SSL Communications Set SSL communications to Disable or Enable The setting will take effect after rebooting However if no certificate is installed SSL communications cannot be changed to Enable Note It may take a few minutes to generate an SSL key If SSL communications are used video transmission performance drops Depending on the type of the certificate being installed on the camera a dialog box...

Page 73: ... fps Video size and quality of the recorded video are made according to the settings in the Video menu 4 Pre event Buffer number of frames Pre event Buffer sec Enter the number of frames or seconds of video to be buffered before the event The maximum amount is number of frames for a JPEG selection and number of seconds for an H 264 selection in Video Format 5 Post event Buffer number of frames Pos...

Page 74: ...operation may be performed Recreating video management information This status indicates that video management information is being recreated Other operations cannot be performed Deleting videos This status indicates that videos are being deleted Other operations cannot be performed 3 Video Management Information Status Displays the status of the video management information The two status message...

Page 75: ... SD Memory Card Access p 144 An SD memory card can store a total of 100 000 files regardless of recording format Important Information recorded to the SD memory card may be regarded as personal information Take sufficient precautions for handling this information when releasing to third parties for disposal transfer or repair ...

Page 76: ...y disable camera connection from the active web browser a dialog box appears and alerts the user Click OK to apply the new setting Depending on the new setting it may not be possible to connect to the camera again after rebooting If this happens a candidate URI for reconnecting the camera will appear if available Try the URI displayed to reconnect the camera If you cannot connect to the camera thr...

Page 77: ... write down all current setting values before restoring factory default settings in Restore Settings p 163 The camera can be restored to factory default settings using the reset switch as well Note however that this will reset all camera settings to factory default settings except for date and time p 162 Maintenance Viewing Event Logs and Current Settings and Performing Maintenance The following i...

Page 78: ...78 ...

Page 79: ...Chapter 6 Admin Tools Privacy Mask Setting Panorama Image Registration View Restriction Setting Camera Preset Setting Intelligent Function Setting Viewing Logs Managing SD Memory Card Video ...

Page 80: ...ation Tool A panorama image creation tool that shows the entire area that can be captured by this camera Once a panorama image is captured and registered it is shown in the panorama display panel of the viewer As the panorama image is also shown when view restrictions and presets are set you can see at a glance which part of the entire area the set area is occupying View Restriction Setting Tool T...

Page 81: ... abandoned object removed object camera tampering passing etc You can view the image on the camera while setting the position and size of the detection area and line detection conditions etc Log Viewer This viewer shows the logs of operating conditions of the camera Note On the control panel of Windows the decimal point in a value is always indicated by regardless of the settings of Region and Lan...

Page 82: ... about 5 to 10 seconds until the software is downloaded to your PC From then on launching will be quicker Also when accessing via SSL encrypted communication download time will take longer about 20 to 30 seconds None of the following tools can be launched concurrently Privacy Mask Setting Tool Panorama Creation Tool View Restriction Setting Tool Preset Setting Tool and Intelligent Function Setting...

Page 83: ...esized moved While in this mode the camera orientation will not change When the button is set to pan tilt operations can be performed 3 Switch Screen Size button Each time this button is clicked the screen size of the image display area switches between 480 x 270 and 960 x 540 4 BLC Back Light Compensation button This button turns on off backlight compensation This control is effective when the im...

Page 84: ... camera and show them in 15 2 15 4 Privacy Mask Position and Size Set left and upper edge width and height of the privacy mask 15 5 Preview settings The settings will be reflected in the image display area and in the registered privacy mask display area capture area 16 Restore settings Clear the settings you have specified on the screen of the tool and restore the settings saved in the camera 17 S...

Page 85: ...tection area Subject movement may be seen Privacy masks are applied to all images transmitted from the camera live video uploaded images recorded video video recorded to an SD memory card Privacy mask areas cannot be set in digital zoom areas Privacy masks set at a zoom position close to the tele end may deviate slightly from the specified position Set the privacy mask area to a somewhat larger si...

Page 86: ...nd size of the preview frame Click Get camera info to load the current pan tilt and zoom settings If you want to cancel the changes and restore the settings saved in the camera click Restore settings The changed privacy mask area is saved in the camera Note Select a disabled privacy mask and click Quick change to enable it How to Delete Select the privacy mask area you want to delete and click Del...

Page 87: ...set area is occupying Admin Viewer Preset Setting Tool Panorama Creation Tool Important If the privacy mask settings were changed using the Privacy Mask Setting Tool it is recommended that you recreate the panorama image to reflect the new privacy mask settings in the panorama image Create capture a panorama image with the Panorama Creation Tool and save it in the camera You can see at a glance wh...

Page 88: ...tc 12 Exposure Lock Select Center or Current Position for the auto exposure lock position 13 White Balance Lock Set the white balance to Do not lock Center or Current Position 14 Focus Lock Set the focus to Do not lock Center or Current Position Capturing a Panorama Image The capture is started Change the settings for Exposure Lock White Balance Lock and Focus Lock as necessary To stop the capture...

Page 89: ...ge Files Saving as Image Files You can open image files as a panorama image or save a captured panorama image as an image file Only JPEG image files created using Panorama Creation Tool can be handled How to Open from Image Files Click Load from file and then select the image files you want to use in the displayed dialog box How to Save Click Save to file and then select the folder you want to sav...

Page 90: ...w Restriction Setting Restrictions set by the View Restriction Setting Tool are applied in the following cases When the Admin Viewer is accessed with authorized user authorities When the VB Viewer is accessed When accessed via RM Lite View Restriction Setting Tool To limit zoom or a certain field of view when publishing live video use the View Restriction Setting Tool to set the view restrictions ...

Page 91: ... view defined by top bottom left right edges 6 2 Wide angle preview frame green frame Wide angle restriction setting restriction of capture frame 6 3 Telephoto preview frame yellow frame Telephoto restriction setting restriction of maximum zoom ratio 7 Digital Zoom The current digital zoom usage status of the camera is shown in real time 8 Image Stabilizer The current image stabilizer usage status...

Page 92: ...Image in Image Display Area The loaded view restriction can be checked in the view restriction setting entry box or view restriction preview frame The settings are saved in the camera Note Even when view restrictions are set an area outside the view restriction may still appear momentarily when the camera is controlled near the boundary of the view restriction To cancel the view restrictions clear...

Page 93: ...oom range Pan controllable area Maximum horizontal captured area Maximum wide angle viewing angle Maximum vertical capture area Tilt controllable area Setting view restrictions automatically restricts the camera operating angle When wide angle is selected the capture of the camera operating angle would exceed the view restrictions if it remained the same Therefore it is narrowed automatically View...

Page 94: ...tting Tool Set preset tour after the presets have been set Preset Setting Tool Important If you want to use intelligent functions it is strongly recommended that you use the Preset Setting Tool to register a preset that corresponds to the camera position of the area where you want to use intelligent functions Presets that were set with the Preset Setting Tool cannot be used for the settings of int...

Page 95: ... 960 x 540 4 Obtain Release Camera Control button This button is used to obtain release the camera control privileges For details see Obtaining Camera Control Privileges p 128 5 Control for Admin button Displays the Control for Admin Panel p 120 6 Panorama Screen The panorama image registered in the camera is shown A preset preview frame yellow reflecting the preset settings is shown where you can...

Page 96: ...he new frame is reflected in the preset settings 14 Update Image Update the full image Click this button to obtain an image at the current camera angle of view 15 Show in viewers checkbox Select this checkbox to use presets in the viewer When home position is selected in 8 this function is grayed out 16 Camera Parameters Displays the values for the pan and tilt positions and zoom viewing angle in ...

Page 97: ...ttings are reflected in the preset preview frame on Full Image and the camera parameters If you previewed incorrect settings etc and want to restore the settings registered in the camera click Restore settings Alternatively click Get Digital PTZ Info to restore the preset settings that you set last time 3 Operate the camera from the image display area set it to the desired position and click Quick...

Page 98: ...is function reduces the load on the network because only part of the image is cropped and transmitted 5 Click Save settings 1 Select the Show in viewers checkbox 2 Click Get camera info 3 Fine tune the camera angle and adjust the image quality with focus or smart shade control while checking the image 4 Click Preview settings 5 Click Save settings Important To use presets in the viewer select the ...

Page 99: ... the new angle can be checked in the image display area 7 Speed PT Select Slow Normal or Fast for the moving speed of the camera during panning tilting 8 Speed Z Select Slow or Fast for the camera speed during zoom 9 Pause sec Set the time at which the camera stops at the preset position You can set between 0 and 120 seconds in 5 second increments You can set between 1 and 120 seconds in 1 second ...

Page 100: ...ge display area When you want to delete changes made to the tour schedule list and restore the settings registered in the camera click Restore settings When you complete setting the tour schedule list click Save settings The settings are saved in the camera Note The home position cannot be added to the tour schedule list 3 Select a preset in the tour schedule list and set the preset operation 4 Cl...

Page 101: ...tification Network Video recording on storage server Upload to FTP server HTTP server Volume Detection Moving Object Detection Removed Object Detection Abandoned Object Detection Camera Camera Tampering Detection Moving Object Detection Detect moving objects This function can be used to detect visitors or suspicious individuals Moving object detection is triggered when moving objects are inside th...

Page 102: ...es Removed object detection is triggered when an object is removed from the detection area for a specified duration Picture has disappeared Background Image Generated Alert Change in Designated Area Analysis Object Removal Detected The picture object is removed and detection begins after set time Camera Tampering Detection Detect when the capture is being obstructed This function can be used to de...

Page 103: ...er undesirable outcomes resulting from intelligent function operations Passing Detection Detect when a person or moving object crosses a specified line It determines that an object is passing when the decision point of the object detection frame crosses a detection line Passing detected Background Image Generated Alert Video Area Changes Analysis Passing Detected Detection begins when decision poi...

Page 104: ...ht compensation This control is effective when the image is dark due to backlight 5 Obtain Release Camera Control button This button is used to obtain release the camera control privileges For details see Obtaining Camera Control Privileges p 128 If camera control privileges have not yet been obtained elsewhere such as in the Admin Viewer the control privileges will be obtained the moment the Inte...

Page 105: ...nt tabs Detection Criteria Specify detection settings name detection area line and detection criteria p 107 Event Specify operations to be performed when events occur p 108 19 Restore settings Clear the settings you have specified on the screen of the tool and restore the settings saved in the camera 20 Save settings Save the edited detection settings in the camera After the detection settings hav...

Page 106: ...p 108 5 Save the detection settings in the camera 6 Check the detection result 1 2 Important Notes on intelligent function settings and operation When setting intelligent function do an actual detection test to confirm that detection will be performed correctly When the entire screen are exposed to sudden changes in brightness detection may not be performed as intended for up to 5 minutes If Auto ...

Page 107: ...4 Object Size Change Ratio Duration Sec Set the lower limit for the size change ratio and judgment time for the set detection area to trigger detection If the value set here is exceeded Detected mode is triggered Click the text box to enter a value directly or specify a value using the slider For details on the setting method see Setting Detection Criteria per Detection Type p 109 5 Clear detectio...

Page 108: ...triggered to ON Audio Playback at OFF Event checkbox When selected the sound set in 4 Sound Clip Name is played at the moment the detected mode is turned OFF 4 Set the playback sound Sound Clip Name Select the sound that is to be played The sound clip name set for Sound Clip Upload under Event in the Setting page is shown in the pull down list p 65 Volume Set the audio playback volume in the range...

Page 109: ...r to set the ratio of the size of an object moving in the detection area to the size of the detection area When the ratio of an area where the camera has detected a moving object exceeds the value set for Object Size detected mode is triggered to ON When Object Size is changed an indicator frame showing the size of the object is displayed for 1 second in the center of the image display area allowi...

Page 110: ... changed an indicator frame representing the area that can be obstructed is displayed for 1 second in the center of the image display area This allows you to check the change ratio of the camera tampering detection area which occupies the entire image display area while specifying the Change Ratio setting Any moving objects detected are shown with contour lines If it is smaller than Change Ratio c...

Page 111: ...ed when an event occurs Setting by Right Click Menu Right click on the Intelligent Function Setting Tool display screen to display the menu There the following functions can be used Copy detection area line Copy the detection area line of the detection setting selected Paste detection area line Paste the copied detection area line to the detection setting selected It cannot be copied to camera tam...

Page 112: ...n as Intelligent Function Image Detection in the event display panel of the Admin Viewer For details see Displaying Event Status p 141 Note If the detection setting is not stored in the camera only the detection status for the currently selected detection setting is displayed 2 Select Reduce effects of lighting change 3 Click Save settings Important A Reduce effects of lighting change setting may ...

Page 113: ...ource from where log files are loaded is shown From the camera s internal memory Camera Internal memory From an SD memory card Camera SD card From files saved to a PC File name 8 Copy Copy to the clipboard logs that you have selected on the log display area 9 Select all Select all the logs that are shown in the log display area 10 Show all logs checkbox When selected all logs including those witho...

Page 114: ...t and display them Note Logs cannot be deleted in the Log viewer Downloading Log Files When Log Viewer is launched the latest log files will be downloaded and displayed automatically To download a new log file list click Download A Download dialog box is shown where you can select Internal memory or SD Card as a download source When the list has been downloaded a dialog box showing the log file li...

Page 115: ...ching the specified conditions Log Type Select the Specify type or Specify code checkbox to filter logs by type If you do not want to filter logs by type select Not specified Specify type Specify the log level Select Error Warning or Information for the level of logs to be shown Specify log output module Select Application HTTP Server or System for the output source module whose logs will be displ...

Page 116: ...l Select all video in the video list 6 Export to mov format Export the Downloaded JPEG images selected in the video list to a mov format video file 7 Video List Displays a list of videos recorded on an SD memory card and downloaded to a PC 8 Delete from Camera Delete videos selected in the video list from the SD memory card 9 Download Download videos selected in the video list to a PC 10 Download ...

Page 117: ...row down the number of videos that appear in the video list to the ones you need Set the following conditions and click Apply filter to show only the videos matching the specified conditions Date Time Specify start date time When this checkbox is selected and a date and time are entered videos recorded on or after the specified date and time are shown Specify end date time When this checkbox is se...

Page 118: ...ndows 7 use QuickTime However playback when using this software is not guaranteed A recorded JPEG video whose size is changed during recording and exported to a mov file cannot be played back by Windows Media Player Use QuickTime to play it back Playing Back Videos Videos selected in the video list can be played back in the Playback Videos area The appearance and operations of the Playback Videos ...

Page 119: ...back Note The exported video files can be played back using QuickTime 7 7 and Windows Media Player 11 12 For an operating system other than Windows 7 use QuickTime However playback when using this software is not guaranteed A JPEG video whose size is changed during recording and is then exported to a mov file cannot be played back by Windows Media Player Use QuickTime to play it back Deleting Vide...

Page 120: ...the setting items You can open the various control items even without obtaining the camera control privileges but the items will be grayed out Operating the Control Items The panel operates in the same way as Control for Admin of the Admin Viewer Smart Shade Control You can set Smart Shade Control For details see Setting the Smart Shade Control p 137 Focus You can adjust focus For details see Sett...

Page 121: ...Viewer Differences between the Admin Viewer and the VB Viewer User Authorities and Camera Control Privileges Viewer Startup and Operation Camera Control and Obtaining Camera Control Privileges Admin Viewer Operation and Settings ...

Page 122: ...ed by the Administrator beforehand p 66 VB Viewer Users with camera control authority can use this viewer You can set the applicable options to enable disable authentication etc User Authorities and Camera Control Privileges User authorities and their relative camera control privileges are specified as follows Can be changed The Administrator can change the privileges of Authorized Users and Guest...

Page 123: ...iewer At any time the Administrator can launch the Admin Viewer to override the camera control privileges of another instance of the Admin Viewer launched by an Authorized User The Administrator can retain the camera control privileges but doing so prevents authorized users from obtaining camera control privileges After viewing the necessary information the Administrator should always close the vi...

Page 124: ...ewer Video Distribution Audio Distribution VB Viewer Video size video display size full screen mode reconnect audio reception get a snapshot Panorama display Digital PTZ Video Distribution 2 VB Viewer Video size video display size full screen mode reconnect get a snapshot Panorama display Digital PTZ ...

Page 125: ... Tools p 82 for information on launching the Admin Tools Launching the Viewer Important The Admin Tools Certificate must be installed on a PC that is using the Admin Viewer p 26 This Operation Guide explains relevant operations based on the IP address 192 168 100 1 factory default setting You must enter the actual IP address set for the camera when following instructions 1 Access http 192 168 100 ...

Page 126: ...Reconnect button The camera is reconnected 6 Audio Transmission button Transmit audio to the camera 7 Audio Reception button Audio from the camera is received and output 8 Slider for tilt This slider is used to control the tilt vertical movement of the camera 9 Slider for pan This slider is used to control the pan horizontal movement of the camera 10 Slider for zoom This slider is used to control ...

Page 127: ...e position 25 Event Display Panel This panel is displayed upon clicking the Event Display button The panel shows the input status of external devices and the status of image and volume detection by intelligent functions 26 Panorama Display Panel This panel is displayed upon clicking the Panorama Display button 27 Panorama Display Area Displays panorama images registered in the camera You can opera...

Page 128: ...ed upon clicking the Panorama Display button 20 Panorama Display Area Displays panorama images registered in the camera You can operate the camera by controlling the frame lines within the panorama display area 21 Digital PTZ Panel This panel is displayed upon clicking the Digital PTZ button 22 Digital PTZ Area Designator Specify the area in the image display area to crop with Digital PTZ Obtainin...

Page 129: ...outside the view restrictions Users operating the camera in the Admin Viewer with the authorized user authorities can control the camera only within the view restrictions Users operating the camera in the VB Viewer can control the camera within the view restrictions If another user is waiting for control privileges while you are assigned control privileges your remaining time is shown on the contr...

Page 130: ...forehand p 94 Click the preset selection box and select a preset from the displayed list to go to the selected preset camera angle Click the Home Position button to move the camera angle to the home position Note Register presets and home position beforehand using the Preset Setting Tool p 96 Registered presets will appear in the preset selection box Compensating Backlight This control is effectiv...

Page 131: ...128 x 72 and the new size is displayed in Image Size on the Digital PTZ panel The aspect ratio is always 16 9 If the size of the preview frame becomes larger than the display size specified in the display size setting of the viewer the quality of the image in the image display area deteriorates Changing the Position You can move the preview frame by dragging the inside of the frame If you click an...

Page 132: ...hed for the first time the camera settings are applied but from then on settings from the previous time are used When the viewer is launched the display screen size opens at Actual Pixels Black bars will appear above and below the image if Actual Pixels is selected for the display screen size while the video size is set to 320x240 Displaying in Full Screen Mode You can show images over the entire ...

Page 133: ...snapshot panel To save a still image right click on it and select Save Picture As from the menu that appears Enter the file name desired and save the image Reconnect To reconnect the camera click this button Note If you reconnect audio reception will stop and camera control privileges will be lost In the VB Viewer the video size and display screen size will also return to the default settings Rece...

Page 134: ...formation image stabilization information Pan tilt and zoom information for Digital PTZ Yellow Warning A message will appear notifying the user when camera control privileges cannot be obtained audio reception stops etc Orange Error Appears when a system error occurs Important If the image stabilizer function is turned on in the settings page p 53 the actual viewing angle of the image will be smal...

Page 135: ...ition for example during use of an intelligent function Note The image display for the Viewer PTZ panel is subject to the settings configured in Maximum Number of Clients and Maximum Connection Time sec under Video Server in the Setting page Therefore depending on the settings the image may not display or will display for a certain amount of time only In such cases see The video is not displayed f...

Page 136: ...ting Viewer PTZ Click the Viewer PTZ button again The Viewer PTZ panel closes and Viewer PTZ is exited Although clicking the close button of the Viewer PTZ panel closes the PTZ panel the Viewer PTZ will stay on Differences Between Viewer PTZ and Digital PTZ Viewer PTZ and Digital PTZ are both simple pan tilt and zoom functions that use the digital zoom function but they have the following differen...

Page 137: ... speed or Zoom speed will not change the speed of the slider or of the pan tilt or zoom in panorama Setting the Smart Shade Control The smart shade control function differs from backlight compensation in that only dark areas are brightened while bright areas are kept intact 1 Smart Shade Control Set to Off or On 2 Adjusting the Smart Shade Control When smart shade control is On set one of the 7 le...

Page 138: ...screen regardless of the brightness darkness on the periphery of the screen Use this mode if you want to adjust the exposure to the center of the screen because the subject is receiving a spotlight or backlight etc 4 Shutter Speed When Manual or Auto Shutter priority AE is selected for the exposure mode select the shutter speed desired If Manual is selected set the shutter speed in the range of 1 ...

Page 139: ...ng of the infrared cut filter 4 Day Night Mode Focus Settings Click to display the Day Night Mode Focus Settings panel for making focus settings when switching Day Important If the subject is a traffic signal or electronic scoreboard etc the captured image may flicker In this case try changing the exposure mode to Auto Shutter priority AE and then select a shutter speed lower than 1 100 to see if ...

Page 140: ...red focus position will appear when selecting 5 even if only one focus position has been registered for either Day Mode or Night Mode When switching to 5 and then back to Move to registered focus position mode selecting No will preserve the registered focus position Selecting Yes will clear the registered focus position Note Refer to the notes on p 52 for focus ranges when day night p 53 p 139 is ...

Page 141: ...on image detection will be displayed When the detection settings configured in intelligent functions Moving Object Detection Abandoned Object Detection Removed Object Detection Camera Tampering Detection or Passing Detection enter Detected mode the corresponding icon will turn green p 107 If names are entered in Detection Setting Name in Intelligent Function Setting Tools p 107 Setting 1 to Settin...

Page 142: ...page p 73 Recording Videos Manually The Start Stop SD Card Recording button appearance changes as shown below depending on recording status Confirming Manually Recorded Video Use the Recorded Video Utility p 116 to confirm video manually recorded to an SD memory card Click the Recorded Video Utility button to start the Recorded Video Utility from the Admin Viewer 1 If you have not yet obtained the...

Page 143: ...Chapter 8 Appendix SD Memory Card Access Modifiers Troubleshooting List of Log Messages List of Viewer Messages Restore Settings List of Factory Default Settings Index ...

Page 144: ... cannot save further images to the SD memory card If this happens delete any unneeded JPEG images with the Recorded Video Utility JPEG H 264 Video Stored when Uploading Fails When either the storage capacity of the SD memory card or the number of files that can be saved in all subdirectories is reached you cannot save further video files to the SD memory card If this happens delete any unneeded JP...

Page 145: ...2012 from 16 00 00 to 16 59 59 Camera Time Zone GMT 09 00 1 Folder specified with Download to 2 IP address of the camera 3 Video recording date 4 Recording start and end times UTC 5 Time difference from UTC 6 Recording type E Event M Manual recording R Recording mode stream T Timer U Upload 7 Video format JPEG or H 264 Note A folder is created once per hour If the time difference is added to the s...

Page 146: ...time If multiple video files were created because recording continued for several seconds or more a new file name with different values for 2 and the sequential number ending will be used In the above example if recording starts at 16 09 19 and the next file is switched to 4 seconds later the file name will be as follows 20120910070623 070619 M00_508 mov Since this is a continuation of the recordi...

Page 147: ... 173 Intelligent Function Detection Setting 13 174 Intelligent Function Detection Setting 14 175 Intelligent Function Detection Setting 15 N Reason for capture character string External input device name alphanumeric characters Intelligent Function Detection Setting 1 15 NULL external input device name alphanumeric characters not yet set volume detection timer event or test X Width of image Number...

Page 148: ...below HTTP Upload p 58 Parameter query string All modifiers can be used FTP Upload p 58 Subdirectory Name to Create Only the modifiers y m d w H h n can be used File Name to Create Only the modifiers y m d w H M S s n can be used E mail Notification p 59 Message Body All modifiers can be used ...

Page 149: ...ult gateway address are set within the ranges supported by the applicable network If you have changed the IP address the new address will not become effective until the camera is rebooted Check if the correct URI camera IP address is entered in your web browser p 42 p 76 p 125 The Admin Tools will not start The Admin Viewer will not start Your web browser is not supported If this message is displa...

Page 150: ...rectly You can perform an operation check based on the currently set upload destination by running a test p 58 from the Upload menu Check View Logs in the Maintenance menu or logs on the server to check the detailed operating environment For View Logs see Application Uploader Messages p 152 Also see Important in p 57 For the server settings contact your System Administrator You cannot use recordin...

Page 151: ...1 webview W001 1 Starting or stopping Meaning wvhttp server webview has started or stopped Description 1 2 host Host user User prio Priority W030 1 W WebView session V Session less video client N Session less event client 2 Connect Disconnect Meaning The camera server client was connected or disconnected Description 1 host Host user User video jpg h264 Number of frames W031 1 W WebView session V S...

Page 152: ...oader cannot resolve the server name A120 Meaning The name of the upload destination could not be resolved Description uploader cannot connect the server A121 Meaning Execution of connect to upload destination failed Description uploader cannot connect the server A122 Meaning The upload destination could not be connected due to a reason other than A120 and A121 Description ftp http mode invalid up...

Page 153: ...cription uploader initialization failure 1 A470 1 Error number Meaning The uploader could not be initialized Countermeasure If the problem persists after rebooting the camera the camera is faulty arrange for servicing Description 1 audio B001 1 starting stopping Meaning The audio server was started shut down Description 1 2 connected n 3 B011 1 Client type send recv 2 Client host IP address 3 Tota...

Page 154: ...v error 1 2 B204 1 Error notification number 2 Cause of error Meaning The audio message could not be received Description cannot use audio device for 1 2 3 B301 1 Transmission reception type rx tx 2 Error handling open write flush 3 Error number Meaning An audio device error was detected Countermeasure If the error is not reset automatically arrange for servicing Description audio device initializ...

Page 155: ...se the video input system could not be initialized Countermeasure If the problem persists after rebooting the camera is faulty Arrange for servicing Description video 1 command error 2 3 V401 1 Video number 2 Process description 3 Error details Meaning The video input function was stopped because a video input command could not be processed Countermeasure If the problem persists after rebooting th...

Page 156: ...nt process failed Description http_auth c XXX get_password failed IP 1 H143 1 IP address Meaning An unknown user was specified in user authentication Description http_auth c XXX password doesn t match for 1 username 2 IP 3 H144 1 URL XSS vulnerability countermeasure implementation process equivalent to ftpd 2 User Name 3 IP address Meaning A wrong password was specified in user authentication Desc...

Page 157: ...essary files in the user memory area etc Description vbadmin c XXX Can t update system settings S307 Meaning An error generated while the settings were saved by the setup protocol Setting could not be saved Countermeasure Provide enough memory space by deleting unnecessary files in the user memory area etc Description cannot work event 1 2 3 S310 1 Error number 2 Cause of error 3 Error information...

Page 158: ...r occurred in the initialization of the external input output device service Countermeasure If the problem persists after rebooting the camera is faulty Arrange for servicing Description timer initialization error 1 2 S412 1 Error number 2 Cause of error Meaning An error occurred in the initialization of the timer service Countermeasure If the problem persists after rebooting the camera is faulty ...

Page 159: ...mera control is obtained You can operate the camera Camera control lost Displayed when camera control is released You cannot operate the camera until you get camera control privileges again Use the menu displayed by right clicking to exit the full screen mode When switched to full screen mode Recording to SD card aborted When recording to SD card was completed successfully The connection was termi...

Page 160: ...he Admin Viewer is already connected to the camera The viewer is already connected in another window The viewer is already available in another window Cookie is not available or blocked on your web browser Cookie is not available or blocked on your web browser JavaScript is not available or disabled on your web browser JavaScript is not available or blocked on your web browser No audio device The ...

Page 161: ...our Administrator password you cannot operate the camera via the network In this case press the reset switch at the back of the camera For dome case removal see the Installation Guide included with the camera There is no on off switch on the camera Turn the camera on and off by plugging in or unplugging LAN cable PoE power supply AC adapter or external power plug The reset switch is located in a r...

Page 162: ...ess etc Accordingly you can no longer operate the camera from the PC you were using to connect to the camera before When initializing the camera use the VB Initial Setting Tool installed in your PC to set an IP address appropriate for the environment in which the camera is used See Performing Initial Settings for the Camera p 28 Reset Switch VB H41 VB H610VE Reset Switch VB H610D Reset Switch 4 Fo...

Page 163: ...dministrator Contact Information Administration Function Name VB H41 VB H610 VB H710 Installation Location Current Date and Time Setting Setting Method Set manually Auto Setting of NTP Server Disable NTP Server Time Zone GMT 09 00 Osaka Sapporo Tokyo Daylight Saving Time Disable Camera Name Camera Name alphanumeric characters Camera Initial Camera Settings AE Mode Auto Slow Shutter Disable Shutter...

Page 164: ... Position of time display Upper left Text display Display nothing Position of text display Upper left Text string display Color of text Black Color of text outline White Color depth of text and outline Fill text and outline Item Setting General Upload Upload Upload Disabled Video Format JPEG Frame Rate 1 Pre event Buffer number of frames 0 Post event Buffer number of frames 0 Pre event Buffer sec ...

Page 165: ... Continuous Pulse Output Time sec 1 External Device Output 2 Operation Mode Normally Open Active Output Format Continuous Item Setting Pulse Output Time sec 1 External Device Input External Device Input Event Enable External Device Input 1 Operation Mode Normally Open Active Event Operation Disable Inactive Event Operation Disable Preset None Video Record Disable E mail Notification Disable Extern...

Page 166: ...Sound Clip Name Authorized User Account User List User Authority Authorized User Privileged Camera Control Checked Camera Control Checked Video Distribution Checked Audio Distribution Checked Item Setting Guest user Camera Control Checked Video Distribution Checked Audio Distribution Checked IPv4 Host Access Restrictions Apply Host Access Restrictions Disable Default Policy Authorize Access Networ...

Page 167: ... ESP Encryption Key outbound SA ESP Authentication Key outbound SA ESP SPI outbound Item Setting SA ESP Encryption Key inbound SA ESP Authentication Key inbound SA ESP SPI inbound SA AH Authentication Algorithm HMAC_SHA1_96 SA AH Authentication Key outbound SA AH SPI outbound SA AH Authentication Key inbound SA AH SPI inbound IPsec Set 2 IPsec Set Disable IPsec Mode Tunnel Mode Destination IPv4 Ad...

Page 168: ...curity Protocol ESP Security Gateway IPv4 Address Security Gateway IPv6 Address Item Setting Destination Subnet Mask Length 16 Destination Prefix Length 16 IKE Pre Shared Key SA ESP Encryption Algorithm AES SA ESP Authentication Algorithm HMAC_SHA1_96 SA ESP Encryption Key outbound SA ESP Authentication Key outbound SA ESP SPI outbound SA ESP Encryption Key inbound SA ESP Authentication Key inboun...

Page 169: ... Province ST Locality L Organization O Organizational Unit OU Common Name CN Validity Period Start Date Validity Period End Date Encrypted Communications SSL Communications Disable SD Card Operations Mount Unmount Operation Settings Save Logs and Videos Video Format JPEG Pre event Buffer number of frames 0 Post event Buffer number of frames 0 Pre event Buffer sec 0 Post event Buffer sec 0 Overwrit...

Page 170: ...102 110 Certificate Management 71 Control for Admin 120 136 Custom Installation 26 D Date 50 Date and Time 50 Day Mode 53 139 Day Night 53 139 Day Night Mode Focus Settings 139 Daylight Saving Time 50 Default Gateway Address 47 Detection Area 108 Detection Criteria 62 107 109 Detection Line 109 Detection Setting 111 Detection Type 101 109 Device Name 54 DHCP 28 47 Digest Authentication 61 Digital ...

Page 171: ... LED 54 Lock camera position 105 Log Code 114 Log Files 145 Log Messages 151 Logs 77 113 M MAC Address 28 Maintenance 77 Maximum Frame Rate 55 Maximum Packet Size 47 Memory Card 73 Message Error Message 159 Information Message 159 Log Messages 151 Warning Message 159 Metering Mode 51 138 Microphone 60 Modifiers 147 Mount 74 Moving Object Detection 109 N Name Server Address 48 Network 47 Network Ad...

Page 172: ...Control 52 137 Snapshot 133 SNMP 49 Sound Clip Upload 65 SSL TLS Certificate 71 Subnet Mask 47 T Target Bit Rate 55 Tilt 37 93 129 Time 50 Time Zone 50 Timer 64 Top Page 42 Troubleshooting 149 U Unmount 73 Upload 57 User Account 66 User Authentication 42 123 User Authority 66 User List 66 User Name 28 42 User Page 44 V VB Initial Setting Tool 16 26 28 VB Viewer 121 127 Video Distribution 66 122 Vi...

Page 173: ...1185 XB Amstelveen The Netherlands CANON EUROPE LTD 3 The Square Stockley Park Uxbridge Middlesex UB11 1ET United Kingdom CANON FRANCE SAS 17 quai du Président Paul Doumer 92414 Courbevoie France CANON UK LTD Woodhatch Reigate Surrey RH2 8BF United Kingdom CANON DEUTSCHLAND GmbH Europark Fichtenhain A 10 47807 Krefeld Germany CANON ITALIA S p A Via Milano 8 20097 San Donato Milanese MI Italy CANON...

Reviews: