Canon S 6300 User Manual Download Page 92

Envelopes

92

Printing Media

Loading

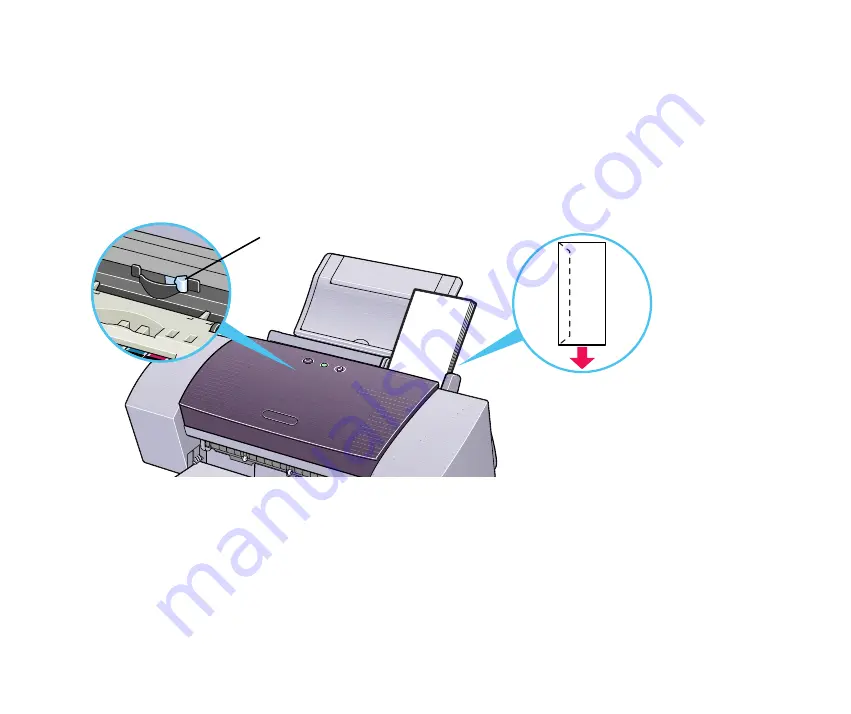
• Place envelopes lengthwise with the flap to the left and the address side facing 

upwards.

• Set the Paper Thickness Lever to the right.

• Up to 10 envelopes can be loaded at once.

Note

If even after removing any curl in the envelopes they still will not feed 
properly, clean the paper feed roller.

1

Ensure the printer is turned on.  If any paper is loaded in the printer, 
remove the paper.

2

Hold down the RESUME/CANCEL button; when the POWER lamp 
flashes three times, release the RESUME/CANCEL button.

Paper 
Thickness 
Lever

Summary of Contents for S 6300

Page 1: ...User s Guide BUBBLE JET PRINTER V1...

Page 2: ...peration Panel 18 Printer Driver Functions Windows 19 Opening the Printer Properties Dialog Box 20 Printer Properties Dialog Box Description 22 BJ Status Monitor Functions 35 Cancelling a Print Job 38...

Page 3: ...ing 79 Cleaning the Printer 81 Transporting the Printer 83 Printing Media 87 Compatible Media Types 88 Envelopes 90 High Resolution Paper HR 101N 94 Glossy Photo Paper GP 301 96 High Gloss Photo Film...

Page 4: ...d Properly or Paper Jams 140 The POWER Lamp Flashes Orange 143 An Error Message is Displayed on the Screen 146 Problems Unique to Windows 156 Problems Unique to the Macintosh 161 Appendices 164 Deleti...

Page 5: ...ath or serious personal injury caused by incorrect operation of the equipment Must be observed for safe operation Caution Instructions that if ignored could result in personal injury or material damag...

Page 6: ...ader 3 0 Please note that screens displayed by Acrobat Reader 3 0 are slightly different Use this button to enlarge the viewing screen Select this button in the tool bar and click within the screen Di...

Page 7: ...This Manual Displays the table of contents Click the heading to jump to the topic Click the symbol to see the headings for each chapter Click the symbol to close the headings Use this button to searc...

Page 8: ...shock fire or damage the printer if you ignore any of these safety precautions Choosing a location Do not place the printer close to flammable solvents such as alcohol or thinners Power supply Never...

Page 9: ...the printer at the power supply and call for service Cleaning the printer Use a damp cloth to clean the printer Never use flammable solvents such as alcohol benzene or thinners If flammable solvents...

Page 10: ...rts inside the printer The printer contains high voltage components Never attempt any maintenance procedure not described in this guide Working around the printer Do not use inflammable sprays near th...

Page 11: ...humid or dusty in direct sunlight outdoors or close to a heating source To avoid the risk of fire or electric shocks install the printer in a location with an ambient temperature range of 5 C to 35 C...

Page 12: ...o not intend to use the printer for a long period of time unplug the printer after turning it off Never use a power supply voltage other than that supplied in the country of purchase The correct power...

Page 13: ...metal or liquid falls into the printer unplug the power cord and call for service Print heads and ink tanks For safety reasons store print heads and ink tanks out of the reach of small children If a c...

Page 14: ...14 Printer Parts and Their Functions Printer Parts and Their Functions Front View Rear View Inside the Printer Operation Panel...

Page 15: ...en the paper rest extension when printing on paper larger than A4 Sheet Feeder Load paper here Paper feeds automatically one sheet at a time Front Cover Open to replace the ink tanks or remove jammed...

Page 16: ...Their Functions Rear View USB Port This connector is used to connect the printer to a computer through a USB interface Printer Port Parallel This connector is used to connect the printer to a compute...

Page 17: ...rinter Print Head Holder Install the print head here Print Head Lock Lever Locks the print head into the holder Once the print head is installed do not touch this lever Paper Thickness Lever Adjusts t...

Page 18: ...printing Flashing orange an error has occurred and the printer is not ready to print Flashing orange and green alternately an error has occurred that may require a service call POWER Button Press to...

Page 19: ...r Functions Windows Printer Driver Functions Windows Opening the Printer Properties Dialog Box Printer Properties Dialog Box Description BJ Status Monitor Functions Cancelling a Print Job Uninstalling...

Page 20: ...pending on your application program This section describes only the general procedure for opening the Printer Properties dialog box 1 In your application select the command to print a document The Pri...

Page 21: ...om the Start menu the Windows operating system adds several tabs including the Details tab These do not appear when the Printer Properties dialog box is opened from within an application For further i...

Page 22: ...Box Description Note The screens in this section refer to Windows 95 Windows 98 Windows Me operation The equivalent screens for Windows 2000 and Windows NT4 0 may look slightly different Main Tab Page...

Page 23: ...s Windows Main Tab 1 Media Type Ensure this setting matches the type of media loaded in the printer 2 Print Quality Select the print quality you require from among the different options To select cust...

Page 24: ...figuration of the printer driver By having the user answer a series of questions the Printer Advisor automatically configures the printer driver settings 6 Preview Area Before starting printing verify...

Page 25: ...ption 25 Printer Driver Functions Windows Page Setup Tab 1 Page Size Ensure the correct paper size is selected 2 Orientation Select landscape or portrait printing and ensure it is the same orientation...

Page 26: ...you can specify the Printer Paper Size and Scaling Page Layout Printing Pages are reduced and printed so that 2 to 16 document pages fit on each printed page Only the 2 page layout is available in Wi...

Page 27: ...tion 27 Printer Driver Functions Windows Stamp Background Tab Not Available in Windows NT4 0 1 Stamp Select the check box and choose the stamp 2 Place stamp over text When selected the stamp is printe...

Page 28: ...ws you to create new stamps or modify details of a selected stamp 5 Background Select the check box and choose the background image you wish to use 6 Background first page only Prints the background i...

Page 29: ...ion 29 Printer Driver Functions Windows Effects Tab 1 Simulate Illustration This function manipulates colour image data with certain effects Select the check box and adjust the brightness of the image...

Page 30: ...application 4 Photo Optimizer PRO Optimises the colour of images taken from a digital camera or scanner It is especially effective for images affected by colour imbalance and over or under exposure Wh...

Page 31: ...1 Printing Profiles This list displays the printing settings currently registered in the Profiles tab The Current Settings profile contains the settings currently specified in the Main Page Setup and...

Page 32: ...Effects tabs Select Current Settings in the Printing Profiles list then click this button The Add to Profiles dialog box appears 5 Retrieve from Profiles Click to activate registered printer settings...

Page 33: ...nance Tab 1 Cleaning Click to start print head cleaning For details refer to Print Head Cleaning 2 Deep Cleaning Click to start print head deep cleaning Use this function only if Cleaning has not impr...

Page 34: ...nt refer to Quick Start Guide 5 Power Off Click to turn the printer off 6 Auto Power This allows you to turn the printer off when no data is sent to the printer for a certain period of time or turn th...

Page 35: ...re of the error and suggests an appropriate solution The status monitor also checks the ink tanks and displays a warning message when the ink is low Launching the BJ Status Monitor The BJ Status Monit...

Page 36: ...Functions 36 Printer Driver Functions Windows Note To open the BJ Status Monitor when the printer is not printing click the Maintenance tab in the Printer Properties dialog box and click the Start Sta...

Page 37: ...if the printer runs out of paper or ink is low In such cases take the appropriate action as described in the Printer Status tab In Windows 95 Windows 98 or Windows Me click the Guide tab and follow th...

Page 38: ...ng a Print Job To cancel the current print job first open the BJ Status Monitor 1 Click the Canon BJ Status Monitor icon on the Task Bar 2 Click Cancel Printing Note If Cancel Printing is greyed out p...

Page 39: ...Click the Start button and select Programs Canon S6300 Uninstall 2 Click Yes when the confirmation message appears 3 When all the files have been deleted click OK The deletion of the printer driver i...

Page 40: ...Printer Driver Functions Macintosh Printer Driver Functions Macintosh Description of Print Settings BJ Print Monitor Cancelling a Print Job Using the Printer with a Network Uninstalling Printer Drive...

Page 41: ...Settings 41 Printer Driver Functions Macintosh Description of Print Settings Page Setup Dialog Box Printer Utility Dialog Box Print Dialog Box Detailed Setting Dialog Box Options Dialog Box Register...

Page 42: ...ize of the print media and resizing the printed image To open the Page Setup dialog box select Page Setup from the File menu in your application program 1 Paper Size Select the size of the paper for t...

Page 43: ...g Custom 1 to Custom 3 in the Paper Size popup menu The Custom Dialog Box allows you to specify the length and width of the paper 6 Utilities Click to open the Printer Utility dialog box for maintenan...

Page 44: ...ed when you click the Utilities button in the Page Setup dialog box 1 Select the function you wish to perform 2 Display area showing the various maintenance functions including cleaning and test patte...

Page 45: ...Description of Print Settings 45 Printer Driver Functions Macintosh Print Head Cleaning Print Head Deep Cleaning Note For information about Print Head Alignment refer to the Quick Start Guide...

Page 46: ...int job To open the Print dialog box select Print from the File menu in your application program 1 Media Type Ensure this setting matches the type of paper media loaded in the printer 2 Greyscale Prin...

Page 47: ...o manually set the print quality and colour settings in the Detailed Setting Dialog Box 5 Options Specify the output destination print order and page layout for the document you are printing 6 Apply A...

Page 48: ...tions Macintosh Detailed Setting Dialog Box To open the Detailed Setting dialog box select Manual in the Print dialog box and then click Details 1 Panel display icons Click these icons to switch betwe...

Page 49: ...4 Photo Optimizer PRO Optimises the colour of images taken from a digital camera or scanner It is especially effective for images affected by colour imbalance and over or under exposure When printing...

Page 50: ...ects panel click the Special effects display icon 1 Simulate illustration This function manipulates colour image data to produce illustration effects To use the function select the check box To adjust...

Page 51: ...scription of Print Settings 51 Printer Driver Functions Macintosh 2 Monochrome effects Prints a colour image in a single colour Select the check box and choose the colour you wish to use 3 Preview Are...

Page 52: ...ick the Colour display icon 1 Colour Correction Select a colour correction method BJ Standard ColourSync or None BJ Standard is usually the optimum colour correction method for printing with a BJ prin...

Page 53: ...ia type and other factors 4 Gamma Correction This function adjusts the colour contrast not including pure black and white To adjust the contrast select the check box and move the slide bar Moving the...

Page 54: ...ptions button in the Print dialog box 1 Destination Select the print output destination Printer is the usual selection To check the layout or other image elements before printing select Preview To sav...

Page 55: ...e copy at a time 4 Page Layout Allows you to print two or four pages of a document on a single page If you select 2 Up or 4 Up you should also set the Page Order to specify the document page order for...

Page 56: ...ngs select the desired settings in the Settings list and click the Import button 3 Apply Saves the settings currently specified in the Print dialog box After clicking the button enter the name under w...

Page 57: ...progress of print jobs You can launch the BJ Print Monitor if background printing is enabled in the Chooser utility Opening the BJ Print Monitor 1 Select Chooser from the Apple Menu 2 Set Backgroundi...

Page 58: ...ton down while dragging the document name to the new position then release Note however that you cannot change the print order of a document already printing Click to pause printing of the specified d...

Page 59: ...nd the currently printing job 1 Select BJ Print Monitor in the Application Menu 2 Click the name of the print job you wish to cancel then click The document selected in the Print Monitor is deleted fr...

Page 60: ...driver on each network computer that will use the printer For information on installation refer to the Quick Start Guide Use a USB cable to connect the printer to the computer that will function as t...

Page 61: ...click Send 6 Confirm that the new print server name has been added to Current print servers then click Close 7 Click the close box to close the Chooser Client setup procedure 1 Select Chooser in the...

Page 62: ...t start the BJ Status Monitor Click the BJ Status Monitor icon in the BJ Extras folder To close the BJ Status Monitor select Quit in the File menu The BJ Print Monitor and BJ Status Monitor The BJ Pri...

Page 63: ...inting Click to cancel printing of the specified document Note You can determine the owner of a computer by selecting the File Sharing control panel and checking the Owner Name item If you are using t...

Page 64: ...e CD ROM 2 Double click the Printer Driver folder 3 Double click the Installer icon 4 When the Software License Agreement is displayed click Accept 5 Select Uninstall from the popup menu and then clic...

Page 65: ...nce Routine Maintenance When to Replace Ink Tank and Maintain Print Head Replacing an Ink Tank Printing the Nozzle Check Pattern Print Head Cleaning Print Head Deep Cleaning Cleaning the Printer Trans...

Page 66: ...nitor Macintosh will tell you to replace the ink tank Attempting to print causes the POWER lamp to flash four times Replacing an Ink Tank If printing becomes faint or a specific colour is no longer pr...

Page 67: ...ition With this printer ink tanks must be installed from the right in the order indicated below Yellow BCI 3eY Magenta BCI 3eM Cyan BCI 3eC Black BCI 3eBK Note Damage caused by using a refilled cartri...

Page 68: ...h the tab and remove the ink tank Do not touch the lock lever remove only the ink tank Important Handle ink tanks carefully to avoid staining clothing or the surrounding area Discard empty ink tanks a...

Page 69: ...Replacing an Ink Tank 69 Routine Maintenance 3 Unpack the new ink tank and pull off the orange tape...

Page 70: ...ve the orange protective cap from the bottom of the ink tank Important Do not re attach the protective cap once you have removed it Once you have removed the protective cap do not touch the open ink p...

Page 71: ...front cover The print head holder moves to the right The ink tank installation process is now complete Note To maintain optimal print quality use an ink tank within six months of first use Once an in...

Page 72: ...rrect Nozzle check pattern printing can be executed from the Windows and Macintosh printer drivers or from the printer itself Printing the Nozzle Check Pattern from the Printer Drivers Windows 1 With...

Page 73: ...age Setup dialog box The Page Setup dialog box can normally be opened by selecting Page Setup in the File menu 3 Click the Utilities button to open the Printer Utilities dialog box 4 Select Test Print...

Page 74: ...Maintenance Printing the Nozzle Check Pattern through the Printer 1 With the printer on load a sheet of A4 or Letter paper in the printer 2 Hold the RESUME CANCEL button down until the POWER lamp flas...

Page 75: ...ld appear as follows when ink is discharged properly Examine the nozzle check pattern output by the printer Lines missing here indicate the print head requires cleaning Unevenness in these patterns in...

Page 76: ...er from the printer drivers or from the printer itself Note Cleaning the head consumes ink so perform head cleaning only when necessary Cleaning the Print Head from the Printer Drivers Windows 1 Ensur...

Page 77: ...nk nozzles 5 When the confirmation message is displayed click OK Macintosh 1 Ensure the printer is on 2 Open the Page Setup dialog box The Page Setup dialog box can normally be opened by selecting Pag...

Page 78: ...lost 1 Ensure the printer is on 2 Hold down the RESUME CANCEL button until the POWER lamp flashes once Now the POWER lamp starts flashing and print head cleaning begins Do not perform any other opera...

Page 79: ...ad deep cleaning from the printer driver Note Print head deep cleaning consumes more ink than standard print head cleaning so perform this procedure only when necessary Windows 1 Ensure the printer is...

Page 80: ...WER lamp starts flashing and print head deep cleaning begins The process takes one or two minutes to complete so simply wait until the POWER lamp stops flashing After print head deep cleaning finishes...

Page 81: ...in the printer When the accumulated debris becomes clearly visible clean the printer by the following procedure 1 Turn the printer off 2 After making sure that the POWER lamp is off unplug the printer...

Page 82: ...y stray ink drops paper scraps and dust Pay special attention to cleaning the black panel and white rollers as these are most susceptible to soiling Do not touch any of the printer s internal componen...

Page 83: ...you do not have the original packing materials pack the printer carefully and thoroughly in protective material inside of a sturdy box 1 Turn the printer off 2 After making sure that the POWER lamp i...

Page 84: ...ter 84 Routine Maintenance 3 Remove the paper rest and push in the paper output tray and extension 4 Disconnect the printer cable from the computer and from the printer and then disconnect the power c...

Page 85: ...Transporting the Printer 85 Routine Maintenance 5 Secure the printer with adhesive tape as shown and then pack it in a plastic bag...

Page 86: ...he Printer 86 Routine Maintenance 6 When placing the printer in its box immobilize it by inserting the protective material on both sides of the printer Clearly label the box as Fragile if using a tran...

Page 87: ...e Media Types Envelopes High Resolution Paper HR 101N Glossy Photo Paper GP 301 High Gloss Photo Film HG 201 Glossy Photo Cards FM 101 Photo Paper Pro PR 101 Photo Paper Pro PC 101S Transparencies CF...

Page 88: ...nvelopes European DL and US Com 10 Important Do not use the following types of paper Using such paper will not only produce unsatisfactory results but can also cause the printer to jam or malfunction...

Page 89: ...can be used For more information about the media and the printing methods refer to the specific sections Plain paper Refer to the Quick Start Guide Envelopes High Resolution Paper HR 101N Glossy Photo...

Page 90: ...lopes Preparation for Printing 1 Press down on all four corners and edges of the envelopes to flatten them as shown below 2 If the envelopes are curled hold the opposite corners and gently bend them i...

Page 91: ...rinter if they are not completely flat and the edges are not aligned Ensure that no curl or puff exceeds 5 mm 0 2 in Unsuitable Envelopes Envelopes with an embossed or treated surface Envelopes with a...

Page 92: ...10 envelopes can be loaded at once Note If even after removing any curl in the envelopes they still will not feed properly clean the paper feed roller 1 Ensure the printer is turned on If any paper i...

Page 93: ...is loaded in the printer will feed through the printer and be ejected Repeat this operation three times If the printer still will not feed envelopes through even after cleaning the paper feed roller p...

Page 94: ...is suitable for printing business documents that feature graphics and for photographs Loading Load the paper with the whiter side facing up Set the Paper Thickness Lever to the left Do not load paper...

Page 95: ...tting matches the size set in the application Handling of Printed Output Do not stack more than 40 sheets in the paper output tray If the output paper is curled it may prevent the next sheet being eje...

Page 96: ...with a glossy printing surface to produce printouts close to photograph quality Loading Load the paper with the whiter side facing up Set the Paper Thickness Lever to the left A maximum of 10 sheets c...

Page 97: ...ation Handling of Printed Output Do not stack more than 10 sheets in the paper output tray If the output paper is curled it may prevent the next sheet being ejected In this case or if the ink takes a...

Page 98: ...ossy surface ideal for printing photographs with outstanding results Loading Load only one sheet at a time Load the film with the cut corner at the upper right If the film is curled flatten it by curl...

Page 99: ...Settings Media Type High Gloss Photo Film Page Size Ensure the setting matches the size set in the application Handling of Printed Output Remove each sheet as soon as it is printed Do not touch the pr...

Page 100: ...surface of the card without a white border To take full advantage of FM 101 make the images slightly larger than the area indicated by the perforations Loading Load the paper with the glossy side fac...

Page 101: ...gs Media Type Glossy Photo Cards Page Size Canon 101 6 x 152 4 mm Canon 4 x 6 in Handling of Printed Output Do not stack more than 20 sheets in the paper output tray Do not touch the printed surface u...

Page 102: ...ed surface that enhances gloss and provides superior colour reproduction It is ideal for printing high quality photographs Loading Load only one sheet at a time Load the paper with the glossier side f...

Page 103: ...before the ink is completely dry It is recommended that you allow the ink to dry for 24 hours Do not attempt to dry the ink with a hair dryer or by exposing printed sheets to direct sunlight Storing...

Page 104: ...Photo Paper Pro PR 101 104 Printing Media Printable Area Printing Area...

Page 105: ...tire surface of the card without a white border To take full advantage of PC 101S make the images slightly larger than the area indicated by the perforations This paper is ideal for printing high qual...

Page 106: ...in Applications Settings Enter 109 6 x 160 4mm 4 31 x 6 31 in in Image Size For details on how to specify the image size refer to the application s user manual You may not be able to specify the size...

Page 107: ...ing presentation material for use with overhead projectors Loading Place one sheet of plain A4 or Letter paper under the transparencies in the sheet feeder Set the Paper Thickness Lever to the left A...

Page 108: ...ard which it curls when held by the edge Printer Driver Settings Media Type Transparency Page Size Ensure the setting matches the size set in the application Handling of Printed Output Remove each tra...

Page 109: ...printer driver Note For the customers in the United States refer to the Quick Start Guide for instructions on using TR 101 T shirt transfers Loading Load only one sheet at a time If the T shirt transf...

Page 110: ...Size Ensure the setting matches the size set in the application Handling of Printed Output Remove each T shirt transfer as soon as it is printed The T shirt transfer should be used as soon as possible...

Page 111: ...ne more sheet than you actually need to print The maximum length for one print job is six sheets so if you will be printing on six sheets tear off a seven sheet length Loading 1 Close the paper rest e...

Page 112: ...Banner Paper 112 Printing Media 4 Place the printer where the printed banner output can hang over the edge of the table Ensure the ink does not stain the table or floor...

Page 113: ...banner paper A4 When using letter size banner paper Letter Copies Must be set to 1 to print correctly In Windows select Banner Printing for Printing Type on the Page Setup tab On a Macintosh before c...

Page 114: ...ality is Poor or Contains Errors Printer Does Not Start or Stops During Print Jobs Paper Does Not Feed Properly or Paper Jams The POWER Lamp Flashes Orange An Error Message is Displayed on the Screen...

Page 115: ...tly reinstall it If you are using Windows delete the printer driver before reinstalling it Uninstalling Printer Drivers Note If the Installer was forcibly terminated due to an error in Windows Windows...

Page 116: ...e If you are typing in the file name you must specify the CD ROM drive letter and the installation program MSetup exe The CD ROM drive letter is computer dependent Confirm that there are no problems w...

Page 117: ...rors Cannot Print to End of Job Colours are Unclear Meaningless Characters or Symbols are Printed Printing is Blurred Colours are Wrong Straight Lines are Misaligned Printed Paper Curls or Ink Blots B...

Page 118: ...tion Then check the Page Size setting in the Printer Properties dialog box for Windows or the Page Setup dialog box for Macintosh Note When using an ECP printer port in Windows you may not be able to...

Page 119: ...nt Quality on the Main tab If you are working in a Macintosh environment select the Photo or Graphic icon for the Print Mode in the Print dialog box Confirm the specified ink tank is installed When an...

Page 120: ...shooting Meaningless Characters or Symbols are Printed If the problem only occurs when printing a specific document try editing the document and then printing it If this does not resolve the problem t...

Page 121: ...tly If the nozzle check pattern does not print correctly clean the print head Printing the Nozzle Check Pattern Print Head Cleaning If the problem is not resolved after cleaning the print head several...

Page 122: ...aight Lines are Misaligned Align the print head Ensure you align the print head every time you install a new print head Windows 1 Open the Printer Properties dialog box 2 Click the Maintenance tab 3 C...

Page 123: ...up dialog box 2 Click Utilities 3 Select Test Print from the pull down menu and then click Print Head Alignment Follow the instructions on the screen Note Straight lines can become misaligned if the p...

Page 124: ...r print quality setting Windows 1 Open the Printer Properties dialog box 2 On the Main tab click High for the Print Quality setting Macintosh 1 Open the Print dialog box 2 For Print Mode select Manual...

Page 125: ...print images that require a lot of ink i e pictures with intense colours or photographs Reduce the Intensity setting in the printer driver and try printing again Windows 1 Open the Printer Properties...

Page 126: ...oor or Contains Errors 126 Troubleshooting Macintosh 1 Open the Print dialog box 2 For Print Mode select Manual and then click Details 3 Click the Colour icon and then drag the Intensity slide bar to...

Page 127: ...ge printer driver setting You can either remove each printed sheet from the output tray as soon as it is printed or enable Pause Page to pause after each sheet has printed Windows 1 Open the Printer P...

Page 128: ...own menu 4 Select Pause between pages and then click Send You may need to clean some internal parts of the printer Follow the procedure below 1 Load sheets of A4 or Letter plain paper in the printer 2...

Page 129: ...by simply turning the paper over When printing on thick paper set the paper thickness lever to the mark This widens a gap between the print head and the paper If the paper is scratched even when prin...

Page 130: ...for Colour Adjustment and then click Set 3 Drag the Intensity slide bar to adjust the intensity Macintosh 1 Open the Print dialog box 2 For Print Mode select Manual and then click Details 3 Click the...

Page 131: ...ern to check the ink output If a specific colour does not print in the nozzle check pattern clean the print head Printing the Nozzle Check Pattern Print Head Cleaning The problem can also be resolved...

Page 132: ...etting in the printer driver settings Windows 1 Open the Printer Properties dialog box 2 On the Main tab click High for the Print Quality setting Macintosh 1 Open the Print dialog box 2 For Print Mode...

Page 133: ...ows 1 Open the Printer Properties dialog box 2 On the Main tab select Custom for the Print Quality setting and click Set 3 Click Diffusion for the Halftoning setting Macintosh 1 Open the Print dialog...

Page 134: ...s During Print Jobs 134 Troubleshooting Printer Does Not Start or Stops During Print Jobs Printing Does Not Start Printing Stops Before It is Completed Printer Moves But Does Not Print Print Head Hold...

Page 135: ...r graphics it takes longer than usual to begin printing While the POWER lamp is flashing the computer processes the data and sends it to the printer Simply wait until the processing is completed Ensur...

Page 136: ...ows you can set the Canon S6300 as the default printer Ensure the printer port is set correctly If using a parallel interface printer cable set LPT1 as the printer port If using a USB cable set USBPRN...

Page 137: ...processing is completed Halt the print job and turn the printer off for at least 15 minutes to cool the print head down The print head can overheat when continuously printing for long time To protect...

Page 138: ...print head print the nozzle check pattern to check that ink is being output normally Print Head Cleaning Printing the Nozzle Check Pattern If the problem is not resolved by cleaning the print head sev...

Page 139: ...e front cover and turn the power on If the POWER lamp is flashing green the printer is initialising When the POWER lamp stops flashing open the front cover again If the front cover has been left open...

Page 140: ...Paper Does Not Feed Properly or Paper Jams 140 Troubleshooting Paper Does Not Feed Properly or Paper Jams Paper Does Not Feed Properly Paper Jams...

Page 141: ...of the paper just touches the paper guide When printing envelopes refer to Envelopes in Printing Media and prepare the envelopes before printing Once you have prepared the envelopes load them in the...

Page 142: ...per out press the POWER button twice to eject the paper automatically If the paper tears and a piece remains inside the printer open the front cover and remove it After removing all paper close the fr...

Page 143: ...Out of paper paper jam or paper feed error Replace the paper correctly and press the RESUME CANCEL button If paper has jammed in the printer clear the jam and press the RESUME CANCEL button Three fla...

Page 144: ...ste ink tank almost full The printer has a built in waste ink tank for the ink used during print head cleaning Eight flashes indicates that the waste ink tank is nearly full Press the RESUME CANCEL bu...

Page 145: ...reen and orange An error that requires contacting a Canon service representative may have occurred Turn the printer off and unplug the printer from the power supply Plug the printer back in and turn t...

Page 146: ...n the Screen 146 Troubleshooting An Error Message is Displayed on the Screen Error Writing to LPT1 or USBxxx Application Error or General Protection Fault Other Error Messages Other Error Messages Win...

Page 147: ...Note If you are using a switch box or other devices remove and reconnect the printer directly to the computer and try printing again If printing is now successful there may be a problem with the devic...

Page 148: ...ter port status When using the parallel interface in Windows 95 Windows 98 Windows Me Windows 2000 1 Right click My Computer and select Properties 2 Click the Device Manager tab In Windows 2000 click...

Page 149: ...sal serial bus controller and then double click Canon S6300 3 On the General tab check for any indication of a problem with the device If an error has occurred follow the instruction of Notes on Handl...

Page 150: ...may be a problem in the printer driver Uninstall the printer driver and reinstall it Uninstalling Printer Drivers If the printer is connected to the USB interface follow the procedure Notes on Handlin...

Page 151: ...u attempt to print with a Windows 3 1 application under Windows 98 the application may not function correctly and an error may occur Use an application program intended for your operating system If ot...

Page 152: ...ument and then printing it If this resolves the problem there may have been a problem in the original document If the same problem occurs with the edited document contact the manufacturer of your appl...

Page 153: ...nitor is displayed follow the instructions on screen If an error occurs during printing the BJ Status Monitor displays the error on the Printer Status tab Follow the instructions on screen In Windows...

Page 154: ...ny unnecessary files Could not spool successfully due to insufficient memory Increase available memory by closing any other applications currently running Printer driver could not be found Uninstall t...

Page 155: ...3 There is a problem with the printer driver Uninstall the printer driver and reinstall it Uninstalling Printer Drivers Error No X300 Ensure the power is on and that the printer and the computer are s...

Page 156: ...lems Unique to Windows 156 Troubleshooting Problems Unique to Windows The BJ Status Monitor is Not Displayed Cannot Print in Background Windows 95 Windows 98 Windows Me only Cannot Print Normally Wind...

Page 157: ...enu 2 On the Details tab or Ports tab click Spool Settings and select Enable bi directional support for this printer If the printer is connected to the parallel interface ensure the printer cable supp...

Page 158: ...he hard disk Background printing requires a certain amount of disk space You may need to delete unnecessary files or disable background printing Ensure that background printing is enabled 1 Open the P...

Page 159: ...mode and then try printing again Sometimes ECP mode disrupts normal printing 1 Open the Printer Properties dialog box 2 Click the Maintenance tab 3 Click Custom Settings to open the Custom Setting di...

Page 160: ...iver port to FILE as follows The WPS Windows Printing System driver or CAPT Canon Advanced Printing Technology driver may disrupt normal printing 1 Click the Start button then click Settings and Print...

Page 161: ...Problems Unique to the Macintosh 161 Troubleshooting Problems Unique to the Macintosh Jagged Text or Graphics or Banded Gradations Cannot Print in Background Macintosh...

Page 162: ...ns Ensure your application supports Quick Draw If you are using a PostScript compatible application printed text and lines may appear jagged and gradations may appear banded As S6300 is not a PostScri...

Page 163: ...Ensure background printing is enabled 1 In the Apple menu select Chooser 2 Click Backgrounding on Check the amount of free space on the hard disk Background printing requires a certain amount of disk...

Page 164: ...164 Appendices Appendices Deleting an Unknown Device USB interface For Faster Printing Windows Macintosh Windows...

Page 165: ...low the steps below to delete the unknown device 1 Click the Start button select Settings and click Control Panel 2 Double click System 3 Click the Device Manager tab In Windows 2000 click the Hardwar...

Page 166: ...Deleting an Unknown Device USB interface 166 Appendices If the unknown device is under Universal serial bus controller If the unknown device is under Other devices...

Page 167: ...es window In Windows 2000 click and then click OK in the System Properties window 7 Click at the top right of the Control Panel window to close it 8 Turn the printer off 9 Remove the Setup Software Us...

Page 168: ...rinting on some computers 1 To enable the ECP mode first confirm the following The printer and computer are connected with a parallel printer cable The printer driver has been installed The printer po...

Page 169: ...For Faster Printing 169 Appendices 3 Click the Maintenance tab and click the Custom Settings icon 4 Select the Set printer to ECP mode check box and click Send...

Page 170: ...In this case clear the Set printer to ECP mode check box in the screen above and click Send Turn the printer off and back on to cancel the ECP mode With Windows 95 a problem may remain after you cance...

Page 171: ...n 2400 horizontal 1200 vertical dpi max Print speed printing with Canon standard pattern Black printing Fast 17 ppm Standard 11 ppm Colour printing Fast 12 ppm Standard 4 3 ppm Print direction Bi dire...

Page 172: ...B standard Series B receptacle USB interface Recommended printer cable parallel Material AWG28 or larger Type Twisted pair shielded cable Length Up to 2 0 m 6 5 ft Connectors Amphenol 30360 or equival...

Page 173: ...condensation Storage environment Temperature 0 to 40 C 32 to 95 F Humidity 5 to 90 RH no condensation Power supply Europe AC 230 V 10 50 Hz USA Canada AC 120 V 60 Hz Australia AC 240 V 50 Hz Power co...

Page 174: ...nner Paper Sheet feeder capacity Plain Paper 75 gsm 100 sheets max High Resolution Paper 80 sheets max 20 sheets max with A3 size paper Envelopes 10 pieces max Glossy Photo Paper 10 sheets max 1 sheet...

Page 175: ...width 90 0 to 329 0 mm 3 5 to 13 0 in height 120 0 to 584 2mm 4 7 to 23 0 in Weight 64 to 105 gsm 17 to 28 lb Canon Special media High Resolution Paper HR 101N Glossy Photo Paper GP 301 High Gloss Pho...

Page 176: ...low 256 nozzles 1200 dpi Ink Tanks Capacity Black BCI 3eBK approx 695 1 approx 1250 2 Cyan BCI 3eC approx 460 2 Magenta BCI 3eM approx 395 2 Yellow BCI 3eY approx 300 2 1 1500 characters per page norm...

Page 177: ...network operating environment When connecting printer and computer through USB interface use the system under the following operating environment Windows Computer with Microsoft Windows 98 or Windows...

Page 178: ...ark blue Canon recommends that you print within this area Printable area light blue The area where it is possible to print However printing in this area can adversely affect the print quality or the p...

Page 179: ...290 2 412 0 mm 11 4 16 2 in Ledger 11 17 272 6 423 8 mm 10 7 16 7 in B4 250 2 356 0 mm 9 9 14 0 in A4 203 2 289 0 mm 8 0 11 4 in B5 175 2 249 0 mm 6 9 9 8 in A5 141 2 202 0 mm 5 6 7 9 in 28 0 mm 1 1...

Page 180: ...Size Printable Area width x height Letter 203 2 271 4 mm 8 0 10 7 in Legal 203 2 347 6 mm 8 0 13 7 in 28 0 mm 1 1 in 26 5 mm 1 04 in 6 4 mm 0 25 in 6 3 mm 0 25 in 5 0 mm 0 2 in 3 0 mm 0 12 in Recommen...

Page 181: ...4 11 8 in Letter 218 4 281 9 mm 8 6 11 1 in Glossy Photo Card 109 4 159 9 mm 4 3 6 3 in 5 1 mm 0 2 in A4 5 9 mm 0 23 in Letter 5 1 mm 0 2 in Glossy Photo Card 4 1 mm 0 16 in A4 Letter 28 0 mm 1 1 in...

Page 182: ...101 is identical to that of A4 size paper For details refer to A3 A3 Ledger B4 A4 B5 A5 Size Printable Area width x height Photo Paper Pro PC 101S 109 6 160 4 mm 4 3 6 3 in 4 0 mm 0 16 in 4 0 mm 0 16...

Page 183: ...ecifications Envelopes Size Printable Area width x height European DL 190 5 103 2 mm 7 5 4 1 in US Com 10 211 8 98 0 mm 8 3 3 9 in 3 0 mm 0 12 in 26 5 mm 1 04 in 3 4 mm 0 13 in 3 4 mm 0 13 in Printabl...

Page 184: ...ble Area width x height Banner Paper A4 203 2 1774 0 mm 8 0 69 8 in Letter 203 2 1668 4 mm 8 0 65 7 in 3 4 mm 0 13 in 3 4 mm 0 13 in 3 0 mm 0 12 in 28 0 mm 1 1 in 5 0 mm 0 2 in Max 6 sheets Min 2 shee...

Page 185: ...8 Banner Paper 111 BCI 3eBK 67 BCI 3eC 67 BCI 3eM 67 BCI 3eY 67 BJ Print Monitor Macintosh 57 BJ Status Monitor Macintosh 63 BJ Status Monitor Windows 35 153 157 C Cancelling a Print Job Macintosh 59...

Page 186: ...known Device USB interface 165 E ECP mode 168 Envelopes 90 Error Message 146 153 155 F Fit to Page Printing 26 Front cover 15 139 G Gamma Correction Macintosh 53 General Protection Fault 151 Glossy Ph...

Page 187: ...Properties Dialog Box Windows 20 P Page Setup Dialog Box Macintosh 42 Page Size Windows 25 Paper feed roller 92 Paper Guide 15 Paper Jams 142 Paper Output Tray 15 Paper Rest 15 Paper Size Macintosh 42...

Page 188: ...t server Macintosh 60 Printable area 178 Printer Driver Macintosh 40 Printer Driver Windows 19 Printer port 148 149 Printer Port Parallel 16 Printer Properties Dialog Box Windows 20 22 Printing Area 1...

Page 189: ...nsporting the Printer 83 T Shirt Transfers TR 201 109 U Uninstalling Printer Drivers Macintosh 64 Uninstalling Printer Drivers Windows 39 USB interface 165 USB Port 16 W When to Replace Ink Tank and M...

Reviews: