Canon S 530D Quick Start Manual Download Page 12

■■

Installing the Printer Driver 

■■■■■■■■■■■■■■■■■■■■■■

Note

If you are printing with only Direct Print, skip this chapter and go to “Aligning the Print
Head” on page 16.

Installing the Printer Driver - Windows

Notes

• Do not disconnect the cable or remove the CD-ROM during the installation. The driver

cannot be correctly installed.

• The screens below refer to Windows Me installation. Screen may differ depending on

the environment you are using.

• When installing the printer driver in Windows XP or Windows 2000, log on to the

system as a member of the 

Administrators

group.

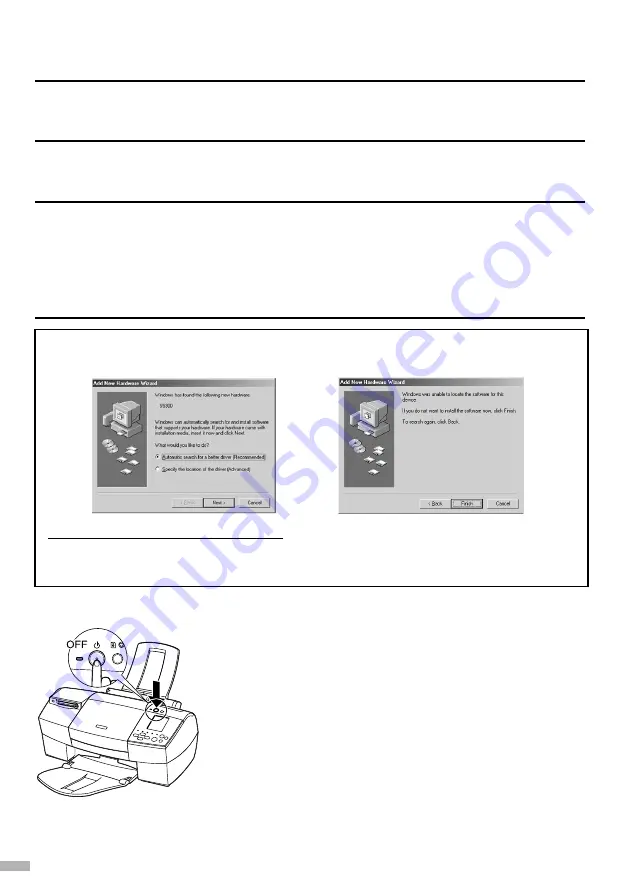
If the following screen appears automatically, click 

Cancel

and follow steps 1 to 7 to install

the printer driver.

Special Notes for Windows 98 USB Users

Click 

Cancel

to quit the screen and turn off the printer. Next, remove and replace the USB

cable connected to your computer.

10

1

Ensure the printer and computer are
switched off.

2

Turn on the computer and start
Windows. If any applications
automatically run, quit them.

Disable any virus detection programs.
Do NOT turn the printer on at this stage.

Summary of Contents for S 530D

Page 1: ...Print Head 16 Basic Operations 22 Printing with Windows 22 Printing with Macintosh 24 Printing Without Using the Computer 26 Before Printing 26 Printing Photographs 31 Print Applications 40 If Photogr...

Page 2: ...ustrie Canada International ENERGY STAR Program As an ENERGY STAR Partner Canon Inc has determined that this product meets the ENERGY STAR guidelines for efficiency The International ENERGY STAR Offic...

Page 3: ...r safe operation Instructions that if ignored could result in personal injury or material damage caused by incorrect operation of the equipment These must be observed for safe operation Also read the...

Page 4: ...he printer to a digital camera Sheet Feeder Load paper here Paper feeds automatically one sheet at a time Indicator lamp Goes on when memory card reading becomes enabled and flashes while the memory c...

Page 5: ...printer is turned off Green the printer is ready to print Flashing green the printer is preparing to print or is currently printing Flashing orange an error has occurred and the printer is not ready...

Page 6: ...ut tray as shown Setting Up 1 Preparing the Printer 2 Connecting the Printer to the Computer Note If you are printing with only Direct Print skip this section and go to Installing the Print Head on pa...

Page 7: ...ter has an earth connection ensure that this is attached If you do not intend to use the printer for a long period of time unplug the power cord from the power outlet after turning off the printer Not...

Page 8: ...the Print Head Never attempt to plug the power cord into the power outlet or unplug the power cord when your hands are wet Never damage modify stretch or excessively bend or twist the power cord Do n...

Page 9: ...Lock the print head into place by lowering the lever Do not touch the lock lever once the print head has been installed Installing the Ink Tanks For safety reasons store ink tanks out of the reach of...

Page 10: ...t clicks into place 5 Use the same procedure to install the other ink tanks in their appropriate slots Check the labels to ensure that each tank is in the correct position Notes Only install the ink t...

Page 11: ...right side of the sheet feeder You can load up to 100 sheets of plain paper Do not exceed this limit After printing do not stack more than 50 sheets in the paper output tray 4 Press the paper guide a...

Page 12: ...n installing the printer driver in Windows XP or Windows 2000 log on to the system as a member of the Administrators group If the following screen appears automatically click Cancel and follow steps 1...

Page 13: ...anguage selection screen appears select a language then click the Next button 4 Follow the instructions displayed on the screen When the screen shown on the left is displayed click Install 5 When the...

Page 14: ...ck Exit Notes To view the User s Guide please refer to page 59 If a message prompting you to restart the computer appears click Yes Installing the Printer Driver Macintosh Notes Do not remove or inser...

Page 15: ...Read the Licence Agreement and click Accept to continue 6 Click Install Wait for the installation to finish Note If the above message appears check that there are no unsaved documents then click the...

Page 16: ...9 Double click the BJ Installer 10Click 11Read the Software License Agreement and if you agree click Agree and then click 12Click Install Installation is started and when completed a message for succe...

Page 17: ...pple Menu 14Click the icon for the printer you are using and close Chooser Before you use the printer you must carry out print head alignment on page 18 Note Refer to the User s Guide when using this...

Page 18: ...ng Preferences to open the setting screen 4 Click OK 5 Click the Maintenance tab and click the Print Head Alignment icon 6 Check that paper is loaded in the printer and click OK If a message warning y...

Page 19: ...nd click OK If it is difficult to pick the best pattern on Column F pick the setting that produces the least noticeable vertical white stripes Less noticeable More noticeable white stripes white strip...

Page 20: ...n 4 Check that paper is loaded in the printer and click OK If the pattern is not printed successfully open the front cover and ensure that the ink tanks are correctly installed 5 Look at the print out...

Page 21: ...F enter their numbers and click Send If it is difficult to pick the best pattern on Column F pick the setting that produces the least noticeable vertical white stripes Less noticeable More noticeable...

Page 22: ...pattern number 7 to 3 of column A where the check mark was placed in step 4 When you press the right button the number increases when you press the left button the number decreases 6 Press the Print...

Page 23: ...the Cancel button and start over from step 1 7 Repeat steps 5 and 6 and set the pattern numbers for columns B to F When you finish pattern number settings for up to column F the icon appears 8 Press...

Page 24: ...ic Operations If you detect smoke unusual smells or strange noises around the printer immediately switch the printer off and always unplug the printer Contact your local Canon service representative T...

Page 25: ...e details on the functions in the tab This may not appear when using Windows XP or Windows 2000 If this happens in Windows XP click Start then select All Programs Canon S530D Guide In Windows 2000 cli...

Page 26: ...box in your application to print the document On the File menu click Print Check the application s user s manual for the actual procedures 4 Specify the print settings according to your requirements F...

Page 27: ...e printer 2 Print Mode Select the closest type of document you want to print To specify more detailed settings for the print quality or colour select Manual and click Details 3 Print Click this to sta...

Page 28: ...on one sheet Quality Specify the print quality Print Date Specify whether the date when the photograph was taken is to be printed Optimize Image Specify whether the photograph is to be adjusted befor...

Page 29: ...tems To move the cursor press the up and down buttons Changing a Setting To change the photograph number or a setting press the left and right buttons The right button increases the photograph number...

Page 30: ...r may be destroyed Format the memory card with the digital camera This printer does not support the computer s unique format Photographs that have been edited with the computer may not print properly...

Page 31: ...ting Photographs Image Correction on page 43 Notes When changing modifying the content of the memory card of the computer ensure to print from the computer When printing from the operation panel print...

Page 32: ...rd slot Notes Saving the ink to users who will be using the printer without connecting to a computer Except when the printer will not be used for a long period of time one month or longer always leave...

Page 33: ...vidually DPOF Printing see page 38 Prints according to the camera settings 2 Printing Photographs This section explains how to print photographs without using a computer Print Flow Print photographs a...

Page 34: ...tting the Print Layout see page 41 Setting the Print Quality see page 42 Printing the Date see page 42 Correcting Photographs see page 43 Operating the Cursor Buttons see page 27 4 Printing Load paper...

Page 35: ...details on the paper types that can be used see Setting the Media Type on page 40 Printing a Photograph List Index Printing This mode allows you to print a list of the photographs and photograph numbe...

Page 36: ...t number the photographs will be printed in reverse order starting from the photograph with the largest photograph number Note Specifying the range and print the photographs You can print only the spe...

Page 37: ...Setting the Media Type on page 40 4 Press the Print button Printing starts Printing a Sequential Range of Photographs All Frames Printing This mode allows you to print all photographs found on the mem...

Page 38: ...will need the number of sheets displayed in Required Sheets Note For instructions on loading paper see Loading Paper on page 9 or the User s Guide For details on the paper types that can be used see S...

Page 39: ...1 Press the Mode button and select Print Selected 2 Move the cursor to First Order by pressing the top and bottom buttons 3 Display 01 by pressing the left and right button 01 indicates the first fram...

Page 40: ...ts Printing According to Camera Settings DPOF Printing If Digital Print Order Format DPOF settings are specified in the digital camera the printing begins automatically according to the specified sett...

Page 41: ...camera 3 Load paper into the printer You will need the number of sheets displayed in Required Sheets Note For instructions on loading paper see Loading Paper on page 9 or the User s Guide For details...

Page 42: ...Copies from the digital camera Copies allows you to specify the number of copies for one photograph The number of required sheets differs depending on the setting in Layout For example if eight copies...

Page 43: ...nted on one sheet of paper Notes In Index mode Layout cannot be set In Single Frame mode the same photograph is lined up in the specified layout and printed In All Frames Specified Frame and DPOF mode...

Page 44: ...e and the print mode 1 Set the print mode See Printing Photographs on page 31 2 Move the cursor to Quality by pressing the top and bottom buttons 3 Select the quality by pressing the left and right bu...

Page 45: ...s before printing them This function is effective when printing photographs that fogged because of fluorescent lighting effects or photographs that do not have proper exposure Notes When image correct...

Page 46: ...d To use only the correction function for reproducing vivid colours VIVID Photo function 2 Press the right button twice The display changes to VP ON and only the VIVID Photo function becomes enabled N...

Page 47: ...played on the viewer The brightness and contrast of the viewer display can be adjusted Adjusting the Brightness and Contrast see page 47 Note When Digital Print Order Format DPOF is set the photograph...

Page 48: ...elected using the Mode button 4 Use or to move to Layout 5 Use or to specify Borderless Printing 6 Press and hold the Maintenance button until Maintenance icon is shown for Required Sheets A green fra...

Page 49: ...t buttons You can adjust the brightness within the following setting range by operating the buttons The base setting is 0 As the number increases in the negative direction the brightness becomes darke...

Page 50: ...Image 6 Adjust the contrast by using the left and right buttons You can adjust the contrast within the following setting range by operating the buttons The base setting is 0 As the number increases i...

Page 51: ...to the printer Use either of the cables that come with the printer For the type of connection cables that match up correctly with your camera read the instructions that come with the camera 3 Turn on...

Page 52: ...Note If the conditions does not improve even after you perform Step3 the print head may be damaged Contact the store where you bought the printer or a repair center STEP1 Printing the Nozzle Check Pa...

Page 53: ...ning the Print Head on page 52 If the vertical lines in pattern 2 stand out the print head position must be adjusted See Adjusting the Print Head on page 20 Printing the Nozzle Check Pattern Print the...

Page 54: ...6 If there is no improvement repeat print head cleaning up to three times 7 If there is still no improvement perform print head deep cleaning See Deep cleaning the Print Head on page 53 Cleaning the P...

Page 55: ...uired Sheets 2 Press the right button three times The icon appears 3 Press the Print button Print head deep cleaning starts When deep cleaning is completed the is displayed 4 Press the Maintenance but...

Page 56: ...paper thickness lever is not correct Corrective action Printing will start when you set the paper thickness lever to the correct position Press the Print button to start printing with paper thickness...

Page 57: ...If a sheet is jammed remove the jammed sheet see page 2 load paper correctly and then press the Reset button on the printer Error number 401 Cause Front cover is open Corrective action Close the front...

Page 58: ...f a memory card is already set eject the card set it again and check that the indicator lamp goes on Check whether the PC card adapter is ATA compliant Notes If the memory card details are amended or...

Page 59: ...ttings screen and click the Maintenance tab Click the Cleaning icon See page 16 for details on how to open the setting screen Macintosh Open the Page Setup dialog box and click the Utilities button Cl...

Page 60: ...may be a problem with the USB driver installation Try reinstalling the printer driver Reinstalling If you cannot proceed beyond the Printer Port screen 1 Click Cancel 2 When the Abort Installation scr...

Page 61: ...omputer 2 Click Documentation on the left of the screen 3 Click View Documents If Acrobat Reader is not installed or Acrobat Reader 4 0 is installed a message appears Click Yes Follow the instructions...

Page 62: ...2 ppm Colour printing Fast Draft 10 ppm Standard 6 ppm Print direction Bi directional Print width 203 2 mm 8 0 in max for borderless printing 216 0 mm 8 5 in Resident print control mode Canon extended...

Page 63: ...lution Paper Glossy Photo Paper High Gloss Photo Film Glossy Photo Cards Photo Paper Pro Photo Paper Plus Glossy Matte Photo Paper Transparencies T shirt Transfers Banner Paper Sheet feeder capacity P...

Page 64: ...0 2400 dpi Print Head Black 320 nozzles 600 dpi Cyan Magenta Yellow 256 nozzles 1200 dpi Ink Tanks Capacity page Black BCI 3eBK approx 695 1 approx 1250 2 Cyan BCI 3eC approx 460 2 Magenta BCI 3eM app...

Page 65: ...from computer and operation panel 2 4 8 16 patterns in one sheet index Photo Paper Plus Glossy PP 101 Borderless printing from computer and operation panel 2 4 8 16 patterns in one sheet index Matte...

Page 66: ...oto Optimizer PRO VIVID Photo DPOF function Ver 1 00 compliant Print index prints Set the number of copies Select images for print Include the date on the print Include the file number on the print Re...

Page 67: ......

Page 68: ...QA7 2102 V01 XXXXXXXX CANON INC 2002 PRINTED IN THAILAND...

Reviews: