background image

24

Maintenance

This chapter describes to clean and maintain the printer.

To ensure high-quality printing, regularly clean your RP10 as 
described below.

About Cleaning Frequency

It is recommended that you clean the printer at regular intervals
However, if paper chips, foreign substances, paper dusts, etc. 
adhere to the printer, clean it immediately.

CAUTION

Before you clean the printer, turn OFF the printer and computer, and 
disconnect the power cord from the power outlet. Otherwise, it may 
cause an electrical shock.

Never clean the printer with any kind of organic solvent, such as alcohol, 
benzene, or paint thinner. This may cause a fire and electrical shock, or 
cause the exterior of the printer to disfigure or discolor.

Do not touch the blade fixed at the upper part of the paper output section 
or side surfaces of the metal parts. You may cut your fingers or get 
injured.

When opening or closing the Paper Cover, do not hold the Platen Roller. 
Doing so may deform the Platen Roller. 

Do not touch the cutting blades (fixed/moving blades) with bare hands. 
Also, be careful not to press something hard such as a screwdriver 
against them. Doing so may affect the paper cutting characteristics.

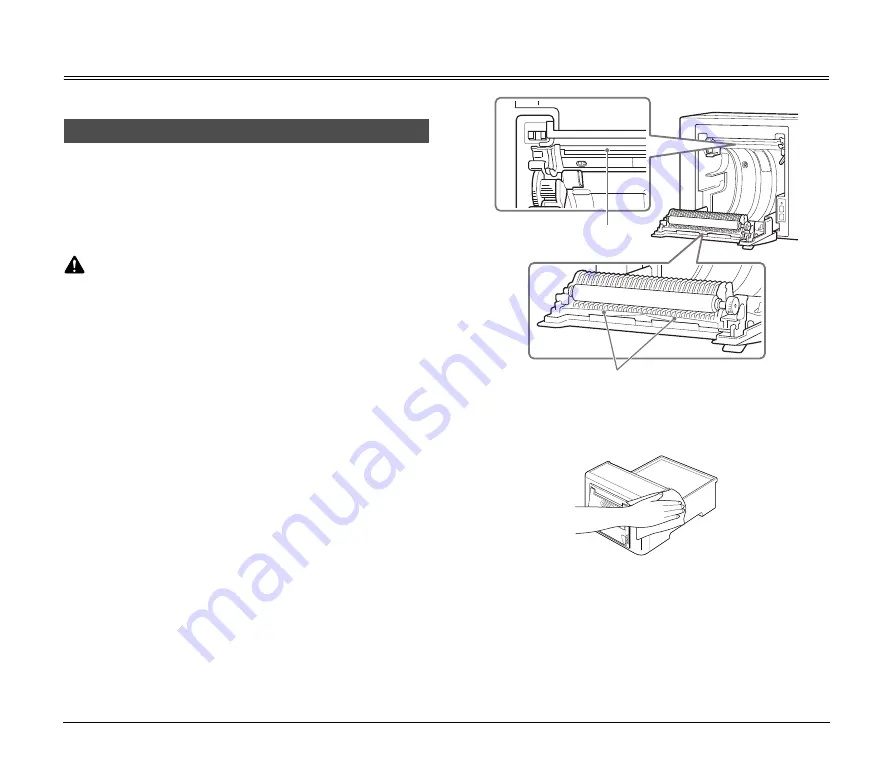
Main Unit

Wipe the printer with a cloth that has been moistened with water and 
thoroughly wrung out, and then wipe again with a clean, dry cloth.

Daily Cleaning

Moving blade

Fixed blade

Summary of Contents for RP10

Page 1: ...Please read this manual before operating this printer User Manual RP10...

Page 2: ...he Industry Canada R GLEMENT SUR LE BROUILLAGE RADIO LECTRIQUE For 120V models Cet appareil num rique respecte les limites de bruits radio lectriques applicables aux appareils num riques de Classe B p...

Page 3: ...or household use under limited circumstances Trademarks Canon and the Canon logo are registered trademarks of Canon Inc in the United States and may also be trademarks or registered trademarks in oth...

Page 4: ...everything you need to do to operate the RP10 from the introduction to the RP10 to basic operations maintenance troubleshooting etc User Manual is included as a PDF file on the CD ROM You need Acroba...

Page 5: ...urning ON and OFF the Power 17 Turning ON the Power 17 Setting RP10 Configuration 18 Printer Driver Settings 20 Cautions When Printing 23 Maintenance 24 Daily Cleaning 24 Main Unit 24 Thermal Head 25...

Page 6: ...power and disconnect the power cord from the power outlet CAUTION To avoid damage to the printer never place the printer on an unstable or vibrating surface The printer may tip or fall over causing i...

Page 7: ...nstallation in such places is unavoidable provide a curtain or similar object to shade the printer Places subject to dust and fumes Places that are uneven unsteady or subject to vibrations Places wher...

Page 8: ...zed Canon dealer or service representative for further information Never place an object on top of the power cord or step on the power cord Never bundle the power cord or wrap the cord around an objec...

Page 9: ...oints Do not store it in a high temperature high humidity place Do not store for long periods of time in places exposed to direct sun light Do not use solvent type glue for pasting Do not let it touch...

Page 10: ...t paper Operation Buttons Paper Sensor This sensor detects the status of paper Warning Label This shows warning when using printer Cover Open Lever To open the Paper Cover Rear View Power Button USB C...

Page 11: ...printer The colors and patterns of the light indicate the following Ready state Lit green No paper Blinking red RAM error Blinking red and green alternately Other errors Lit red During download Blinki...

Page 12: ...operating conditions Thermal paper does not like an environment where temperature or humidity is high Especially when temperature reaches 60 C 140 F or higher discoloring begins Take extra care when s...

Page 13: ...y pull the edge of paper and then close the Paper Cover while pulling the paper forward so that the paper will not be loosened The Status LED is lit green and the printer is ready to print IMPORTANT M...

Page 14: ...nfiguration on p 18 OPOS Driver The driver to control the RP10 using the OPOS compliant software Printer Driver The driver to print using the Windows print features Operating Conditions Install the so...

Page 15: ...close it in advance B Download usable software from the Canon website IMPORTANT Once any version of the software is installed you need to uninstall it before you re install C Double click Setup exe o...

Page 16: ...ssible for computers connected to the LAN to use it for printing Use a LAN cable to connect the CR 150N CR 120N to the wired LAN router IMPORTANT Connect computers to the router by wired or wireless L...

Page 17: ...ven when the paper is properly loaded there is a problem with the printer Turn OFF the power and contact your local authorized Canon dealer or service representative to have the printer serviced WARNI...

Page 18: ...a long period of time NOTE The printer will turn off automatically if 4 hours elapse without printing being performed To use the printer you must specify the COM port driver and paper that you want to...

Page 19: ...0 to this computer appears under USB confirm the cable connections see p 16 and the STATUS LED see p 17 Ethernet Manually enter the IP address of the CR 150N CR 120N connected with the RP10 Click Test...

Page 20: ...tings in detail When you click Advanced The Canon RP10 Printing Preferences dialog box appears The Canon RP10 Printing Preferences dialog box has three tabs Layout Extended Settings1 and Extended Sett...

Page 21: ...pecified paper length Mark Detection settings Mark Detection Specify how to detect the mark when using paper with a mark When you select Each page mark detection is performed for each page and then pa...

Page 22: ...per line Feed lines after Cut Specify the paper feed volume after cutting paper in the range of 0 to 255 Unit dot per line 1 mm 8 dots per line B Logo top Logo bottom You can register a new logo or de...

Page 23: ...ermal printhead etc Do not damage or stain the rubber part shaft bearing part platen gear etc of the Platen Roller Doing so may result in malfunctions Make sure that no oils or fats or foreign substan...

Page 24: ...hol benzene or paint thinner This may cause a fire and electrical shock or cause the exterior of the printer to disfigure or discolor Do not touch the blade fixed at the upper part of the paper output...

Page 25: ...that may damage the heat generating part Do not apply excessive force to the thermal printhead C Allow the thermal printhead to dry completely and then close the Paper Cover Moving blade initialize s...

Page 26: ...paper feed or print quality problems may occur If they adhere to the Platen Roller follow the steps below to clean it IMPORTANT Do not wipe off the yellow grease applied to the platen gear Doing so m...

Page 27: ...n extended period of time kept at room temperature for more than half a year store the printer with a sheet of paper inserted between the thermal printhead and Platen Roller If the rubber part of the...

Page 28: ...the printer Feeding Trouble Cause Paper is not fed A paper jam occurs Remedy Check that paper is loaded in the printer properly Check that the Paper Cover is closed tightly When a print error is occu...

Page 29: ...tting for the print spooler is set to Manual default setting proper installation may not be possible Perform the following to verify the print spooler setting start the service and then reinstall the...

Page 30: ...rams separately Then re install the software See Installing the Software on p 14 IMPORTANT Be sure to Log On as the Administrator A From the Windows task bar click the Start button and then Control Pa...

Page 31: ...Select the type of ink that contains 50 ppm or smaller Na and K ions respectively and 100 ppm CI ions Recommended ink T K TOKA RNC type The surface intensity of the thermal layer is weaker than that o...

Page 32: ...s The test print is performed repeatedly until you stop it C Press the Feed Button to stop the test print NOTE The test print stops if a printer error such as Paper End or Paper Cover Open etc occurs...

Page 33: ...0 to 85 RH no dew condensation Storage Temperature 30 to 50 C 21 to 122 F Storage Humidity 10 to 90 RH no dew condensation Dimensions 135 mm H x 170 mm W x 280 mm D 5 31 H x 6 7 W x 11 D Weight 1530 g...

Page 34: ...utsch Schalter Aus Espa ol Interruptor apagado Nederlands Schakelaar Off T rk e Anahtar Kapal Power off no standby current Hors tension pas de courant de veille Alimentazione assente nessuna corrente...

Page 35: ...n ais Italiano Apparecchio classe II Deutsch Ger t der Schutzklasse II Espa ol Equipo de clase II Nederlands KlasseII apparatuur T rk e S n f II ekipman quipement de classe II Indicates this is Class...

Page 36: ...nlemi English Fran ais Symbole CC DC symbol Indicates direct current Italiano Simbolo corrente continua C C Indica la corrente continua Deutsch Gleichstrom Symbol Espa ol S mbolo CC Nederlands DC pict...

Page 37: ...A CANON EUROPA N V BOVENKERKERWEG 59 1185 XB AMSTELVEEN THE NETHERLANDS CANON AUSTRALIA PTY LTD BUILDING A THE PARK ESTATE 5 TALAVERA ROAD MACQUARIE PARK NSW 2113 AUSTRALIA CANON SINGAPORE PTE LTD 1 F...

Reviews: