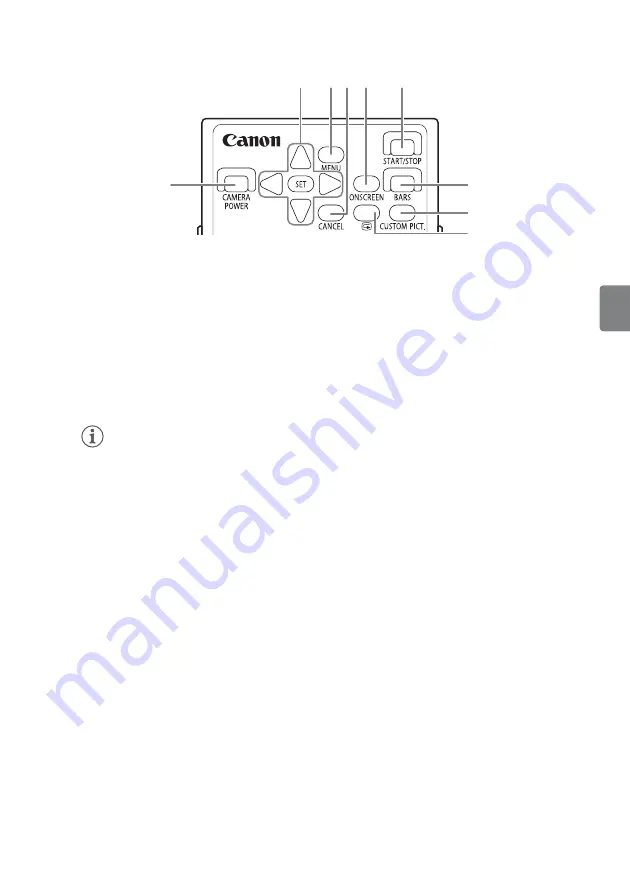
Canon RC-V100 Instruction Manual Download Page 11

11

En

Basic operations

1

CAMERA POWER button

Turns the camera on/off. The camera’s operating mode is determined by the position 
of the camera’s 

Q

 switch. If the camera’s 

Q

 switch is set to OFF, the 

camera cannot be turned on using the remote controller.
You can check if the camera is on or off by the button’s light: The button flashes 
quickly (2 to 3 times per second) while the remote controller is connecting to the 
camera. When the connection is completed correctly, the button lights up in green. 
When the camera is in power save mode or lens exchange mode, the button flashes 
slowly (once per second) in green.

NOTES

• When the remote controller cannot correctly connect to the camera, the CAMERA 

POWER button will keep flashing quickly. Check that the remote controller is 
connected to a compatible camera and, if necessary, that use of the remote 
controller has been correctly activated on the camera.

2

Up / Down / Left / Right / SET buttons

Use these buttons to operate the camera’s menus and select settings. Press the 
navigation buttons to move the orange selection frame in the various menu screens. 
Press the SET button to select a menu setting.
Only with a REMOTE B terminal connection:  These buttons light up in orange.

3

MENU button

Opens and closes the menu.
Only with a REMOTE B terminal connection:  While a menu screen is displayed, the 
button lights up in orange.

4

CANCEL button

Press the button to return to the previous submenu or to interrupt some operations 
while they are in progress.
Only with a REMOTE B terminal connection:  The button lights up in orange.

5

ONSCREEN (output onscreen displays) button

Turns on/off the overlaying of the camera’s onscreen displays on video output from the 
camera’s terminals.
Only with a REMOTE B terminal connection:  While onscreen displays are being output 
with the video signal, the button lights up in orange.

1

2 3

5

4

6

7
8

9

Summary of Contents for RC-V100

Page 1: ...de Mode d emploi Fernbedienung Bedienungsanleitung Controllo remoto Manuale di istruzioni Controlador remoto Manual de Instrucciones Пульт дистанционного управления Руководство по эксплуатации Қашықтан басқару құралы Өнім туралы ақпарат Zh 遥控器 使用说明书 在使用本产品之前 请务必先仔细阅读本使用说明书 请务必妥善保管好本书 以便日后能随时查阅 保留备用 请在充分理解内容的基础上 正确使用 ...

Page 2: ... easy direct operation The IRIS dial is larger and placed closer to the operator to allow for easier access Controls for ISO speed gain shutter speed and ND filter A 12 Controls for white balance and master black A 14 You can easily adjust settings that affect the overall color balance of the picture like the white balance and master black Both have separate R Gain and B Gain adjustment dials Assi...

Page 3: ...ames of Parts and Their Functions 10 Front 18 Back Bottom 19 Customization 21 Specifications Measurements Package Contents RC V100 Remote Controller Remote cable 2 5 mm to 3 5 mm 5 m 16 4 ft Optionals RR 10 8 pin Remote Cable 10 m 32 8 ft RR 100 8 pin Remote Cable 100 m 328 ft Please read this manual carefully before you use the remote controller and retain these instructions for future reference ...

Page 4: ...t 15 of the FCC Rules Operation is subject to the following two conditions 1 This device may not cause harmful interference and 2 this device must accept any interference received including interference that may cause undesired operation Note This equipment has been tested and found to comply with the limits for a Class B digital device pursuant to Part 15 of the FCC Rules These limits are designe...

Page 5: ...ic equipment EEE Improper handling of this type of waste could have a possible negative impact on the environment and human health due to potentially hazardous substances that are generally associated with EEE At the same time your cooperation in the correct disposal of this product will contribute to the effective usage of natural resources For more information about where you can drop off your w...

Page 6: ...ing the REMOTE A Terminal Connect the remote controller to a compatible camera using the supplied remote cable 2 5 mm to 3 5 mm 1 Turn off the camera 2 Remote controller Slide the terminal selection switch to the REMOTE A position 3 Remote controller Connect the 3 5 mm end straight plug of the supplied remote cable to the REMOTE A terminal and pass the cable through the cable clamps to secure it 4...

Page 7: ...OTE B position 3 Remote controller Connect one end of the 8 pin remote cable to the REMOTE B terminal Be sure to align the orientation notch on the cable s plug with the protrusion on the terminal 4 Camera Connect the other end of the 8 pin remote cable to the camera s REMOTE or REMOTE B terminal Again paying attention to the orientation notch NOTES The remote controller s REMOTE A and REMOTE B te...

Page 8: ...iately after activating the remote controller all the controls will be locked 2 Remote controller Press the ACTIVE button repeatedly to change the key lock mode as necessary A 16 Disconnecting the Remote Controller 1 Turn off the camera 2 Disconnect the cable from the remote controller s REMOTE A or REMOTE B terminal and from the corresponding terminal on the camera To disconnect the optional 8 pi...

Page 9: ...ation as well NOTES Use the various controls on the remote controller while checking the picture on the camera s screen or an external monitor connected to the camera Depending on the camera used some of the functions of the remote controller s buttons and dials may not be available or may function differently If you think the camera s recording might pick up the remote controller s operating soun...

Page 10: ... gamma and sharpness controls A 13 5 Assignable button 3 A 17 6 White balance controls A 14 7 Master black controls A 14 8 ACTIVE button A 16 9 Master pedestal and iris controls A 16 A q Assignable button 1 A 17 A a Assignable button 2 A 17 A s ISO Speed Gain controls A 12 A d Assignable button 4 A 17 A f Zoom and focus controls A 15 ...

Page 11: ...f the remote controller has been correctly activated on the camera 2 Up Down Left Right SET buttons Use these buttons to operate the camera s menus and select settings Press the navigation buttons to move the orange selection frame in the various menu screens Press the SET button to select a menu setting Only with a REMOTE B terminal connection These buttons light up in orange 3 MENU button Opens ...

Page 12: ...e currently selected ND filter s number will light up in orange The indicator will change even if you changed the ND filter setting on the camera itself Depending on the camera used and the current position of the ND filter the indicators may flash to indicate other conditions Some cameras are compatible with an extended ND range When connected to such cameras indicators 1 and 4 will both light up...

Page 13: ...knee adjustment the button lights up in orange 17 KNEE POINT dial When the automatic knee setting is turned off this dial changes the knee point manually By default the operating mode of the dial is set to relative mode A 19 You can change the direction in which you need to turn the dial and its sensitivity to your preference A 19 18 KNEE SLOPE dial When the automatic knee setting is turned off th...

Page 14: ...or B respectively When custom white balance A or B is selected the corresponding button lights up in orange 23 Å set custom white balance button After selecting one of the custom white balance settings A or B press this button to have the camera register the custom white balance value When custom white balance A or B is selected and the white balance value has not yet been registered the button wi...

Page 15: ...operating mode of the dials is set to relative mode A 19 You can change the direction in which you need to turn each dial and its sensitivity to your preference A 19 NOTES Only one of the four buttons AWB A B and PRESET can be selected at the same time 27 MASTER BLACK R dial 28 MASTER BLACK B dial These dials adjust respectively the red and blue settings of the master black By default the operatin...

Page 16: ...e mode A 19 You can change the direction in which you need to turn the dial and its sensitivity to your preference A 19 ACTIVE button master pedestal and iris controls 33 ACTIVE button This button locks all or part of the buttons and dials on the remote controller in order to prevent their operation by mistake When all the controls are active the button lights up in green By default immediately af...

Page 17: ...R PEDESTAL IRIS ACTIVE indicator This indicator lights up in green when the key lock mode has been set so only the master pedestal and iris controls of the remote controller are active NOTES Immediately after selecting the Only master pedestal iris controls active mode this indicator may flash momentarily During that time the controls cannot be used please wait until the indicator lights up perman...

Page 18: ...used to connect the remote controller to the camera REMOTE A or REMOTE B 42 REMOTE B terminal A 7 43 Cable clamps A 6 Pass the supplied remote cable through the cable clamps to help prevent it from being inadvertently disconnected from the REMOTE A terminal 44 SET UP switches With the setup switches you can customize various aspects of the remote controller s operation to your preference For detai...

Page 19: ... B 2 Dials Mode PAINT group dials mode Absolute Relative B 3 WB MB group dials mode Absolute Relative B 4 MASTER PEDESTAL dial mode Absolute Relative B 5 Buttons Indicators Lamps active Off On B 6 Brightness Dim Bright B 7 Sound Operating sounds Off On B 8 Reserved for service maintenance About the dial modes You can set the various dials mode to absolute or relative In relative mode the value is ...

Page 20: ... the desired micro switch to the desired position Micro switches A 1 to A 8 are on the left and micro switches B 1 to B 8 are on the right With a toothpick or a similar pointed tool slide the micro switch down to set it OFF slide it up to set it ON IMPORTANT Make sure the remote controller is off before operating the SET UP switches REMOTE A REMOTE A ...

Page 21: ...l dimensions W x H x D approx 89 x 224 x 65 mm 3 5 x 8 8 x 2 6 in Weight excluding cable approx 630 g 1 4 lb Weight and dimensions are approximate Errors and omissions excepted The information in this manual is verified as of September 2015 Subject to change without notice 65 mm 2 6 in 19 mm 0 75 in 100 mm 3 9 in 89 mm 3 5 in Screw 48 mm 1 9 in 224 mm 8 8 in Screw Sockets 19 mm 0 75 in Socket hole...

Page 22: ...r backed up to prevent its loss in the event of failure or other malfunction of such drive Canon USA shall have no responsibility under this limited warranty for use of the Products in conjunction with incompatible peripheral products and incompatible software TO OBTAIN WARRANTY SERVICE You may obtain technical support for your Products as follows Internet support at www usa canon com support E ma...

Page 23: ...NST CANON USA BE GREATER THAN THE PURCHASE PRICE OF THE PRODUCTS SOLD BY CANON USA AND CAUSING THE ALLEGED DAMAGE WITHOUT LIMITING THE FOREGOING YOU ASSUME ALL RISK AND LIABILITY FOR LOSS DAMAGE OR INJURY TO YOU AND YOUR PROPERTY AND TO OTHERS AND THEIR PROPERTY ARISING OUT OF USE MISUSE OR INABILITY TO USE THE PRODUCTS NOT CAUSED DIRECTLY BY THE NEGLIGENCE OF CANON USA SOME STATES DO NOT ALLOW TH...

Page 24: ... stored on that drive be duplicated or backed up to prevent its loss in the event of a failure or other malfunction of such drive TO OBTAIN WARRANTY SERVICE You may obtain technical support for your Products as follows Internet support for English at www canon ca english cs E mail support also available Internet support for French at www canon ca francais cs E mail support also available Telephone...

Page 25: ...stelveen The Netherlands ООО Канон Ру в Москве 109028 Москва Серебряническая наб 29 этаж 8 Бизнес центр Серебряный Город ООО Канон Ру в Санкт Петербурге 191186 Санкт Петербург Волынский переулок 3А литер А Бизнес центр Северная Столица 原产地 请参照保修卡 产品包装箱或产品机身上的标示 进口商 佳能 中国 有限公司 进口商地址 北京市东城区金宝街89号金宝大厦15层 邮编100005 ...

Page 26: ...gsanleitung Per conoscere il centro Canon più vicino consultare il retro di copertina del manuale di istruzioni della videocamera Para la información de contacto de su oficina Canon local consulte la contraportada del manual de instrucciones de la cámara Контактную информацию местного офиса Canon см на задней обложке руководства по эксплуатации камеры Жергілікті Canon кеңсесінің байланыс ақпаратын...

Reviews: