background image

54

Image Customization Features

Still Images

Changing the Aspect Ratio

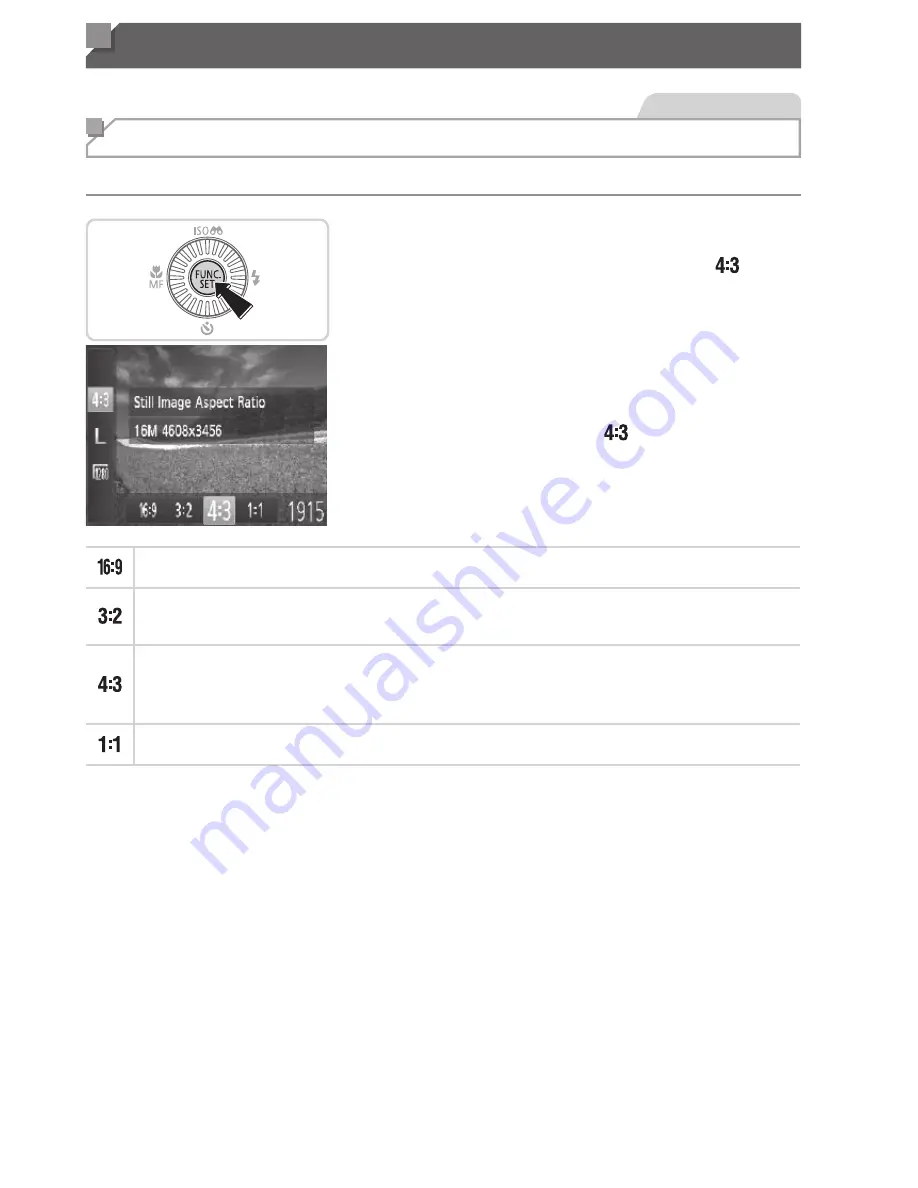
Change the image aspect ratio (ratio of width to height) as follows.

Configure the setting.

z

Press the <

m

> button, choose [ ] in 

the menu, and choose the desired option 

(

=

 37).

X

Once the setting is complete, the screen 

aspect ratio will be updated.

z

To restore the original setting, repeat this 

process but choose [ ].

Used for display on widescreen HDTVs or similar display devices.

Same aspect ra io as 35mm film, used for prin ing images at 5 x 7-inch or 

postcard sizes.
Native aspect ratio of the camera screen, also used for display on standard-

defini ion televisions or similar display devices, or for prin ing images at 3 5 x 

5-inch or A-series sizes.

Square aspect ra io.

Summary of Contents for PowerShot SX160 IS

Page 1: ...ted Guia de inicio Please refer to the complete user guide included on the CD ROM for more detailed information Para informacion mas detallada consulte Ia guia del usuario completa que se incluye en el CD ROM I Ill 11111111111111 CDI S495 ...

Page 2: ......

Page 3: ...ure you read this guide including the Safety Precautions section before using the camera Reading this guide will help you learn to use the camera properly Store this guide safely so that you can use it in the future ...

Page 4: ...be used regardless of capacity SO memory cards SDHC memory cards S soxc memory cards c Eye Fi cards Conforms to SO specifications However not all memory cards have been verified to work with the camera About Eye Fi Cards This product is not guaranteed to support Eye Fi card functions including wireless transfer In case of an issue with an Eye Fi card please check with the card manufacturer Also no...

Page 5: ...amera problems while abroad return to the area of purchase before contacting a Canon Customer Support Help Desk Although the LCD monitor is produced under extremely high precision manufacturing conditions and more than 99 99 o of the pixels meet design specifications in rare cases some pixels may be defectiv or may appear as red or black dots This does not indicate camera damage or affect recorded...

Page 6: ... the corresponding camera buttons and dials on which they appear or which they resemble The following camera buttons and controls are represented by icons a Up button on back Left button on back Right button on back T Down button on back Control dial on back Shooting modes and on screen icons and text are indicated in brackets CD Important information you should know I Notes and tips for expert ca...

Page 7: ... I Down button Indicator DISP Display button MENU button Turning the control dial is one way to choose setting items switch images and perform other operations Most of these operations are also possible with the A buttons For convenience all supported memory cards are simply referred to as the memory card The tabs shown above titles indicate whether the function is used for still images movies or ...

Page 8: ...4 Preliminary Notes and Legal Information 5 Organization of Camera User Guide 5 Part Names and Conventions in This Guide 6 Table of Contents 8 Safety Precautions 9 Initial Preparations 12 Trying the Camera Out 18 Included Software PDF Manuals 23 Accessories 30 8 ...

Page 9: ...tempt to disassemble alter or apply heat to the product Avoid dropping or subjecting the product to severe impacts To avoid the risk of injury do not touch the interior of the product if it has been dropped or otherwise damaged Stop using the product immediately if it emits smoke a strange smell or otherwise behaves abnormally Do not use organic solvents such as alcohol benzine or thinner to clean...

Page 10: ...lding the camera by the strap be careful not to bang it subject it to strong impacts or shocks or let it get caught on other objects Be careful not to bump or push strongly on the lens This could lead to or damage the camera Be careful not to subject the screen to strong impacts If the screen cracks injury may result from the broken fragments When using the flash be careful not to cover it with yo...

Page 11: ...lash to prevent heat build up and damage to the unit Remove and store the batteries when you are not using the camera If the batteries are left inside the camera damage caused by leakage may occur Before you discard the batteries cover the terminals with tape or other insulators Contacting other metal materials may lead to fire or explosions Do not charge batteries of different types at the same t...

Page 12: ...the strap hole CD and then pull the other end of the strap through the loop on the threaded end The strap can also be attached to the left side of the camera Holding the Camera 12 Place the strap around your wrist When shooting keep your arms close to your body and hold the camera securely to prevent it from moving If you have raised the flash do not rest your fingers on it ...

Page 13: ...ab Recording is not possible on memory cards with a write protect tab when the tab is in the locked downward position Slide the tab up until it clicks into the unlocked position 2 Open the cover Slide the switch CD and open the cover 3 Insert the batteries Insert the batteries as shown 4 Insert the memory card Insert the memory card facing as shown until it clicks into the locked position Make sur...

Page 14: ...tent performance of other batteries use of specified batteries only is recommended NiMH batteries last longer in cameras than alkaline batteries do especially in cold weather For guidelines on how many shots or hours of recording are possible with various batteries see Specifications in the Camera User Guide Removing the Memory Card 14 Open the cover and push the memory card in until it clicks and...

Page 15: ...p to shots if you wish see Camera User Guide r Er iL l 5 i D _ I __ Turn the camera on Press the power button The Date Time screen is displayed Set the date and time Press the buttons to choose an option Press the a T buttons or turn the dial to specify the date and time When finished press the button Set the home time zone Press the buttons or turn the dial to choose your home time zone Finish th...

Page 16: ...NU button Choose Date Time Move the zoom lever to choose the fT1 tab Press the A buttons or turn the dial to choose Date Time and then press the button 3 Change the date and time Follow step 2 on QJ15 to adjust the settings Press the MENU button to close the menu Once the date time battery is depleted the Date Time screen will be displayed when you turn the camera on Follow the steps on QJ15 to se...

Page 17: ...e Press the A Y buttons or turn the dial to choose a language and then press the button Once the display language has been set the setting screen is no longer displayed The current time is displayed if you wait too long in step 2 after pressing the button before you press the MENU button In this case press the button to dismiss the time display and repeat step 2 You can also change the display lan...

Page 18: ... power button The startup screen is displayed Enter f ll t mode Set the mode dial to S Aim the camera at the subject The camera will make a slight clicking noise as it determines the scene Icons representing the scene and image stabilization mode are displayed in the upper right of the screen Frames displayed around any detected subjects indicate that they are in focus Compose the shot To zoom in ...

Page 19: ... flash It will fire when shooting If you prefer not to use the flash push it down with your finger into the camera Shoot Press the shutter button all the way down As the camera shoots a shutter sound is played and in low light conditions the flash fires automatically Keep the camera still until the shutter sound ends Your shot remains displayed on the screen for about two seconds Even while the sh...

Page 20: ...s once as recording begins and eRec is displayed with the elapsed time Black bars displayed on the top and bottom edges of the screen indicate image areas not recorded Frames displayed around any detected faces indicate that they are in focus Once recording begins you can take your finger off the movie button Finish shooting Press the movie button again to stop shooting The camera beeps twice as r...

Page 21: ...previous image press the button or turn the dial counterclockwise To view the next image press the button or turn the dial clockwise Press and hold the buttons to browse through images quickly Images appear grainy at this time To access Scroll Display mode turn the dial rapidly In this mode turn the dial to browse through images To return to single image display press the button Movies are identif...

Page 22: ...n halfway Erasing the Images You can choose and erase unneeded images one by one Be careful when erasing images because they cannot be recovered 22 1 Choose an image to erase Press the buttons or turn the dial to choose an image 2 Erase the image Press the i button After Erase is displayed press the buttons or turn the dial to choose Erase and then press the button The current image is now erased ...

Page 23: ...uto Update Function Using the included software you can update to the latest version and download new functions via the Internet some software excluded Be sure to install the software on a computer with an Internet connection so you can use this function CD Internet access is required to use this function and any ISP account charges and access fees must be paid separately rPDF Manuals Camera User ...

Page 24: ... or higher Movies Core 2 Duo 1 66 GHz or higher Duo 1 83 GHz or higher Still images Windows 7 64 bit 2 GB or more Windows 7 32 bit Vista 1 GB or more Windows XP 512MB or more Movies 1GB or more USB 440MB or more 1024 x 768 resolution or higher OS X 10 7 2GB or more OS X 10 6 1 GB or more MB or more Silverlight 4 or later max 100 MB must be installed and in Windows XP Microsoft NET Framework 3 0 or...

Page 25: ...ll the software on a computer with an Internet connection DIGITAL CAMERA so1uti0nDlsit 1 Insert the CD ROM in the computer s CD ROM drive Insert the included CD ROM DIGITAL CAMERA Solution Disk D4 in the computer s CD ROM drive On a Macintosh computer after inserting the disc double click the desktop disc icon to open it and then double click the icon displayed 2 Begin the installation Click Easy ...

Page 26: ...terface cable in the computer s USB port For details about USB connections on the computer refer to the computer user manual Install the files Turn the camera on and follow the on screen instructions to complete the installation process The software will connect to the Internet to update to the latest version and download new functions Installation may take some time depending on computer performa...

Page 27: ...e on screen installation instructions for each Doing so will ensure that each camera will receive the correct updates and new functions via the auto update function rSaving Images to a Computer Windows 7 and Mac OS X 10 6 are used here for the sake of illustration U NN 1 Connect the camera to the computer Follow step 3 on QJ26 to connect the camera to a computer 2 Turn the camera on to access Came...

Page 28: ...ick 18 3 Save the images to the computer Click Import Images from Camera and then click Import Untransferred Images Images are now saved to the Pictures folder on the computer in separate folders named by date After images are saved close CameraWindow press the E button to turn the camera off and unplug the cable For instructions on viewing images on a computer refer to the Software Guide CQ23 ...

Page 29: ... the computer until camera images are accessible Images shot in vertical orientation may be saved in horizontal orientation Image protection settings may be cleared from images saved to a computer Some problems may occur when saving images or image information depending on the operating system version the software in use or image file sizes Some functions provided by the included software may not ...

Page 30: ...r TV Video System This product is designed to achieve excellent performance when used with genuine Canon accessories Canon shall not be liable for any damage to this product and or accidents such as fire etc caused by the malfunction of non genuine Canon accessories e g a leakage and or explosion of a battery pack Please note that this warranty does not apply to repairs arising out of the malfunct...

Page 31: ... communications However there is no guarantee that interference will not occur in a particular installation If this equipment does cause harmful interference to radio or television reception which can be determined by turning the equipment off and on the user is encouraged to try to correct the interference by one or more of the following measures Reorient or relocate the receiving antenna Increas...

Page 32: ...r AT T patents for the MPEG 4 standard and may be used for encoding MPEG 4 compliant video and or decoding MPEG 4 compliant video that was encoded only 1 for a personal and non commercial purpose or 2 by a video provider licensed under the AT T patents to provide MPEG 4 compliant video No license is granted or implied for any other use for MPEG 4 standard Notice displayed in English as required Di...

Page 33: ...CDI S495 01 0 IY1l CANON INC 2012 PRINTED IN MALAYSIA IMPRESO EN MALASIA ...

Page 34: ... sure you read this guide including the Safety Precautions section before using the camera Reading this guide will help you learn to use the camera properly Store his guide safely so that you can use it in the future ENGLISH ...

Page 35: ...used regardless of capacity SD memory cards SDHC memory cards SDXC memory cards Eye Fi cards Conforms to SD specifica ions However not all memory cards have been verified to work with the camera About Eye Fi Cards This product is not guaranteed to support Eye Fi card functions including wireless transfer In case of an issue with an Eye Fi card please check with the card manufacturer Also note that...

Page 36: ...ase of camera problems while abroad return to the area of purchase before contacting a Canon Customer Support Help Desk Although the LCD monitor is produced under extremely high precision manufacturing conditions and more than 99 99 of the pixels meet design specifications in rare cases some pixels may be defective or may appear as red or black dots This does not indicate camera damage or affect r...

Page 37: ... corresponding camera buttons and dials on which they appear or which they resemble The following camera buttons and controls are represented by icons o Up button on back q Left button on back r Right button on back p Down button on back 5 Control dial on back Shooting modes and on screen icons and text are indicated in brackets Important information you should know Notes and tips for expert camer...

Page 38: ...dicator l Display button n button z Turning the control dial is one way to choose setting items switch images and perform other operations Most of these operations are also possible with the o p q r buttons For convenience all supported memory cards are simply referred to as the memory card The tabs shown above titles indicate whether the function is used for still images movies or both Still Imag...

Page 39: ...t Auto 42 Common Convenient Features 49 Image Customization Features 54 Helpful Shooting Features 59 Customizing Camera Operation 62 3 Other Shooting Modes 65 Brightness Color Customization Live View Control 66 Specific Scenes 67 Special Modes for Other Purposes 69 Image Effects Creative Filters 71 Discreet Mode 76 Shooting Various Movies 77 4 P Mode 79 Shooting in Program AE Mode P Mode 80 Image ...

Page 40: ...141 Adjusting Basic Camera Functions 142 8 Accessories 155 Replacing he Date Time Battery 156 Optional Accessories 157 Using Optional Accessories 159 Printing Images 166 Using an Eye Fi Card 179 9 Appendix 181 Troubleshooting 182 On Screen Messages 186 On Screen Information 188 Functions and Menu Tables 192 Handling Precautions 202 Specifications 203 Index 207 ...

Page 41: ... Low Light 67 t Fireworks 68 Applying special effects Vivid Colors 71 Poster Effect 71 Fish Eye Effect 72 Miniature Effect 72 Toy Camera Effect 74 Monochrome 75 z Where sound and flash are not allowed Discreet Mode 76 z While adjusting image settings Live View Control 66 z Focus on faces 42 67 93 z With myself in the shot Self Timer 50 69 z Add date stamps 52 ...

Page 42: ...110 z Automatic playback Slideshow 118 z On a TV 159 z On a computer 26 z Browse through images quickly 114 z Erase images 124 E Shoot View Movies z Shoot movies 42 77 z View movies Playback Mode 110 c Print z Print pictures 166 Save z Save images to a computer 26 ...

Page 43: ... recommended power sources Do not attempt to disassemble alter or apply heat to the product Avoid dropping or subjecting the product to severe impacts To avoid the risk of injury do not touch the interior of the product if it has been dropped or otherwise damaged Stop using the product immediately if it emits smoke a strange smell or otherwise behaves abnormally Do not use organic solvents such as...

Page 44: ... When holding the camera by the strap be careful not to bang it subject it to strong impacts or shocks or let it get caught on other objects Be careful not to bump or push strongly on the lens This could lead to injury or damage the camera Be careful not to subject the screen to strong impacts If the screen cracks injury may result from the broken fragments When using the flash be careful not to c...

Page 45: ...r foreign matter from the flash to prevent heat build up and damage to the unit Remove and store the batteries when you are not using the camera If the batteries are left inside the camera damage caused by leakage may occur Before you discard the batteries cover the terminals with tape or other insulators Contacting other metal materials may lead to fire or explosions Do not charge batteries of di...

Page 46: ...13 Basic Guide Gives basic instructions from initial preparations to shooting playback and saving on a computer ...

Page 47: ...he other end of the strap through the loop on the threaded end z The strap can also be attached to the left side of the camera Holding the Camera z Place the strap around your wrist z When shooting keep your arms close to your body and hold the camera securely to prevent it from moving If you have raised the flash do not rest your fingers on it ...

Page 48: ... not possible on memory cards with a write protect tab when the tab is in the locked downward position Slide the tab up until it clicks into the unlocked position 2 Open the cover z Slide the switch and open the cover 3 Insert the batteries z Insert the batteries as shown Label 4 Insert the memory card z Insert the memory card facing as shown until it clicks into the locked position z Make sure th...

Page 49: ...istent performance of other batteries use of specified batteries only is recommended NiMH batteries last longer in cameras than alkaline batteries do especially in cold weather For guidelines on how many shots or hours of recording are possible with various batteries see Specifications 203 Removing the Memory Card z Open the cover and push the memory card in until it clicks and then slowly release...

Page 50: ...mp to shots if you wish 52 1 Turn the camera on z Press the power button X The Date Time screen is displayed 2 Set the date and time z Press the q r buttons to choose an option z Press the o p buttons or turn the 5 dial to specify the date and time z When finished press the m button 3 Set the home time zone z Press the q r buttons or turn the 5 dial to choose your home time zone 4 Finish the setup...

Page 51: ...e n button 2 Choose Date Time z Move the zoom lever to choose the 3 tab z Press the o p buttons or turn the 5 dial to choose Date Time and then press the m button 3 Change the date and time z Follow step 2 on 17 to adjust he settings z Press he n button to close the menu Once the date time battery is depleted the Date Time screen will be displayed when you turn the camera on Follow the steps on 17...

Page 52: ...e o p q r buttons or turn the 5 dial to choose a language and then press the m button X Once the display language has been set the setting screen is no longer displayed The current time is displayed if you wait too long in step 2 after pressing the m button before you press the n button In this case press the m button to dismiss the time display and repeat step 2 You can also change the display la...

Page 53: ...e power button X The startup screen is displayed 2 Enter A mode z Set the mode dial to A z Aim the camera at the subject The camera will make a slight clicking noise as it determines the scene X Icons representing the scene and image stabilization mode are displayed in the upper right of the screen X Frames displayed around any detected subjects indicate that they are in focus 3 Compose the shot z...

Page 54: ...flash It will fire when shooting If you prefer not to use the flash push it down with your finger into the camera Shoot z Press the shutter button all the way down X As the camera shoots a shutter sound is played and in low light conditions the flash fires automatically z Keep the camera still until the shutter sound ends X Your shot remains displayed on the screen for about two seconds z Even whi...

Page 55: ...e elapsed time X Black bars displayed on the top and bottom edges of the screen indicate image areas not recorded X Frames displayed around any detected faces indicate that they are in focus z Once recording begins you can take your finger off the movie button Finish shooting z Press the movie button again to stop shooting The camera beeps twice as recording stops ...

Page 56: ...the q button or turn the 5 dial counterclockwise To view the next image press the r button or turn the 5 dial clockwise z Press and hold the q r buttons to browse through images quickly Images appear grainy at this time z To access Scroll Display mode turn the 5 dial rapidly In this mode turn the 5 dial to browse through images z To return to single image display press the m button z Movies are id...

Page 57: ...tton halfway Erasing the Images You can choose and erase unneeded images one by one Be careful when erasing images because they cannot be recovered 1 Choose an image to erase z Press the q r buttons or turn the 5 dial to choose an image 2 Erase the image z Press the a button z After Erase is displayed press the q r buttons or turn the 5 dial to choose Erase and then press the m button X The curren...

Page 58: ...es Auto Update Function Using the included software you can update to the latest version and download new functions via the Internet some software excluded Be sure to install the software on a computer with an Internet connection so you can use this function Internet access is required to use this function and any ISP account charges and access fees must be paid separately PDF Manuals Camera User ...

Page 59: ...gher Mac OS X 10 7 Core 2 Duo or higher Mac OS X 10 6 Core Duo 1 83 GHz or higher RAM Still images Windows 7 64 bit 2 GB or more Windows 7 32 bit Vista 1 GB or more Windows XP 512 MB or more Movies 1 GB or more Mac OS X 10 7 2 GB or more Mac OS X 10 6 1 GB or more Interfaces USB Free Hard Disk Space 440 MB or more 550 MB or more Display 1024 x 768 resolution or higher Silverlight 4 or later max 10...

Page 60: ...e sure to install the software on a computer with an Internet connection 1 Insert the CD ROM in the computer s CD ROM drive z Insert the included CD ROM DIGITAL CAMERA Solution Disk 2 in the computer s CD ROM drive z On a Macintosh computer after inserting the disc double click the desktop disc icon to open it and then double click the icon displayed 2 Begin the installation z Click Easy Installat...

Page 61: ...USB port For details about USB connections on the computer refer to the computer user manual 4 Install the files z Turn the camera on and follow the on screen instructions to complete the installation process X The software will connect to the Internet to update to the latest version and download new functions Installation may take some time depending on computer performance and the Internet conne...

Page 62: ...ow the on screen installation instructions for each Doing so will ensure hat each camera will receive the correct updates and new functions via the auto update function Saving Images to a Computer Windows 7 and Mac OS X 10 6 are used here for the sake of illustration 1 Connect the camera to the computer z Follow step 3 on 28 to connect the camera to a computer 2 Turn the camera on to access Camera...

Page 63: ...e computer z Click Import Images from Camera and then click Import Untransferred Images X Images are now saved to the Pictures folder on the computer in separate folders named by date z After images are saved close CameraWindow press the 1 button to turn the camera off and unplug the cable z For instructions on viewing images on a computer refer to the Software Guide 25 ...

Page 64: ...o the computer until camera images are accessible Images shot in vertical orienta ion may be saved in horizontal orientation Image protection settings may be cleared from images saved to a computer Some problems may occur when saving images or image information depending on the operating system version the software in use or image file sizes Some functions provided by the included software may not...

Page 65: ...purchase separately 2High Power Flash HF DC1 also supported 3DC Coupler DR DC10 is required Use of genuine Canon accessories is recommended This product is designed to achieve excellent performance when used with genuine Canon accessories Canon shall not be liable for any damage to this product and or accidents such as fire etc caused by he malfunction of non genuine Canon accessories e g a leakag...

Page 66: ...33 Camera Basics Practical guide that introduces other camera basics and describes shooting and playback options 1 Advanced Guide ...

Page 67: ...utton Power Saving Features Auto Power Down As a way to conserve battery power the camera automatically deactivates the screen Display Off and then turns itself off after a specific period of inactivity Power Saving in Shooting Mode The screen is automatically deactivated after about one minute of inactivity In about two more minutes the lens is retracted and the camera turns itself off To activat...

Page 68: ...amera beeps twice and AF frames are displayed around image areas in focus 2 Press all the way down From the halfway position press fully to shoot X The camera shoots as a shutter sound is played z Keep the camera still until the shutter sound ends Images may be out of focus if you shoot without initially pressing the shutter button halfway Length of shutter sound playback varies depending on the t...

Page 69: ... shooting 71 Live View Control Mode Customize image brightness or colors when shoo ing 66 You can turn the mode dial to switch to Shooting mode from Playback mode Shooting Display Options Press the l button to view other information on the screen or to hide the information For details on the information displayed see 188 Information is displayed No information is displayed Screen brightness is aut...

Page 70: ...le options are shown at the bottom of the screen 3 Choose an option z Press the q r buttons or turn the 5 dial to choose an option z Options labeled with a icon can be configured by pressing the l button z To return to the menu items press the l button 4 Finish the setup process z Press the m button X The screen before you pressed the m button in step 1 is displayed again showing the option you co...

Page 71: ...n button 2 Choose a tab z Move the zoom lever to choose a tab z After you have pressed the o p buttons to choose a tab initially you can switch between tabs by pressing the q r buttons 3 Choose a setting z Press the o p buttons or turn the 5 dial to choose a setting z To choose settings with options not shown first press the m or r button to switch screens and then either press the o p buttons or ...

Page 72: ... q r buttons to choose an option 5 Finish the setup process z Press the n button to return to the screen displayed before you pressed the n button in step 1 To undo any accidental setting changes you can restore the camera s default settings 152 ...

Page 73: ...e memory card battery cover or shake or jolt the camera which may corrupt images or damage the camera or memory card Clock You can check the current time z Press and hold the m button X The current time appears z If you hold the camera vertically while using the clock function it will switch to vertical display Press the q r buttons or turn the 5 dial to change the display color z Press the m butt...

Page 74: ...41 Smart Auto Mode Convenient mode for easy shots with greater control over shooting 2 ...

Page 75: ...ra at the subject The camera will make a slight clicking noise as it determines the scene X Icons representing the scene and image stabilization mode are displayed in the upper right of the screen 46 47 X Frames displayed around any detected subjects indicate that they are in focus Zoom Bar Focus Range approx 3 Compose the shot z To zoom in and enlarge the subject move the zoom lever toward i tele...

Page 76: ...on to raise the flash It will fire when shooting If you prefer not to use the flash push it down with your finger into the camera Shoot z Press the shutter button all the way down X As the camera shoots a shutter sound is played and in low light conditions when you have raised the flash it fires automatically z Keep the camera still until the shutter sound ends X Your shot remains displayed on the...

Page 77: ...esize the subject do the same thing as in step 3 on 42 However note that the sound of camera operations will be recorded and movies shot at zoom factors shown in blue will look grainy z When you recompose shots the focus brightness and colors will be automatically adjusted Finish shooting z Press the movie button again to stop shooting The camera beeps twice as recording stops z Recording will sto...

Page 78: ... focusing the lamp may be activated when shooting in low light conditions A blinking h icon displayed with the message Charging the flash when you attempt to shoot indicates that shooting is not poss ble until the flash has finished recharging Shooting can resume as soon as the flash is ready so either press the shutter button all the way down and wait or release it and press it again Movies Micro...

Page 79: ...er Subjects Icon Background Color In Motion 1 Shadows on Face 1 In Motion 1 At Close Range Bright Gray Backlit With Blue Sky Light Blue Backlit Sunsets Orange Spotlights Dark Blue Dark Tripod Used 2 2 1Not displayed for movies 2Displayed in dark scenes when the camera is held s ill as when mounted on a tripod Try shooting in G mode 79 if the scene icon does not match actual shooting conditions or ...

Page 80: ...on for slow camera shake such as when shooting movies at telephoto Powered IS Image stabilization for macro shots Hybrid IS No image stabilization because the camera is mounted on a tripod or held s ill by other means Displayed when you pan following moving subjects wi h the camera When you follow subjects moving horizontally image stabilization only counteracts vertical camera shake and horizonta...

Page 81: ...ces Frames follow moving subjects within a certain range to keep them in focus However if the camera detects subject movement only the white frame will remain on the screen When you are pressing the shutter button halfway and the camera detects subject movement a blue frame is displayed and the focus and image brightness are constantly adjusted Servo AF Try shooting in G mode 79 if no frames are d...

Page 82: ... position The color of the zoom bar will change depending on the zoom range White range optical zoom range where he image will not appear grainy Yellow range digital zoom range where the image is not noticeably grainy ZoomPlus Blue range digital zoom range where the image will appear grainy Because the blue range will not be available at some resolution settings 55 the maximum zoom factor can be a...

Page 83: ... button X Once the setting is complete is displayed 2 Shoot z For Still Images Press the shutter button halfway to focus on the subject and then press it all the way down z For Movies Press the movie button X Once you start the self timer the lamp will blink and the camera will play a self timer sound X Two seconds before the shot the blinking and sound will speed up The lamp will remain lit in ca...

Page 84: ... step 1 on 50 and choose X Once the setting is complete is displayed z Follow step 2 on 50 to shoot Still Images Movies Customizing the Self Timer You can specify the delay 0 30 seconds and number of shots 1 10 1 Choose z Following step 1 on 50 choose and press the n button immediately 2 Configure the setting z Press the o p buttons to choose Delay or Shots z Press the q r buttons or turn the 5 di...

Page 85: ...wo seconds before the shot he lamp blinking and self timer sound will speed up The lamp will remain lit in case the flash fires Still Images Adding a Date Stamp The camera can add the shooting date to images in the lower right corner However note that date stamps cannot be edited or removed so confirm beforehand that the date and time are correct 17 1 Configure the setting z Press the n button cho...

Page 86: ...acking AF Shoot after choosing a subject to focus on as follows 1 Specify Tracking AF z Press the o button X is displayed in the center of the screen 2 Choose a subject to focus on z Aim the camera so that is on the desired subject and then press the shutter button halfway X A blue frame is displayed and the camera will keep the subject in focus and image brightness adjusted Servo AF 3 Shoot z Pre...

Page 87: ...te the screen aspect ratio will be updated z To restore the original setting repeat this process but choose Used for display on widescreen HDTVs or similar display devices Same aspect ra io as 35mm film used for prin ing images at 5 x 7 inch or postcard sizes Native aspect ratio of the camera screen also used for display on standard defini ion televisions or similar display devices or for prin ing...

Page 88: ...ry card see Specifications 203 Configure the setting z Press the m button choose in the menu and choose the desired option 37 X The option you configured is now displayed z To restore the original setting repeat this process but choose Guidelines for Choosing Resolution Based on Paper Size for 4 3 Images A2 16 5 x 23 4 in A3 A5 11 7 x 16 5 5 8 x 8 3 in 5 x 7 in Postcard 3 5 x 5 in z For e mailing ...

Page 89: ...onfigure the setting z Choose Red Eye Corr and then choose On 38 X Once the setting is complete R is displayed z To restore the original setting repeat this process but choose Off Red eye correction may be applied to image areas other than eyes if the camera misinterprets red eye makeup as red pupils for example You can also correct exis ing images 138 You can also access the screen in step 2 when...

Page 90: ...g z Press the m button choose in the menu and choose the desired option 37 X The option you configured is now displayed z To restore the original setting repeat this process but choose Image Quality Resolution Frame Rate Details 1280 x 720 25 fps For shooting in HD 640 x 480 30 fps For shooting in standard definition movies are played back at 30 fps In mode black bars displayed on the top and bott...

Page 91: ...ng when the wind is strong can be reduced However the recording may sound unnatural when this option is used when there is no wind Configure the setting z Press the n button choose Wind Filter on the 4 tab and then choose On 38 z To restore the original setting repeat this process but choose Off ...

Page 92: ...tical and horizontal reference while shooting Configure the setting z Press the n button choose Grid Lines on the 4 tab and then choose On 38 X Once the setting is complete grid lines are displayed on the screen z To restore the original setting repeat this process but choose Off Grid lines are not recorded in your shots ...

Page 93: ...en choose On 38 2 Check the focus z Press the shutter button halfway The face detected as the main subject is now magnified z To restore the original setting choose Off in step 1 The area in focus will not be magnified when you press the shutter button halfway if a face was not detected if the person is too close to the camera and their face is too large for the screen or if the camera detects sub...

Page 94: ... n button choose Blink Detection on the 4 tab and then choose On 38 2 Shoot X A frame accompanied by is displayed when the camera detects a person whose eyes are closed z To restore the original setting choose Off in step 1 When you have specified multiple shots in mode this function is only available for the final shot The frame is not displayed when Review is set to Quick 63 ...

Page 95: ... button choose AF assist Beam on the 4 tab and then choose Off 38 z To restore the original setting repeat this process but choose On Still Images Deactivating the Red Eye Reduction Lamp You can deactivate the red eye reduction lamp that lights up to reduce red eye when the flash is used in low light shots 1 Access the Flash Settings screen z Press the n button choose Flash Settings on the 4 tab a...

Page 96: ...e setting z Press the n button choose Review on the 4 tab and then choose the desired option 38 z To restore the original setting repeat this process but choose 2 sec Quick Displays images only until you can shoot again 2 10 sec Displays images for the specified time Hold Displays images until you press the shutter button halfway Off No image display after shots ...

Page 97: ... Info on the 4 tab and then choose the desired option 38 z To restore the original setting repeat this process but choose Off Off Displays only the image Detailed Displays shooting details 190 Focus Check Shows the area in the AF frame magnified enabling you to check the focus Follow the steps in Checking the Focus 113 This setting is set to Off and cannot be changed when Review 63 is set to Quick...

Page 98: ...65 Other Shooting Modes Shoot more effectively in various scenes and take shots enhanced with unique image effects or captured using special functions 3 ...

Page 99: ...uttons to choose a setting item and then press the q r buttons or turn the 5 dial to adjust the value as you watch the screen z Press the m button 3 Shoot Brightness For brighter images adjust the level to the right and for darker images adjust it to the left Color For more vivid images adjust the level to the right and for more subdued images adjust it to the left Tone For a warm reddish tone adj...

Page 100: ...z Set the mode dial to K 2 Choose a shooting mode z Press the m button choose I in the menu and then choose a shooting mode 37 3 Shoot Still Images Movies I Shoot portraits Portrait z Take shots of people with a softening effect Still Images Shoot under low light Low Light z Shoot with minimal camera shake and subject blur even in low light conditions ...

Page 101: ...ds Still Images Movies tShoot fireworks Fireworks z Vivid shots of fireworks In t mode mount the camera on a tripod or take other measures to keep it still and prevent camera shake Additionally you should set IS Mode to Off when using a tripod or other means to hold the camera still 101 mode resolution is 2304 x 1728 and cannot be changed ...

Page 102: ... frame is displayed around the face you focus on and white frames around other faces 3 Press the shutter button all the way down X The camera now enters shooting standby mode and Look straight at camera to start count down is displayed X The lamp blinks and the self timer sound is played 4 Join the subjects in the shooting area and look at the camera X After the camera detects a new face the lamp ...

Page 103: ... you join the others in he shoo ing area the camera will shoot about 15 seconds later To change the number of shots after choosing in steps 1 2 on 69 press the l button and then either press he q r buttons or turn the 5 dial to choose a value and then press the l button again ...

Page 104: ...s the m button choose in the menu and then choose a shooting mode 37 3 Shoot Still Images Movies Shoot in vivid colors Super Vivid z Shots in rich vivid colors Still Images Movies Posterized shots Poster Effect z Shots that resemble an old poster or illustration In and modes try taking some test shots first to make sure you obtain the desired results ...

Page 105: ... applied 3 Shoot Try taking some test shots first to make sure you obtain the desired results Still Images Movies Shots Resembling Miniature Models Miniature Effect Creates the effect of a miniature model by blurring image areas above and below your selected area You can also make movies that look like scenes in miniature models by choosing the playback speed before the movie is recorded People an...

Page 106: ... speed by pressing the q r buttons or turning the 5 dial 4 Return to the shooting screen and shoot z Press the n button to return to the shooting screen and then shoot Playback Speed and Estimated Playback Time for One Minute Clips Speed Playback Time Approx 12 sec Approx 6 sec Approx 3 sec The zoom is not available when shooting movies Be sure to set the zoom before shooting Try taking some test ...

Page 107: ...Effect Toy Camera Effect This effect makes images resemble shots from a toy camera by vignetting darker blurred image corners and changing the overall color 1 Choose z Follow steps 1 2 on 71 and choose 2 Choose a color tone z Press the l button choose a color tone either press the q r buttons or turn the 5 dial and then press the l button again X A preview is shown of how your shot will look with ...

Page 108: ...ose z Follow steps 1 2 on 71 and choose 2 Choose a color tone z Press the l button choose a color tone either press the q r buttons or turn the 5 dial and then press the l button again X A preview is shown of how your shot will look with the effect applied 3 Shoot B W Black and white shots Sepia Sepia tone shots Blue Blue and white shots ...

Page 109: ...camera sounds the flash or lamp as follows Use this mode where camera sounds the flash and lights are prohibited 1 Enter mode z Set the mode dial to 2 Shoot In mode even playback sounds are muted Sounds of camera operations are muted and movie audio is also muted ...

Page 110: ...To stop movie recording press the movie button again Movies Locking or Changing Image Brightness Before Shooting Before shooting you can lock the exposure or change it in 1 3 stop increments within a range of 2 to 2 1 Lock the exposure z After releasing the shutter button press the o button to lock the exposure The exposure shift bar is displayed z To unlock the exposure press the o button again 2...

Page 111: ... save and manage iFrame movies using the included software 25 1 Choose z Set the mode dial to E z Press the m button choose E in the menu and then choose 37 X Black bars displayed on the top and bottom edges of the screen indicate image areas not recorded 2 Shoot 77 The resolution is 57 and cannot be changed iFrame is a video format developed by Apple ...

Page 112: ...oting style Instructions in this chapter apply to the camera with the mode dial set to G mode G Program AE AE Auto Exposure Before using a function introduced in this chapter in modes other than G make sure the function is available in that mode 192 199 4 ...

Page 113: ...osure cannot be obtained when you press the shutter button halfway shutter speeds and aperture values are displayed in orange To obtain adequate exposure try adjusting the following settings Ac ivate the flash 98 Change the ISO speed 82 Movies can be recorded in G mode as well by pressing he movie button However some H and n settings may be automa ically adjusted for movie recording For details on...

Page 114: ... Brightness Exposure AE Lock Before shooting you can lock the exposure or you can specify focus and exposure separately 1 Lock the exposure z Aim he camera at the subject to shoot with the exposure locked With the shutter button pressed halfway press the b button X is displayed and the exposure is locked z To unlock AE release the shutter button and press the b button again In this case is no long...

Page 115: ...cluding backlit shots Automatically adjusts exposure to match the shooting conditions Center Weighted Avg Determines the average brightness of light across the entire image area calculated by treating brightness in the central area as more important Spot Metering restricted to within the Spot AE Point frame displayed in the center of the screen Still Images Changing the ISO Speed z Press the o but...

Page 116: ... ISO speed will increase shutter speed which may reduce subject blurriness and increase the flash range However shots may look grainy Still Images Correcting Image Brightness i Contrast Before shooting excessively bright or dark image areas such as faces or backgrounds can be detected and automatically adjusted to the optimal brightness Insufficient overall image contrast can also be automatically...

Page 117: ...e optimal white balance for the shooting condi ions Day Light For shoo ing outdoors in fair wea her Cloudy For shoo ing in cloudy conditions in the shade or at twilight Tungsten For shoo ing under ordinary incandescent tungsten lighting and similarly colored fluorescent lighting Fluorescent For shoo ing under warm white or similarly colored or cool white fluorescent lighting Fluorescent H For shoo...

Page 118: ... are shooting Set the white balance under the same light source that will illuminate your shot z Follow the steps on 84 to choose z Aim the camera at a plain white subject so that the entire screen is white Press the l button X The tint of the screen changes once the white balance data has been recorded Colors may look unnatural if you change camera settings after recording white balance data ...

Page 119: ...es Sepia Creates sepia tone images B W Creates black and white images Posi ive Film Combines the effects of Vivid Blue Vivid Green and Vivid Red to produce intense yet natural looking colors resembling images on posi ive film Lighter Skin Tone Lightens skin tones Darker Skin Tone Darkens skin tones Vivid Blue Emphasizes blues in images Makes the sky ocean and other blue subjects more vivid Vivid G...

Page 120: ... saturation red green blue and skin tones in a range of 1 5 1 Access the setting screen z Follow the steps on 86 to choose and then press the l button 2 Configure the setting z Press the o p buttons to choose an option and then specify the value by pressing the q r buttons or turning the 5 dial z For stronger more intense effects or darker skin tones adjust the value to the right and for weaker li...

Page 121: ...n all the way down to shoot continuously Mode Description W Continuous Continuous shooting with he focus and exposure determined when you press the shutter button halfway Continuous Shooting AF Continuous shooting and focusing AF Frame is set to Center and cannot be changed Continuous Shooting LV Continuous shooting with he focus fixed at he position determined in manual focusing In t mode focus i...

Page 122: ... Detection 61 Shooting may stop momentarily or continuous shooting may slow down depending on shooting conditions camera settings and the zoom position As more shots are taken shooting may slow down Shooting may slow down if the flash fires Continuous shooting is faster in mode 67 ...

Page 123: ... the camera will not focus To prevent camera shake try moun ing the camera on a tripod and shooting with the camera set to 51 Still Images Movies Shooting in Manual Focus Mode When focusing is not poss ble in AF mode use manual focus You can specify the general focal position and then press the shutter button halfway to have the camera determine the optimal focal position near the position you spe...

Page 124: ...AF frame mode or size cannot be changed while focusing manually 92 If you want to change the AF frame mode or size cancel manual focus mode first Focusing is possible when using the digital zoom 49 or digital tele converter 92 or when using a TV as a display 163 but the magnified display will not appear To focus more accurately try attaching he camera to a tripod to stabilize it To hide the magnif...

Page 125: ...actor is displayed on the screen The digital tele converter cannot be used with digital zoom 49 and AF point zoom 60 The respective focal lengths when using 1 6x and 2 0x are 44 8 716 8 mm and 56 0 896 0 mm 35mm film equivalent The shutter speed may be equivalent when you move the zoom lever all the way toward i for maximum telephoto and when you zoom in to enlarge he subject to the same size foll...

Page 126: ...rst aim he camera to capture he subject in an AF frame and then hold the shutter button halfway down As you continue to hold the shutter button halfway recompose the shot as desired and then press the shutter button all the way down Focus Lock Still Images Movies Face AiAF Detects people s faces and then sets the focus exposure evaluative metering only and white balance only After you aim the came...

Page 127: ...dden The camera may misinterpret non human subjects as faces No AF frames are displayed if the camera cannot focus when you press the shutter button halfway Still Images Choosing Subjects to Focus On Tracking AF Shoot after choosing a subject to focus on as follows 1 Choose Tracking AF z Follow the steps on 92 to choose Tracking AF X is displayed in the center of the screen 2 Choose a subject to f...

Page 128: ...color or brightness matches that of the background too closely AF Point Zoom on the 4 tab is not available e is not available The camera can detect subjects even if you press the shutter button halfway without pressing the q button After your shot is displayed in the center of the screen When shooting in f mode 90 press and hold the q button for at least one second Still Images Shooting with Servo...

Page 129: ...lease the shutter button and then press it halfway again AF lock shooting is not available AF Point Zoom on the 4 tab is not available Not available when using the self timer 50 Still Images Changing the Focus Setting You can change default camera operation of constantly focusing on subjects it is aimed at even when the shutter button is not pressed Instead you can limit camera focusing to the mom...

Page 130: ...t change even when you release your finger from the shutter button 1 Lock the focus z With the shutter button pressed halfway press the q button X The focus is now locked and f and the MF indicator are displayed z To cancel AF lock release the shutter button hold the shutter button halfway down again and press the q button 2 Compose the shot and shoot ...

Page 131: ...en the flash is lowered Press the h button to raise the flash then configure the setting Still Images Shooting with Slow Synchro With this option the flash fires to increase the brightness of the main subject such as people while the camera shoots at a slow shutter speed to increase the brightness of the background that is out of the flash range For details on the flash range see Specifications 20...

Page 132: ...m 2 to 2 stops in 1 3 stop increments z Press the m button choose X in the menu and adjust the setting by either pressing the q r buttons or turning the 5 dial 37 X Once the setting is complete X is displayed When there is a risk of overexposure the camera automatically adjusts the shutter speed or aperture value during the flash shots to reduce washed out highlights and shoot at optimal exposure ...

Page 133: ...mera at the subject to shoot with the exposure locked With the shutter button pressed halfway press the b button X The flash fires and when is displayed the flash output level is retained z To unlock FE release the shutter button and press the b button again In this case is no longer displayed 3 Compose the shot and shoot z After one shot FE is unlocked and is no longer displayed FE Flash Exposure...

Page 134: ...anging the IS Mode Settings z Press the n button choose IS Mode on the 4 tab and then press the q r buttons to choose the desired option 38 Con inuous Optimal image stabilization for the shooting conditions is automatically applied Intelligent IS 47 Shoot Only Image stabilization is ac ive only at he moment of shooting Off Deactivates image stabilization The setting is changed to Continuous for mo...

Page 135: ...102 ...

Page 136: ...103 Tv Av and M Mode Take smarter more sophisticated shots Instructions in this chapter apply to the camera as set to the respective mode 5 ...

Page 137: ...nds or slower there will be a delay before you can shoot again as images are processed to remove noise When shooting at low shutter speeds on a tripod you should set IS Mode to Off 101 Maximum shutter speed with the flash is 1 2000 second If you specify a faster speed the camera will automatically reset the speed to 1 2000 second before shooting Orange display of aperture values when you press the...

Page 138: ...f shutter speeds when you press the shutter button halfway indicates that the settings deviate from standard exposure Adjust the aperture value until the shutter speed is displayed in white or use safety shift see below B Aperture value size of the opening made by he iris in the lens To avoid exposure problems in M and B modes you can have the camera automatically adjust the shutter speed or apert...

Page 139: ...e level indicator for comparison to the standard exposure level X The exposure level mark is shown in orange when the difference from standard exposure exceeds 2 stops 2 or 2 is displayed in orange in the lower right when you press the shutter button halfway After you set the shutter speed or aperture value the exposure level may change if you adjust the zoom or recompose the shot Screen brightnes...

Page 140: ... X in the menu and adjust the setting by either pressing the q r buttons or turning the 5 dial 37 X Once the setting is complete X is displayed You can also set the flash level by accessing n 38 and choosing Flash Output in Flash Set ings on the 4 tab You can set he flash level in M or B mode by accessing n 38 choosing Flash Settings on the 4 tab and then set ing Flash Mode to Manual You can also ...

Page 141: ...108 ...

Page 142: ...d browse or edit them in many ways To prepare the camera for these operations press the 1 button to enter Playback mode It may not be possible to play back or edit images that were renamed or already edited on a computer or images from other cameras 6 ...

Page 143: ...ise To view the next image press the r button or turn the 5 dial clockwise z Press and hold the q r buttons to browse through images quickly Images appear grainy at this time z To access Scroll Display mode turn the 5 dial rapidly In this mode turn the 5 dial to browse through images z To return to single image display press the m button z To browse images grouped by shooting date press the o p bu...

Page 144: ... the movie is finished is displayed To switch to Shooting mode from Playback mode press the shutter button halfway To deactivate Scroll Display press the n button choose Scroll Display on the 1 tab and hen choose Off If you prefer to have he most recent shot displayed when you enter playback mode press he n button and on the 1 tab choose Resume and then Last shot To change the transi ion shown bet...

Page 145: ...splayed However simple information display is not available To change the initial display mode press he n button and choose Review Info on the 4 tab 64 Still Images Movies Overexposure Warning for Image Highlights Washed out highlights in the image flash on the screen in detailed information display Still Images Movies Histogram High Dark Low Bright z The graph in detailed information display is a...

Page 146: ...splayed over faces detected later in Playback mode X The portion of the image in the orange frame is magnified 2 Switch frames z Move the zoom lever toward k once X The screen at left is displayed z To switch to a different frame when there are multiple frames press the m button 3 Zoom in or out or view other image areas z As you examine the focus use the zoom lever to zoom in or out Press the o p...

Page 147: ... g to display images in an index Moving the lever again will increase the number of images shown z To display fewer images move the zoom lever toward k Fewer images are shown each time you move the lever 2 Choose an image z Turn the 5 dial to scroll through the images z Press the o p q r buttons to choose an image X An orange frame is displayed around the selected image z Press the m button to vie...

Page 148: ...nly still images or movies 1 Choose the first condition for image display or navigation z In single image display press the o button and then press the o p buttons to choose a display filter z When is selected you can view only images matching this condition by pressing the q r buttons To perform an action for all of these images together press the m button and go to step 3 2 Choose the second con...

Page 149: ...not be available To show or hide informa ion press the l button in step 2 Options for viewing the images found in step 3 include Navigating Through Images in an Index 114 Viewing Slideshows 118 and Magnifying Images 117 You can protect erase or print all images found or add them to a photobook by choosing Select All Images in Search in Protec ing Images 120 Erasing All Images 124 Adding Images to ...

Page 150: ...o about 10x by continuing to hold the zoom lever z To zoom out move the zoom lever toward g You can return to single image display by continuing to hold it 2 Move the display position and switch images as needed z To move the display position press the o p q r buttons z To switch to other images while zoomed turn the 5 dial You can return to single image display from magnified display by pressing ...

Page 151: ... z Press the o p buttons or turn the 5 dial to choose Start and then press the m button X The slideshow will start a few seconds after Loading image is displayed z Press the n button to stop the slideshow The camera s power saving functions 34 are deactivated during slideshows To pause or resume slideshows press the m button You can switch to other images during playback by pressing he q r buttons...

Page 152: ...then press the m button 38 X Four candidate images are displayed 2 Choose an image z Press the o p q r buttons to choose the image you want to view next X Your chosen image is displayed in the center surrounded by the next four candidate images z For full screen display of the center image press the m button To restore the original display press the m button again z Press the n button to restore s...

Page 153: ...ress the n button and choose Protect on the 1 tab 38 2 Choose a selection method z Choose a menu item and a setting as desired 38 z To return to the menu screen press the n button Protected images on a memory card will be erased if you format the card 146 147 Protected images cannot be erased using the camera s erasure function To erase them this way first cancel protec ion ...

Page 154: ...e m button is displayed z To cancel selection press the m button again is no longer displayed z Repeat this process to specify other images 3 Protect the image z Press the n button A confirmation message is displayed z Press the q r buttons or turn the 5 dial to choose OK and then press the m button Images will not be protected if you switch to Shooting mode or turn the camera off before finishing...

Page 155: ...ress the m button z Press the q r buttons or turn the 5 dial to choose an image and then press the m button 3 Choose an ending image z Press the r button to choose Last image and then press the m button z Press the q r buttons or turn the 5 dial to choose an image and then press the m button z Images before the first image cannot be selected as the last image ...

Page 156: ...teps 2 and 3 is displayed Specifying All Images at Once 1 Choose Select All Images z Following step 2 on 120 choose Select All Images and press the m button 2 Protect the images z Press the o p buttons or turn the 5 dial to choose Protect and then press the m button To cancel protection for groups of images choose Unlock in step 4 of Selecting a Range or in step 2 of Specifying All Images at Once ...

Page 157: ...e a button z After Erase is displayed press the q r buttons to choose Erase and then press the m button X The current image is now erased z To cancel erasure press the q r buttons or turn the 5 dial to choose Cancel and then press the m button Erasing All Images You can erase all images at once Be careful when erasing images because they cannot be recovered However protected images 120 cannot be e...

Page 158: ...ce you follow step 2 on 121 to choose an image is displayed z To cancel selection press the m button again is no longer displayed z Repeat this process to specify other images 3 Erase the image z Press the n button A confirmation message is displayed z Press the q r buttons or turn the 5 dial to choose OK and then press the m button Selecting a Range 1 Choose Select Range z Following step 2 in Cho...

Page 159: ... button to choose Erase and then press the m button Specifying All Images at Once 1 Choose Select All Images z Following step 2 in Choosing a Selection Method 125 choose Select All Images and press the m button 2 Erase the images z Press the q r buttons or turn the 5 dial to choose OK and then press the m button ...

Page 160: ...n and choose Rotate on the 1 tab 38 2 Rotate the image z Press the q r buttons or turn the 5 dial to choose an image z The image is rotated 90 each time you press the m button z To return to the menu screen press the n button Movies with an image quality of cannot be rotated Rotation is not possible when Auto Rotate is set to Off 128 ...

Page 161: ...e camera z Press the n button choose Auto Rotate on the 1 tab and then choose Off 38 Images cannot be rotated 127 when you set Auto Rotate to Off Additionally images already rotated will be displayed in the original orientation In Smart Shuffle 119 mode even if Auto Rotate is set to Off images shot vertically will be displayed vertically and rotated images will be displayed in the rotated orientat...

Page 162: ...avorites z Press the n button and choose Favorites on the 1 tab 38 2 Choose an image z Press the q r buttons or turn the 5 dial to choose an image and then press the m button is displayed z To untag the image press the m button again is no longer displayed z Repeat this process to choose additional images 3 Finish the setup process z Press the n button A confirmation message is displayed z Press t...

Page 163: ...ote that images are automatically categorized at the time of shooting according to shooting conditions Images with detected faces or images shot in I mode Images detected as or in A mode Images shot in P or t mode Choosing a Selection Method 1 Access the setting screen z Press the n button and then choose My Category on the 1 tab 38 2 Choose a selection method z Choose a menu item and a setting as...

Page 164: ...ory and then press the m button is displayed z To cancel selection press the m button again is no longer displayed z Repeat this process to choose additional images 4 Finish the setup process z Press the n button A confirmation message is displayed Press the q r buttons or turn the 5 dial to choose OK and then press the m button Images will not be assigned to a category if you switch to Shooting m...

Page 165: ...2 3 on 122 to specify images 3 Choose a category z Press the p button to choose the type of image and then press the q r buttons or turn the 5 dial to choose a category 4 Finish the setup process z Press the p button to choose Select and then press the m button You can clear he selec ion of all images in the Select Range category by choosing Deselect in step 4 ...

Page 166: ... button and choose Resize on the 1 tab 38 2 Choose an image z Press the q r buttons or turn the 5 dial to choose an image and then press the m button 3 Choose an image size z Press the q r buttons or turn the 5 dial to choose the size and then press the m button X Save new image is displayed 4 Save the new image z Press the q r buttons or turn the 5 dial to choose OK and then press the m button X ...

Page 167: ...ge is now displayed Editing is not poss ble for images saved as in step 3 Images cannot be resized to a higher resolution Still Images Cropping You can specify a portion of an image to save as a separate image file 1 Choose Cropping z Press the n button and then choose Cropping on the 1 tab 38 2 Choose an image z Press the q r buttons or turn the 5 dial to choose an image and then press the m butt...

Page 168: ...he frame press the o p q r buttons z To change the frame orientation press the l button z Faces detected in the image are enclosed in gray frames in the upper left image To crop the image based on this frame turn the 5 dial to switch to the other frame z Press the m button 4 Save as a new image and review z Follow steps 4 5 on 133 134 Editing is not possible for images shot at a resolution of 55 o...

Page 169: ... r buttons or turn the 5 dial to choose an image and then press the m button 3 Choose an option z Press the q r buttons or turn the 5 dial to choose an option and then press the m button 4 Save as a new image and review z Follow steps 4 5 on 133 134 Image quality of pictures you repeatedly edit this way will be a little lower each time and you may not be able to obtain the desired color The color ...

Page 170: ... Contrast z Press the n button and then choose i Contrast on the 1 tab 38 2 Choose an image z Press the q r buttons or turn the 5 dial to choose an image and then press the m button 3 Choose an option z Press the q r buttons or turn the 5 dial to choose an option and then press the m button 4 Save as a new image and review z Follow steps 4 5 on 133 134 For some images correction may be inaccurate ...

Page 171: ...button X Red eye detected by the camera is now corrected and frames are displayed around corrected image areas z Enlarge or reduce images as needed Follow the steps in 117 4 Save as a new image and review z Press the o p q r buttons or turn the 5 dial to choose New File and then press the m button X The image is now saved as a new file z Follow step 5 on 134 Some images may not be corrected accura...

Page 172: ...or turn the 5 dial to move Cut the beginning of the movie from by choosing and cut the end of the movie by choosing z Even if you move to a position other than a mark choosing will only cut the portion from the nearest to the left and choosing will cut the portion from the nearest to the right 3 Review the edited movie z Press the o p buttons to choose and then press the m button The edited movie ...

Page 173: ...To overwrite the original movie with the cut one choose Overwrite in step 4 In this case the original movie will be erased Overwrite is only available when memory cards lack sufficient free space Movies may not be saved if the batteries run out while saving is in progress When editing movies you should use batteries with sufficient charge or fully charged NiMH AA batteries 157 or an AC adapter kit...

Page 174: ...141 Setting Menu Customize or adjust basic camera functions for greater convenience 7 ...

Page 175: ...an also be silenced by holding down the l button as you turn he camera on Sound is not played during movies if you mute camera sounds 110 To restore sound during movies press the o button Adjust volume with the o p buttons as needed Sound settings cannot be changed in mode 76 Adjusting the Volume Adjust the volume of individual camera sounds as follows z Choose Volume and then press the m button z...

Page 176: ...en press the q r buttons to choose an option 1 Preset sounds cannot be modified 2 Preset sounds Can be changed by using the included software Sound settings cannot be changed in mode 76 Hiding Hints and Tips Hints and tips are normally shown when you choose FUNC menu 37 or Menu 38 items If you prefer you can deactivate this information z Choose Hints Tips and then choose Off ...

Page 177: ...This will override the LCD Brightness setting on the 3 tab To restore the original brightness press and hold the l button again for at least one second or restart he camera Start up Screen Customize the start up screen shown after you turn the camera on as follows z Choose Start up Image and then press the m button z Press the q r buttons or turn the 5 dial to choose an option No start up image 1 ...

Page 178: ...ton 2 Choose one of your shots z Choose an image and press the m button After Register is displayed choose OK either press the q r buttons or turn the 5 dial and then press the m button The previous start up setting is overwritten when you assign a new start up image You can assign he operating sounds and start up image for your camera from the included software Refer to the Software Guide 25 for ...

Page 179: ...ormat and then press the m button 2 Choose OK z Press the o p buttons to choose Cancel choose OK either press the q r buttons or turn the 5 dial and then press the m button 3 Format the memory card z To begin the formatting process press the o p buttons or turn the 5 dial to choose OK and then press the m button z When formatting is finished Memory card formatting complete is displayed Press the m...

Page 180: ...evel formatting copy images on the memory card to a computer or take other steps to back them up Perform low level formatting z On the screen in step 2 on 146 press the o p buttons or turn the 5 dial to choose Low Level Format and then select this option mark with a by pressing the q r buttons z Follow steps 2 3 on 146 to continue with the formatting process Low level format ing takes longer than ...

Page 181: ...h memory cards or when a new folder is created Regardless of he op ion selected in this setting shots may be numbered consecutively after the last number of exis ing images on newly inserted memory cards To start saving shots from 0001 use an empty or formatted 146 memory card Refer to he Software Guide 25 for information on he card folder structure and image formats Date Based Image Storage Inste...

Page 182: ...0 sec Power Saving Adjustment Adjust the timing of automatic camera and screen deactivation Auto Power Down and Display Off respectively as needed 34 1 Access the Power Saving screen z Choose Power Saving and then press the m button 2 Configure the settings z After choosing an item press the q r buttons to adjust it as needed To conserve battery power you should normally choose On for Auto Power D...

Page 183: ...one 1 Specify your destination z Choose Time Zone and then press the m button z Press the o p buttons or turn the 5 dial to choose World and then press the m button z Press the q r buttons or turn the 5 dial to choose the destination z To set daylight saving time 1 hour ahead press the o p buttons to choose z Press the m button 2 Switch to the destination time zone z Press the o p buttons or turn ...

Page 184: ...ing the o p buttons or turning the 5 dial Metric Non Metric Display Change the unit of measurement shown in the MF indicator 91 and zoom bar 42 from m cm to ft in as needed z Choose Units and then choose ft in Checking Certification Logos Some logos for certification requirements met by the camera can be viewed on the screen Other certification logos are printed in this guide on the camera packagi...

Page 185: ...k mode by pressing and holding the m button and immediately pressing the n button Adjusting Other Settings The following settings can also be adjusted on the 3 tab Video System 163 Ctrl via HDMI 161 Eye Fi Settings 179 Restoring Defaults If you accidentally change a setting you can restore default camera settings 1 Access the Reset All screen z Choose Reset All and then press the m button 2 Restor...

Page 186: ...ns are not restored to default settings 3 tab settings Date Time 17 Language 19 Time Zone 150 Video System 163 and he image assigned to Start up Image 144 Custom white balance data you have recorded 85 Shooting mode chosen in K 67 or 71 mode The movie mode 77 ...

Page 187: ...154 ...

Page 188: ...155 Accessories Use included accessories effectively and enjoy the camera in more ways with optional Canon accessories and other compatible accessories sold separately 8 ...

Page 189: ...me you turn the camera on replace the date time battery with a new one CR1220 1 Make sure the camera is off 2 Remove the date time battery holder 3 Replace the battery z Insert the battery with the and sides facing the correct way 4 Insert the battery holder 5 Insert the battery and close the cover 6 Turn the camera on and set the date and time 17 ...

Page 190: ...the camera DC Coupler DR DC10 z Used with the AC adapter kit Battery and Charger Kit CBK4 300 z Includes four rechargeable AA NiMH batteries NB 3AH and a battery charger CB 5AH Recommended when using the camera over extended periods A set of four rechargeable AA NiMH batteries NiMH Battery NB4 300 is also available wi hout the charger Battery and Charger Kit CBK4 200 can also be used The battery a...

Page 191: ...ssories Stereo AV Cable AVC DC400ST z Connect the camera to a TV to enjoy playback on the larger TV screen HDMI Cable HTC 100 z For connecting the camera to an HDMI input of a high definition TV Printers Canon PictBridge Compatible Printers z Printing images without a computer is possible by connecting the camera to a Canon PictBridge compatible printer For details visit your nearest Canon dealer ...

Page 192: ...V 190 Still Images Movies Playback on a High Definition TV Connecting the camera to an HDTV with the HDMI Cable HTC 100 sold separately enables you to view your shots on the larger screen of the TV Movies shot at a resolution of can be viewed in high definition 1 Make sure the camera and TV are off 2 Connect the camera to the TV z On the TV insert the cable plug fully into the HDMI input as shown ...

Page 193: ...e cable to in step 2 4 Turn the camera on z Press the 1 button to turn the camera on X Images from the camera are now displayed on the TV Nothing is displayed on the camera screen z When finished turn off the camera and TV before disconnecting the cable Camera operating sounds are not played while the camera is connected to an HDTV ...

Page 194: ...HDMI on the 3 tab and then choose Enable 38 2 Connect the camera to the TV z Follow steps 1 2 on 159 to connect the camera to the TV 3 Display images z Turn on the TV On the camera press the 1 button X Images from the camera are now displayed on the TV Nothing is displayed on the camera screen 4 Control the camera with the TV remote z Press the q r buttons on the remote to browse images z To displ...

Page 195: ...until you return to single image display Moving the zoom lever on the camera will switch control to the camera itself which will prevent remote control until you return to single image display The camera may not always respond correctly even if the remote is for an HDMI CEC compatible TV Still Images Movies Playback on a Standard Definition TV Connecting the camera to a TV with the Stereo AV Cable...

Page 196: ...not possible unless the camera video output format NTSC or PAL matches the TV format To change the video output format press the n button and choose Video System on the 3 tab When the camera and TV are connected you can also shoot while previewing shots on the larger screen of the TV To shoot follow he same steps as when using the camera screen However AF Point Zoom 60 and MF Point Zoom 90 are not...

Page 197: ...tor the remaining battery level 1 Make sure the camera is off Coupler Cable Port 2 Open the cover z Follow step 2 on 15 to open the memory card battery cover z Open the coupler cable port as shown 3 Insert the coupler z Insert the coupler as shown z Make sure the coupler cable passes through the port 4 Close the cover z Lower the cover and hold it down as you slide it until it clicks into the clos...

Page 198: ...other end into a power outlet z Turn the camera on and use it as desired z When finished turn the camera off and unplug the power cord from the outlet Do not disconnect the adapter or unplug the power cord while the camera is still on This may erase your shots or damage the camera Do not attach the adapter or adapter cord to other objects Doing so could result in malfunction or damage to the produ...

Page 199: ...nter Also refer to the printer manual for additional information Still Images Easy Print Easily print your shots by connecting the camera to a PictBridge compatible printer sold separately with the included interface cable 2 1 Make sure the camera and printer are off 2 Connect the camera to the printer z Open the cover Holding the smaller cable plug in the orientation shown insert the plug fully i...

Page 200: ...ton 7 Print the image z Press the o p buttons or turn the 5 dial to choose Print and then press the m button X Printing now begins z To print other images repeat steps 5 6 after printing is finished z When you are finished printing turn the camera and printer off and disconnect the interface cable For Canon PictBridge compatible printers sold separately see 158 ...

Page 201: ...tches current printer settings Date Prints images with the date added File No Prints images with the file number added Both Prints images with bo h the date and file number added Off Default Matches current printer settings Off On Uses information from the time of shoo ing to print under optimal settings Red Eye 1 Corrects red eye No of Copies Choose the number of copies to print Cropping Specify ...

Page 202: ...cropping frame is now displayed indicating the image area to print 2 Adjust the cropping frame as needed z To resize the frame move the zoom lever or turn the 5 dial z To move the frame press the o p q r buttons z To rotate the frame press the l button z When finished press the m button 3 Print the image z Follow step 7 on 167 to print Cropping may not be poss ble at small image sizes or at some a...

Page 203: ... paper size z Press the o p buttons or turn the 5 dial to choose an option and then press the m button 3 Choose a type of paper z Press the o p buttons or turn the 5 dial to choose an option and then press the m button 4 Choose a layout z Press the o p buttons or turn the 5 dial to choose an option z When choosing N up press the q r buttons to specify the number of images per sheet z Press the m b...

Page 204: ...olution of L and an aspect ra io of 4 3 Fixed Size Choose the print size Choose from 3 5 x 5 in postcard or wide format prints Still Images Printing ID Photos 1 Choose ID Photo z Following steps 1 4 on 170 choose ID Photo and press the m button 2 Choose the long and short side length z Press the o p buttons or turn the 5 dial to choose an item Choose the length by pressing the q r buttons and then...

Page 205: ... the 5 dial to choose and then press the q r buttons to choose the printing method 3 Print the image Movie Printing Options Single Prints the current scene as a still image Sequence Prints a series of scenes a certain interval apart on a single sheet of paper You can also print the folder number file number and elapsed time for the frame by setting Caption to On To cancel printing in progress pres...

Page 206: ...ttings Specify the printing format whether to add the date or file number and other settings as follows These settings apply to all images in the print list z Press the n button and then choose Print Settings on the 2 tab Choose and configure settings as desired 38 Print Type Standard One image is printed per sheet Index Smaller versions of multiple images are printed per sheet Both Both standard ...

Page 207: ...time The date is printed in a format matching set ing details in Date Time on he 3 tab accessible by pressing the n button 17 Index printing is not available on some Canon PictBridge compatible printers sold separately Still Images Setting Up Printing for Individual Images 1 Choose Select Images Qty z Press the n button choose Select Images Qty on the 2 tab and then press the m button 2 Choose an ...

Page 208: ...ecified for index prints You can only choose which images to print by following step 2 z When finished press the n button to return to the menu screen Still Images Setting Up Printing for a Range of Images 1 Choose Select Range z Following step 1 on 174 choose Select Range and press the m button 2 Choose images z Follow steps 2 3 on 122 to specify images 3 Configure the print settings z Press the ...

Page 209: ...1 on 174 choose Clear All Selections and press the m button 2 Confirm clearing the print list z Press the q r buttons or turn the 5 dial to choose OK and then press the m button Still Images Printing Images Added to the Print List DPOF z When images have been added to the print list 173 176 the screen at left is displayed after you connect the camera to a PictBridge compatible printer Press the o ...

Page 210: ...lection Method z Press the n button choose Photobook Set up on the 1 tab and then choose how you will select images may be displayed on the camera to warn you that the memory card has print settings that were configured on another camera Changing the print settings using this camera may overwrite all previous settings After importing images to your computer also refer to the Software Guide 25 and ...

Page 211: ...ll Images Adding All Images to a Photobook 1 Choose Select All Images z Following the procedure on 177 choose Select All Images and press the m button 2 Configure the print settings z Press the q r buttons or turn the 5 dial to choose OK and then press the m button Still Images Removing All Images from a Photobook 1 Choose Clear All Selections z Following the procedure on 177 choose Clear All Sele...

Page 212: ... and computer settings For details refer to the card s user manual Poor Eye Fi connections may cause image transfer to take a long time and transfer may be interrupted in some cases Eye Fi cards may become hot due to their transfer functions Battery power will be consumed faster than in normal use Camera operation may become sluggish To resolve this try setting Eye Fi trans to Disable Connection s...

Page 213: ...isplayed Disabling Eye Fi Transfer Configure the setting as follows to disable Eye Fi transfer by the card if necessary Choose Disable in Eye Fi trans z Press the n button choose Eye Fi Settings on the 3 tab and then press the m button z Choose Eye Fi trans and then choose Disable Eye Fi Settings is not shown unless an Eye Fi card is in the camera with its write protect tab in the unlocked positio...

Page 214: ...181 Appendix Helpful information when using the camera 9 ...

Page 215: ...ts The lens is not retracted Do not open the memory card battery cover while the camera is on Close he cover turn he camera on and then turn it off again 16 Display on a TV Camera images look distorted or not displayed on a TV 163 Shooting Cannot shoot In Playback mode 19 press the shutter button halfway 35 Strange display on the screen under low light 36 Strange display on the screen when shootin...

Page 216: ...ayed and the camera does not focus when the shutter button is pressed halfway To have AF frames displayed and the camera focus correc ly try composing he shot with higher contrast subject areas centered before you press the shutter button halfway Otherwise try pressing the shutter button halfway repeatedly Subjects in shots look too dark Raise the flash and set the flash mode to h 98 Adjust bright...

Page 217: ...Recording to the memory card takes too long or continuous shooting is slower Use the camera to perform low level formatting of the memory card 147 Shooting settings or FUNC menu settings are not available Available setting items vary by shooting mode Refer to Func ions Available in Each Shooting Mode FUNC Menu and Shooting Menu 192 196 Shooting Movies The elapsed time shown is incorrect or recordi...

Page 218: ...d on a computer frames may be dropped and audio may skip if computer performance is inadequate Sound is not played during movies Adjust the volume 24 111 if you have activated Mute 142 or the sound in the movie is faint No sound is played for movies shot in mode 72 because audio is not recorded in this mode Computer Cannot transfer images to a computer When attempting to transfer images to the com...

Page 219: ...pace 15 Change the batteries 15 No Image The memory card does not contain any images that can be displayed Protected 120 Unidentified Image Incompatible JPEG Image too large Cannot play back AVI RAW Unsupported or corrupt images cannot be displayed It may not be possible to display images that were edited or renamed on a computer or images shot with another camera Cannot magnify Cannot play back t...

Page 220: ... In the 3 menu change File Numbering to Auto Reset 148 or format the memory card 146 Lens Error This error may occur if the lens is held while it is moving or when the camera is used in dusty or sandy locations Frequent display of this error message may indicate camera damage In this case contact a Canon Customer Support Help Desk A camera error was detected error number If this error message is d...

Page 221: ...Resolution 55 Still images Recordable shots 204 Grid lines 59 Movie resolution 57 Movies Remaining time 204 Digital zoom magnification 49 Digital tele converter 92 Focusing range 90 Shooting mode 192 Scene icon 46 Flash mode 98 Red eye correction 56 Flash exposure compensation Flash output level 99 107 Spot AE point frame 82 AF frame 92 Date stamp 52 ISO speed 82 AE lock 81 FE lock 100 Exposure sh...

Page 222: ... and adjusts settings for op imal shots Orientation is also detected during playback and in either orientation the camera automa ically rotates images as needed However the orienta ion may not be detected correc ly when the camera is pointed straight up or down Battery Level An on screen icon or message warns you when there is little battery power left No icon or message is shown unless the batter...

Page 223: ...MOV movies Transferred via Eye Fi 179 Battery level 189 Metering method 82 Folder number File number 148 Current image no Total no of images Shutter speed still images 104 Image quality Frame rate movies 57 Aperture value 105 106 Image quality movies 57 i Contrast 83 137 Flash 98 Flash exposure compensation 99 Focusing range 90 File size Still images Resolution 204 Movies Playback time 204 Protect...

Page 224: ... con inue skipping backward keep holding down he m button Previous Frame For fast rewind keep holding down the m button Next Frame For fast forward keep holding down the m button Skip Forward To continue skipping forward keep holding down the m button Edit 139 c Shown when the camera is connected to a PictBridge compa ible printer 166 Displays the frame approx 4 sec before or after the current fra...

Page 225: ...rture Value O O Shutter Speed O O Program Shift 81 O O O AE Lock FE Lock 81 100 5 O O O AE Lock Movie Exposure Shift 77 Focusing Range 90 O O O O O O e f 90 O O O O O Tracking AF 53 O O O O O O Screen Display 36 Information Display No Information Display O O O O O O 1 Set in Dark and Light 2 Cannot be set to 0 seconds in modes without selec ion of the number of shots 3 One shot cannot be modified ...

Page 226: ... O O O O O O O O O O O O O O O O O O O O O O O O O O O O O O O O O O O O O O O O O O O O O O O O O O O O O O O O O O O O O O O O O O O O O O O O O O O O O O O O O O O O O O O O O O O O O O O O O O O O O O O O O O O O O O O O O O O O O O O O Available or set automatically Not available ...

Page 227: ... O Metering Method 82 O O O O O O O O O O Still Image Aspect Ratio 54 O O O O O Resolu ion 55 O O O O O O O O O O O O O O O O Compression 101 O O O O O O O O O O Movie Quality 57 O O O O O O O O O O O 1 White balance is not available 2 Set in a range of 1 5 contrast sharpness color saturation red green blue and skin tone 3 is set with f AF lock or t 4 Only and are available 5 Synchronizes with the...

Page 228: ... O O O O O O O O O O O O O O O O O O O O O O O O O O O O O O O O O O O O O O O O O O O O O O O O O O O O 4 O O O O O O O O O O O O O O O O O O O O O O O O O O O O O O O O O O O O O O O O O O O O O O O O O O O O 5 O O O O O O O O O O O O O 5 O O O O O O O Available or set automatically Not available ...

Page 229: ...ame 92 Center O O O O O Face AiAF 1 O O O O O O Tracking AF O O O O O 2 AF Frame Size 3 Normal O O O O O Small O O O O O Digital Zoom 49 Standard O O O O O O Off O O O O O O Digital Tele converter 1 6x 2 0x O O O O O AF Point Zoom 60 On O O O O O O Off O O O O O O Servo AF 95 On O O O O O Off 4 O O O O O O Continuous AF 96 On O O O O O O Off O O O O O AF assist Beam 62 On O O O O O O Off O O O O O...

Page 230: ... O O O O O O O O O O O O O O O O O O O O O O O O O O O O O O O O O O O O O O O O O O O O O O O O O O O O O O O O O O O O O O O O O O O O O O O O O O O O O O O O O O O O O O O O O O O O O O O O O O O O O O O O O O O O O O O O O O O O O O O O O O O O O O O O O O O O O O O O O O O O O O O O O O O O O O O O O O O O Available or set automatically Not available ...

Page 231: ...ety FE On O O O O O Off O O O O O i Contrast 83 Auto O O O O O Off O O O O O Safety Shift 105 On O O Off O O O O O O Wind Filter 58 On Off O O O O O O Review 63 Off Quick 2 10 sec Hold O O O O O O Review Info 64 Off Detailed Focus Check O O O O O O Blink Detection 61 On O O O O O O Off O O O O O O Grid Lines 59 On Off O O O O O O IS Mode 101 Off Continuous O O O O O O Shoot Only O O O O O Date Sta...

Page 232: ...O O O O O O O O O O O O O O O O O O O O O O O O O O O O O O O O O O O O O O O O O O O O O O O O O O O O O O O O O O O O O O O O O O O O O O O O O O O O O O O O O O O O O O O O O O O O O O O O O O O O O O O O O O O O O O O O O O O O O O O O O O O O O O O O O O O O O O O O O O O O O O O O O Available or set automatically Not available ...

Page 233: ...1 LCD Brightness 144 Eye Fi Settings 179 Start up Image 144 145 Cer ification Logo Display 151 Format 146 147 Language 19 File Numbering 148 Reset All 152 1 Playback Menu Item Ref Page Item Ref Page Smart Shuffle 119 Red Eye Correction 138 Slideshow 118 Cropping 134 Erase 124 Resize 133 Protect 120 My Colors 136 Rotate 127 Scroll Display 111 Favorites 129 Auto Rotate 128 My Category 130 Resume 111...

Page 234: ...201 Functions and Menu Tables 2 Print Menu Item Ref Page Item Ref Page Print Select All Images 176 Select Images Qty 174 Clear All Selections 176 Select Range 175 Print Set ings 173 ...

Page 235: ...c solvents to clean the camera or screen Use a blower brush to remove dust from the lens If cleaning is difficult contact a Canon Customer Support Help Desk To prevent condensation from forming on the camera after sudden temperature changes when the camera is transferred from cold to warm environments put the camera in an airtight resealable plastic bag and let it gradually adjust to the temperatu...

Page 236: ...Approx 243 g approx 8 57 oz camera body only Number of Shots Recording Time Playback Time Power Source Alkaline Batteries Supplied NiMH Batteries Sold Separately Number of Shots Approx 140 Approx 380 Movie Recording Time 1 Approx 30 minutes Approx 90 minutes Continuous Shooting 2 Approx 1 hour 10 minutes Approx 2 hours 40 minutes Playback Time Approx 7 hours Approx 10 hours 1Time under default cam...

Page 237: ...However since 16 9 images have a setting of 1920 x 1080 pixels their data size will be larger than 4 3 images Recording Time per Memory Card Image Quality Recording Time per Memory Card 8 GB 32 GB 49 min 18 sec 1 3 hr 19 min 03 sec 2 1 hr 28 min 59 sec 5 hr 59 min 10 sec 127 min 28 sec for iFrame movies 78 21 hr 50 min 52 sec for iFrame movies 78 The values in the table are measured according to C...

Page 238: ...0 ft infinity Not available in some shoo ing modes Continuous Shooting Speed Shooting Mode Continuous Shooting Mode Speed G W Approx 0 8 shots sec Approx 0 5 shots sec Approx 0 6 shots sec Approx 2 8 shots sec Shutter Speed A mode automatically set range 1 1 3200 sec Range in all shoo ing modes 15 1 3200 sec M mode available values sec 15 13 10 8 6 5 4 3 2 2 5 2 1 6 1 3 1 0 8 0 6 0 5 0 4 0 3 1 4 1...

Page 239: ...0 T B mode available values f 3 5 f 4 0 f 4 5 f 5 0 f 5 6 f 5 9 f 6 3 f 7 1 f 8 0 Depending on he zoom position some aperture values may not be available All data is based on tests by Canon Camera specifications or appearance are subject to change without notice ...

Page 240: ...ing 134 Custom white balance 85 D Date time Adding date stamps 52 Changing 18 Date time battery 156 Set ing 17 World clock 150 DC coupler 157 Defaults Reset all DIGITAL CAMERA Solution Disk 2 Digital tele converter 92 Digital zoom 49 Discreet mode shoo ing mode 76 Display language 19 DPOF 173 Drive mode 88 E Editing Cropping 134 i Contrast 137 My Colors 136 Red eye correction 138 Resizing images 1...

Page 241: ...ing mode 66 Low light shooting mode 67 M Macro focus mode 90 Magnified display 117 Manual focus focus mode 90 Memory cards 2 Recording time 204 Menu Basic operations 38 Table 192 Metering method 82 Miniature effect shoo ing mode 72 Monochrome shooting mode 75 Movies Editing 139 Image quality resolution frame rate 57 Recording time 204 M shooting mode 106 My Category 130 My Colors 86 136 P Package ...

Page 242: ...time Shooting information 188 Slideshow 118 Smart Shuffle 119 Snow shoo ing mode 68 Software DIGITAL CAMERA Solution Disk 2 Installation 27 Saving images to a computer 29 Sounds 142 Stereo AV cable 162 Strap 2 14 Super vivid shoo ing mode 71 T Terminal 159 163 165 166 Toy camera effect shooting mode 74 Tracking AF 53 94 Traveling with the camera 150 Troubleshooting 182 TV display 159 Tv shooting m...

Page 243: ...210 ...

Page 244: ...211 MEMO ...

Page 245: ...radio communications However there is no guarantee hat interference will not occur in a particular installation If this equipment does cause harmful interference to radio or television reception which can be determined by turning he equipment off and on the user is encouraged to try to correct the interference by one or more of the following measures Reorient or relocate the receiving antenna Incr...

Page 246: ...under AT T patents for the MPEG 4 standard and may be used for encoding MPEG 4 compliant video and or decoding MPEG 4 compliant video that was encoded only 1 for a personal and non commercial purpose or 2 by a video provider licensed under the AT T patents to provide MPEG 4 compliant video No license is granted or implied for any other use for MPEG 4 standard Notice displayed in English as require...

Page 247: ...CDD E494 010 CANON INC 2012 ...

Page 248: ...C C Co Co Co Co Co Co Co Co Co t t nt nt nt nt nt nt nt nt nten en en en en en en en ent t ts ts ts ts ts ts ts ts ts ImageBrowser EX User Guide CDC E498 010 ImageBrowser EX CameraWindow ...

Page 249: ... environments Windows operations are used in some cases to illustrate instructions in this manual The Macintosh equivalent for Ctrl is command and for Enter is return Screenshots in explanations are mainly from Windows Some screen elements may be dif ferent in Macintosh environments Indicates operating precautions that should be followed or important information to note Be sure to read these secti...

Page 250: ... the next page 1 2 3 4 1 2 3 4 Click links to access other pages Click links in the manual shown in blue such as XXXXX or p XX to access the page men tioned Supported Operating Environments Windows 7 and Mac OS X 10 6 screenshots and procedures are used to illustrate instructions in this manual If you are using another version of operating system the actual screens and procedures may be different ...

Page 251: ... run Digital Photo Professional 3 In Windows XP Microsoft NET Framework 3 0 or later max 500 MB must be installed Installation may take some time depending on computer performance Macintosh Operating System OS X 10 6 or 10 7 OS X 10 6 8 or later required for wireless connections 1 Computer Computer running one of the above operating systems preinstalled with an included USB port Internet connectio...

Page 252: ...port images and manage them on your computer CameraWindow CameraWindow interacts with a connected camera camcorder enabling the following tasks Import images from the camera camcorder Return images to the camera camcorder still images only Organize images on the camera camcorder EOS DIGITAL camera users Use EOS Utility for these operations Also refer to the EOS Utility Instruction Manual provided ...

Page 253: ...the desktop icon In the taskbar click the Start menu All Programs Canon Utilities ImageBrowser EX ImageBrowser EX icon Windows You can also start the program as follows Click the ImageBrowser EX Dock icon Navigate to the Applications folder Canon Utilities folder ImageBrowser EX folder and double click the ImageBrowser EX icon Macintosh Do not use operating system utilities or other software to mo...

Page 254: ... Basic Operations in ImageBrowser EX 20 Updating the Software and Obtaining New Functions 27 Advanced Operations 28 Printing 28 Organizing Images 31 Editing Still Images 32 Preference Settings 38 More Advanced Operations 40 Editing Movies 40 Other Playback and Image Search 43 Using Online Services Emailing Images 46 GPS 53 Appendix 56 Index 56 Supported Image Formats 57 Searching for Terms in This...

Page 255: ...e the interface cable connected to the computer and try to wake the computer while the camera is still connected Some computers may not recover from sleep correctly if the interface cable is disconnected while they are in sleep mode For details on sleep or standby mode refer to the computer user manual Do not disconnect your camera camcorder from the computer while the CameraWindow or EOS Utility ...

Page 256: ...ra owner name Returning images to the camera camcorder Sending personal information Setting up linkage with CANON iMAGE GATEWAY Non EOS DIGITAL Cameras Importing Images with CameraWindow Connect your camera camcorder to the computer and import images as follows Instructions in this ImageBrowser EX User Guide apply when the program has been installed correctly For instal lation instructions refer t...

Page 257: ...Window will start up automatically Windows Vista On the screen displayed select Downloads Images From Canon Camera using Canon CameraWindow Windows XP On the screen displayed select Canon CameraWindow and then click OK Whenever the camera and com puter are ready for communication CameraWindow will start up Camcorder Select Canon CameraWindow and click OK Windows XP Windows Vista When the AutoPlay ...

Page 258: ... the instructions dis played to choose the destination folder Importing problems may occur if there are too many images more than 1 000 on the memory card In this case use a memory card reader to import the images For instructions on importing images from a memory card reader see Importing Images from Memory Cards Movies take longer to import due to the larger file size Turn the camera camcorder o...

Page 259: ...displayed double click On the screen on the left double click Change general settings You can now adjust the settings so that whenever the camera and computer are ready for communication EOS Utility will start up automatically Whenever the camera and com puter are ready for communication EOS Utility will start up Configure EOS Utility so that ImageBrowser EX starts up after image importing 1 On th...

Page 260: ...mcorder Start the process of uploading camera camcorder movies to video sharing websites Used for configuring camera camcorder settings Configurable settings include My Camera Changing the Shutter Sound and Startup Screen Registering Face ID Information p 44 Configuring Sharing Websites 1 2 3 4 5 6 Menu Screen The buttons shown vary depending on camera camcorder model 1 2 3 4 5 6 Customizing Camer...

Page 261: ...oose Start importing images automati cally when this software is launched Changing the Destination Folder By default images imported using CameraWindow are saved in either the Pictures or My Pictures folder in Windows or in the Pictures folder on Macintosh computers Click in the upper right of the screen to access CameraWindow preferences and then click Import On the Folder Settings tab click Brow...

Page 262: ...to import and click Import to start importing the images to your computer Return to the menu screen Images on the camera cam corder that match the conditions you select here are shown on the right Show hide the shooting date time and file name below thumbnails in thumbnail display mode Change thumbnail size in thumbnail display mode Switch display modes Thumbnail display Preview display Double cli...

Page 263: ... memory cards You can use this program with EOS DIGITAL cameras as well as other cameras camcorders First insert the memory card in the memory card reader When a screen is displayed for selecting an action choose View Download Images using Canon ImageBrowser EX ImageBrowser EX now starts up and the screen on the left is displayed When you insert a memory card in the memory card reader ImageBrowser...

Page 264: ... here are shown on the right Show hide the shooting date time and file name below thumbnails in thumbnail display mode Change thumbnail size in thumbnail display mode Switch display modes Thumbnail display Preview display Double clicking an image will also switch to preview display Full screen display 1 2 3 4 5 Indicates that the image has not been imported yet Show selected images against a blue ...

Page 265: ...access CameraWindow For details see steps 1 2 in Non EOS DIGITAL Cameras Importing Images with CameraWindow If the main ImageBrowser EX window is open when your camera camcorder is con nected for example immediately after images are imported access the CameraWindow menu screen by clicking the Import Camera Settings launcher button and then click Connect to Camera Click Organize Images on Camera Or...

Page 266: ...d to return images directly to EOS DIGITAL cameras Insert a memory card in the memory card reader that has been formatted on the camera In the main ImageBrowser EX window select images to return to the camera Click Import Camera Settings and choose Transfer Images to Memory Card Only images in JPEG or MOV format can be returned However returning MOV files requires a camera that supports this forma...

Page 267: ...tails see Toolbar Browser Area Rows of images are shown in this area Icons near images indicate image properties For details see Properties Icons below Browser Control Bar Settings governing display in the browser area For details see Browser Control Bar 1 2 3 4 5 Properties Icons The buttons shown vary depending on camera camcorder model Images shot in Stitch Assist mode RAW Images To view RAW im...

Page 268: ...ar month day People People s names as assigned to images or acquired from cameras sup porting Face ID are listed here This area is useful when browsing shots of friends family members or other people Only available with cameras supporting Face ID History Lists a record of operations 1 2 3 4 The buttons shown vary depending on camera camcorder model 1 2 3 4 Image Storage Location By default images ...

Page 269: ...k a desired launcher button If a menu is displayed below the button select a desired item These items may vary depending on your model of camera cam corder Follow the instructions to complete the task Import Camera Settings Import images or return images to the memory card Share Attach images to email messages or upload them to sharing websites Launcher Buttons Edit Edit images Print Print images ...

Page 270: ...o the Recycle Bin or Trash on the desk top 1 2 3 1 2 3 Browser Control Bar Settings governing display in the browser area Sort Sort images according to the selected order Show Image Information Show hide the properties icon file name and shooting date time near images in Thumbnail mode Show Image Properties Show the properties area to the right of the browser area Switch Display Modes Clicking thi...

Page 271: ... for still images or double click for movies the current image or movie Browser Area Tasks You can do the following tasks in the browser area Select Images Thumbnail Mode Click images to choose them To select multiple images hold down the Ctrl key as you click each image To select a range of adjacent images click the first image and then hold down the Shift key as you click the last image Convenie...

Page 272: ...ntroduction Basic Operations Properties Window Image Details To view image properties select an image in the browser area and click in the browser control bar Show hide the information item Read Only Prevent the image from being overwritten or deleted Shooting Info Tab View a brightness histogram the shutter speed expo sure compensation and other shooting details 1 2 3 1 2 3 ...

Page 273: ...the movie adjust volume When viewing super slow motion movies you can use a playback speed bar and real time playback button Click the button to watch the movie at the speed at which it was actually recorded Trim unneeded scenes at the beginning or end When viewing movies created in Movie Digest mode you can select unneeded scenes and delete them 1 2 1 2 Returning to the Original View from Full Sc...

Page 274: ... update Use ImageBrowser EX when online to take advantage of auto updating This feature is not avail able when offline The following task requires administrator rights Internet access is required for updates You must have an account with an Internet service provider a browser must be installed and an Internet connection must be established As with ordinary Internet access ISP connection or access ...

Page 275: ...vidual Images on a Sheet Print individual images on single sheets of paper as follows Printing Scenes in Movies Although movies cannot be printed you can extract save and print still images from movies For instructions on extracting still images from movies see Extracting Multiple Images from Movie Select an image to print click Print and then select Print Images 1 Printing Individual Images on a ...

Page 276: ...mplete the print settings as desired 1 4 5 2 3 Specify the printer paper size borderless printing options and so on Select your preferred printing format for the shoot ing date time Specify whether or not to maintain the aspect ratio of cropped images when you print them Crop images to avoid printing unwanted image areas Add text to images before printing 1 2 3 4 5 Click Print The image is now pri...

Page 277: ...ages to print click Print and then select Print Contact Sheet Complete the print settings as desired Specify the printer paper size and other options Specify the number of rows and columns Configure settings to print details such as shooting information a header or footer and page numbers Select images to rotate or crop Rotate selected images Crop selected images to avoid printing unwanted image a...

Page 278: ... image to another folder drag the image to the destination folder under All Images and release the mouse button Images will be tagged instead of moved when the selected original images are in Shooting Date People or History and the destination folder is in All Images In this case the original images are not moved Changing the Image Sort Order You can sort images in the browser area according to yo...

Page 279: ...g Images Automatically Adjusting Color and Brightness Emphasizing Outlines in Images to Increase Sharpness Cropping Images Adding Text to Images Using PhotoStitch to Create a Panoramic Image Editing RAW Images Processing RAW Images with Digital Photo Professional First Steps for All Editing Tasks In the browser area select the image to edit Click the Edit launcher button and in the menu choose an ...

Page 280: ... red from the flash firing Edit Correct Red eye Adjusting Images Automatically Automatically adjusts image color tone and brightness Edit Auto Correct Adjusting Color and Brightness Adjust image color tone and brightness using a variety of methods Edit Adjust Color and Brightness On the screen displayed next you can also adjust images using a histogram and tone curves Edit Adjust Color and Brightn...

Page 281: ...jects Edit Increase Sharpness The Unsharp Mask Radius is the size at which outlines are detected and the Threshold is a reference value used to determine outlines Cropping Images Crop images to remove unwanted outer portions and leave the desired area Edit Crop Image You can also specify the area to crop by entering numeric values or specifying an aspect ratio Adding Text to Images Add text to ima...

Page 282: ...ore each shot Edit Stitch Photos If a message is displayed regarding insufficient memory try the following Close all programs other than PhotoStitch Use fewer images Reduce the file size of the images On the Save tab select Adjust image and specify a smaller size in Saved Image Size Using PhotoStitch with Stitch Assist For images captured in Stitch Assist shooting mode PhotoStitch can automaticall...

Page 283: ...e images are saved Select an image Click Edit image window The tool palette is displayed Using the tool palette adjust image brightness and white balance as needed Modification details information on image process ing conditions are saved as a recipe with the image In Digital Photo Professional optimal image adjust ment for the scene or subject is possible by specify ing a Picture Style Image attr...

Page 284: ...ssional can be processed by the program Be sure to refer to the camera user guide A more detailed description of operations is available in the Digital Photo Professional Instruction Manual which EOS DIGITAL camera users can view from the included CD ROM and other users can download from the Canon website RAW Images Defined RAW image files contain the unmodified data captured by the camera image s...

Page 285: ...erences refer to the EOS Utility Instruction Manual provided in PDF format ImageBrowser EX Click Configure settings as desired on the preferences screen With some models of camera camcorder custom ization may require you to add another destination folder In this case access ImageBrowser EX prefer ences to add a folder CameraWindow Click Configure settings as desired on the preferences screen 1 2 1...

Page 286: ...s see steps 1 2 in Non EOS DIGITAL Cameras Importing Images with CameraWindow Click Camera Settings Click one of the following options as desired Set Start up Image Set Sounds Set Theme My Camera customization is only available if Camera Settings is shown in CameraWindow for your camera camcorder Theme Choose to assign the startup screen startup sound shutter sound task sound and self timer sound ...

Page 287: ...d music and a variety of special effects Select a movie Click Edit and choose Edit Movies Follow the instructions to complete the task Movies you edit this way cannot be returned to the camera Playback of some scenes may not be smooth if you change the frame rate after movie editing Saving movies may take some time In particular saving movies in MOV format may take a long time Note that the time r...

Page 288: ...ay be in a dif ferent movie compression format than specified by the camera Size Resolution Max Length MOV 23 976 fps 25 fps 29 97 fps 50 fps 59 94 fps 1920 1080 Less than 10 min 1280 720 Less than 20 min Less than 10 min 640 480 Less than 30 min Less than 20 min 320 240 Less than 60 min On cameras 23 976 fps is indicated as 24 fps 29 97 fps as 30 fps and 59 94 fps as 60 fps Size Resolution Max Le...

Page 289: ...eparately as still images Select a movie Click Edit and choose Extract Multiple Images from Movie Follow the instructions to complete the task Editing EOS Video Snapshot EOS DIGITAL Cameras Only Select a video snapshot album To confirm that the file is a video snapshot access the properties Edit Edit EOS Video Snapshot EOS Video Snapshot Task starts up The EOS Video Snapshot Task Instruction Manua...

Page 290: ...ted into groups by person Entering personal information in ImageBrowser EX enables you to search images by names or nicknames You can also enter personal information on the camera in advance Entering Personal Information Under People in the tree view click Add Person A screen for entering personal information is displayed Unwanted faces can be removed from groups by clicking the in the upper right...

Page 291: ...Uploading to Sharing Websites To delete registered personal information right click the person s name in the tree view and choose Delete Editing Registered Personal Information To edit registered personal information right click the person s name in the tree view and choose Edit face info Searching Images by Faces in Thumbnail Mode Click a person s name in the tree view Images that may include the...

Page 292: ... to identify people you shoot Linking ImageBrowser EX and Camera The first time you connect a camera supporting Face ID to the computer a screen is dis played to confirm syncing of personal information Select Synchronize automatically Linking is also possible by accessing Camera Settings in CameraWindow Connect your camera to the com puter to access CameraWindow For details see steps 1 2 in Non EO...

Page 293: ...ration free of charge you can share your shots in online photo albums and take advantage of many other services Visit the CANON iMAGE GATEWAY website http canon com cig for the latest information on where the services are available around the world Also check your regional CANON iMAGE GATEWAY website to see which services are offered in your area CANON iMAGE GATEWAY Member Registration Free Click ...

Page 294: ...TEWAY and choose the desired option Using Extended ImageBrowser EX Functions Attaching Images to Email Messages Your shots can be shared as email attachments Uploading Images to Facebook Your shots can be uploaded to Facebook Requires Facebook registration in advance For details visit the Facebook website Uploading Movies to YouTube Your movies can be uploaded to YouTube Requires YouTube registrat...

Page 295: ...ail The default email program now starts up showing the screen for composing your message Images you selected are shown as attachments Images will be saved in your designated destination folder if you have selected Save to Folder under After Finishing the Task in Custom Settings If the email program does not start up automatically save the images to your computer before starting the program manual...

Page 296: ...lications folder Attach the saved images to email messages Configuring the Email Program for Automatic Startup Windows 7 An email program must be installed in advance To change the default email program click the Start menu and select Default Programs Windows Vista Configure the settings in your regular email program For example to configure Windows Mail start Windows Mail and in the Tools menu se...

Page 297: ...as desired Upload to Facebook Album Upload to Facebook Wall Uploader for Facebook now starts up Enter a description and then click Upload Enter your Facebook user name and password and then click Log in Future software operation cannot be guaranteed in consideration of Facebook specifications and changes in specifications It may not be possible to upload images that have been edited on a computer ...

Page 298: ... operation cannot be guaranteed in consideration of YouTube spec ifications and changes in specifications The maximum length for uploaded movies is less than 15 minutes and the maxi mum file size is less than 2 GB It may not be possible to upload movies that have been edited on a computer Uploading requires Internet access You must have an account with an Internet service provider a browser must b...

Page 299: ...d Operations Introduction Basic Operations Deleting Personal Information Before Uploading to Sharing Websites Click Share and then select a shar ing website On the next screen select images in List Select Delete privacy related infor mation such as people and places before uploading To delete personal information from all images select Apply to all images 1 2 3 ...

Page 300: ...n information in images and GPS logs is sent to service providers Uploading requires Internet access You must have an account with an Internet service provider a browser must be installed and an Internet connection must be established As with ordinary Internet access ISP connection or access fees may apply Google Google Maps and Google Earth are trademarks of Google Inc Geotagged shots and GPS log...

Page 301: ...n Google Earth Use of these files requires Google Earth to be installed Note that display may be incor rect in some versions of Google Earth Add images Add or remove image location information Label images in the current map area with landmark names Shooting locations are indicated by pins on the map The current image is shown in a pop up window 1 2 3 4 5 6 7 8 1 4 5 6 7 8 2 3 Viewing or editing r...

Page 302: ...om a camera or memory card Add a GPS log file Change GPS log time difference information Remove a GPS log file from the list Click to filter log information display Adjust display conditions as needed for a better view of the route on the map 1 2 3 4 5 6 2 1 3 4 5 Managing GPS logs The buttons shown vary depending on camera camcorder model 6 Map data 2012 ZENRIN This Map Utility feature works with...

Page 303: ...s Import images from EOS DIGITAL cameras Import images from memory card readers Import selected images Return favorite images to the camera Browsing Images View images at full screen View movies Check image details Search images by faces Organizing Images Organize images into folders Sort image display Editing Images Edit still images Convert RAW images Edit movies Printing Print individual images...

Page 304: ...y RAW CRW CR2 TIF Proprietary image format developed by Canon designed to preserve digital camera image sensor out put with no loss of image quality Some cameras may not support this format TIFF TIF Widely used image format Supported by many programs in both Windows and Macintosh environ ments Movies AVI AVI Standard Windows movie format Files in this format are labeled with a movie icon in the br...

Page 305: ...ts ts ts ts Advanced Operations More Advanced Operations Introduction Basic Operations Appendix Searching for Terms in This Manual This manual can be read using Adobe Reader To find instances of specific terms or expressions you can use search functions in Adobe Reader Windows Macintosh Enter the text to find ...

Page 306: ... as an example Other programs can be uninstalled the same way The following task requires administrator rights Click the Start menu select All Programs or Programs and then select Canon Utilities ImageBrowser EX ImageBrowser EX Uninstall The uninstallation process now begins and ImageBrowser EX will be removed from your computer Drag the ImageBrowser EX folder in the Applications folder in Canon U...

Page 307: ...th A In GPS log file names for files in the GPS folder yy represents the last two digits of the year All folders other than these contain image management files Do not open or delete them Some image formats may not be supported by your camera camcorder File Name Type of File IMG_xxxx JPG Image files in JPEG format _MG_xxxx JPG JPEG image files shot in the Adobe RGB color space IMG_xxxx CR2 Image f...

Page 308: ...a camcorder connected to the computer correctly For connection instructions refer to the camera camcorder user guide Also confirm that you are using the correct cable and that it is firmly connected Are your camera camcorder and the computer ready to send or receive data Some models of camera camcorder must be in playback mode before data can be sent or received from a computer For details refer t...

Page 309: ...o resolve the problem by referring to Initial Troubleshooting Tips on the previous page Camera camcorder not detected Events dialog AutoPlay Device Stage not displayed Images not imported when the camera camcorder is connected to the computer via an interface cable Your camera camcorder may mistakenly be recognized as another device Uninstall the device as follows The following task requires admin...

Page 310: ...nother device Other factors may be causing the problem if Other devices Portable Devices or Imaging devices are not listed or if your camera cam corder model name or Canon Camera is not listed Go to step 5 and consider another solu tion or try again later Right click on your camera camcorder model name or Canon Camera and then select Uninstall Click OK after the confirmation mes sage is displayed ...

Page 311: ...ons Appendix ImageBrowser EX User Guide 1 Unauthorized reproduction of this guide in whole or part is prohibited 2 Information in this guide is subject to change without notice 3 Illustrations or screenshots in this guide may differ slightly from actual products 4 Notwithstanding the preceding items Canon cannot be held liable for any loss arising from the use of this software CANON INC 2012 ...

Page 312: ... Canon digital camera or PictBridge compatible camera PRESS Press the FUNC SET button on your camera and select the PRINT menu f PRINT Print long lasting professional quality photos SELPH V ES40 COMPACT PHOTO PRINTER Creative Prints of your choice with the ES40 SElPHY AVariety of Print Size Selections ...

Page 313: ... PHOTO PRINTER Print Photos in aVariety of Sizes to Add to Your Scrapbooks at www canon com c park for background pages borders fonts frames patterns and more for downloading and printing on a letter size printer Buy Canon Products Supplies and Accessories Direct from the Canon Online Store Canon shop usa canon com PI MA MG8120 Wireless Inkjet Photo All ln One CDX E049 For more information please ...

Page 314: ...I 1111111111111111 ...

Page 315: ...eguro ya que contiene informacion importante Fran ais La garantie de ce ou ces produits n est valide que dans le pays indique sur votre certificat de garantie Veuillez conserver cette feuille car elle contient d importantes informations Online product registration for U S A Customers only Register your product online at www powershot com productregistration and V Receive firmware and software upgr...

Page 316: ...strement de produits en ligne pour les clients canadiens seulement Enregistrez votre produit en ligne a www canon ca product_registration et Recevez les mises aniveau de microprogrammation et de logiciels Canon Canada met ajour Ia microprogrammation et les logiciels de ses produits de photographie numerique Vous serez parmi les premieres personnes a recevoir les notifications correspondantes i Rec...

Page 317: ...OREGOING YOU ASSUME AU RISK AND LIABILITY FOR LOSS DAMAGE OR INJURY TO YOU AND YOUR PROPERTY AND TO OTHERS AND THEIR PROPERTY ARISING OUT OF USE OR MISUSE OF OR INABILITY TO USE THE PRODUCTS NOT CAUSED DIRECTLY BY THE NEGLIGENCE OF CANON U S A OR CANON CANADA SOME STATES AND PROVINCES DO NOT ALLOW THE EXCLUSION OR LIMITATION OF INCIDENTAL OR CONSEQUENTIAL DAMAGES SO THE ABOVE EXCLUSION OR LIMITATI...

Page 318: ...QUE SOIT L ARGUU ENTATION JURIDIOUE SUR LAOUELLE S APPUIE LA DEMAND ET Mi ME Sl CANON U S A OU CANON CANAO A ETE tNFOAM E DE LA POSS BIUTE DE TELS DOMMAGES AUCUN RECOUVREMENT OUELLE OU EN SOIT LA FORME CONTRE CANON U S A OU CANON CANADA NE SERA SUPERIEUR AU MONTANT OU PRIX O ACHAT DES PRODUITS VENOUS PAR CANON U S A OU CANON CANADA ET A L ORIGINE DES OOWJAGES PRE SUMM SANS VOUS LIMITER A CE OUt PR...

Reviews: