background image

81

Shooting - Selecting Par

ticular Ef

fects

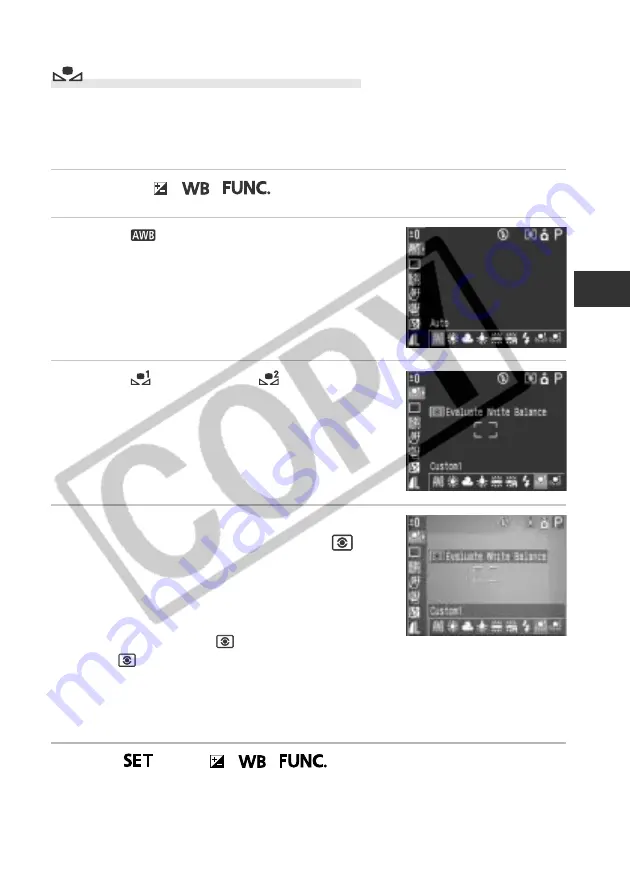
Setting a Custom White Balance

You can set a custom white balance to obtain the optimal setting for the shooting
conditions by having the camera evaluate a subject such as a white piece of paper
or cloth, or a photo-quality gray card. You can set two types of settings.

1

Press the   / 

 / 

 button.

2

Select

* (Auto) using 

C

 or 

D

 on the

multicontroller.

* The current setting is displayed.

3

Select

 (Custom1) or 

 (Custom2)

using

B

 or 

A

 on the multicontroller.

4

Aim the camera at the white paper or
cloth, or gray card and press the 
button.

Aim the camera so that the white paper or cloth,
or gray card, completely fills the frame on the
LCD monitor screen or the entire viewfinder
before pressing the 

 button. When you press

the

 button, the camera reads the white

balance data.

You can shoot the image right after selecting settings by pressing the shutter
button.  This screen will appear again, once the image is shot.

5

Press

 or the   / 

 / 

 button.

Summary of Contents for PowerShot S45

Page 1: ...rt by reading the Precautions on page 4 of this manual Please refer to the Software Starter Guide for information on installing the software and downloading images Please also read the printer user gu...

Page 2: ...al Camera However Canon makes no warranties concerning and is not responsible for damages resulting from use of non Canon Brand Accessories Flowchart and Reference Guides This Guide Shooting with the...

Page 3: ...n it means that the date time battery charge is depleted Recharge it as described above Disclaimer While every effort has been made to ensure that the information contained in this guide is accurate a...

Page 4: ...menus Selecting Menus and Settings p 36 3 What settings are available under each function and Will my settings remain in effect even after I ve turned the camera off Functions Available in Each Shooti...

Page 5: ...s various shooting features Explains how to review recorded images or select replay settings how to protect images or erase them and how to edit movies Explains how to print and make print settings a...

Page 6: ......

Page 7: ...D Monitor 28 Using the Viewfinder to Shoot 32 Pressing the Shutter Button 33 Using the Zoom Focal Length 35 Selecting Menus and Settings 36 Customizing the Camera My Camera Settings 40 Changing My Cam...

Page 8: ...AEB Mode 86 Focus Bracketing Focus BKT Mode 88 Locking the Exposure Setting AE Lock 90 Locking the Flash Exposure Setting FE Lock 92 Switching between the Built in Flash Adjustment Settings 93 Switch...

Page 9: ...fer Order 142 Selecting Images for Transferring 142 Viewing Images on a TV Set 144 Downloading Images to a Computer 145 Downloading Directly from a CF Card 145 Connecting the Camera to a Computer via...

Page 10: ...ial properties by means of a camera or other device may contravene copyright or other legal rights even if the image was shot for personal use Warranty Limitations This camera s warranty is only effec...

Page 11: ...p Desk Stop operating the equipment immediately if it emits smoke or noxious fumes Failure to do so may result in fire or electrical shock Immediately turn the camera s power off remove the camera bat...

Page 12: ...losion Immediately flush with water any area of the body including the eyes and mouth or clothing that comes into contact with the inner contents of a battery If the eyes or mouth contact these substa...

Page 13: ...touch the surface of the flash after taking several pictures in rapid succession Either action could result in burns If your camera is used for prolonged periods the camera body may become warm Please...

Page 14: ...the battery lock in the direction of the arrow using the corner of the battery pack then insert the battery pack into the compartment until it is locked 3 Install the CF card p 19 4 Open the lens cove...

Page 15: ...is complete 8 View the recorded image p 47 The recorded image appears in the LCD monitor for approximately 2 seconds Keep your finger on the shutter button or press on the multicontroller while the im...

Page 16: ...efer to the Bubble Jet Printer user guide Please refer to your System Map to find out which direct print function compatible printer can be used with this camera Front View Components Guide Lens Lens...

Page 17: ...CF Card Slot Battery Cover p 17 19 Tripod Socket Be careful not to wave the camera about or catch it on other items when dangling it from the wrist strap Attaching the Wrist Strap The LCD monitor is c...

Page 18: ...range Ready to record camera shake warning Lower Indicator Yellow Macro mode Manual focus mode Blinking Yellow Focusing difficulty although you can press the shutter button try using focus lock or adj...

Page 19: ...selects settings according to the image composition type Portrait p 56 Landscape p 56 Night Scene p 57 Fast Shutter Speed p 57 Slow Shutter Speed p 58 Stitch Assist p 59 Movie p 62 Creative Zone The u...

Page 20: ...LCD monitor and confirm the selection Moving the cursor on the LCD monitor up and down Use C or D to select a menu item on the LCD monitor Moving the cursor on the LCD monitor left and right Use B or...

Page 21: ...ight red while the battery pack is charging It will change to a steady green when the charge is complete After charging unplug the battery charger and remove the battery pack from it To protect and pr...

Page 22: ...tore it in a cool dry place Recharge it fully before using it again Even charged battery packs continue to discharge naturally You are advised to charge the battery on the day of use or one day before...

Page 23: ...arrow with the corner of the battery pack then insert the battery pack into the compartment until it is locked To remove the battery pack release the battery lock 4 Close the CF card slot battery cov...

Page 24: ...s off this icon will display when you press the or button Battery charge is insufficient to operate the camera Replace the battery pack immediately Change the battery pack Installing the Battery Pack...

Page 25: ...h the CF card eject button and pull the card out When the indicator on the left side of the viewfinder blinks green the camera is writing reading erasing or transmitting an image to or from the card D...

Page 26: ...water droplets have evaporated completely Place the CF card in the supplied case for storage Do not use or store CF cards in the following types of locations Locations subject to dust or sand Location...

Page 27: ...appears 3 Select the Set up menu using A on the multicontroller Pressing the button also switches between menus 4 Select Date Time using C or D on the multicontroller then press The factory default fo...

Page 28: ...er camera settings This battery recharges when the main battery pack is inserted into the camera When you first purchase the camera place a charged battery pack in it or use the AC Adapter Kit ACK700...

Page 29: ...or D on the multicontroller and press 5 Select a language using B A C or D on the multicontroller 6 Press After adjusting the settings press the button to close the menu window In replay mode you can...

Page 30: ...tion mode see the Software Starter Guide supplied with the camera Turning On Off the Camera in Shooting Mode 1 Open the lens cover The camera powers up in Shooting mode The power mode indicator lights...

Page 31: ...minutes after the last time a camera control is accessed Printer Connection Mode Powers down approximately five minutes after the last time a camera control is accessed on the camera or something is p...

Page 32: ...immediately after it is shot 2 Shooting Mode 1 Slide the power replay lever to the right p 24 The camera switches to Replaying mode In this case the lens does not retract To return to Shooting mode s...

Page 33: ...ying Mode Power Off Replaying Mode Shooting Mode Sliding the Power Replay lever to the right Opening Closing the lens cover Pressing the shutter button halfway Relationship of the Three States Power O...

Page 34: ...mation or Off shooting information appears for approximately 6 seconds when you take any of the following actions The power is turned on The or button is pressed The focus is set with the manual focus...

Page 35: ...left Zoom powers reflect the combined optical and digital zoom effects These figures appear when the digital zoom is activated Shutter Speed Aperture Value MF Manual Focus Indicator Recordable Images...

Page 36: ...LCD Monitor continued File Number Image Number and Total Display Image Total Shooting Date Time Aperture Value Shutter Speed Histogram L M1 M2 S Compression Settings p 49 Resolution Settings still im...

Page 37: ...osure compensation to a negative number if the image is bright p 79 Overexposure Warning In detailed display mode overexposed portions of the image blink Notice Concerning Shooting When using this cam...

Page 38: ...sical separation between the viewfinder and lens This is called the parallax phenomenon and is more noticeable the closer the subject is to the lens In some cases portions of images shot up close that...

Page 39: ...o mode Manual focus mode Blinking Yellow Focusing difficulty single beep sounds Use the focus lock or focus manually to shoot when the indicator blinks yellow p 98 The AF frame appears as follows when...

Page 40: ...up menu p 151 When the shutter sound is set to Off but the beep is set to On one beep will sound when the shutter button is fully pressed There is no shutter sound in movie mode AF assist Beam The AF...

Page 41: ...m lever toward to zoom in telephoto Slide the zoom lever toward to zoom out wide angle Digital Zoom An image already zoomed with the optical zoom lens can be further zoomed up digitally to an approxim...

Page 42: ...utton Icons of the selectable settings appear on the left side of the LCD monitor The current settings icons appear 2 Select a menu item using C or D on the multicontroller 3 Select setting contents u...

Page 43: ...the zoom lever also switches between the menu tabs 3 Select a menu item using C or D on the multicontroller 4 Select setting contents using B or A on the multicontroller Press for items followed by a...

Page 44: ...ter Automatically shoots images at a set time interval 96 Save Settings Saves customized settings 102 Protect Turns image protection on and off 118 Rotate Rotates the image in the display 112 Erase al...

Page 45: ...ce Page Beep On Off 151 LCD Brightness 151 Auto Power Down On Off 151 Date Time Sets the date and time 21 Format Formats the CF card 121 Shutter Volume Off 1 2 3 4 5 152 Playback Vol Off 1 2 3 4 5 152...

Page 46: ...ing has a science fiction theme and My Camera setting has an animal bird theme Changing My Camera Settings 1 Turn on the camera p 24 2 Press the button The Rec or Replay menu appears 3 Select the My C...

Page 47: ...button halfway In Replaying mode the menu closes when the shutter button is pressed halfway and the camera switches to Shooting mode if the lens cover is open If you select Theme in Step 4 you can se...

Page 48: ...ems can be saved to the camera Start up Image Start up Sound Operation Sound Selftimer Sound Shutter Sound Registering CF Card Images and Sounds 1 Turn on the camera p 24 2 Slide the power replay leve...

Page 49: ...age you wish to register using B or A or on the multicontroller 9a Press 8b Select Record using B or A on the multicontroller and press Recording starts Recording stops when the set amount of time has...

Page 50: ...ration Sound Selftimer Sound and Shutter Sound Recording format WAVE monaural Standardizing bit 8 bit Sampling frequency 11 025 kHz and 8 000 kHz Recording time 11 025 kHz 8 000 kHz Start up Sound 1 0...

Page 51: ...he LCD monitor is on the AF frame will appear green The shutter speed and aperture value are automatically determined and show on the LCD monitor if it is on The yellow indicator will blink and the be...

Page 52: ...ons Available in Each Shooting Mode p 180 With the Review function you can change the length of time images show on the LCD monitor after shooting or set it so they do not show at all p 47 Auto Mode c...

Page 53: ...displayed Erasing Images Individually p 9 119 Displaying Images in detailed display mode p 28 Magnifying Images p 106 Changing the Recording Format p 52 Attaching Sound Annotations p 113 Changing the...

Page 54: ...Rec menu select Review See Selecting Menus and Settings p 36 2 Select a Review setting and press the button With the Off option the image will not automatically display With the 2 sec to 10 sec optio...

Page 55: ...200 pixels M2 Medium 2 1024 x 768 pixels S Small 640 x 480 pixels Low Print large prints Send images as e mail attachments Shoot more images Print on small labels Compression Purpose Superfine High Qu...

Page 56: ...the compression you wish to set using B or A on the multicontroller You can shoot the image right after selecting settings by pressing the shutter button This screen will appear again once the image i...

Page 57: ...e Settings do not change Settings change to those of the next mode Initial Shooting Mode Some settings are not available with certain Shooting modes Please refer to Functions Available in Each Shootin...

Page 58: ...only approximately one quarter the size of an uncompressed RGB TIFF format file making it relatively compact With standard uncompressed file formats such as RGB TIFF images are processed in the camera...

Page 59: ...an shoot the image right after selecting settings by pressing the shutter button The previous screen will appear again once the image is shot 5 Press or the button 6 Shoot the image Images shot in the...

Page 60: ...ssed halfway Shooting procedures are the same as for the mode p 45 Red eye reduction Auto The flash fires automatically as required by the lighting level and the red eye reduction lamp fires each time...

Page 61: ...The Flash flash exposure and the Flash Output can be changed p 93 The flash setting is saved when the camera is turned off in the and Shooting modes When shooting with Slow Synchro set to On we recomm...

Page 62: ...that the upper half of the subject s body fills most of the viewfinder or LCD monitor The background gets increasingly indistinct the more you adjust the focal length toward telephoto Landscape Mode U...

Page 63: ...use a tripod to prevent camera shake in this mode Functions Available in Each Shooting Mode p 180 Warn people to stay still for a few seconds after the flash fires because of the slow shutter speed Us...

Page 64: ...bjects to make them appear blurred such as river rapids 1 Turn the shooting mode dial to Shooting procedures are the same as for the mode p 45 Functions Available in Each Shooting Mode p 180 Always us...

Page 65: ...nto a large panoramic image using a computer Please use the bundled PhotoStitch program to merge the images on a computer Framing a Subject PhotoStitch detects the overlapping portions of adjoining im...

Page 66: ...and white balance settings are set and locked with the first image Compose each frame so that it overlaps 30 to 50 of the adjoining image Try to keep the vertical misalignment to within 10 of the imag...

Page 67: ...s to shoot the remaining frames A maximum of 26 images can be recorded either horizontally or vertically 6 Press after the last shot A custom white balance setting p 80 cannot be set in mode To use a...

Page 68: ...or when the CF card becomes full The data reflects Canon s testing standard The actual figures will vary according to the shooting objects and conditions Be careful not to touch the microphone while...

Page 69: ...utton is pressed halfway Shooting procedures are the same as for the Mode p 45 Some settings are not available with certain Shooting modes Please refer to Functions Available in Each Shooting Mode p 1...

Page 70: ...splayed 3 Select or using B or A on the multicontroller and press When is selected the shutter release will be delayed for 10 seconds and when is selected the shutter release will be delayed for 2 sec...

Page 71: ...lever toward and hold it The lens will zoom to the maximum optical telephoto setting and stop Release the lever and slide it toward again to further zoom the image digitally Slide the lever toward to...

Page 72: ...utton all the way to shoot Shooting will stop when the shutter button is released The shooting speed is as follows When is selected Approx 1 5 frames per second When is selected Approx 2 5 frames per...

Page 73: ...p 180 at the end of this manual to find out which settings can be changed in which Shooting modes Program AE Use the program AE mode to have the camera automatically set the shutter speed and aperture...

Page 74: ...e Differences and Similarities between the and Modes Both modes automatically select the shutter speed and aperture value The following settings can be adjusted in mode but not in mode Exposure Compen...

Page 75: ...h quality images Nevertheless a certain amount of processing time may be required before the next image can be shot Setting the Shutter Speed When you set the shutter speed in the shutter speed priori...

Page 76: ...00 Telephoto F 4 9 6 3 to 1 1000 F 7 1 8 0 to 1 1500 The fastest shutter speed for flash synchronization is 1 250 second The camera automatically resets the shutter speed to 1 250 second if a faster s...

Page 77: ...ound and create a beautiful portrait A higher aperture value closing it brings the entire range from foreground to background into focus The larger the aperture value the greater the range of the imag...

Page 78: ...factor at low shutter speeds If the camera shake warning appears in the LCD monitor secure the camera to a tripod before shooting In this mode the shutter speed with synchronized flash is 1 60 second...

Page 79: ...r indicating the difference between the standard exposure and the selected exposure appears on the LCD monitor If the difference is more than 2 steps 2 or 2 appears in red The standard exposure is cal...

Page 80: ...he camera automatically selects an AF frame from 9 points to focus according to the shooting conditions With the digital zoom the center point AF frame is always selected 1 Press The AF frame appears...

Page 81: ...fixed to center point when an image is shot using the viewfinder with the LCD monitor off or when using the digital zoom even if you previously set the AF frame to the position you desire 1 Press The...

Page 82: ...is changed the AF frame may also change depending on the Shooting mode See the table below If you switch to mode the AF frame will change to the setting previously saved with the Save Settings functi...

Page 83: ...ut places more weight on the subject at the center Use this mode when the subject is backlit or surrounded by bright light Meters the area within the spot AE point frame at the center of the LCD monit...

Page 84: ...ter the spot AE point frame appears at the center of the LCD monitor and when Spot AE Point is set to AF Point it appears inside the selected AF frame 5 Shoot the image Some settings are not available...

Page 85: ...setting using B or A on the multicontroller The settings can be adjusted in 1 3 steps in the range of 2EV to 2EV You can shoot the image right after selecting settings by pressing the shutter button T...

Page 86: ...e balance cannot be adjusted when the photo effect is set to Sepia or B W Auto Settings are automatically set by the camera Daylight For recording outdoors on a bright day Cloudy For recording under o...

Page 87: ...ler The current setting is displayed 3 Select Custom1 or Custom2 using B or A on the multicontroller 4 Aim the camera at the white paper or cloth or gray card and press the button Aim the camera so th...

Page 88: ...advisable to use the LCD monitor to compose the shot and to zoom in to the maximum telephoto setting Since the white balance data cannot be read in mode preset the white balance in another Shooting mo...

Page 89: ...rpness and color saturation appears when you press the button In this screen select the item you wish to set using the CD buttons and set it using the BA buttons Photo Effect Off Records with no effec...

Page 90: ...ral and Strong This function allows you to adjust the degree of brightness Sharpness Select from Weak 0 Neutral and Strong This function allows you to adjust how sharply outlines are defined Saturatio...

Page 91: ...desired setting using B or A on the multicontroller You can shoot the image right after selecting settings by pressing the shutter button This screen will appear again once the image is shot 4 Press o...

Page 92: ...s are shot in the following order Standard exposure underexposure and overexposure 1 Press the button 2 Select BKT Off using C or D on the multicontroller The current setting is displayed 3 Select AEB...

Page 93: ...The AEB mode cannot be used for flash photography If the flash fires only one image gets recorded Some settings are not available with certain Shooting modes Please refer to Functions Available in Ea...

Page 94: ...nd forward 1 Press the button 2 Select BKT Off using C or D on the multicontroller The current setting is displayed 3 Select Focus BKT using B or A on the multicontroller and press the button 4 Select...

Page 95: ...KT mode is not available when shooting with the flash on The camera will revert to shooting only one image when the flash is on Some settings are not available with certain Shooting modes Please refer...

Page 96: ...he spot metering frame on the subject on which you wish to lock the exposure setting and press the shutter button halfway Selecting an AF frame p 74 Switching Between Light Metering Modes p 77 3 While...

Page 97: ...nged without altering the exposure with the following procedures 1 Turn the mode dial to or 2 Press the button to turn on the LCD monitor 3 Focus on the subject on which you wish to lock the exposure...

Page 98: ...the button The flash exposure compensation setting locks FE lock and the icon appears on the LCD monitor The flash will fire a pre flash and lock the flash exposure to the required intensity to illum...

Page 99: ...h adjustment can be changed when Flash Adjust is set to Auto The settings can be adjusted in 1 3 stop increments in the range of 2EV to 2EV You can enjoy flash photography with exposure adjustments wi...

Page 100: ...ubject from different positions because the pre flash does not fire 1 Press the button 2 Select Flash Output using C or D on the multicontroller 3 Adjust the compensation using B or A on the multicont...

Page 101: ...utter closes regardless of the shutter speed Compared with the 1st curtain the flash fires later and this allows you to shoot images in which for example a car s rear lamps seem to trail off behind 1...

Page 102: ...ptional is recommended p 162 1 Select Intervalometer from the Rec menu See Selecting Menus and Settings p 36 2 Select an interval time using B or A on the multicontroller If you press the multicontrol...

Page 103: ...is waiting to shoot the next image Opening the card slot battery cover Switching to Replay mode Turning off the power Once the interval shooting session is started all operation buttons become inactiv...

Page 104: ...dure when this happens 4 Keep it pressed while you recompose the image and press the shutter button all the way to shoot the image Shooting Problem Subjects for the Autofocus The autofocus may not wor...

Page 105: ...e When shooting through glass get as close as possible to avoid reflection off the glass Focus Lock Method 2 1 Press the button to turn on the LCD monitor 2 Press the shutter button halfway to lock th...

Page 106: ...when the digital zoom is activated or a TV is used as the display Can also be set so that the image displayed is not magnified The center of the LCD monitor is magnified when the AF frame is set to A...

Page 107: ...nnot change the AF frame setting while focusing manually Cancel the manual focus mode then change the AF frame setting With the changed AF frame setting you can resume the manual focus mode Some setti...

Page 108: ...membered Settings that can be saved to the mode Shooting mode and mode items that can be saved p 180 Shooting menu settings Zoom location Manual Focus location 1 Turn the shooting mode dial to or 2 Se...

Page 109: ...nd This function may not operate correctly when the camera is pointed straight up or down Check that the arrow is pointed in the right direction and if it is not then set the Auto Rotate function to O...

Page 110: ...es Folders are assigned numbers from 100 to 998 Since images shot in continuous mode or Stitch Assist mode are always saved in the same folder some folders may contain 101 or more images 100 0001 0002...

Page 111: ...era Replaying Displaying Images Individually You can view the recorded images on the LCD monitor 1 Slide the power replay lever to the right The last recorded image appears single image replay 2 Move...

Page 112: ...gh each setting approximately 2 5 times to approximately 5 times and 10 times Cancelling the Magnified Display 1 Slide the zoom lever toward When you press the button the image switches to its origina...

Page 113: ...oom lever once towards 3 Change the image selection using B A C or D on the multicontroller 4 Press the button Index replay cancels and the display reverts to single image replay The same display appe...

Page 114: ...le replay p 105 or index replay p 107 The jump bar appears 2 The displayed image s change Single Replay Jump 10 images behind or ahead using B or A on the multicontroller Index Replay Jump to the prev...

Page 115: ...instruction on it The movie replay panel appears 3 Select using B or A on the multicontroller and press The movie images and sound will play You can adjust the volume using C or D on the multicontroll...

Page 116: ...nd the movie editing bar appear 3 Select an editing method using C or D on the multicontroller Deletes frames in the first half of the movie Deletes frames in the second half of the movie Reverts to t...

Page 117: ...he original data is not deleted When there is not enough space left on the CF card only the overwrite function is available If this happens C appears on the counter of the movie editing bar Protected...

Page 118: ...ion 90 270 original each time is pressed 3 Press the button The Replay menu appears again Press the button again to close the menu Movie images cannot be rotated When images are downloaded to a comput...

Page 119: ...s you like until their total time reaches 60 seconds Playing back the Sound Annotations Select Replay in step 2 above Images with sound annotations are displayed with the mark simple display or detail...

Page 120: ...ow Press to pause the show Press it again to resume Fast Forward Rewinding a Slide Show Use B or A on the multicontroller to move to the previous or next image Stopping a Slide Show Press the button d...

Page 121: ...s 4 Mark images to include in the show Single Replay Move between images using B or A on the multicontroller and mark or remove marks from images using C or D on the multicontroller The selection numb...

Page 122: ...e or Repeat using C or D on the multicontroller 4 Select a setting using B or A on the multicontroller Play Time Select a play time Repeat Select On or Off Automated Playback Slide Show continued Play...

Page 123: ...g Erasing 5 Press the button The set up menu closes The display interval may vary somewhat for some images Slide shows can be easily edited on a computer with the supplied software See the Software St...

Page 124: ...nd press The icon appears on protected images To remove the protection press again in protection mode You can make the selection of images easier by toggling between single replay and Index replay wit...

Page 125: ...ng a file 1 Set the camera to the replay mode p 26 2 Select the image you wish to erase using B or A on the multicontroller and press the button 3 Select Erase using B or A on the multicontroller and...

Page 126: ...ion before erasing a file 1 In the Replay menu select Erase all and press See Selecting Menus and Settings p 36 2 Select OK using B or A on the multicontroller and press To cancel instead of erasing s...

Page 127: ...select Format and press See Selecting Menus and Settings p 36 2 Select OK using B or A on the multicontroller and press To cancel formatting instead select Cancel and press If the camera does not work...

Page 128: ...s from the CF card directly to the printer using the camera buttons Or you can specify the images on your CF card you want to print and how many copies you want DPOF Print Settings and then take the C...

Page 129: ...print style p 131 Standard Multiple Bordered Borderless Date On Off Select the print area Trimming p 133 DPOF Print Settings Select the image you want to print p 135 Select how many copies you want p...

Page 130: ...124 Selecting from the Print Order Menu Use the Print Order Menu as shown below to select all print settings However set the camera to replay mode beforehand Direct Print Function DPOF Settings...

Page 131: ...on off Selects items and settings Sets items and settings Image p 131 Style Paper p 131 Borders p 131 Date p 131 Number of copies p 131 Trimming p 133 Order Number of copies p 135 Print Type p 137 Set...

Page 132: ...guide for instructions on loading paper and installing ink cartridges Connecting to a Direct Print Function Compatible Printer Two direct interface cables are supplied with the printer Use the cable D...

Page 133: ...r BJ printer to see if it is compatible with the direct print function and for instructions on connection cables and general operations 1 Turn off the camera p 24 2 Turn the BJ printer s power on afte...

Page 134: ...ions cannot be performed while the printer is connected Replaying movies Setting the language using the and the button combination When the printer is disconnected the or symbol will disappear from th...

Page 135: ...Choose an image using B or A on the multicontroller and press 2 Set the number of prints the print style and cropping settings as required Selecting the Number of Copies p 131 Setting the Print Style...

Page 136: ...current image and eject the paper Printing Errors An error message appears if an error occurs for some reason during the printing process p 158 Use B or A on the multicontroller to select Stop or Resu...

Page 137: ...e Printer Image Standard Prints one image per page Multiple Prints eight copies of the same image on one page Borders Borderless Prints right to the edges of the page Bordered Prints with a border Dat...

Page 138: ...C or D on the multicontroller 3 Select settings using B or A on the multicontroller Choose On or Off Select Standard or Multiple Choose Borderless or Bordered Borders Date Image Settings Paper Direct...

Page 139: ...he frame will appear around the previously selected portion Print Area Frame 4 Press the button With borderless or multiple prints the top bottom and sides of the image may be cropped slightly If you...

Page 140: ...the Trimming Frame Move the trimming frame using C D B or A on the multicontroller Rotating the Trimming Frame You can rotate the trimming frame by pressing the button 3 Press the button to close the...

Page 141: ...function compatible BJ printer The mark appears on images that have had print marks set by another DPOF compliant camera These settings will be overwritten by any print marks set by your camera Print...

Page 142: ...each image to print by pressing then selecting Mark All using C or D on the multicontroller and pressing again When the print type is set to Standard or Both the setting for the number of print copie...

Page 143: ...using B or A on the multicontroller and press 3 Select Print Type Date or File No using C or D on the multicontroller 4 Select a setting using B or A on the multicontroller Print Type Select Standard...

Page 144: ...t to On however only the file number is printed for the index print The date prints as the date and time in the format specified in the Set Date Time menu p 21 Date Select On or Off File No Select On...

Page 145: ...ce The print type is reset to Standard and the date and file number options are set to Off 1 In the Replay menu select Print Order and press See Selecting Menus and Settings p 36 2 Select Reset using...

Page 146: ...2 Select Print using C D B or A on the multicontroller and press 3 Set the print style settings as required See Setting the Print Settings p 131 A print style cannot be set if the print type is set to...

Page 147: ...Size 63 images Please refer to your Bubble Jet s user guide for an explanation of the number of images printed with a Bubble Jet printer Cancel Printing p 130 Restarting Printing In the Print Order m...

Page 148: ...gs are compatible with the Digital Print Order Format DPOF standards The mark will display on images that have had transfer marks set by another DPOF compliant camera These settings will be overwritte...

Page 149: ...eplay three images Then press and select Mark All using C or D on the multicontroller and press again If you select Clear All instead of Mark All you can remove marks from all the images You can mark...

Page 150: ...g on the TV when shooting press the button No image will appear on the LCD monitor when the camera is connected to a TV monitor The video output signal can be switched NTSC or PAL to accommodate diffe...

Page 151: ...ownloading Directly from a CF Card 1 Eject the CF card from the camera and insert it into a CF card reader connected to the computer If you are using a PC card reader first insert the CF card into a P...

Page 152: ...gital Camera Solution Disk before connecting the camera to the computer Please refer to the Software Starter Guide for installation instructions image download instructions and system requirements 1 C...

Page 153: ...imately 5 minutes while it is connected to the computer the computer screen displays a warning message If you do not take any action within the next minute the camera turns off You can turn the camera...

Page 154: ...the flash is adjusted automatically Auto Manual Red eye Sets whether or not the red eye reduction lamp fires On Off Spot AE Point Sets the Spot AE Point option Center the AE point is fixed to the cent...

Page 155: ...ith the optical zoom to zoom images On Off Review Sets the duration images display on the LCD monitor after the shutter button is released Off 2 sec to 10 sec Intervalometer Shoots automatically at se...

Page 156: ...rotected images Slide Show Plays images in an automated slide show Print Order Sets the images that will be printed on a DPOF compatible printer or at a photo lab service the number of copies and othe...

Page 157: ...156 On Off Still beeps to warn of an error even when set to Off LCD Brightness Sets the brightness level of the LCD monitor Normal Bright Auto Power Down Sets whether or not the camera automatically...

Page 158: ...ed all the way There is no shutter sound in Movie mode Off 1 2 3 4 5 Playback Vol Replay Adjusts the sound volume when a sound annotation or a movie is played Off 1 2 3 4 5 Start up Vol Adjusts the so...

Page 159: ...ile No Reset Sets how file numbers are assigned to images when new CF cards are inserted On Off Auto Rotate Sets whether or not images shot with the camera on end are automatically rotated in the disp...

Page 160: ...n ais Svenska Nederlands Espa ol Dansk Chinese Suomi Japanese You can change the language during image replay by holding the button and pressing the button Except when the camera is connected to a pri...

Page 161: ...y using the supplied software See the Software Starter Guide for details Default setting Theme Selects a common theme for each My Camera settings item 1 Off 1 Start up Image Sets the start up image wh...

Page 162: ...n the beep sounds even if each sound item in the My Camera menu is set to Off For details see the table below The sound specified in sounds No sound The settings of each sound item in the My Camera me...

Page 163: ...appears on the LCD monitor 3 Select OK using B or A on the multicontroller then press The screen on the right appears while resetting The normal screen resumes when resetting is complete To cancel res...

Page 164: ...le could not be created because there is a file with the same name as the directory that the camera is attempting to create or the highest possible file number has already been reached In the Rec menu...

Page 165: ...ave format Cannot attach sound annotation to the image because the image has some sound file recorded in an inappropriate format Protected You attempted to erase a protected image Too many marks Too m...

Page 166: ...nd ink are from different sets Paper Jam The paper jammed during printing Paper has been changed Paper was changed after the print menu was displayed Recharge the printer battery The printer s battery...

Page 167: ...ected a paper type incompatible with the printer Select a compatible paper type in the Print Style menu Paper lever error Adjust the paper thickness lever to the proper position Low ink level The ink...

Page 168: ...nd plug it into a power outlet 2 Connect the DC plug of the compact power adapter cable to the DC Coupler DR 700 terminal 3 Open the CF card slot battery cover then insert the DC Coupler until it is l...

Page 169: ...ix Always turn the camera s power off before connecting or disconnecting the compact power adapter p 24 Use of any adapter other that AC Adapter Kit ACK700 may cause malfunction of the camera or AC ad...

Page 170: ...rger as shown Align the arrow on the battery pack and the arrow on the battery charger to correctly insert the battery pack in the charger The charge indicator will light red while the battery pack is...

Page 171: ...pecifications and handling precautions Camera Operations Camera Operations with the Waterproof Case Page without the waterproof case Number Turning off the power Selecting menus using the button or th...

Page 172: ...ve dust and dirt then remove any remaining dirt by wiping the lens lightly with a soft cloth Never use synthetic cleansers on the camera body or lens If dirt remains contact the closest Canon Customer...

Page 173: ...the CF card logic circuits may be damaged Contact the nearest Canon Customer Support Help Desk Close the CF card slot battery cover then turn off the camera Close the CF card slot battery cover then...

Page 174: ...ction See Locking the Exposure Setting AE Lock p 90 and Switching between Light Metering Modes p 77 To use the built in flash shoot within the following ranges When sensitivity is set to AUTO 35 cm 4...

Page 175: ...Shoot in a different mode Operate the zoom before shooting in movie mode Use a CF card formatted with this camera See Formatting a CF Card p 121 Problem Cause Solution Subject too close Subject brigh...

Page 176: ...1 8 in T Shutter Mechanical shutter electronic shutter Shutter speeds 15 1 1500 sec 1 3 sec or more shutter speed is available in Shutter Priority mode or Manual mode Slow shutter speeds of 15 1 3 sec...

Page 177: ...Still images JPEG Exif 2 2 or RAW recording format Movies AVI Image data Motion JPEG Audio data WAVE monaural JPEG compression mode Super fine Fine or Normal Number of Still images Large 2272 x 1704...

Page 178: ...econds CF card used Interface Universal Serial Bus USB Normal or PTP selectable Audio Video Output NTSC or PAL selectable monaural audio Power source 1 Rechargeable Lithium ion battery type NB 2L supp...

Page 179: ...7 14 30 61 123 13 27 54 110 222 26 54 110 220 443 14 30 61 122 246 26 54 109 219 440 52 108 217 435 868 25 53 107 215 431 46 94 189 379 762 84 174 349 700 1390 58 120 241 482 962 94 196 393 788 1563...

Page 180: ...res 0 40 C 32 104 F Dimensions 91 29 5 56 mm 3 6 1 2 2 2 in Weight CB 2LT Approx 86 g 3 0 oz CB 2LTE Approx 82 g 2 9 oz When charging Battery Pack CB 2LT Compact Power Adapter CA PS700 Included with t...

Page 181: ...175 Appendix CompactFlash Card Card slot type Type I Dimensions 36 4 x 42 8 x 3 3 mm 1 4 x 1 7 x 0 1 in Weight Approx 10 g 0 4 oz...

Page 182: ...Time 21 151 DC Coupler 162 Digital Print Order Format DPOF Settings Print Settings 135 140 Transfer Order 142 Digital Terminal 10 126 144 Digital Zoom 35 65 149 Display Modes 28 31 Detailed 29 30 Sim...

Page 183: ...Mode Indicator 24 Power On Off 24 25 Power Saving 25 151 R RAW File Format 47 52 Recording File Format 47 52 Red Eye Reduction Function 54 Replay Index Replay 107 Jumping 108 LCD Monitor 28 Magnifyin...

Page 184: ...ting 60 Strap 11 T Telephoto 35 Transfer Order Reset 142 Selecting Images 142 Troubleshooting 167 169 V Video System 144 154 Viewfinder LCD Monitor 12 28 Optical 11 32 Volume Replay 152 Shooting 152 W...

Page 185: ...pment off and on the user is encouraged to try to correct the interference by one or more of the following measures Reorient or relocate the receiving antenna Increase the separation between the equip...

Page 186: ...mall S Resolution Movie Movie Superfine Compression Fine Normal File JPEG Format RAW Auto Flash On Off Red eye reduction Flash On Slow Synchro On Off Flash Adjust Auto Manual Flash Sync 1st curtain 2n...

Page 187: ...The photo effect Sepia and B W cannot be selected 4 The white balance is set to AUTO 5 The white balance flash cannot be set 6 The ISO speed is automatically set by the camera 7 ISO AUTO cannot be sel...

Page 188: ...CDI E064 010 XXXXXXX 2002 CANON INC PRINTED IN JAPAN...

Reviews: