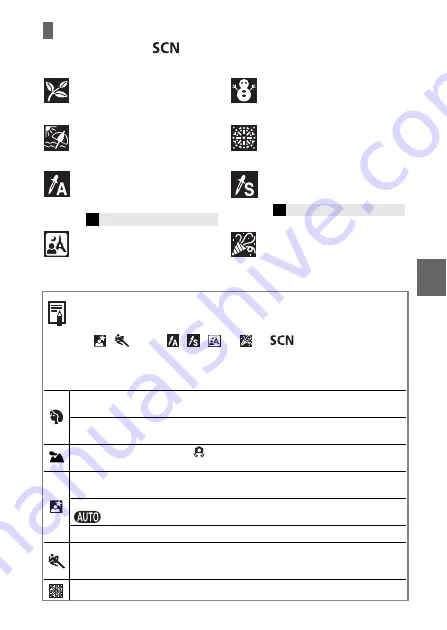
background image

9

Special Scene Items

Turn the mode dial to 

, and use the 

W

 or 

X

 button to select a 

shooting mode.

Foliage

Shoots trees and leaves - such as new 

growth, autumn leaves or blossoms - in 

vivid colors.

Snow

Shoots without a blue tinge and without 

making people appear dark against a 

snowy background.

Beach

Shoots without making people appear 

dark near water or sand where reflected 

sunlight is strong.

Fireworks

Captures fireworks in the sky sharply 

and at an optimal exposure.

Color Accent

Allows you to have only the color specified 

in the LCD monitor remain and to 

transform all others to black and white.

Color Swap

Allows you to transform a color specified 

in the LCD monitor into another color.

Night Snapshot

Allows you to take snapshots of people 

against twilight or night backgrounds by 

reducing the effects of camera shake 

even without using a tripod.

Indoor

Prevents camera shake and maintains 

the subject's true color when shooting 

under fluorescent or tungsten lighting.

z

Some settings can be changed in each shooting mode (

Advanced 

Guide

: p. 167).

z

Results may vary depending on the subject.

z

In ,  

mode, 

, , 

 or 

 of 

 mode (depending on 

the scene being shot), the ISO speed may increase and cause noise 
in the image.

z

Observe the following precautions according to the selected function.

You can achieve a better blurring effect of the background by making sure the upper 

half of your subject fills the entire LCD monitor.
You can enhance the blurring effect of the background even more by setting the lens to 

its maximum telephoto setting.
The camera shake warning icon 

 may appear on the LCD monitor since slower shutter 

speeds are frequently used in this mode. If this happens, affix the camera to a tripod.
The shutter speed slows down. Even if you use the flash, tell your subjects not to move 

for a few moments.
If the Night Scene mode is used to shoot mid-day shots, the same effects as with the 

 mode can be obtained.

The slow synchro option automatically turns on. Use a tripod to avoid camera shake.
Use when the distance between the front of the lens and the subject is 1 m to infinity 

(zoom position is at the maximum wide angle setting) or 4 m to infinity, (when zoom 

position is at the maximum telephoto setting).

The shutter speed is slow. Always use a tripod to avoid camera shake.

Î

See the 

Advanced Guide 

(p. 53)

Î

See the 

Advanced Guide

 (p. 54)

Basic Shootin

g Fu

nc
ti

ons

Summary of Contents for PowerShot S3 IS Digital Camera

Page 1: ...it has been damaged Stop operating the equipment immediately if it emits smoke or noxious fumes Do not handle the power cord if your hands are wet Only use batteries recommended in this manual The out...

Page 2: ...e battery and memory card Opening the LCD monitor Setting the date time and language Shooting Playback Erasing Menus and Settings Handling precautions references to the various shooting and playback f...

Page 3: ...y card until it clicks into place then close the cover c d See the Advanced Guide Battery Handling p 132 Battery orientation can be checked against the diagram in battery compartment See the Advanced...

Page 4: ...ile shooting them navigate menus and play back images You can position the LCD monitor in the following ways 1 Opened from left to right 180 degrees 2 LCD monitor is opened to the left 180 degrees and...

Page 5: ...lever to Shooting or Playback while pressing the release button The camera switches to Playback mode but the lens does not retract the lens will retract if you turn the mode lever to Playback once mor...

Page 6: ...is not displayed and there is no start up sound Also the start up image does not appear when the viewfinder display is on in Shooting mode Advanced Guide p 16 or the A V OUT terminal is connected to...

Page 7: ...and press the MENU button c This operation cannot be performed during movie playback in the jump search mode Advanced Guide p 94 or while connected to a printer or computer 3Use the W X S or T button...

Page 8: ...shutter button fully all the way to shoot The shutter sound will play and the image will record The indicator will blink red while the image is recorded to the memory card z The Image Stabilizer func...

Page 9: ...h of the movie button z Max Clip Size 1 GB z Sound is recorded in stereo z Pressing the Movie button again stops recording Even before the recording size reaches 1 GB recording will stop at the moment...

Page 10: ...ttings can be changed Advanced Guide p 42 Special Scene 8 scene modes to shoot with the most appropriate settings for the scene are available with this camera By simply selecting one of the following...

Page 11: ...on the subject z In mode or of mode depending on the scene being shot the ISO speed may increase and cause noise in the image z Observe the following precautions according to the selected function Yo...

Page 12: ...the camera automatically set the shutter speed and the aperture Shutter speed priority AE When you select the shutter speed the camera automatically sets the aperture Aperture priority AE When you sel...

Page 13: ...vel In this case raise the flash before shooting However when shooting with the or mode there is no indication z The flash cannot be used in the mode s and modes z cannot be selected in the and modes...

Page 14: ...d this button for more than one second for Super Macro mode appears on the LCD monitor When using the zoom in macro mode a yellow bar appears below the zoom bar to indicate the range in which you cann...

Page 15: ...e Image area Distance between front of lens and subject Maximum wide angle fixed 0 10 cm 0 3 9 in 22 16 mm 0 87 0 63 in 0 cm 0 in z Exposure may not be optimal when the flash is used in Macro mode You...

Page 16: ...se button 2Use the W or X button to select the image you wish to erase and press the button a 3Confirm that Erase is selected b and press the SET button c z To exit instead of erasing select Cancel us...

Page 17: ...ed Guide FUNC Menu Menu list p 28 b c a To select an item b Press the S or T button To change the setting c Press the W or X button z You can select further options with the SET button for some option...

Page 18: ...s a When the menu icon is selected press the W or X button or press the zoom lever To select an item b Press the S or T button To change the setting c Press the W or X button When appears by an item p...

Page 19: ...100 CP 200 CP 300 2Turn on the camera in Playback mode Confirm that or is displayed in the upper left of the LCD monitor a z The button lights blue z The displayed icon will vary according to the prin...

Page 20: ...ystems listed above Refer to the Software Starter Guide for details Supplied Software Install It Do Not Install It Downloading Method Computer Procedure Camera Procedure Computer Procedure Windows 98...

Page 21: ...ace USB Free Hard Disk Space z Canon Utilities ZoomBrowser EX 200 MB or more PhotoStitch 40 MB or more z Canon Camera TWAIN Driver 25 MB or more z Canon Camera WIA Driver 25 MB or more z ArcSoft Photo...

Page 22: ...proceed 3 When the installation is finished the Finish or Restart button appears Click the one that appears 4 When the screen returns to the desktop display remove the Canon Digital Camera Solution D...

Page 23: ...ally the camera and computer will be able to communicate The LCD monitor or viewfinder turns off and the power mode indicator lights yellow Always grasp the connector s sides to remove the interface c...

Page 24: ...downloaded images will display in the ZoomBrowser EX Main Window By default the downloaded images are saved into subfolders according to their shooting dates If the window to the right does not appear...

Page 25: ...lt all the images that have yet to be downloaded will download to the Pictures folder Thumbnails small versions of the downloaded images will display in the ImageBrowser Browser Window By default the...

Page 26: ...d for the first time p 20 If the Direct Transfer menu is not displayed press the button All Images Transfers and saves all images to the computer New Images Transfers and saves to the computer only th...

Page 27: ...SET button The images will download The button will blink blue while downloading is in progress Images can also be selected during index playback 3Press the MENU button c The display will return to t...

Reviews: