background image

E

79

Using Various Functions

Macintosh

Reviewing and Changing the Owner Name of the 
Camcorder

You can change and confirm the owner name of the camcorder.
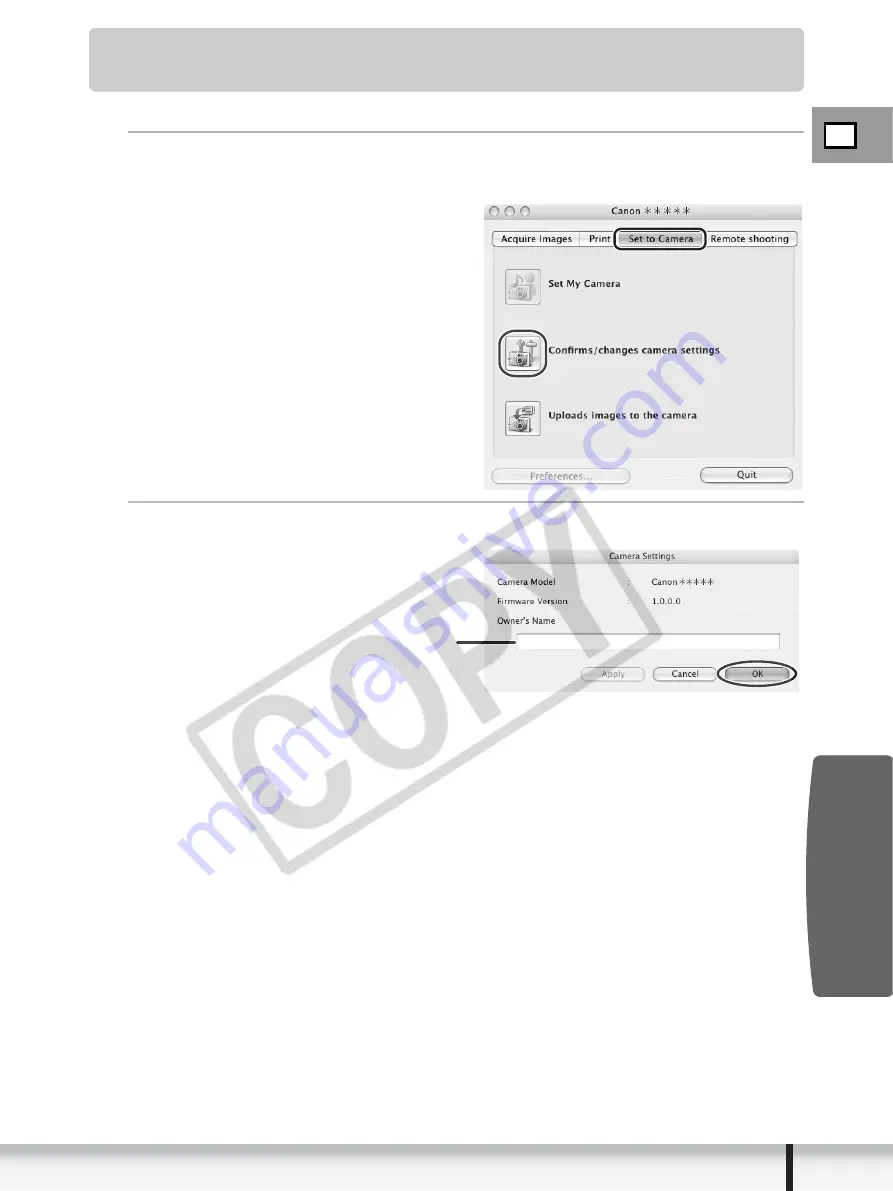
1

Click the [Set to Camera] tab and click [Confirms/changes 
camera settings] in the Camera Control window.

2

Enter the camcorder’s owner name and click [OK].

Input a camcorder owner name here 
(up to 31 characters).

Summary of Contents for PowerShot G3

Page 1: ...E Digital Video Software Version 21 Instruction Manual...

Page 2: ...Downloading Still Images ImageBrowser 28 Using the Computer to Download Still Images 29 Auto downloading 29 Applying Auto downloading Settings 30 Downloading the Selected Still Images 33 Using a Card...

Page 3: ...Card 67 Adding Still Images to the Memory Card 67 Adding Sample Images to the Memory Card 68 Using Various Functions 71 Merging Panoramic Images PhotoStitch 71 Attaching Images to E mail Messages 74...

Page 4: ...Trademark Acknowledgments Macintosh and Mac OS are trademarks of Apple Computer Inc registered in the United States and other countries iPhoto and QuickTime are trademarks of Apple Computer Inc miniSD...

Page 5: ...geBrowser does not operate on disks initialized with the Unix File System UFS A CD ROM drive is required to install the software OS Mac OS X version 10 2 10 3 10 4 Computer Model Computers that come w...

Page 6: ...till image Printing still images with titles and comments Printing indexes CameraWindow Downloading still images from a disc or a memory card to your computer Viewing still images recorded in a disc o...

Page 7: ...the owner name of the camcorder you specify 79 Refer to CameraWindow Automatic Launch Setting 27 for launching the software The Remote capture function is not supported by the camcorder Click the Cam...

Page 8: ...a camcorder or a card reader writer to the computer Camera Control window Images will be downloaded to the computer and ImageBrowser starts Selects a function in the Camera Control window Images in t...

Page 9: ...mory Card 38 Unable to set the DPOF print settings to the still images recorded on the disc Camera Control window Prints all still images in the disc or card one image per page Prints all still images...

Page 10: ...hanging the owner name of the camcorder you can specify 79 and uploading the still images to the card My Camera function is not supported by the camcorder Camera Control window Enter or change the nam...

Page 11: ...era Browser window Prints the selected still images Starts ImageBrowser Selects the still image selection method Changes the size of the thumbnail Selects whether to show or hide the image frame and f...

Page 12: ...that you can use on your computer To show or hide the folder contents click the triangle symbol besides the folder name indicates that newly downloaded still images are in the folder Selecting the Fav...

Page 13: ...ayed as thumbnails The thumbnails can be enlarged reduced by selecting Enlarge or Reduce from the View menu Context Menu When the view mode is set to Preview or List click on a thumbnail image while p...

Page 14: ...released the bar Play Sound Plays back the added sound The date time at which the images were shot appears on the red line You can change this date time by double clicking it on the display A window...

Page 15: ...s in the Browser Window 3 Selecting Images Allows to select all images and deselects images 4 Display Pattern Allows to change the appearances of the Browser Window Histogram Sets a Star Rating Sets a...

Page 16: ...age Displays a selected image in the Image Viewer window 3 SlideShow Displays still images in a slide show 4 Internet Allows attaching the selected still images to E mail messages 5 Print Prints the s...

Page 17: ...editing applications Unable to use when the multiple images are selected 4 Number of Displays Allows you to display multiple images at the same time 5 Synchronize Synchronizes View functions across al...

Page 18: ...drag the mouse on the still image or specify the cropping area and click Trim Image Color Brightness Adjustment Window Select Color Brightness Adjustment from the icon located at the bottom of the Im...

Page 19: ...the icon located at the bottom of the Image Viewer window Use this to correct still images in which peoples eyes appear red Insert Text Window Select Insert Text from the icon located at the bottom o...

Page 20: ...f the Image Viewer window Use this to adjust the levels in a still image to change its appearance Tone Curve Adjustment Window Select Tone Curve Adjustment from the icon located at the bottom of the I...

Page 21: ...the bottom of the Image Viewer window Use this to emphasize and clarify the outlines of people and objects Auto Adjustment Window Select Auto Adjustment from the icon located at the bottom of the Imag...

Page 22: ...ter connecting the camcorder until you can download still images Still images protected on the camcorder may lose this setting once they are downloaded to the computer When downloading the still image...

Page 23: ...Click Digital Video Software Install 5 Select Easy Installation and click Next To install the software individually select Custom Installation 6 Read the license agreement and click Agree 7 Review th...

Page 24: ...24 Installing the Digital Video Software 8 When the Installation has finished message appears click OK After the installation is complete restart the computer as prompted...

Page 25: ...corders to the same computer via the USB interface The connections may not operate correctly Never allow the computer to go into standby sleep mode while a camcorder is connected via the USB interface...

Page 26: ...ore Downloading Images 6 Attach the supplied USB cable to the computer s USB port and the camcorder s USB Terminal USB Cable USB Terminal on the Camcorder Camcorder End Computer End USB Port on the Co...

Page 27: ...t Preferences from the Image Capture menu 2 Select Other from When a camera is connected open 3 Select CameraWindow and click Open CameraWindow is normally installed in Applications Canon Utilities Ca...

Page 28: ...g a memory card please use a card reader writer to download the still images for the disc please use your computer s DVD drive When using the DVD drive to download the images recorded on the disc it i...

Page 29: ...er 25 To start the Camera Control window manually click the CameraWindow icon located in the Dock If the CameraWindow icon is not in the Dock double click the Canon Utilities folder on the drive where...

Page 30: ...ettings This task allows you to apply auto downloading settings You can specify the types of still images and the destination folder 1 In the Camera Control window click the Acquire Images tab and cli...

Page 31: ...ading from the disc the still images on the disc will not be deleted even if the Download Options is selected a check mark is placed 4 Specify the destination folder settings and click Next Place a ch...

Page 32: ...will be displayed when you select Perform selected processes consecutively You can redisplay the window by clicking Select Select a process to perform after the image is downloaded and click OK 6 Cli...

Page 33: ...and click Download Images Clicking on 2 images while holding down the option shift key selects also all images between the 2 images Clicking on different images while holding down the shift key selec...

Page 34: ...ser Window appears To make changes click Change Settings Specify Folder Tab Specify File Name Tab Settings for the file prefix and the consecutive numbers Setting for the folder and the subfolder for...

Page 35: ...reader writer does not support miniSD cards please purchase an appropriate adapter for the card 1 Insert a memory card containing images recorded with the camcorder into the reader 2 Select a method t...

Page 36: ...er screen after starting the Camera Control window See your camcorder instruction manual for how to set and operate the camcorder to transfer images For instructions on how to change the destination f...

Page 37: ...t transfer download destination folder and click Next 3 Specify the destination folder settings and click Finish Click Quit to close the Camera Control window Click this button to specify the destinat...

Page 38: ...age Print Contact Sheet of All Images Prints all still images recorded on a disc or memory card in the connected camcorder or in a card reader writer in an index rows of images on one page Print accor...

Page 39: ...E 39 Printing Still Images Macintosh 3 Click on one of the 4 printing methods 4 Specify the print settings and click Print The window varies depending on the selected printing method in step 3...

Page 40: ...the printer Sets the paper size settings Rotates images Sets the shooting date time imprint and color settings Sets the number of print copies of the displayed image Click this button to switch betwe...

Page 41: ...bed in the previous section When you have selected Print All Images 40 will be displayed Click this to use the trimming function crops a portion of the still image Selects the printer Sets the printer...

Page 42: ...t the same window described in the previous section When you have selected Print Contact Sheet of All Images 41 will be displayed If you selected One Photo Per Page Print the same window described in...

Page 43: ...s one still image per page Index Print Prints a selection of multiple still images in columns and rows in an index form Layout Print Allows you to lay out the selected still images in special arrangem...

Page 44: ...ts the printer Sets the shooting date time imprint and color settings Sets the number of print copies of the displayed image Click this button to switch between still images if multiple images are sel...

Page 45: ...Images Macintosh 3 When the print window opens click Print 4 When the printing finishes click to close the window Index Print 1 Select still images you wish to print and click Print Index Print from...

Page 46: ...this to use the trimming function crops a portion of the still image Selects the printer Rotates still images Sets the print settings for shooting information comments headers footers and page number...

Page 47: ...he size of the all still images Tiled photo printing Allows you to have the program lay out and print the specified number of images per page with no gaps between still images on the page Selecting Ed...

Page 48: ...nting finishes click to close the window Multiple Page Printing Multiple page printing is a function that enables you to print enlarged still images or panoramic images onto multiple pages Your camcor...

Page 49: ...and enter a new value at Scale Selecting Multiple Page Print Options from the File menu allows you to specify the Print Resolution The lower the resolution you set the larger the image is printed and...

Page 50: ...be used as one of the search conditions or for the selection of images to be displayed in the Browser Window The default setting of the Star Rating is two stars 1 Select the image to which you wish t...

Page 51: ...elect an image you wish to apply the keyword 2 Select Keyword Settings from the Edit menu 3 Place a check mark next to the keyword you wish to apply and click OK You can add and delete keywords or cha...

Page 52: ...ges into a folder according to the shooting date or Star Rating Sort by the Shooting Date 1 Select the images you wish to classify and select Organize Image Sort Images from the File menu 2 Select The...

Page 53: ...tosh 3 Specify the sort settings and click OK The selected images are classified into the specific folder Sort by the Star Rating 1 Select the images you wish to classify and select Organize Image Sor...

Page 54: ...54 Organizing Images 2 Select The files will be organized by Star Rating and click Next 3 Specify the sort settings and click OK...

Page 55: ...ame and copy multiple files 1 Select the images you wish to rename and select Organize Image Rename from the File menu 2 Specify the settings and click OK The images are renamed according to the setti...

Page 56: ...ment or Keywords 1 Select a folder in the explorer view 2 Select Search from the File menu 3 Specify the search conditions and click Search Now The search results are displayed as thumbnails Select at...

Page 57: ...d perform another search click Back and repeat steps 3 4 The images of the search result are displayed in the Search Results folder You can print or copy these images to another folder The images will...

Page 58: ...in the Browser area 2 From the Edit menu select Movie Edit 3 Arrange images and click 2 Effect To change the order of images select an image and click Move Left or Move Right Operational instructions...

Page 59: ...ill Images Macintosh 4 Apply effects to the images and click 3 Audio To set a transition effect you need to select a transition box in the Storyboard Area 5 Set the audio and click 4 Save You can add...

Page 60: ...ve To exit MovieEdit Task from the MovieEdit Task menu select Quit MovieEdit Task Select this to save as Motion JPEG compressed AVI Select this to save as either Motion JPEG compressed AVI or QuickTim...

Page 61: ...d Browser Area movies are displayed with the first scene as a still image with a movie icon 1 In the Browser Area double click a thumbnail with a movie icon Clicking the Play icon at the bottom of the...

Page 62: ...l images and save them as new files and allows saving the shooting properties of the still image to a text file or copying the still images with new names Furthermore you can export still images for u...

Page 63: ...elected Edit and Save Image You can convert still images to another file type resize and save them as new files You can select the file type from BMP PICT JPEG and TIFF You can also specify a prefix t...

Page 64: ...rt as a Screensaver You can export and save the image as a screen saver When you have selected Export an Image as Wallpaper You can export and save the image as a desktop wallpaper This task cannot be...

Page 65: ...l frames Extracts all frames in the movie as still images Specify an interval and extract frames Extracts frames as still images from a specified frame range or time interval Specify the number of cop...

Page 66: ...66 Exporting Images 3 Check the extracted still images and click 3 Save 4 Specify the file name and the folder where you wish to save it and click Save...

Page 67: ...o save sample images for card mix from the DIGITAL VIDEO SOLUTION DISK Only still images with JPEG compression can be saved to the memory card Unable to upload the still images to the disc Adding Stil...

Page 68: ...meraWindow Adding Sample Images to the Memory Card You can save sample images for card mix to the memory card CARD CHROMA CARD ANIMATION CARD LUMINANCE and CAMERA CHROMA are provided on the DIGITAL VI...

Page 69: ...ges Macintosh 2 Connect the camcorder to the computer 25 3 Click the Set to Camera tab in the Camera Control window and Uploads images to the camera 4 Double click the CD ROM icon followed by the DVC...

Page 70: ...70 Exporting Images 5 Open the CAMERA CHROMA CARD ANIMATION CARD CHROMA or CARD LUMINANCE folder select the image you wish to copy to the camcorder and click Open 6 In the Add image window click Add...

Page 71: ...to merge them Please refer to the Camcorder Instruction Manual to learn how to record in Stitch Assist mode The following instruction explains how to merge still images recorded in Stitch Assist mode...

Page 72: ...ng Various Functions 2 Select PhotoStitch from the Edit menu 3 Arrange the order of the still images and click 2 Merge Operational instructions are displayed in the upper section of the window 4 Click...

Page 73: ...mage To exit PhotoStitch from the PhotoStitch menu select Quit PhotoStitch You can record the surroundings in 360 degrees and stitch them together later to form a 360 degrees cylinder In 1 Selection a...

Page 74: ...Select the images you wish to send in the Browser Area 2 From the Internet menu select Create Image for Email 3 Specify the image size and click Next When you select Send without changing the file siz...

Page 75: ...duction ratio relative to the original size of the image Quality Select the image quality The lower the quality the rougher the image becomes but the size of the file also becomes smaller Compress Use...

Page 76: ...m the Browser Area to the new message window Click Preview to check the changed image The image will be saved to the Email Images folder in the explorer view section You can set the e mail software to...

Page 77: ...or Keypad Advances the slide show manually with the mouse or keyboard Repeat Continuously Runs the slide show in a loop Hides buttons Hides the buttons during the slide show Transition Effect Select...

Page 78: ...om the File menu The recording window appears 2 Click and start recording when the Save button is enabled 3 Click Save to stop recording appears on the still image The sound file will be copied in AIF...

Page 79: ...f the Camcorder You can change and confirm the owner name of the camcorder 1 Click the Set to Camera tab and click Confirms changes camera settings in the Camera Control window 2 Enter the camcorder s...

Page 80: ...ired to fix corrupted files Uninstalling ImageBrowser Move the program s folder contain subfolders into the Trash to uninstall programs such as ImageBrowser If the program folders contain subfolders i...

Page 81: ...check the connection Ensure that you are using the correct cable and that its connectors are in good shape If you are experiencing operational problems detach the USB cable from the camcorder and com...

Page 82: ...stern Time CANADA Canon CANADA Inc Tel Canada 1 800 OK CANON 1 800 652 2666 ASIA Canon Hongkong Co Ltd 19 F The Metropolis Tower 10 Metropolis Drive Hunghom Kowloon Hong Kong Phone 852 2170 2828 Fax 8...

Reviews: