background image

Trying the Camera Out

22

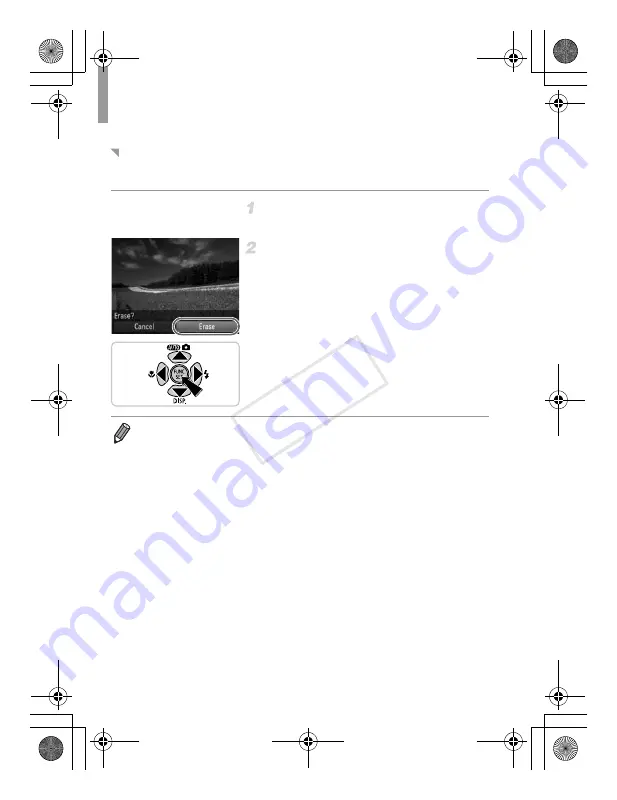
You can choose and erase unneeded images one by one. Be careful when 
erasing images, because they cannot be recovered.

Choose an image to erase.

z

Press the 

qr

 buttons to choose an image.

Erase the image.

z

Press the 

m

 button, press the 

op

 buttons 

to choose 

a

, and then press the 

m

 button 

again.

z

After [Erase?] is displayed, press the 

qr


buttons to choose [Erase], and then press the 

m

 button.

X

The current image is now erased.

z

To cancel erasure, press the 

qr

 buttons to 

choose [Cancel], and then press the 

m


button.

Erasing the Images

You can also erase all images at once (see 

Camera User Guide

).

EC320_GS-EN_Web.book  Page 22  Wednesday, February 15, 2012  2:53 PM

COP

Y

Summary of Contents for PowerShot D20

Page 1: ...precautions This guide will familiarize you with how to use the camera correctly Keep the guide handy for future reference Please refer to the complete user guide included on the CD ROM for more detai...

Page 2: ...f capacity Conforms to SD specifications However not all memory cards have been verified to work with the camera Package Contents About Getting Started This Guide and the PDF Manuals Adobe Reader is r...

Page 3: ...law and note that even for personal use photography may contravene copyright or other legal rights at some performances or exhibitions or in some commercial settings The camera warranty is valid only...

Page 4: ...card The tabs shown above titles indicate whether the function is used for still images movies or both Indicates that the function is used when shooting or viewing still images Indicates that the fun...

Page 5: ...pod socket Memory card battery cover Memory card battery cover lock Waterproof seal n button Release button Strap mount Terminal cover Terminal cover lock Waterproof seal AV OUT Audio video output DIG...

Page 6: ...Not doing so may result in leaks If the waterproof seal is damaged do not use the camera underwater Avoid opening and closing the covers while on the beach or near water Change memory cards and batte...

Page 7: ...ick After washing the camera dry it completely by wiping it with a soft dry cloth After washing and drying the camera make sure the buttons and covers do not stick when pressed or opened and closed To...

Page 8: ...ge eyesight In particular remain at least one meter 39 inches away from infants when using the flash Store this equipment out of the reach of children and infants Strap Putting the strap around a chil...

Page 9: ...nes and medical facilities Do not play the supplied CD ROM s in any CD player that does not support data CD ROMs It is possible to suffer hearing loss from listening with headphones to the loud sounds...

Page 10: ...store the battery when you are not using the camera If the battery is left inside the camera damage caused by leakage may occur Keep the covers closed when the camera is not in use Storing the camera...

Page 11: ...z When shooting keep your arms close to your body and hold the camera securely to prevent it from moving Do not rest your fingers on the flash Before use charge the battery with the included charger B...

Page 12: ...ing the battery charger remove the battery by pushing it in and up CB 2LY CB 2LYE To protect the battery and keep it in optimal condition do not charge it continuously for more than 24 hours For batte...

Page 13: ...rt the battery facing as shown and push it in until it clicks into the locked position z Batteries inserted facing the wrong way cannot be locked into the correct position Always confirm that the batt...

Page 14: ...lease it X The memory card will pop up Red Mark Do not open the covers when the camera is wet or submerged in water If there is moisture on the camera wipe it off with a soft dry cloth until it is com...

Page 15: ...e date and time z Press the qr buttons to choose an option z Press the op buttons to specify the date and time z When finished press the m button Set the local time zone z Press the qr buttons to choo...

Page 16: ...ead choose in step 2 and then choose by pressing the op buttons Changing the Date and Time Date time settings can be retained for about 3 weeks by the camera s built in date time battery backup batter...

Page 17: ...press the m button X Once the display language has been set the setting screen is no longer displayed Display Language The current time is displayed if you wait too long in step 2 after pressing the...

Page 18: ...ible z If either cover is not fully closed water may enter the camera when it gets wet which may damage it Turn the camera on z Press the power button X The startup screen is displayed Enter A mode z...

Page 19: ...twice after focusing and AF frames are displayed to indicate image areas in focus Shoot z Press the shutter button all the way down X As the camera shoots a shutter sound is played and in low light co...

Page 20: ...ecording begins you can take your finger off the movie button Finish shooting z Press the movie button again to stop shooting The camera beeps twice as recording stops X Recording will stop automatica...

Page 21: ...ress the m button z To browse images grouped by shooting date press the op buttons in Scroll Display mode z Movies are identified by a icon To play movies go to step 3 Play movies z Press the m button...

Page 22: ...m button press the op buttons to choose a and then press the m button again z After Erase is displayed press the qr buttons to choose Erase and then press the m button X The current image is now erase...

Page 23: ...nuals on your computer Camera User Guide Once you are familiar with the information in this manual refer to this for a more in depth understanding of camera operation ImageBrowser EX User Guide Refer...

Page 24: ...64 bit 2 GB or more Windows 7 32 bit Windows Vista 64 bit 32 bit 1 GB or more still images 2 GB or more movies Windows XP 512 MB or more still images 2 GB or more movies Interfaces USB Free Hard Disk...

Page 25: ...r s CD ROM drive z On a Macintosh computer after inserting the disc double click the desktop disc icon to open it and then double click the icon displayed Begin the installation z Click Easy Installat...

Page 26: ...and Mac OS X 10 6 are used here for the sake of illustration Connect the camera to the computer z Follow step 3 on p 25 to connect the camera to a computer When not connected to the Internet there ar...

Page 27: ...ages From Canon Camera using Canon CameraWindow and then click OK z Double click Save the images to the computer z Click Import Images from Camera and then click Import Untransferred Images X Images a...

Page 28: ...er without using the included software the following limitations apply It may take a few minutes after you connect the camera to the computer until camera images are accessible Images shot in vertical...

Page 29: ...o 60 minutes Dustproof Capability IEC JIS protection class IP6X equivalent 1 Shock Resistant Capability Canon standard based on MIL Standard 810F Method 516 5 Selecting Procedure IV A US Defense Stand...

Page 30: ...n the subject memory card and camera settings Table values are based on images with a 4 3 aspect ratio Changing the aspect ratio see Camera User Guide will enable more shots because less data is used...

Page 31: ...ry cards are recommended Not available in some shooting modes Approximately 1 3x for underwater shots Recording Time per Memory Card Image Quality Recording Time per Memory Card 8 GB 32 GB 29 min 39 s...

Page 32: ...4 4 x 41 8 x 6 9 mm 1 35 x 1 65 x 0 27 in Weight Approx 21 g approx 0 74 oz Battery Charger CB 2LY CB 2LYE Rated Input 100 240 V AC 50 60 Hz 0 085 A 100 V 0 05 A 240 V Rated Output 4 2 V DC 0 7 A Char...

Page 33: ...d by turning the equipment off and on the user is encouraged to try to correct the interference by one or more of the following measures Reorient or relocate the receiving antenna Increase the separat...

Page 34: ...LY CB 2LYE 1 Power Accessory Kit AKT DC2 1Also available for purchase separately 2High Power Flash HF DC1 also supported 3The included DC coupler is not used 4These accessories can also be used with t...

Page 35: ...malfunction of non genuine Canon accessories e g a leakage and or explosion of a battery pack Please note that this warranty does not apply to repairs arising out of the malfunction of non genuine Ca...

Page 36: ...e for MPEG 4 standard Notice displayed in English as required Disclaimer Reprinting transmitting or storing in a retrieval system any part of this guide without the permission of Canon is prohibited C...

Reviews: