background image

24

The following methods can be used to download images recorded by 
the camera to a computer. Some methods, depending on the OS 
used, may not be available. Please read 

System Requirements

 (p. 25) 

in advance.

„

Camera to Computer Connection

„

Using a Memory Card Reader

A memory card reader can be used with all the operating systems 
listed above. See the 

Software Starter Guide

 for details.

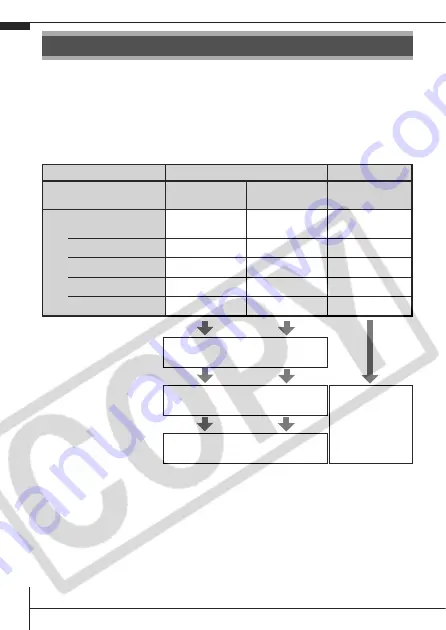
Downloading Images to a Computer

Supplied Software

Install It

Do Not Install It

Downloading Method

Computer 

Procedure

Camera 

Procedure

Computer 

Procedure

OS

Windows 98
Second Edition (SE)

z

z

Windows Me

z

z

Windows 2000

z

z

Windows XP

z

z

z

Mac OS X

z

z

z

Computer System 
Requirements

Basic Guide

 (p. 25)

• Software Starter Guide

Connecting the Camera 
to a Computer

Basic Guide

 (p. 27)

Windows

®

 XP 

and Mac OS X 
Users

 leaflet

Downloading Images to 
a Computer

Basic Guide

 (pp. 28, 29)

• Software Starter Guide

Summary of Contents for PowerShot A710 IS

Page 1: ...Playback Erasing Menus and Settings Printing Basic Downloading Images to a Computer CDI E291 010 XXXXXXX 2006 CANON INC PRINTED IN JAPAN Camera User Guide Please Read This First This guide explains ho...

Page 2: ...ries and memory card Setting the date time and language Shooting Playback Erasing Menus and Settings Handling precautions references to the various shooting and playback functions Printing Installing...

Page 3: ...12 dSelf Timer Lamp p 16 eSpeaker fViewfinder Window Advanced Guide p 16 gFlash p 12 hTerminal Cover iA V OUT Audio Video output Terminal Advanced Guide p 88 jDIGITAL Terminal p 27 kDC IN Terminal Po...

Page 4: ...16 cWrist Strap Mount dMemory Card Slot Battery Cover Lock p 5 eMemory Card Slot Battery Cover p 5 fTripod Socket The LCD monitor is covered with a thin plastic film for protection against scratches d...

Page 5: ...p 8 fShooting Mode Dial pp 8 9 gMode Switch pp 8 18 h Print Share Button pp 22 30 iFUNC SET Function Set Button Advanced Guide p 18 jMENU Button Advanced Guide p 19 kDISP Display Button Advanced Guide...

Page 6: ...e data Shake or jolt the camera Shut off the power or open the memory card slot battery cover Green Ready to shoot Blinking Green Image recording reading erasing transferring when connected to a compu...

Page 7: ...rt the memory card until it clicks into place 2 Close the memory card slot battery cover Preparations See the Advanced Guide Battery Handling p 103 Ensure that the memory card is correctly oriented be...

Page 8: ...sh the memory card with your finger until the memory card clicks and then release it You can use SD memory cards SDHC memory cards and MultiMediaCards with this camera These cards are collectively cal...

Page 9: ...menu p 21 Setting the Display Language 1 Set the mode switch to playback 2 Hold down the FUNC SET button and press the MENU button 3 Use the or button to select a language and press the FUNC SET butt...

Page 10: ...the shooting mode dial to b 4 Aim the camera at the subject 5 Focus and shoot 1 Press the shutter button halfway to focus When the camera focuses the camera beeps twice and the indicator lights green...

Page 11: ...eeping the shutter button pressed after a shot Pressing the FUNC SET or DISP button while the image is displayed in the LCD monitor To stop displaying the image press the shutter button halfway Select...

Page 12: ...making people appear dark against a snowy background Foliage Shoots trees and leaves such as new growth autumn leaves or blossoms in vivid colors Beach Shoots without making people appear dark near wa...

Page 13: ...osure and aperture value to suit your shooting purposes The shutter speed is slow in or mode Always use a tripod to avoid camera shake In or mode the ISO speed may increase and cause noise in the imag...

Page 14: ...ms The zoom bar appears when you press the zoom lever Using the Flash 1 Press the button to cycle through flash settings Telephoto Zooms in on the subject Wide Angle Zooms out from the subject Each ti...

Page 15: ...the Red Eye Reduction Function p 14 See Setting the Slow Synchro Function p 14 or cannot be set in mode You are recommended to shoot with the camera attached to a tripod or other device if the camera...

Page 16: ...adjusted to slow shutter speeds This reduces the chance that only the background will appear dark when a person is shot against a twilight background or night scene or when an interior shot is taken 1...

Page 17: ...ess the button to turn off the or display Macro Use this mode to shoot close ups of flowers or small items Image Area at Minimum Shooting Distance from End of Lens to Subject Maximum wide angle settin...

Page 18: ...fore the shutter releases the self timer sound and lamp will speed up 1 2 sec Self Timer Shoots 2 sec after you press the shutter button The self timer sound beeps quickly 1 when you press the shutter...

Page 19: ...s and Settings p 20 If the Shots option is set to 2 or more shots the following occurs The exposure and white balance are locked at the settings selected for the first shot If the flash is used the in...

Page 20: ...has been switched or the images on the memory card have been edited with a computer the newest image on the memory card appears 2 Use the or button to display the image you wish to view b Use the but...

Page 21: ...and press the button b 2 Confirm that Erase is selected and press the FUNC SET button c To exit instead of erasing select Cancel Erasing Please note that erased images cannot be recovered Exercise ade...

Page 22: ...on to select a menu item Some items may not be selectable in some shooting modes dUse the or button to select an option for the menu item You can select further options with the MENU button for some o...

Page 23: ...electable in some shooting modes dUse the or button to select an option Menu items followed by an ellipsis can only be set after pressing the FUNC SET button to display the next menu Press the FUNC SE...

Page 24: ...e printer s power 1 Since this camera uses a standard protocol PictBridge you can use it with other PictBridge compliant printers in addition to Canon brand printers 2 You can also use card photo prin...

Page 25: ...lue The displayed icon will vary according to the printer model will display for movies 3 Select an image to print using the or button b and press the button c The button will blink blue and printing...

Page 26: ...See the Software Starter Guide for details Downloading Images to a Computer Supplied Software Install It Do Not Install It Downloading Method Computer Procedure Camera Procedure Computer Procedure OS...

Page 27: ...z or higher processor RAM Windows 98 SE Windows Me 128 MB or more Windows 2000 Windows XP 256 MB or more Interface USB Free Hard Disk Space Canon Utilities ZoomBrowser EX 200 MB or more PhotoStitch 40...

Page 28: ...le reviewing installation settings 3 When the installation is complete Click either the Finish or Restart button that appears 4 Remove the Canon Digital Camera Solution Disk from the CD ROM drive when...

Page 29: ...able in all the way 2 Set the camera s mode switch to playback and turn on the power The camera and computer will be able to communicate Always grasp the sides of the connector when disconnecting the...

Page 30: ...mall versions of the downloaded images will display in the ZoomBrowser EX Main Window By default the downloaded images are saved into subfolders according to their shooting dates If the window to the...

Page 31: ...the images using the camera or the computer By default the downloaded images are saved into the Pictures folder Thumbnails small versions of the downloaded images will display in the ImageBrowser Bro...

Page 32: ...blink blue while downloading is in progress The display will return to the Direct Transfer menu when the download is complete To cancel the download press the FUNC SET button All Images Transfers and...

Page 33: ...yback Advanced Guide p 71 Press the MENU button to return to the Direct Transfer menu Only JPEG images can be downloaded as wallpaper for a computer On the Windows platform the files are automatically...

Page 34: ...32 MEMO...

Page 35: ...human or animal eyes Store this equipment out of the reach of children and infants Avoid dropping or subjecting the camera to severe impacts Do not touch the flash portion of the camera if it has been...

Reviews: