background image

7

Pre

parat

ions

Turning the Power On/Off

„

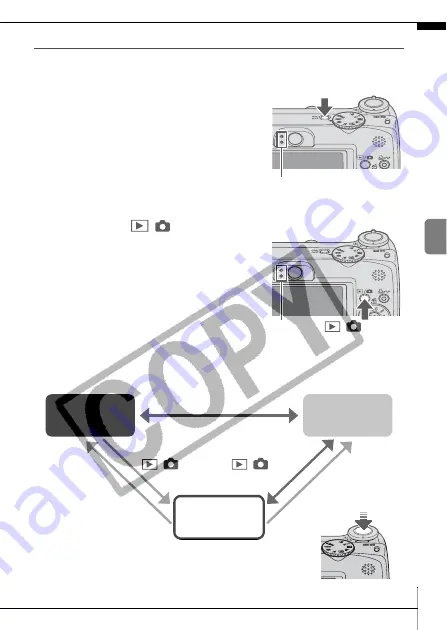
Turning the Camera On/Off in Shooting Mode

1. Press the power button.

The indicators blink while the 
camera turns on.

2. Pressing the power button again 

turns the power off.

„

Turning the Camera On/Off in Playback Mode

1. Press the 

/

 button.

The indicators blink while the 
camera turns on.

2. Press the power button to turn 

the power off.

„

Switching between Shooting Mode and Playback 
Mode

Power Button

Indicators

/

 Button

Indicators

Press the 

/

button.

Press the power button.

Press the shutter 
button halfway.

Press the 

/

button.

Shooting 

Mode

Playback 

Mode

Power Off

Press the power 
button.

Summary of Contents for PowerShot A560

Page 1: ...ng Playback Erasing Menus and Settings Printing Basic Downloading Images to a Computer CDI E277 010 2007 CANON INC PRINTED IN MALAYSIA Camera User Guide Please Read This First This guide explains how...

Page 2: ...anguage Shooting Playback Erasing Menus and Settings Handling precautions references to the various shooting and playback functions Printing Installing the software Downloading images to a computer Us...

Page 3: ...ide p 21 cRed Eye Reduction Lamp Advanced Guide p 30 dSelf Timer Lamp p 16 eViewfinder Window Advanced Guide p 16 fFlash p 14 gTerminal Cover hA V OUT Audio Video output Terminal Advanced Guide p 72 i...

Page 4: ...Lock p 5 fMemory Card Slot Battery Cover p 5 gTripod Socket In order to avoid dropping the camera we recommend attaching the wrist strap before using the camera The LCD monitor may be covered with a t...

Page 5: ...eShooting Mode Dial pp 9 11 f Print Share Button p 21 gFUNC SET Function Set Button p 19 Advanced Guide p 18 hMENU Button p 20 Advanced Guide p 19 iDISP Display Button Advanced Guide p 12 j Playback...

Page 6: ...ra Shut off the power or open the memory card slot battery cover Green Ready to shoot camera beeps twice when connected to a computer Blinking Green During camera startup image recording reading erasi...

Page 7: ...ace 2 Close the memory card slot battery cover a pressing down and sliding it until it clicks into place b Preparations See the Advanced Guide Battery Handling p 96 Ensure that the memory card is corr...

Page 8: ...sh the memory card with your finger until the memory card clicks and then release it You can use SD memory cards SDHC memory cards and MultiMediaCards with this camera These cards are collectively cal...

Page 9: ...off Turning the Camera On Off in Playback Mode 1 Press the button The indicators blink while the camera turns on 2 Press the power button to turn the power off Switching between Shooting Mode and Pla...

Page 10: ...Set up menu p 20 Setting the Display Language 1 Press the button 2 Hold down the FUNC SET button and press the MENU button 3 Use the or button to select a language and press the FUNC SET button The di...

Page 11: ...ssing and holding the DISP button will turn on the mute setting which will mute all sounds except for warning sounds 2 Set the shooting mode dial to 3 Aim the camera at the subject Shooting See the Ad...

Page 12: ...an Image Right After Shooting After a shot is taken the image appears in the LCD monitor for approximately 2 seconds You can continue to display images regardless of the review duration setting with...

Page 13: ...conditions is selected the camera automatically adjusts settings for optimal shooting Portrait Produces a soft effect when photographing people Landscape Optimized for shooting landscape scenes which...

Page 14: ...n leaves or blossoms in vivid colors Fireworks Captures fireworks in the sky sharply and at optimal exposure Night Scene Allows you to capture human subjects against the backdrop of an evening sky or...

Page 15: ...ail attachments Manual Allows you to select settings yourself such as the exposure compensation white balance My Colors or ISO speed The shutter speed is slow in or mode Always use a tripod to avoid c...

Page 16: ...be set in mode You are recommended to shoot with the camera attached to a tripod or other device if the camera shake warning icon appears When the LCD monitor is on and flash recharging begins the in...

Page 17: ...2 4 1 8 in Minimum focusing distance 5 cm 2 0 in Maximum telephoto setting 94 71 mm 3 7 2 8 in Minimum focusing distance 33 cm 1 1 ft Use the LCD monitor to compose close ups in macro mode since image...

Page 18: ...he self timer sound beeps quickly and the lamp will speed up 2 sec delay The shutter releases 2 sec after the shutter button is pressed The self timer sound beeps quickly when the shutter button is pr...

Page 19: ...ooting modes If the Shots option is set to 2 or more shots the following occurs The exposure and white balance are locked at the settings selected for the first shot If the flash is used the interval...

Page 20: ...o view b Use the button to move to the previous image and the button to move to the next image Holding the button down advances the images more rapidly but shows them less clearly 1 In the playback mo...

Page 21: ...ton c Use the or button to select a menu item Some items may not be selectable in some shooting modes d Use the or button to select an option for the menu item You can select further options with the...

Page 22: ...selectable in some shooting modes d Use the or button to select an option Menu items followed by an ellipsis can only be set after pressing the FUNC SET button to display the next menu Press the FUNC...

Page 23: ...ter and turn on the printer s power 1 Since this camera uses a standard protocol PictBridge you can use it with other PictBridge compliant printers in addition to Canon brand printers 2 You can also u...

Page 24: ...he displayed icon will vary according to the printer model The icon will display for movies 3 Select an image to print using the or button b and press the button c The button will blink blue and print...

Page 25: ...rating systems listed above See the Software Starter Guide for details Downloading Images to a Computer Supplied Software Install It Do Not Install It Downloading Method Computer Procedure Camera Proc...

Page 26: ...er RAM Windows 2000 Windows XP 256 MB or more Windows Vista 512 MB or more Interface USB Free Hard Disk Space zCanon Utilities ZoomBrowser EX 200 MB or more PhotoStitch 40 MB or more zCanon Camera TWA...

Page 27: ...sy Installation Follow the onscreen instructions to proceed 3 When the installation is complete click either the Finish or Restart button that appears 4 Remove the Canon Digital Camera Solution Disk f...

Page 28: ...in all the way 2 Press the button to turn on the power The camera and computer will be able to communicate Always grasp the sides of the connector when disconnecting the interface cable from the camer...

Page 29: ...ures folder Thumbnails small versions of the downloaded images will display in the ZoomBrowser EX Main Window By default the downloaded images are saved into subfolders according to their shooting dat...

Page 30: ...g the camera or the computer By default the downloaded images are saved into the Pictures folder Thumbnails small versions of the downloaded images will display in the ImageBrowser Browser Window By d...

Page 31: ...he button will blink blue while downloading is in progress The display will return to the Direct Transfer menu when the download is complete To cancel the download press the FUNC SET button All Images...

Page 32: ...ide p 61 Press the MENU button to return to the Direct Transfer menu Only JPEG images can be downloaded as wallpaper for a computer On the Windows platform the files are automatically created as BMP i...

Page 33: ...31 MEMO...

Page 34: ...32 MEMO...

Page 35: ...o human or animal eyes Store this equipment out of the reach of children and infants Avoid dropping or subjecting the camera to severe impacts Do not touch the flash portion of the camera if it has be...

Reviews: