background image

89

Menu Featur

es

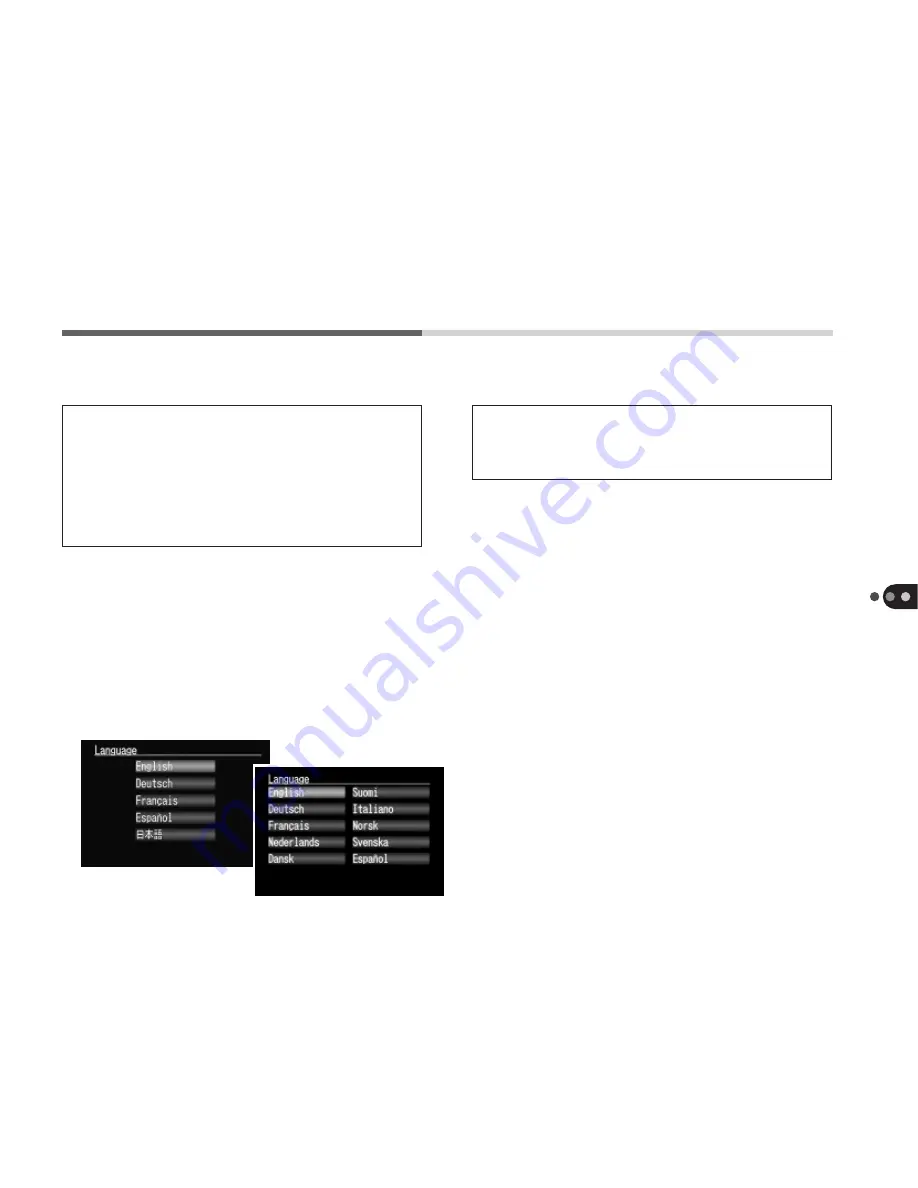
Language

Use the Language option to change the
language in which messages on the LCD
panel are displayed.

The Language menu may appear differ-
ently on cameras in some regions.

• If you are having difficulty with a CF

card made by a manufacturer other
than Canon, reformatting it may solve
the problem. If it doesn’t, consult the
outlet from which you purchased the
card.

• Use the +/- buttons to move between

language selections and the SET button
to execute the selection.

Shortcut

Hold the SET button down in PLAY mode and
press the MACRO/JUMP button to display this
menu directly.

Summary of Contents for Powershot A50

Page 1: ...Read this guide first if you are new to this camera It describes the camera functions setup and operating procedures ...

Page 2: ...for Use Start Taking Pictures Load Images onto a Computer Digital Camera Operating Steps and Reference Guides Install the Software PowerShot A50 Solutions Disk s Hardware Guide This Guide PowerShotA50SoftwareStarterGuide ...

Page 3: ...en Help or Using softwarename On screen Guide or PowerShot A50 Software Stater Guide Read This First Camera Setup Quick Start Basic Functions Buttons Mode Dial Functions Stitch Assist Mode Menu Features Other Functions Appendices Customer Support ...

Page 4: ...orm by any means without the prior written permission of Canon Inc Canon Inc makes no warranties for damages resulting from corrupted or lost data due to a mistaken operation or malfunction of the camera the software the CompactFlash cards CF cards personal computers peripheral devices or use of non Canon CF cards Trademark Acknowledgments Canon and PowerShot are trademarks of Canon Inc CompactFla...

Page 5: ...erference to radio or television reception which can be determined by turning the equipment off and on the user is encouraged to try to correct the interference by one or more of the follow ing measures Reorient or relocate the receiving antenna Increase the separation between the equipment and receiver Connect the equipment into an outlet on a circuit different from that to which the receiver is ...

Page 6: ... 29 Quick Start Taking Pictures 32 Taking pictures in Auto Mode 32 Replaying Images 34 Replaying Images in PLAY Mode 34 Replaying Images in MULTI Mode 34 Erasing Images 36 Erasing Images from a CF Card 36 Detailed Guide to the Functions Basic Functions 40 Image Size and Quality Specifications 40 Power On Off Switch 41 Camera Modes 42 Display Panel 43 Viewfinder 44 Indicators 45 Upper Indicator 45 ...

Page 7: ...9 Multi Mode 59 PC Mode 60 Stitch Assist Mode 61 Procedures for Shooting Horizontal Vertical Sequences 63 Procedures for Shooting 2 x 2 Matrix Sequences 65 Menu Features 68 Basic Menu Operations 69 Record Menu 70 Quality 70 Exp 72 White Balance 73 Slow Shutter 74 Play Menu 75 Show Hide Info 75 Erase 76 Protect 77 Rotate 77 Slide Show 78 Print Order 81 Setup 85 LCD 85 Beep 85 Power Save 85 Date Tim...

Page 8: ... 90 Connecting to a TV 90 Changing the Button Battery 91 Changing the Recording Format 94 Appendices 95 Camera Maintenance 95 Troubleshooting 96 List of Message Codes 100 List of Messages 101 Specifications 102 Index 105 Customer Support 107 ...

Page 9: ... subsidiaries and affiliates and distributors of its digital cameras are not liable for any consequential damages arising from any malfunction of a PowerShot camera or CompactFlash card CF card that results in the failure of an image to be recorded or to be recorded in a format that is machine sensible Warning Against Copyright Infringement Please note that PowerShot digital cameras are intended f...

Page 10: ...eyesight Do not trigger the optional flash in close proximity to human or animal eyes Exposure to the intense light produced by the flash may injure eyesight In particular remain at least one meter 39 inches away from infants when using the flash Store this equipment out of the reach of children and infants Accidental damage to the camera or batteries by a child could result in serious injury In a...

Page 11: ... it is dropped or the casing is damaged Failure to do so may result in fire or electrical shock Immediately power off the camera turn the Mode Dial to the L Lock position and remove the camera battery or unplug the compact power adapter from the electrical outlet Please consult your camera distributor or the closest Canon Customer Support Help Desk Prevent the equipment from contact with or immers...

Page 12: ...iquids which may result in fire electrical shock explosion and serious injury Do not attempt to disassemble alter or apply heat to the batteries There is serious risk of injury due to an explosion Immediately flush with water any area of the body including the eyes and mouth or clothing that comes into contact with the inner contents of a battery If the eyes or mouth contact these substances immed...

Page 13: ...e and other hazards Caution Avoid using placing or storing the equipment in places subject to strong sunlight or high temperatures such as the dashboard or trunk boot of a car Exposure to intense sunlight and heat may cause the batteries to leak overheat or explode resulting in fire burns or other injuries High temperatures may also cause deformation of the casing Ensure that there is good ventila...

Page 14: ...irtight plastic bag and letting it adjust to temperature changes slowly before removing it from the bag If Condensation Forms Inside the Camera Stop using the camera immediately if you detect condensation Continued use may damage the equipment Remove the CF card battery and compact power adapter if connected from the camera and wait until the moisture evaporates completely before resuming use Exte...

Page 15: ...ead This First Guide to Components Viewfinder p 44 Autofocus AF Auxiliary Light Emitter Flash p 51 Red Eye Reduction Lamp p 51 VIDEO Terminal p 90 DIGITAL Terminal see Software Starter Guide Lens Front View ...

Page 16: ...ttery Cover p 20 Battery Cover Lock p 20 Tripod Socket The LCD panel is produced with extremely high precision manufacturing techniques with more than 99 99 of the pixels operating to specification Less than 0 01 of the pixels may occasionally misfire or appear as black or red dots This has no effect on the recorded image and does not constitute a malfunction ...

Page 17: ...nel p 43 Operation panel Indicators p 45 SET Button pp 55 69 MENU Button pp 54 69 MACRO JUMP Button p 52 LCD VIDEO Button p 54 Zoom Buttons p 49 Continuous Self Timer Button p 49 Flash Button p 51 Shutter Button p 46 Mode Dial p 56 ...

Page 18: ...below to charge Battery Pack NB 5H before installing it in the camera 1 Attach the AC power cord to Compact Power Adapter CA PS100 100E and plug it into an electrical outlet 2 Set the battery pack into the compact power adapter as shown below Battery Pack NB 5H While charging the CHARGING indicator on the charger will flash green Once the battery pack has charged the CHARGING indicator will stop f...

Page 19: ...eries other than Battery Pack NB 5H with the compact power adapter The battery pack continues to discharge a minute amount while it is left in the camera even if the camera is not used Since continual discharge will shorten the life of the battery pack you should remove it from the camera when it is not in use and store it in the supplied case in a cool dry place Remember to charge it fully before...

Page 20: ...position The following describes how to insert Battery Pack NB 5H or 2CR5 lithium battery into the camera Fully charge Battery Pack NB 5H before using it for the first time 1 Ensure that the Mode Dial is turned to the L Lock position power off 2 Slide the battery cover lock to the release position and open the battery cover Installing the Battery Pack Battery Terminals 2CR5 NB 5H ...

Page 21: ...y pull it out Indent 2CR5 Lithium Batteries Please note that using 2CR5 lithium batteries at low temperatures will severely limit their performance Even new batteries may only provide power for a few shots You can obtain more shots if you warm the battery in your pocket immediately prior to use When operating the camera at close to 32 F 0 C keep the LCD panel off and compose images with the optica...

Page 22: ... will vary with shooting conditions and camera modes Shooting room temperature Large Fine zoom used flash fired once every four shots Replay room tempera ture continuous replay of one image every 5 seconds You are advised to use a power kit sold separately in some regions a charged battery pack or an AC adapter if you will be using the camera frequently at low temperatures loading images onto a co...

Page 23: ...he camera Unplug the compact power adapter cord from the electrical outlet after use The compact power adapter can only be used as an AC power source for products specified for use with Battery Pack NB 5H DC Coupler DR 100A Cable Cover To power the camera with an AC power source connect DC Coupler DR 100A to Compact Power Adapter CA PS100 100E as shown below and replace Battery Pack NB 5H with the...

Page 24: ...ted with other application software may cause malfunctions 1 Slide the lock for the CF card slot cover to the open position and open the cover The CF card eject button will pop up when a card is inserted Use this button to eject a card 2 As shown below orient the card with its label side facing up and insert it into the slot until it is firmly seated Label Side Arrow Mark 3 Close the CF card slot ...

Page 25: ...ion To avoid condensation place the CF card into a sealed plastic bag before moving it into a different temperature zone and allow it to adjust slowly to the new temperature If condensation forms on the CF card put it aside until the water droplets have evaporated completely Place the CF card in the supplied case for storage Do not use or store CF cards in the following types of location Locations...

Page 26: ...rties dialog will appear Click the Device Manager tab and select View devices by connection check box at the top 3 Click the Computer option select the device with the PC card icon and click the Remove button 4 When the Confirm Device Removal dialog appears click the OK button 5 Close the System Properties dialog 6 Remove the CF card from the slot How to Install the SanDisk ATA FlashDisk Device Dr...

Page 27: ...it 1 Insert the thin part of the wrist strap through the strap holder 2 Insert the other end of the wrist strap through the loop of the thin part that you inserted through the strap holder in step 1 3 Pull the wrist strap through the loop of the thin part until the loop slips over the plastic part of the strap Strap holder ...

Page 28: ... differ ently on cameras in some regions SET Button MACRO JUMP Button Buttons LCD Panel 1 Turn the Mode Dial to the PLAY position 2 Press and hold the SET button then press the MACRO JUMP button to display the Language menu 3 Use the buttons to move between language selections and the SET button to execute the selection Mode Dial ...

Page 29: ...ing the Date and Time Set the correct date and time with the following procedures SET Button MENU Button Buttons LCD Panel 1 Turn the Mode Dial to the Auto position 2 Press the MENU button to display the Rec menu Mode Dial ...

Page 30: ... button to save your selection and exit 7 Turn the Mode Dial to the L Lock position to shut off the power 3 Press the buttons to select Setup Then press the SET button to display the Setup menu 4 Select Date Time with the buttons and press the SET button The Date Time menu will be displayed The factory default for the date display style may differ in some regions ...

Page 31: ...set up lets jump right into picture taking This section explains the most basic procedures for taking reviewing and deleting images Since any images you record can be readily deleted try actually taking some shots as you read through this section ...

Page 32: ...e beep sounds twice 5 After the beeps press the shutter button all the way A single beep will indicate that the image has been taken 6 You can now take another picture Turn the Mode Dial to the L Lock position when you wish to stop taking pictures Shutter Button Viewfinder Zoom Buttons About Power Save The lens cover will close and the camera will automatically power down if left for 3 minutes Tur...

Page 33: ...not open the battery cover or CF card slot cover while this indicator is flashing Press Halfway Press Fully However the next shot can usually be taken while the green light is flashing p 47 Other Shooting Features Using the LCD Panel to Compose a Shot p 54 Reviewing an Image on the LCD Panel p 86 Focusing on an Object at the Edge of a Composition p 48 Shooting Close Ups Macro Mode p 52 Shooting Te...

Page 34: ...he previous image 3 When you have finished viewing images turn the Mode Dial to the L Lock position Replaying Images in PLAY Mode Replays images one at a time on the LCD panel Replaying Images in MULTI Mode Replays sets of up to 9 images on the LCD panel 1 Turn the Mode Dial to the MULTI position Mode Dial LCD Panel Buttons Mode Dial Replaying Images ...

Page 35: ... or previous nine images by pressing the MACRO JUMP button and buttons To select an image press the MACRO JUMP button again 3 When you have finished viewing images turn the Mode Dial to L Lock position Other Replay Features Continuous Image Replay Slide Shows p 78 Displaying images on a TV p 90 Rotating Images p 77 Displaying the date and time information for an image p 75 ...

Page 36: ...t the image to be erased 3 Press the MENU button 4 Press the buttons to select Erase then press the SET button Mode Dial 5 Press the buttons to select Single then press the SET button 6 Check the image then press the SET button 7 Press the buttons to select OK or Cancel in the erase confirmation screen then press the SET button Buttons Menu Button SET Button Erasing Images ...

Page 37: ...f you want to stop the erase procedure select Cancel To display the previous menu press the MENU button Shortcut In Play mode you can erase the currently displayed image by pressing and holding the SET button and pressing the button The erase confirmation screen will display ...

Page 38: ......

Page 39: ...ctions This section provides individual explana tions of each camera function Read it to find out more detail about each function or for instructions on using the advanced modes such as the Stitch Assist mode and Menu settings ...

Page 40: ...de the default size and quality settings are Small Fine or Small Normal p 49 Figures noted herein reflect standard shooting conditions established by Canon Actual file sizes will vary among photographic subjects Basic Functions Image Size and Quality Specifications The PowerShot A50 can take pictures with the following screen sizes and qualities Large Fine 1280 x 960 JPEG High Quality 320 KB Large...

Page 41: ... for approximately three minutes Playback Modes The camera automatically powers down if you do not use a camera function for approximately five minutes PC Mode When connected to a computer a message is displayed on the computer monitor if you do not use a camera function for approximately five minutes If you do not use a camera function for an additional minute the camera automatically powers down...

Page 42: ...ly by the camera The exposure can be fine tuned manually with the Exposure Compensation function Stitch Assist Mode Taking pictures in this mode is helpful if you intend to merge several images into a single high quality panoramic image Merging images is easy if you use the PhotoStitch software program Playback Modes PLAY Play Mode Play mode is for viewing images recorded on the CF card Images are...

Page 43: ... current size and quality settings Changing size and quality settings will alter the number of images that can be stored in the CF card Message codes on the Display panel will indicate errors or the camera status p 100 Single Mode Continuous Mode Self Timer Mode Fine Normal CCD RAW Large Small Flash On Flash Off Red Eye Reduction Macro Mode Exposure Compensation Beep On Low Battery Clock Not Set ...

Page 44: ...encompassed by the square brackets in the viewfinder s center When composing images aim the camera so that the photographic subject is in the middle of the viewfinder Pressing the shutter button halfway locks the focus until the button is released This allows you to focus on a particular object while freely changing the image composition A moment after depressing the shutter button halfway two bee...

Page 45: ... when data such as images or print information is being written to the CF card Never open the battery cover or CF card slot cover while the indicator is flashing Opening either cover could corrupt the data being written to the CF card When the battery charge weakens the LCD panel will shut off and Lb will show in the display panel You are advised to replace the battery when this shows To warn you ...

Page 46: ...will flash red and the shaking hands icon will display in the bottom of the LCD panel This is a warning that hand tremors or camera movement may blur the image In the Macro mode the lower indicator will shine orange In the Exposure Compensation mode the subject will display in the LCD panel after the second beep if the LCD panel is turned on when the shutter button is pressed halfway Pressing Full...

Page 47: ... continuously while the shutter button is pressed halfway Rapid Shot Function When a picture is taken the data is temporarily stored in the camera s on board memory until it can be written to the CF card As long as there is adequate free capacity in the on board memory a second shot can be taken immediately after the first When the on board memory is fills up the camera will beep and temporarily c...

Page 48: ...ou can take a second picture at the same focal setting simply by pressing the shutter button all the way down again Situations Not Suited to Autofocus Photography Some subjects are not suited to autofocus photography For these subjects aim the camera at another object at the same distance press and hold the shutter button halfway to lock the focus and re aim the camera at the subject The following...

Page 49: ...r the first shot has been taken in Stitch Assist mode Continuous Self Timer Button Auto Mode This button turns the Self Timer mode on and off The icon indicates the Single frame mode One frame is shot when the shutter button is pressed The icon indicates the Self Timer mode The shutter will activate 10 seconds after the shutter button is pressed Program Mode This button switches between the Single...

Page 50: ...atically activate 10 seconds after the shutter button is pressed Play Mode This button displays the next stored image Multi Mode This button selects the next stored image Menu Button This button moves the selection to the next option Self Timer Procedures With the Self Timer mode activated the shutter activates 10 seconds after the shutter button is pressed You can tell when the Self Timer has bee...

Page 51: ...each shot The Red Eye Reduction mode counter acts the tendency for flash photography to produce the red eye effect in prints of humans and animals the result of light reflected back from the subjects retinas The flash emitted before the actual shutter operation causes the subjects irises to narrow in advance thereby reducing the potential for reflections back from the retinas When shooting in the ...

Page 52: ...am or Stitch Assist Mode This button turns the Macro mode on or off The icon indicates that the Macro mode is on In Macro mode the lower indicator will shine orange when you press the shutter button halfway In Macro mode the actual area shot by the lens is slightly lower than the area shown in the viewfinder The closer the camera is to the photographic subject the larger the difference between the...

Page 53: ...ble In Play mode press the button to jump 9 images ahead the button to jump 9 images back In Play mode you can also press and hold the SET button and press the button to jump to the last image Substitute the button to jump to the first image In Multi mode turning on the Jump mode enables you to display the next or previous set of nine images by pressing the buttons In Multi mode you can also press...

Page 54: ...ut Auto or the Slow Shutter function is set to any setting but Off The LCD VIDEO button can be pressed to turn it off In Stitch Assist mode the LCD panel is automatically turned on The Video Output does not function while shooting is in progress If the LCD panel is left on for a long period the camera may become warm This is normal and does not constitute a breakdown MENU Button Auto Mode Program ...

Page 55: ... p 68 When a menu is already displayed on the LCD panel pressing the MENU button restores the previous screen SET Button This button selects the current menu option shown on the LCD panel Image Quality and Size Settings LCD Panel MENU Button SET Button SET Button Pressed ...

Page 56: ...ode In Auto mode the camera selects whether or not to use the flash and automatically chooses focus exposure and white balance settings The size is fixed at Large for this mode but the quality setting can be changed It is convenient to use this mode for normal picture taking Buttons Available in Auto Mode Macro Button Use this button to shoot a photographic subject 6 7 to 20in 17 to 50cm from the ...

Page 57: ...his button The icon indicates that the Red Eye Reduction mode is selected The icon indicates the Flash On mode is selected The icon indicates the Flash Off mode is selected Macro Button Use this button when you want to shoot a subject 6 7 to 20in 17 to 50cm from the lens The icon appears in the Display Panel when this mode is selected Continuous Self Timer Button Use this button to activate the Co...

Page 58: ...graphic subject that won t fit into a single frame such as a landscape and stitch it together later with a program such as PhotoStitch This mode displays the previous images while you shoot the next in a horizontal vertical or matrix sequence of images Horizontal Sequence 4 4 4 3 3 3 1 1 1 2 2 2 See Stitch Assist Mode for more detail on this subject p 61 2x2 Matrix Sequence Vertical Sequence 4 4 4...

Page 59: ... or button displays the last or first image respec tively CCD RAW images are displayed as miniature thumbnails not full screen Multi Mode In Multi mode you can display images from the CF card in groups of nine on the LCD panel A green border indicates the selected image Move the selection between images using the buttons and display the selection at full size by turning the Mode Dial to the PLAY p...

Page 60: ...image processing application program The Display panel will display PC when the camera is ready to display or load images on the computer The camera may cease to respond when the Mode Dial is turned from the PC position to another setting Turn the Mode Dial to the L Lock position and back again or press any button to resume normal operation Please refer to the PowerShot A50 Software Starter Guide ...

Page 61: ...can be set with the Macro button Stitch Assist Mode Retaking a Picture In this mode repeatedly pressing the button enables you to scroll through the images to confirm the current merge sequence and to retake an image if required To retake an image in a horizontal or vertical sequence press the button to return to the previous image and take the shot Press the button again to return to the original...

Page 62: ... mode The CD ROM that accompanied the camera contains the PhotoStitch Shooting Guide an On screen Guide introducing shooting hints and techniques for improved results with PhotoStitch Please read this guide before shooting In some regions the PhotoStitch Shooting Guide is included in print in the PowerShot A50 Software Starter Guide ...

Page 63: ...Dial to the Stitch Assist position 2 Select Horizontal or Vertical with the buttons and press the SET button To change the direction press the button 3 Shoot the first image After the indicator stops flashing green the next image appears beside the previous image 4 4 4 3 3 3 1 1 1 2 2 2 4 4 4 3 3 3 1 1 1 2 2 2 Horizontal Sequence ...

Page 64: ... photographic subject captured by the lens 5 Follow the same steps to shoot subsequent images in the sequence Do not worry about minor discrepancies in the overlapped areas because the computer software can compensate for them when the images are merged You can check through a sequence by repeatedly pressing the button Release the button to retake the previous image A maximum of 26 frames may be s...

Page 65: ...sist position 2 Select 2x2 with the buttons and press the SET button 3 Shoot the first image After the indicator stops flashing green the recorded image will display in the upper right and a preview of the new photographic subject captured by the lens will appear in the lower right 4 4 4 3 3 3 1 1 1 2 2 2 ...

Page 66: ...fter the indicator stops flashing green the second recorded image will display in the lower right and a preview of the new photographic subject captured by the lens will appear in the lower left 5 Orient the camera so that the third image will correctly overlap a portion of the second image and take the shot After the indicator stops flashing green the third recorded image will display in the lowe...

Page 67: ...areas because the computer software can compensate for them when the images are merged You can check through the sequence by pressing and holding the button which will cause the lens preview to disappear 7 Finish the sequence by pressing the SET button after all the images have been recorded To retake a shot press the button to advance to the image you want to replace wait until the lens preview d...

Page 68: ... the LCD panel brightness Setup menu Menu Features Record Menu Quality p 70 Exp p 72 White Balance p 73 Slow Shutter p 74 Setup p 85 LCD p 85 Beep p 85 Power Save p 85 Date Time p 86 Review p 86 File No Reset p 87 Play Menu Auto Mode Program Mode Stitch Assist Mode Show Hide Info p 75 Erase p 76 Protect p 77 Rotate p 77 Setup p 85 LCD p 85 Beep p 85 Power Save p 85 Date Time p 86 Format p 88 Langu...

Page 69: ...n to indicate its selection Press the button to display the next option and press the button to display the previous option Pressing and holding either button will cause the highlight to move continu ously to the next option SET Button This button confirms the selection of a menu option or a setting When there is a submenu available pressing this button advances the display to the next menu level ...

Page 70: ...posure Compensation is set to 0 the White Balance to Auto and the Slow Shutter to Off No other settings are available for these functions in Auto mode Quality The Quality option is used to set the format in which the image will be recorded Image quality can be set to Normal Fine or CCD RAW and the to Large or Small Auto Mode Program Mode Stitch Assist Mode ...

Page 71: ...B CCD RAW 1280 x 960 No Compression 1560 KB JPEG file sizes will vary between photographic subjects The file sizes given here reflect standard shooting conditions estab lished by Canon The Small and CCD RAW sizes are not available in Auto mode CCD RAW size is not available in Stitch Assist mode A second CCD RAW picture can not be started until the first image has been completely written to the CF ...

Page 72: ... the LCD panel as you adjust the exposure with the buttons Press the SET button or MENU button to confirm the setting Once a setting other than zero has been selected the Display Panel will show a icon and the icon will display in the lower left of the LCD panel After the setting is set the image can be shot as shown in the LCD display simply by pressing the shutter button The Exposure Compensatio...

Page 73: ...escent settings are available Settings other than Auto will cause the respective icon to display in the lower left of the LCD panel Icons Auto Camera selects the setting automatically Day Light For shooting outdoors in bright daylight Cloudy For shooting in cloudy conditions or in twilight Tungsten For shooting indoors in artificial lighting from tungsten light bulbs Fluorescent For shooting in ar...

Page 74: ...nd examine it before shooting for real In the On or Night Scene mode using flash photography in a dark place will cause the flash to fire twice Since the picture is taken with the second flash do not move the camera until the flash fires for the second time Slow Shutter The Slow Shutter function can be used to shoot night scenes and subjects in dark rooms The On Off and Night Scene settings are av...

Page 75: ...n causes the LCD panel to display the image data The menu then shows the Hide Info option In Play mode this function displays the image number total number of images file number shooting date and time and protection setting icon In Multi mode this function displays the image number of the selected image and the total number of images When the total number of images requires four or more digits all...

Page 76: ... images for erasing Selecting the All option erases all the images on a CF card with the exception of protected images When confirmation messages are displayed select OK to erase or Cancel to cancel this operation Shortcut In Play mode you can erase the currently displayed image by pressing and holding the SET button and pressing the button The erase confirmation screen will display ...

Page 77: ...ages with the correct orientation in slide shows Protect The Protect function locks an image file to prevent accidental deletion from the CF card This function is also used to unlock image files Use the buttons to scroll through images and the SET button to protect or unlock an image A lock icon will appear next to an image that is protected 90 Original 90 ...

Page 78: ...to select the images you wish to include in that show Images are displayed in order by file numbers During a slide show press the buttons to pause or restart it Press the MENU button to stop a slide show In Show Info mode the current frame number and the total number of marked frames will display while a slide show of marked images is being played Slide Show This function automatically scrolls thr...

Page 79: ...displayed as miniature thumbnails not full screen on the LCD panel or a connected video monitor Use the buttons to scroll through images and the SET button to mark an image If you select the marked image and press the SET button the image is unmarked A checkmark will be associated with marked images A maximum of 100 images can be marked A checkmark appears beside slide shows in which marked images...

Page 80: ...rns the LCD panel to the Slide Show menu Play Time The length of time an image is displayed on the LCD panel can be set to Manual or to the 3 sec 5 sec or 10 sec settings With the manual setting the slide show can be advanced forward or backward with the buttons The actual play time for some images may differ slightly from the selected setting ...

Page 81: ...is advisable to use an AC power source The MENU button will still end the slide show when pressed even if the Repeat function is active Print Order Images on a CF card can be marked for printing and the number of prints the print type and the image data date and file no settings can be specified The print specifica tions for the PowerShot A50 conform to the Digital Print Order Format DPOF standard...

Page 82: ... with the oldest shooting date to the newest regardless of which marking option is selected Some printers or developing services may not be able to output the images as specified Print specifications created on a CF card used in another DPOF compliant camera may be overwritten by the PowerShot A50 and lost when you mark images Please note that a warning icon will appear in the upper right of the L...

Page 83: ...within the range 1 to 29 A single underline indicates numbers 10 to 19 and a double underline indicates numbers 20 to 29 A CCD RAW image cannot be marked All Images This setting adds print marks to all images on a CF card except for CCD RAW images The number of print copies is automatically set to 1 Select Images Images can be selectively marked and the number of print copies specified Print Mark ...

Page 84: ...sent the folder name and the last four the individual frame number e g 100 0001 However the file numbers of images taken in the CIFF format will display as four digit numbers e g 1001 p 94 Cancel Orders This setting deletes the print mark data Select OK to delete the print mark data Select Cancel to return to the print mark menu Property This setting determines whether or not image data such as th...

Page 85: ...rom the Record menu Play Menu Settings Record Menu Settings LCD The brightness of the LCD panel can be switched between the Normal and Bright settings Beep The beep that signals the completion of the autofocus process the closing of the shutter and the operation of a menu function can be turned on or off with this function Power Save This option turns the Power Save function on or off If turned on...

Page 86: ...etween the Style Day Month Year Hour and Minute fields Press the buttons to advance the numbers or options in a field Press the MENU button to save the settings and close the Date Time menu Review The Review function displays the picture on the LCD panel if you continue to press the shutter after taking a shot The Review function will still display the picture even when the LCD panel is turned off...

Page 87: ...s CF card For example if the file no 100 0005 is the last shot recorded on a CF card the first shot on the next CF card will be assigned the file no 100 0006 Since the Off option avoids the duplication of file names this setting is convenient for processing images on computers About File Numbers Images can be assigned individual frame numbers ranging from 0001 to 9900 Each folder holds up to 100 i...

Page 88: ...or Stitch Assist mode are always saved into the same folder creating the potential for more than 100 images to be contained in a single folder Whenever the battery is removed from the camera the last used folder is closed and subsequent images are saved into a new folder Please note that formatting a CF card erases all data from the card not just the images After the CF card is reformatted checkin...

Page 89: ...If you are having difficulty with a CF card made by a manufacturer other than Canon reformatting it may solve the problem If it doesn t consult the outlet from which you purchased the card Use the buttons to move between language selections and the SET button to execute the selection Shortcut Hold the SET button down in PLAY mode and press the MACRO JUMP button to display this menu directly ...

Page 90: ...he camera into the VIDEO Terminal and the other end into the TV s Video In jack Other Functions 3 Turn on the TV and set its TV Video setting to Video 4 Turn the camera s Mode Dial to the PLAY or MULTI position 5 If the image displays on the camera s LCD panel press the LCD VIDEO button to turn it off The image will display on the TV screen Each time the LCD VIDEO button is pressed the display wil...

Page 91: ...the Clock Not Set icon flashes on the Display Panel it means that the button battery charge is low and the date time setting has been lost Purchase a generic CR2016 lithium battery and exchange it for the spent battery with the following procedures The button battery is pre installed at the factory and may therefore expire earlier than its rated lifespan after the camera has been purchased The Clo...

Page 92: ...Remove the battery pack 4 Take out the button battery holder and remove the spent battery To remove the button battery holder from the battery chamber insert a fingernail beneath the indent and gently pry it back and upward Indent Button Battery Holder 5 Place the new button battery into the holder with the plus side facing the plastic holder Open End Tabs NB 5H 2CR5 ...

Page 93: ...7 Replace the battery pack Align the button battery holder with its slot and lightly press it forward into place with your fingertip 8 Close the battery cover and slide the lock to the locked position After closing the battery cover check to make sure that the lock is in the locked position The camera will not operate unless the lock is set ...

Page 94: ...urn the Mode Dial to the P Program position 2 Press the MENU button 3 Hold the LCD VIDEO Button down and press the SET button 4 Select a file format using one of the buttons and press the SET button The Default setting records in the Design rule for Camera File system format and the CIFF setting in the CIFF format 5 Turn the Mode Dial back to the L Lock position Changing to the CIFF format will ch...

Page 95: ...eyeglass lens wiper If the lens accumulates dirt that will not come off with a lens blower contact your camera retailer or the closest Canon Customer Support Help Desk Viewfinder Use a lens blower to remove dust and dirt from the viewfinder If necessary gently wipe the viewfinder with a soft cloth or eyeglass lens wiper to remove stubborn dirt that has accumulated LCD panel Use a lens blower to re...

Page 96: ...th a clean dry cloth Turn the Mode Dial to any one of the Auto P Program or Stitch Assist mode positions Wait to press the shutter button until the flash charges the icon changes from flashing to a steady light and the indicator shines red Battery cover lock not in lock position 2CR5 lithium battery is inserted the wrong way Insufficient battery power Display panel flashes Lb Incorrect battery typ...

Page 97: ...f the battery to places with ambient temperatures over 32 F 0 C When taking shots in relatively cold conditions keep the camera warm next to your body or in a pocket p 21 CF card slot cover is open Display Panel flashes CF CF card full O is displayed in the Display Panel and a continuous beep sounds when the shutter button is pressed CF card not formatted correctly Display Panel flashes CF CF card...

Page 98: ... not to move the camera when pressing the shutter button Move camera at least 20 in 50 cm from subject Use the Macro function to shoot subjects between 6 7 and 20 in 17 and 50 cm from the lens Be careful not to block the AF Auxiliary Light Emitter with your finger etc Battery pack capacity has diminished after non use for a year or more Battery pack life has been exceeded Poor connection between b...

Page 99: ...ra to the Auto or Flash Off mode Set the camera to the Auto or Flash On mode Image is blurred or out of focus Images are too dark Images are too bright Flash will not work Incorrect Slow Shutter setting Insufficient ambient light Photographic subject is insufficiently illuminated in comparison with surroundings Incorrect White Balance setting Photographic subject is beyond the range of the flash P...

Page 100: ... Camera malfunction Turn Mode Dial to L Lock position and retry shot or replay Problem exists if error code reappears Note the number and contact Canon Customer Support Help Desk If error code displays directly after taking a picture shot may not be recorded Check image with Play function 2CR5 lithium battery or Battery Pack NB 5H charge low Have some spare batteries at hand This icon may flash wi...

Page 101: ...reached Save all the images you wish to retain onto the computer then format CF card Please note that formatting erases all the images from the CF card Incompatible JPEG format You attempted to view an incompatible JPEG file No CF card You attempted to view or shoot an image without a CF card installed Corrupted Data You attempted to view an image with corrupted data Cannot rotate You attempted to...

Page 102: ...al and CCD RAW Recorded Image Size 1280 x 960 pixels Large 640 x 480 pixels Small Image Properties Shooting date and time image serial number etc Camera Modes Auto Program Stitch Assist Play Multi and PC Lens 4 3 mm F2 6 to 10 8 mm F4 0 35 mm film equivalent 28 to 70 mm Viewfinder Real image optical viewfinder 2 inch low temperature poli silicon thin film transistor liquid crystal display Shutter ...

Page 103: ...s TTL auto manual Self Timer 10 second delay Interfaces RS 232C CF Slot Video Out Power Supply 2CR5 lithium battery Nickel hydride Battery Pack NB 5H Compact Power Adapter CA PS100 100E CR2016 lithium battery for Date Clock backup Operating Temperatures 32 to 104 F 0 to 40 C Operating Humidity 10 to 90 Dimensions 4 1 x 2 7 x 1 5 in 103 x 68 x 37 3 mm Weight Approximately 9 2 oz 260 g excluding bat...

Page 104: ...ng Temperature 32 to 104 F 0 to 40 C Dimentions 3 0 x 4 0 x 1 5 in 75 x 102 x 39 mm Weight Approximately 6 3 oz 180 g Battery Pack NB 5H sold separately in some regions Type Nickel hydride cells Rated Voltage 6 V Rated Amperage 650 mAH Life span Approximately 300 charges cycles Operating Temperatures 32 to 104 F 0 to 40 C Dimentions 1 3 x 0 9 x 1 9 in 34 x 22 x 49 mm Weight Approximately 2 5 oz 70...

Page 105: ...24 CF Card Slot Cover 16 24 CF Card Types 25 Clear Marks 79 Clock Not Set Icon 43 91 100 Compact Power Adapter CA PS100 100E 18 23 Continuous Mode 49 Continuous Self Timer Button 17 49 D Date Time 86 DC Coupler 23 DC Coupler Cable Cover 16 DIGITAL Terminal 15 Display Panel 17 43 E Erase 36 Exposure Compensation 72 Exposure Settings 72 Index F File No Reset 87 File Numbers 87 Flash 51 Flash Button ...

Page 106: ...3 46 Print Order 81 Print Type 82 Program Mode 57 Property 84 Protect 77 Q Quality 40 70 R Rapid Shot Function 47 Record Menu 70 Red Eye Reduction Lamp 15 51 Red Eye Reduction Mode 51 Repeat 81 Review 86 S Select Image 83 Self Timer Button 17 49 Self Timer Mode 49 SET Button 17 69 Setup Menu 85 Shooting Modes 42 Show Hide Info 75 Shutter Button 17 46 Size 40 71 Slide Show 78 Slow Shutter 64 74 Sti...

Page 107: ...hland GmbH Canon Hotline Service Customer Support 02151 349 555 Telefax 02151 349 588 Info Desk Tel 02151 349 566 Info Desk Fax 02151 349 599 Mailbox 02151 349 577 Canon Italia S p A Pronto Canon 02 8249 2000 BBS 02 8249 2099 Canon Customer Support Canon Inc 30 2 Shimomaruko 3 chome Ohta ku Tokyo 146 8501 Japan NORTH AMERICA Canon U S A Inc Canon Customer Care Center Phone US 1 800 423 2366 Automa...

Page 108: ...Canon Marketing Thailand Co Ltd 2nd Floor Indosuez House 152 Wireless Road Bangkok 10330 Thailand Phone 662 651 4000 Ext 454 Fax 662 651 4095 Ulead Customer Support INTERNATIONAL Ulead Systems Inc Taiwan Tel 886 2 8787 6740 Fax 886 2 8787 6741 Internet support ulead com tw NORTH AND SOUTH AMERICA Ulead Systems Inc USA Tel 1 310 523 9393 Fax 1 310 523 9399 Internet support ulead com EUROPE Germany ...

Page 109: ...n Design Sumio Koike J Cat Communications Vancouver Canada Photography Hideyuki Igarashi Yoshisuke Kuramoto CDS Inc Tokyo Japan Writing Yoshisuke Kuramoto CDS Inc Tokyo Japan English Writing Christian Cowley Concise Communications Corp Vancouver Canada ...

Page 110: ...H IE 021 V1 0599Nixx 1999 CANON INC PRINTED IN JAPAN ...

Reviews: