


Performing/Changing Wi-Fi Settings
Follow the procedure below to perform/change Wi-Fi settings.
Important
• Enable Easy wireless connect (Cableless setup) before performing printer setup. (Not required if you
change the IP address.) For details, search for "NR049" on your printer's online manual and see the
page shown.
• If you use a printer over the Wi-Fi, we highly recommend you perform security settings for Wi-Fi
network using WPA/WPA2 from the viewpoint of security.
Note
• For some models, you can perform network setup for a USB connected printer using IJ Network Device
Setup Utility. Select
USB
on
Switch View
under the
View
menu to display printers.
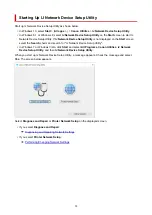
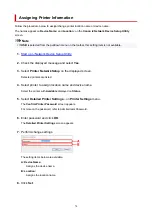
1.
Start up IJ Network Device Setup Utility.
2.
Check the displayed message and select
Yes
.
3.
Select
Printer Network Setup
on the displayed screen.
Detected printers are listed.
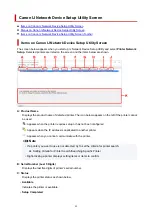
4.
Select printer to perform/change settings from printer list.
Select the printer with
Wi-Fi
displayed on
Connection Method
and
Available
or
Requires Setup
displayed on
Status
to perform settings.
You can perform settings for a printer with
Available
or
Requires Setup
not displayed on
Status
via
USB connection.
To perform setup for a USB connected printer, select
USB
from the pulldown menu on the toolbar and
select the printer to perform/change settings.
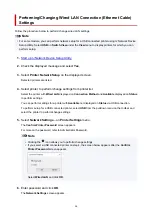
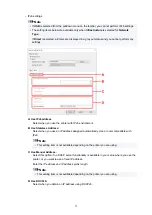
5.
Select
Network Settings...
on
Printer Settings
menu.
The
Confirm Printer Password
screen appears.
For more on the password, refer to Administrator Password.
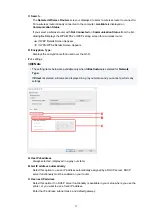
Note
• Clicking the
icon allows you to perform/change settings.
• If you select a USB connected printer on step 4 and the selected printer is compatible with wired
LAN, the screen below appears after the
Confirm Printer Password
screen appears
69
Summary of Contents for PIXMA TS6200 Series
Page 1: ...TS6200 series Online Manual English ...
Page 9: ...4103 457 5011 458 5012 459 5100 460 5200 461 5B00 462 6000 463 C000 464 ...
Page 40: ...Copying 40 ...
Page 73: ...Note This setting item is not available depending on the printer you are using 8 Click Set 73 ...
Page 76: ...Handling Paper Originals Ink Tanks etc Loading Paper Loading Originals Replacing Ink Tanks 76 ...
Page 102: ...102 ...
Page 103: ...Replacing Ink Tanks Replacing Ink Tanks Checking Ink Status on the Touch Screen Ink Tips 103 ...
Page 114: ...Adjusting Print Head Position 114 ...
Page 133: ...Safety Safety Precautions Regulatory Information WEEE EU EEA 133 ...
Page 154: ...8 Attach the protective material to the printer when packing the printer in the box 154 ...
Page 157: ...Main Components and Their Use Main Components Power Supply Using the Operation Panel 157 ...
Page 158: ...Main Components Front View Rear View Inside View Operation Panel 158 ...
Page 186: ...For more on setting items on the operation panel Setting Items on Operation Panel 186 ...
Page 195: ...Language selection Changes the language for the messages and menus on the touch screen 195 ...
Page 235: ...Note Selecting Scaled changes the printable area of the document 235 ...
Page 253: ...In such cases take the appropriate action as described 253 ...
Page 289: ...Printing Using Canon Application Software Easy PhotoPrint Editor Guide 289 ...
Page 312: ...Note To set the applications to integrate with see Settings Dialog Box 312 ...
Page 325: ...ScanGear Scanner Driver Screens Basic Mode Tab Advanced Mode Tab 325 ...
Page 380: ...Other Network Problems Checking Network Information Restoring to Factory Defaults 380 ...
Page 407: ...Scanning Problems Windows Scanning Problems 407 ...
Page 408: ...Scanning Problems Scanner Does Not Work ScanGear Scanner Driver Does Not Start 408 ...
Page 422: ...Errors and Messages An Error Occurs Message Support Code Appears 422 ...