Canon PIXMA Q T 1 0 8 5 1 V 0 1 Getting Started Download Page 13

13

hardware software network

hardware

software network

prepare

prepare

hardware software

network

prepare

hardware software network

prepare

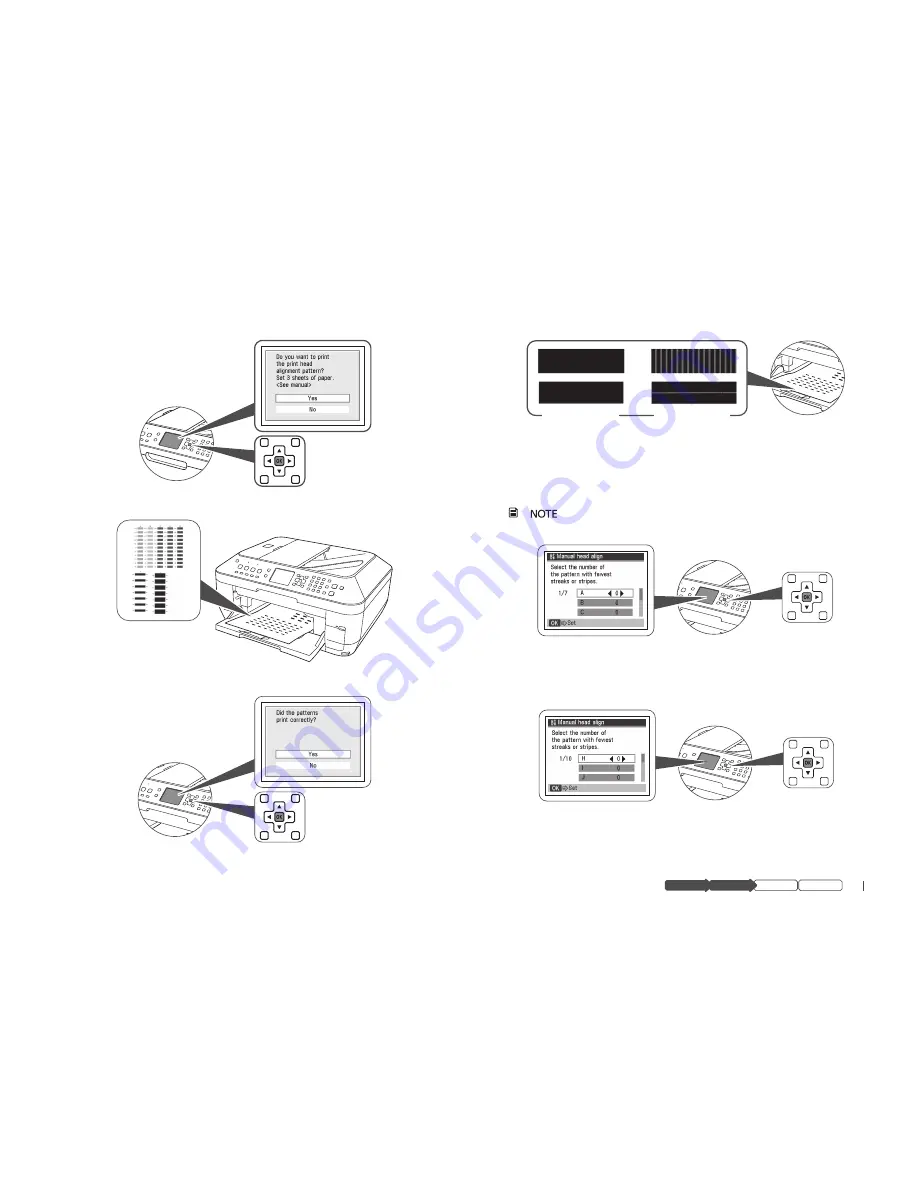
Look at the first printout

less noticeable

more noticeable

Select best pattern

Use the ◄►▲▼ buttons to enter the number of the pattern that has the 

least noticeable vertical or horizontal streaks for columns 

A

 to 

G

, then 

press the 

OK

 button.

If you are not sure which is the best pattern, pick the 

setting that produces the least noticeable white streaks.

Press 

OK

 again to print the second pattern

Look at the second printout

Repeat step 3 for columns 

H

 to 

Q

.

Press 

OK

 again to print the third pattern

Select 

Yes

 to print the first alignment pattern, then press 

OK.

Select 

Yes

 again, then 

OK

.

Summary of Contents for PIXMA Q T 1 0 8 5 1 V 0 1

Page 1: ...Getting Started for Mac Users office all in one series Q T 1 0 8 5 1 V 0 1 ...

Page 2: ......

Page 3: ...d 12 Set Up to Receive Faxes 14 Set Up Your Fax Sender Information 15 Set Up the Software 15 Install the Software 15 Connect to Your Network optional 18 Choose Your Network Type 18 Wireless Networks with a Single Access Point 19 Wireless Networks with Multiple Airport Access Points 23 Wired Networks 28 Connecting Additional Computers 33 Start Using Your MX860 37 Solution Menu 37 On Screen Manual 3...

Page 4: ...860 to a wireless network locate your network name also called SSID or Service Set Identifier and network password if applicable You can locate the wireless network name by clicking the icon in the menu bar Network Name also called SSID ____________________________ Network Password if applicable ____________________________ You can also retrieve your network name and password by using the Canon PI...

Page 5: ...nk tanks USB cable needed for initial network setup or USB connection setup CD NOT SHOWN documentation If any parts are missing contact Canon see back cover for contact data Remove all packing materials 2 Remove all tape from the outside of the MX860 a Open the paper output tray b paper output tray Lift the scanning unit until the support slides into place c scanning unit support print head holder...

Page 6: ... sure you connect the phone cable into the port shown above Connect a phone or answering machine for fax setup 4 To use a phone or answering machine on the same line remove the cap on the top phone jack and connect the phone or answering machine to the MX860 to phone or answering machine Make sure you connect the phone cable into the port shown above 5 Connect the power cord Connect the power cord...

Page 7: ...to turn on the MX860 Your MX860 will make sounds as it powers up This is normal Select language 7 Use the and button on the operation panel to select a language for the display then press OK If you select a wrong language press Back to return to Language selection options back Once your langage is selected the display will prompt to install the print head and ink tanks ...

Page 8: ...aper output tray 1 paper output tray Lift the scanning unit until the support slides into place 2 scanning unit support print head holder Raise the print head lock lever 3 print head lock lever Avoid touching the contact points in the print head holder print head lock lever ...

Page 9: ...ng the print head hold it only on the sides Do not touch the tank seats or contact points Remove the protective orange cap 5 Insert the print head into the print head holder 6 Tilt the print head forward and place it gently into position Do not try to force it Lower the print head lever until it locks into place 7 Once the print head is in place do not remove it unnecessarily ...

Page 10: ...tank with force or hold the tank on the sides to avoid squeezing ink from the tank Insert the ink tank into the print head 3 Slide the ink tank into the matching color slot a Press the PUSH mark until it clicks into place b ink light will turn red Take care to match the inks with the labels in the print head Repeat steps 1 3 until all remaining ink tanks are in place and all 4 ink lights are red ...

Page 11: ...prepare Close the cover 5 The printer will perform initial start up maintenance Wait until the Load plain paper screen displays before continuing setup Press the 6 OK button Load Paper Remove the cassette 1 Load plain paper with the printing side down 2 Paper should fit between the adjustable paper guides a paper guide paper guide ...

Page 12: ...e the guides to match the paper size 3 A slight space between the paper guide and the paper stack is acceptable Confirm paper stack does not exceed the limit 4 paper stack limit line Slide the cassette back in until it clicks into place 5 Align the Print Head Start alignment 1 Use the a and button to select Perform head align ...

Page 13: ...pattern that has the least noticeable vertical or horizontal streaks for columns A to G then press the OK button If you are not sure which is the best pattern pick the setting that produces the least noticeable white streaks Press 4 OK again to print the second pattern Look at the second printout 5 Repeat step 3 for columns H to Q Press 6 OK again to print the third pattern Select b Yes to print t...

Page 14: ...scribe to a ring pattern detection service provided by your telephone company and you want to receive a fax only if the machine detects the pattern for fax Select DRPD Dictinctive Ring Pattern Detection When the FAX menu returns press the 5 Back button For details on fax settings and how to change them refer to the on screen manual Basic Guide Look at the third printout 7 Repeat step 3 for columns...

Page 15: ...ork prepare Set Up the Software Install the Software Connect the USB cable to your computer 1 Connect the other end to your MX860 2 Set Up Your Fax Sender Information For details on sender information refer to Specifying the Basic Settings for the Machine in the on screen manual Basic Guide Go to Set Up the Software on page 15 ...

Page 16: ... double click the CANON_IJ icon on the desktop Enter your administrator password 5 If you do not know your administrator name or password click then follow the on screen instructions Click 6 Easy Install The drivers application software and on screen manuals will install automatically Follow the on screen instructions 7 ...

Page 17: ...ce Decide how you want to connect to your MX860 Connecting to a Network Go to Connect to Your Network optional on page 18 If you plan to connect to a network but select USB connection by mistake you will need to reinstall the software Connecting with a USB Cable After your computer restarts the Canon IJ Network Tool dialog appears Select 1 USB connection Only select USB connection if you plan to c...

Page 18: ...nect additional computers to the MX860 go to Connecting Additional Computers on page 33 wired network connecting with an Ethernet cable wireless network with multiple access points example Airport Extreme and Airport Express wireless network with a single access point Wi Fi router Wi Fi router Wi Fi router router Go to page 19 Go to page 23 Go to page 28 ...

Page 19: ... menu bar and write down the network name with the checkmark next to it Make sure the MX860 is ready 2 Ensure the MX860 is connected to your computer with the USB cable and is powered on You will need the USB cable only for the initial network setup Once your MX860 is connected to your network the USB cable is no longer needed The MX860 is set at the factory to connect to a wireless Wi Fi network ...

Page 20: ...sensitive Complete the network setup 6 When the Setup Completion dialog appears Disconnect the USB cable and place the MX860 where it will be used a On your computer click b Next If the MX860 does not connect see section 5 6 of the printed manual Network Setup Troubleshooting Measuring Wireless Connection Performance Click 1 Next The connection measurement results will display ...

Page 21: ...nt to repeat the connection performance test Add the Printer OS X v10 5 x The Printer Browser window will open automatically Select the printer 1 Click a More Printers Select b MX860 series Click c Add The letters and numbers after MX860 series show the MAC address for this device Media Access Control address a unique identifier for any equipment connected to a network Add the Printer OS X v10 4 x...

Page 22: ...r 1 From the pop up menu select a Canon MX860 series Network In the Network Device List pane select the MAC address of the MX860 b There should be only one device listed unless you have more than one MX860 series device connected to your network Click c Apply to use the MX860 as a scanner Confirm that a checkmark appears next to the selected device then d click Exit Congratulations You are finishe...

Page 23: ...icon in the menu bar and write down the network name with the checkmark next to it Make sure the MX860 is ready 2 Ensure the MX860 is connected to your computer with the USB cable and is powered on You will need the USB cable only for the initial network setup Once your MX860 is connected to your network the USB cable is no longer needed The MX860 is set at the factory to connect to a wireless Wi ...

Page 24: ...etwork If you do not have encryption enabled on your network select Do Not Use on the encryption method pop up menu then click Connect The procedure will skip directly to Complete the network setup on page 25 Click 7 Next Enter your network passphrase then click 8 Next The passphrase password is case sensitive If settings are correct click 9 Finish Click Back to change any settings ...

Page 25: ... Completion dialog appears Disconnect the USB cable and place the MX860 where it will be used a On your computer click b Next If the MX860 does not connect see section 5 6 of the printed manual Network Setup Troubleshooting Measuring Wireless Connection Performance Click 1 Next The connection measurement results display Review results 2 If you see a green check mark a and the word Good click Finis...

Page 26: ... Printer Browser window will open automatically Select the printer 1 Click a More Printers Select b MX860 series Click c Add The letters and numbers after MX860 series show the MAC address for this device Media Access Control address a unique identifier for any equipment connected to a network Add the Printer OS X v10 4 x The Printer List window will open automatically Click 1 Add ...

Page 27: ... open automatically Click 1 Add The Printer Browser window opens Select a MX860 series Click b Add Select the Scanner The Canon IJ Network Scanner Selector dialog opens Select scanner 1 From the pop up menu select a Canon MX860 series Network In the Network Device List pane select the MAC address of the b MX860 There should be only one device listed unless you have more than one MX860 series devic...

Page 28: ...Network using an Ethernet cable follow the steps below Make sure the MX860 is ready 1 Ensure the MX860 is connected to your computer with the USB cable and is powered on You will need the USB cable only for the initial network setup Once your MX860 is connected to your network the USB cable is no longer needed Set the Network Connection Type 2 The MX860 is set at the factory to connect to a wirele...

Page 29: ...en press the OK button Select the desired network connection method f Wired LAN active then press the OK button Select 3 LAN connection On the Canon IJ Network Tool dialog select LAN connection then click OK Select printer to use 4 Select a Setup in the pop up menu Select b MX860 series in the Printers pane Click c OK A Check Wired LAN Connection reminder appears Do not click Yes until after the E...

Page 30: ... not confuse the LAN port with the telephone jacks Click 6 Yes to close the Check Wired LAN Connection reminder If the MX860 is not detected automatically the Set Printer IP Address dialog appears The TCP IP Setting of Get IP address automatically is correct for most networks If your network uses pre assigned IP addresses also called fixed or static addresses select Use following IP address in the...

Page 31: ...e USB cable then click 7 OK Add the Printer OS X v10 5 x The Printer Browser window will open automatically Select the printer 1 Click a More Printers Select b MX860 series Click c Add The letters and numbers after MX860 series show the MAC address for this device Media Access Control address a unique identifier for any equipment connected to a network ...

Page 32: ... open automatically Click 1 Add Add the printer 2 Click a More Printers Select b MX860 series Click c Add Add the Printer OS X v10 3 9 The Printer List window will open automatically Click 1 Add The Printer Browser window opens Select a MX860 series Click b Add ...

Page 33: ...ou are finished with the setup Go to Start Using Your MX860 on page 37 Connecting Additional Computers More than one networked computer can print to your MX860 Follow the instructions in this section if one computer has already been setup to use your MX860 on a network See Connect to Your Network optional on page 18 A USB cable is not required for connecting additional networked computers to your ...

Page 34: ...n appears click Cancel or if the You have no printers available screen appears click Cancel Add the Printer OS X v10 5 x The Printer Browser window will open automatically Select the printer 1 Click a More Printers Select b MX860 series Click c Add The letters and numbers after MX860 series show the MAC address for this device Media Access Control address a unique identifier for any equipment conn...

Page 35: ...k prepare Add the Printer OS X v10 4 x The Printer List window will open automatically Click 1 Add Add the printer 2 Click a More Printers Select b MX860 series Click c Add Add the Printer OS X v10 3 9 The Printer List window will open automatically Click 1 Add The Printer Browser window opens 2 Select a MX860 series Click b Add ...

Page 36: ...ist pane select the MAC address of the b MX860 There should be only one device listed unless you have more than one MX860 series device connected to your network Click c Apply to use the MX860 as a scanner Confirm that a checkmark appears next to the selected device then d click Exit Congratulations You are finished with the setup Go to Start Using Your MX860 on page 37 ...

Page 37: ...o other functions Advanced Guide Describes advanced operating procedures to make full use of your MX860 Troubleshooting Describes troubleshooting steps for your MX860 Start Using Your MX860 Solution Menu The Solution Menu provides quick access to useful functions and information about your MX860 From here you can open various applications and on screen manuals with a single click To start the Solu...

Page 38: ...CANON to locate a dealer near you or visit the Canon eStore at www canonestore com QT1 0851 V01 Canon and PIXMA are registered trademarks of Canon Inc in the United States and may be registered trademarks or trademarks in other countries IMAGEANYWARE is a trademark of Canon Apple AirPort Express AirPort Extreme Mac Macintosh and Time Capsule are trademarks of Apple Inc registered in the U S and ot...

Reviews: