background image

ESP

AÑOL

1
2

3

4

5

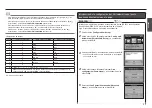
Para borrar un carácter, mueva el cursor hasta el carácter deseado mediante el botón 

[

 o 

]

 y, 

a continuación, pulse el botón 

FUNCIÓN (FUNCTION)

 derecho (D).

Para insertar un espacio, mueva el cursor hasta la posición deseada mediante el botón 

[

 o 

]

 (B) y, 

a continuación, pulse el botón 

FUNCIÓN (FUNCTION)

 izquierdo (C).

Para insertar caracteres, mueva el cursor hasta el carácter que se encuentra a la derecha de la 

posición deseada mediante el botón 

[

 o 

]

 y, a continuación, introduzca caracteres.

Para introducir sucesivamente los caracteres asignados a una misma tecla (por ejemplo, “N” y “O”), 

pulse el botón 

]

 (B) para mover el cursor un carácter hacia la derecha.

<Asignación de teclas>

Tecla

Modo numérico 

123

Modo mayúsculas 

ABC

Modo minúsculas 

abc

1

1

2

2

ABC

abc

3

3

DEF

def

4

4

GHI

ghi

5

5

JKL

jkl

6

6

MNO

mno

7

7

PQRS

pqrs

8

8

TUV

tuv

9

9

WXYZ

wxyz

0

0

#

- . SP   # ! ″ , ; : ^ ` _ = / | ´ ? $ @ % & + ( ) [ ] { } < > \ ~
Cada vez que pulse esta tecla, el modo de introducción de caracteres cambiará entre los 

modos numérico 

123

, mayúsculas

 ABC 

y minúsculas

 abc

.

SP: indica un solo espacio.

Acción

Utilice el botón 

{

 o 

}

 para seleccionar 

Otra 

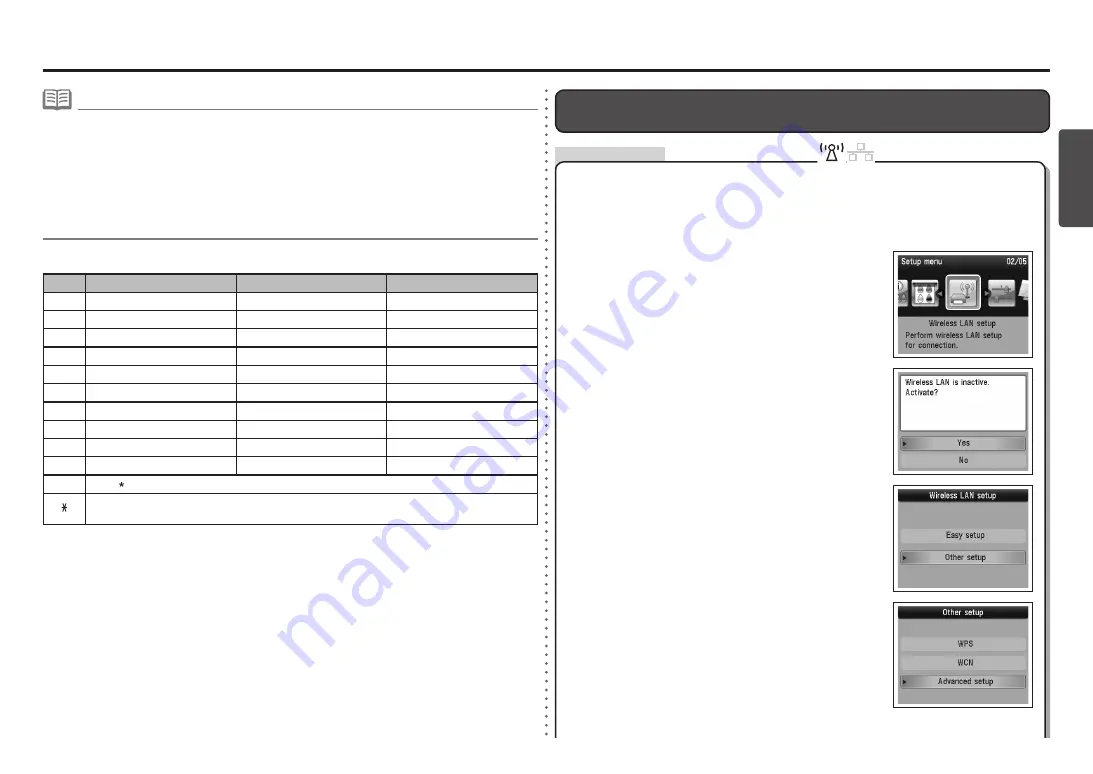
configuración (Other setup)

 y, a continuación, pulse 

el botón 

OK

.

Seleccione 

Sí (Yes)

 y, a continuación, pulse el botón 

OK

.

Utilice el botón 

[

 o 

]

 para seleccionar 

Config. LAN 

inalámbrica (Wireless LAN Setup)

 y, a continuación, 

pulse el botón 

OK

.

Pulse el botón 

Configuración (Setup)

.

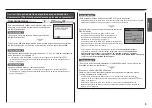
Introduzca el nombre del punto de acceso/nombre de red (SSID) y la configuración 

de seguridad (WEP, WPA, etc.) directamente en el equipo. 

Siga el procedimiento que se explica a continuación.

Cuando se habilita la conexión inalámbrica, la luz de 

Wi-Fi


se enciende en azul.

Introducción de la configuración de LAN inalámbrica del punto 

de acceso directamente en el equipo

Seleccione 

Configuración avanzada (Advanced 

setup)

 y, a continuación, pulse el botón 

OK

.

Summary of Contents for PIXMA MX350

Page 1: ...ENGLISH ESPA OL Soluci n de problemas de configuraci n de red Network Setup Troubleshooting...

Page 2: ...P 3 P 7 P 7 P 8 Check Printer Settings dialog box is Displayed Problems during Network Setup Problems during Software Installation WPS Easy setup Access point was not detected is Displayed The direct...

Page 3: ...A on the machine to search for the access point again For details on how to change the settings of the access point refer to the manual supplied with the access point or contact its manufacturer To es...

Page 4: ...access point or contact its manufacturer For the procedure to configure settings of the machine refer to Wireless Setup Using Easy Setup in the printed manual Getting Started Check Access point was n...

Page 5: ...DHCP function A function to automatically assign required information IP address etc to computers printers or other devices connected to the network Are you using an access point that automatically c...

Page 6: ...ange the settings of the access point refer to the manual supplied with the access point or contact its manufacturer To check the MAC address of the machine press the Setup button then using the and O...

Page 7: ...Pv4 only on page 13 If the DHCP function is active the network key needs to be entered again Perform setup again by following the procedures in Entering the Access Point s Wireless LAN Settings Direct...

Page 8: ...that you follow Check 1 2 3 7 and 8 of Connection Checklist on page 15 then click Update A WPS Action Check Cannot connect Multiple access points are enabled is Displayed The message appears when mult...

Page 9: ...tails on how to check settings of the network device refer to the manual supplied with the network device or contact its manufacturer Activate the DHCP function of the network device then click Update...

Page 10: ...ic IP addresses preventing them from connecting to the network IP address filtering A function to prevent communication between multiple wireless devices such as computers and printers connected to an...

Page 11: ...ey to toggle character options for that key For details on assigned characters refer to Key Assignments on the right Check Check Other Troubleshooting Tips The Machine is Not Detected after the Networ...

Page 12: ...Lower case mode abc 1 1 2 2 ABC abc 3 3 DEF def 4 4 GHI ghi 5 5 JKL jkl 6 6 MNO mno 7 7 PQRS pqrs 8 8 TUV tuv 9 9 WXYZ wxyz 0 0 SP _ Each time you press this button the entry mode changes between nume...

Page 13: ...the OK button For details on how to check the access point name network name SSID refer to the manual supplied with the access point or contact its manufacturer Enter the same access point name networ...

Page 14: ...WPA2 Action Specifying the Machine s IP Address IPv4 only Press the Setup button Select Yes then press the OK button Select IPv4 IPv6 setting then press the OK button Select IPv4 then press the OK but...

Page 15: ...reen returns Press the COPY button Press the Setup button Select Device settings then press the OK button Select LAN settings then press the OK button Select Reset LAN settings then press the OK butto...

Page 16: ...t back on Check 4 Check 3 Check 2 Check 1 Check 5 For the procedures refer to the manuals supplied with the computer and network device or contact their manufacturers Are the access point and machine...

Page 17: ...802 11g 2 4 GHz For details on how to change the operating mode of the access point refer to the manual supplied with the access point or contact its manufacturer Check 7 Check 8 When using a router a...

Page 18: ...r la configuraci n de impresora Check Printer Settings Problemas durante la configuraci n de red Problemas durante la instalaci n del software WPS Configuraci n f cil Se muestra Punto de acceso no det...

Page 19: ...nformaci n sobre c mo cambiar la configuraci n del punto de acceso consulte el manual suministrado con ste o p ngase en contacto con el fabricante Para establecer una conexi n sin modificar la configu...

Page 20: ...aci n del equipo consulte Configuraci n inal mbrica mediante Configuraci n f cil en el manual impreso Gu a de inicio Comprobaciones Se muestra Punto de acceso no detectado Access point was not detecte...

Page 21: ...an varios puntos de acceso con el mismo nombre Glosario Funci n DHCP Funci n que asigna autom ticamente la informaci n necesaria direcci n IP etc a los ordenadores impresoras o dem s dispositivos cone...

Page 22: ...mo cambiar la configuraci n del punto de acceso consulte el manual suministrado con ste o p ngase en contacto con el fabricante Para comprobar la direcci n MAC del equipo pulse el bot n Configuraci n...

Page 23: ...IP del equipo s lo IPv4 en la p gina 13 Si la funci n DHCP est activa deber introducir de nuevo la clave de red Vuelva a realizar la configuraci n seg n los procedimientos de Introducci n de la config...

Page 24: ...r la conexi n por cable cerci rese de haber seguido las comprobaciones 1 2 3 7 y 8 del apartado Lista de comprobaci n de las conexiones de la p gina 15 y a continuaci n haga clic en Actualizar Update...

Page 25: ...icamente aseg rese de que la funci n DHCP del dispositivo de red router punto de acceso etc est activada Para obtener informaci n sobre c mo comprobar la configuraci n del dispositivo de red consulte...

Page 26: ...ado de direcciones IP Funci n para evitar la comunicaci n entre varios dispositivos inal mbricos ordenadores e impresoras por ejemplo conectados a un punto de acceso Funci n de separador de privacidad...

Page 27: ...e las distintas opciones de caracteres de dicha tecla Para obtener informaci n sobre los caracteres asignados consulte la tabla de Asignaci n de teclas m s adelante Comprobaciones Comprobaciones Otros...

Page 28: ...kl 6 6 MNO mno 7 7 PQRS pqrs 8 8 TUV tuv 9 9 WXYZ wxyz 0 0 SP _ Cada vez que pulse esta tecla el modo de introducci n de caracteres cambiar entre los modos num rico 123 may sculas ABC y min sculas abc...

Page 29: ...c mo consultar el nombre del punto de acceso nombre de red SSID consulte el manual suministrado con ste o p ngase en contacto con el fabricante Introduzca en el equipo el mismo nombre del punto de ac...

Page 30: ...n Configuraci n Setup Seleccione S Yes y a continuaci n pulse el bot n OK Seleccione Configuraci n IPv4 IPv6 IPv4 IPv6 setting y a continuaci n pulse el bot n OK Seleccione IPv4 y a continuaci n puls...

Page 31: ...n Setup Seleccione Configuraci n de dispositivo Device settings y a continuaci n pulse el bot n OK Seleccione Configuraci n de LAN LAN settings y a continuaci n pulse el bot n OK Seleccione Rest ajus...

Page 32: ...re el procedimiento consulte los manuales proporcionados con el ordenador y el dispositivo de red o p ngase en contacto con sus fabricantes El punto de acceso y el equipo est n instalados en un espaci...

Page 33: ...bre c mo modificar el modo de funcionamiento del punto de acceso consulte el manual suministrado con ste o p ngase en contacto con el fabricante Comprobaci n 7 Comprobaci n 8 Si utiliza un router los...

Page 34: ...QT5 2856 V01 XXXXXXXX CANON INC 2010 PRINTED IN XXXXXXXX...

Reviews: