Canon PIXMA MP268 Getting Started Download Page 8

4

5

3

블랙

 FINE 

카트리지

( )


오른쪽


슬롯

( )


설치합니다

.

( )


잉크


카트리지


잠금


커버

( )


닫히는


딸깍하는


소리가


들릴


때까지


완전히


누릅니

.

잉크


카트리지


커버

( )


직시하여


이가


정확하게

(

기울지


않음

잠기는지


확인합니다

.

같은


방법으로


컬러

 FINE 

카트리지

( )


왼쪽


슬롯

( )


삽입합니다

.

FINE 

카트리지를


홀더의


측면에


부딪히지


마십시오

.

또한


이를


밝은


환경에서


설치하도록


하십시오

.

블랙


카트리지는


오른쪽


홀더에


설치하고


컬러


카트리지는


왼쪽


홀더에


설치합니다

.

FINE 

카트리지


설치하기

將黑色墨盒

(Black FINE Cartridge)(

)

置入右側插槽

(

)

向下推動

(

)

直至聽到喀嗒聲以使墨盒鎖定蓋

(

)

完全地關閉。

直視墨盒鎖定蓋

(

)

並檢查其正確地鎖定

(

沒有傾斜

)

將彩色墨盒

(Color FINE Cartridge)(

)

以同樣的方法插入左側插槽

(

)

請勿使墨盒

(FINE Cartridge)

敲擊到固定座的側面。

此外確保在明亮的環境下安裝墨盒。

將黑色墨盒

(Black FINE Cartridge)

安裝到右側固定座中,並將彩色墨盒安裝到左側固定座中。

安裝墨盒

(FINE Cartridge)

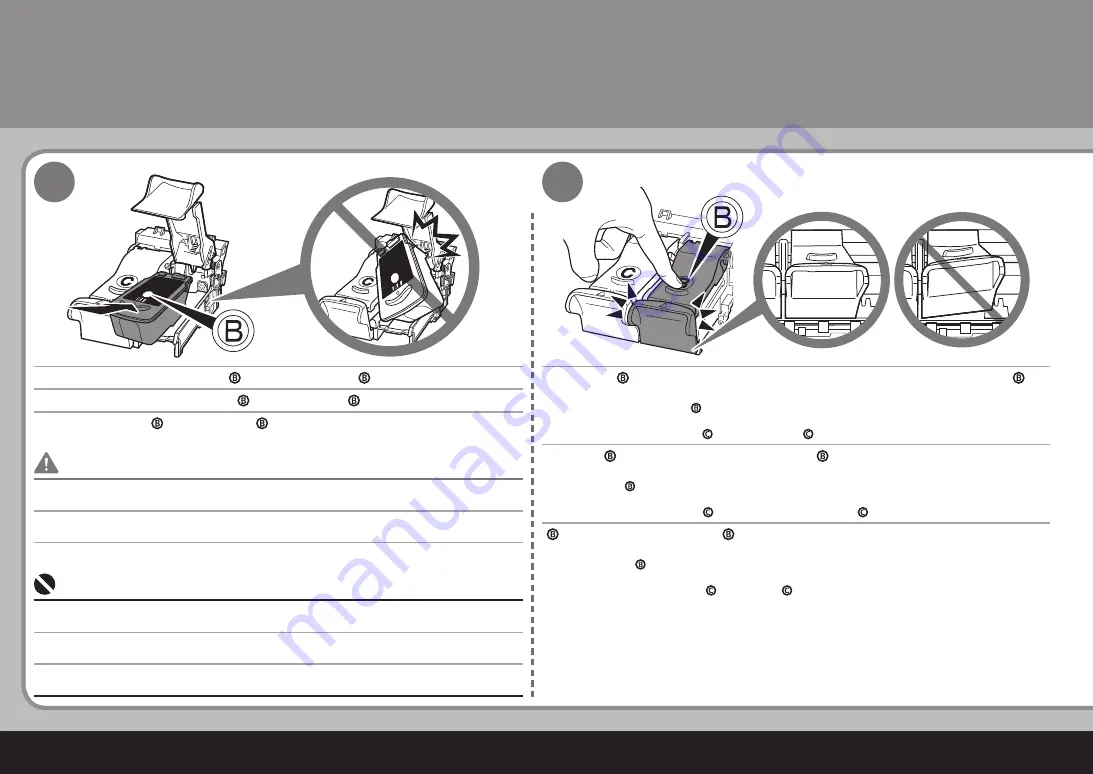
Place the Black FINE Cartridge ( ) into the right slot ( ).

Push down ( ) until you hear a click to close the Ink Cartridge Locking Cover ( ) 

completely.

View the Ink Cartridge Cover ( ) straight on and check that it is locked correctly (not at an angle).

Insert the Color FINE Cartridge ( ) into the left slot ( ) in the same way.

Do not knock the FINE Cartridge against the sides of the holder.

Also be sure to install it in a well-lit environment.

Install the Black cartridge into the right holder, and the Color one into the left holder.

Install the FINE Cartridges

Summary of Contents for PIXMA MP268

Page 1: ...ENGLISH MP268 MP245 Getting Started Make sure to read this manual before using the machine Please keep it in hand for future reference...

Page 2: ...e observed for safe operation Instructions that if ignored could result in personal injury or material damage Descriptions for operations that take some time to complete Contents Remove the Protective...

Page 3: ...tems Manuals Setup CD ROM containing the drivers applications and on screen manuals Warranty Open the Paper Output Tray A Lift the Scanning Unit Cover B until it locks into place The Scanning Unit Sup...

Page 4: ...ve all the orange tapes and the protective sheets Pull the orange protective tape D and remove the protective material E Then lift the Scanning Unit Cover B slightly and fold the Scanning Unit Support...

Page 5: ...in the power cord on the left side of the machine and connect the other end to the wall outlet Do NOT connect the USB cable at this stage Press the ON button A to turn on the machine Confirm that the...

Page 6: ...er returns to the right close the Scanning Unit Cover and reopen it If the FINE Cartridge Holder does not come out to the center make sure that the power is turned on The Scanning Unit Support D is fi...

Page 7: ...n the right side After removing the Black FINE Cartridge from its box pull the orange protective tape G in the direction of the arrow and remove it gently Be careful not to stain your hands or surroun...

Page 8: ...idge Locking Cover completely View the Ink Cartridge Cover straight on and check that it is locked correctly not at an angle Insert the Color FINE Cartridge into the left slot in the same way Do not k...

Page 9: ...ightly and fold the Scanning Unit Support D then gently close the Scanning Unit Cover A Wait until 1 appears on the LED H about 1 2 minutes and go to the next step If the Alarm lamp I lights orange ma...

Page 10: ...ista operating system Ultimate Edition hereafter referred to as Windows Vista and Mac OS X v 10 5 x Quit all running applications before installation You need to log on as the administrator or a membe...

Page 11: ...pears Click Cancel to quit the screen Proceed from Remove the USB cable connected to your computer Press the ON button A to TURN OFF THE MACHINE Operating noise continues for about 25 seconds until th...

Page 12: ...p4 exe Turn on the computer then insert the Setup CD ROM into the CD ROM drive Go to Step Go to Step If the program does not start automatically double click the CD ROM icon on the computer When the C...

Page 13: ...ence screen appears select your place of residence then click Next Click Easy Install The drivers application software and on screen manuals are installed automatically If you want to select particula...

Page 14: ...s 7 8 4 Click Install Move the cursor over items to display explanations If you can agree click Yes on the License Agreement screen Installation starts Follow any on screen instructions to install the...

Page 15: ...e USB cable to the computer the other to the machine then TURN THE MACHINE ON The USB port is located on the right side of the machine When the machine is recognized by the computer a message appears...

Page 16: ...ality is not satisfactory after installing the MP driver you may need to align the Print Head Refer to When Printing Becomes Faint or Colors Are Incorrect in the on screen manual Basic Guide Click Nex...

Page 17: ...t You will need your product serial number which is located on the inside of the machine Internet connection is required Connection fees apply To register later click Cancel User Registration can be s...

Page 18: ...If you can agree click Agree If you click Do not agree the Extended Survey Program will not be installed This has no effect on the machine s functionality If Restart is displayed make sure that the R...

Page 19: ...ble to the computer and the other to the machine Make sure the machine is turned on Turn on the computer then insert the Setup CD ROM into the CD ROM drive If the CD ROM folder does not open automatic...

Page 20: ...low the on screen instructions Click Easy Install The drivers application software and on screen manuals are installed automatically If you want to select particular items to install click Custom Inst...

Page 21: ...License Agreement Yes Move the cursor over items to display explanations Click Install If you can agree click Yes on the License Agreement screen Installation starts Follow any on screen instructions...

Page 22: ...aligned or print quality is not satisfactory after installing the MP driver you may need to align the Print Head Refer to When Printing Becomes Faint or Colors Are Incorrect in the on screen manual Ba...

Page 23: ...w the on screen instructions to register your product You will need your product serial number which is located on the inside of the machine To register later click Cancel User Registration can be sta...

Page 24: ...Restart Click Restart to restart the computer After restarting the computer remove the Setup CD ROM and keep it in a safe place When using Mac OS X v 10 3 9 before using the operation panel on the ma...

Page 25: ...d load paper in the center of the rear tray C Slide the left and right Paper Guide B against both edge of the paper Machine installation is now complete Load paper in portrait orientation with the pri...

Page 26: ...chine Introduces the machine and its functions the included manuals and application software Getting Started this manual Describes the basic operations and gives an introduction to other functions ava...

Page 27: ...ctions and information that allow you to make full use of the machine Open various applications and on screen manuals with a single click You can start Solution Menu from the Canon Solution Menu icon...

Page 28: ...e computer For example you can scan documents images into a computer and copy them or print them without borders Scanned images can be corrected enhanced easily Use them to create your own calendar et...

Page 29: ...lass and pressing the Color button or the Black button For various copying procedures refer to Copying in the on screen manual Basic Guide Load a sheet of A4 or Letter sized plain paper Open the Docum...

Page 30: ...oing so may cause the scanner to malfunction or the Platen Glass to break B A C D E B A C D E Place the document face down and align it with the Alignment Mark B Close the Document Cover A then press...

Page 31: ...int photos easily This section explains how to print borderless photos using 4 x 6 size Photo Paper Plus Glossy II The screens are based on Windows Vista In Solution Menu click One Click to Photo Prin...

Page 32: ...photo paper in portrait orientation Click Print For details refer to 5 Loading Paper on page 23 Load paper with the printing side facing up Printing will start Print Photos from a Computer On Macintos...

Page 33: ...tained with ink To avoid staining your hands or clothes with ink it is recommended that you clean the Ink Cartridge Locking Cover A and the inside of the tray B with a dry cloth as required If the Sca...

Page 34: ...Printing Copy Approx 12W Standby minimum Approx 2W OFF Approx 0 9W MP245 Printing Copy Approx 12W Standby minimum Approx 1 3W OFF Approx 0 8W Additional System Requirements for on screen manuals Brows...

Page 35: ...Hi Speed USB Hi Speed USB USB 1 1 USB 1 1 2 MP245 8in 203 2mm 8 5in 216mm 46dB A II 5 35 C 41 95 F 10 90 RH 0 40 C 32 104 F 5 95 RH AC 100 240V 50 60Hz MP268 12W 2W 0 9W MP245 12W 1 3W 0 8W Easy Guide...

Page 36: ...1 2 PictBridge 1 Hi Speed USB Hi Speed USB USB 1 1 USB 1 1 2 MP245 8in 203 2mm 8 5in 216mm 46dB A II 5 35 C 41 95 F 10 90 RH 0 40 C 32 104 F 5 95 RH AC 100 240V 50 60Hz MP268 12W 2W 0 9W MP245 12W 1 3...

Page 37: ...QT5 1665 V01 XXXXXXXX CANON INC 2008 PRINTED IN VIETNAM www canon asia com www canon bs co kr The following ink cartridges are compatible with this product...

Reviews: