Canon PIXMA mini320 Series Manual Download Page 47

44

Troubleshooting

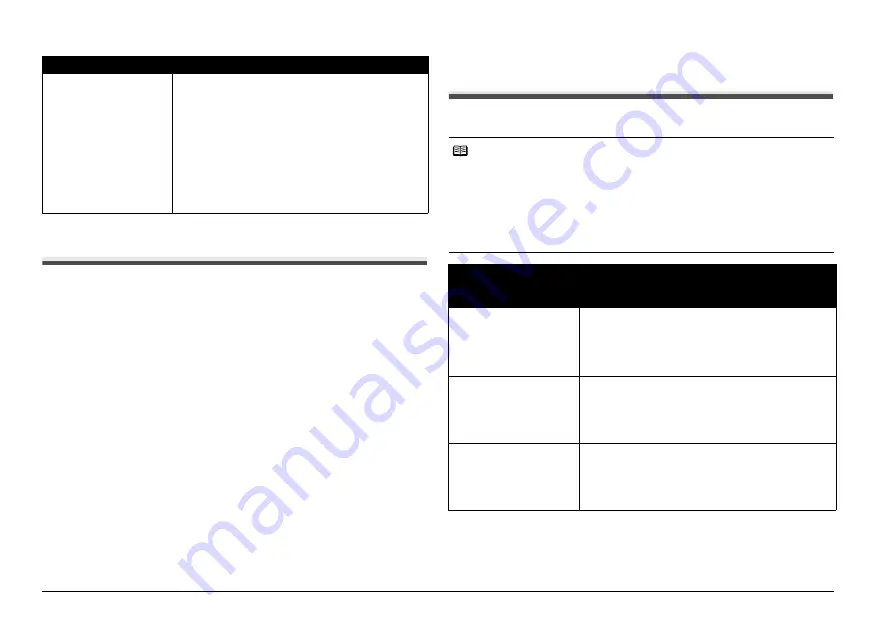
The Power Lamp (blue) and Alarm Lamp (orange) 

Flash Alternately

Disconnect the USB cable from the printer, turn the printer off, and then unplug the 
printer from the power supply. Plug the printer back in and turn the printer back on 
after leaving it for a while.
If the problem is not resolved, contact your Canon Service representative.

Error Message Appears on a PictBridge 

Compliant Device

The following are the possible errors that may occur when printing directly from a 
PictBridge compatible device and the countermeasures to clear them.

Landscape credit card-
sized paper jammed 
inside the printer.

Do not load credit card-sized paper in the landscape 
orientation.
Remove the paper following the procedure below.

(1)

Load a single sheet of the paper in the Rear Tray 

in portrait orientation.

Do not load it in the landscape orientation.

(2)

Start printing.

The paper is fed and then pushes out the jammed 

paper as it ejects.

If you cannot remove the jammed paper, contact your 
Canon Service representative.

Cause

Action

Note

z

This section describes errors that are indicated on Canon-brand PictBridge compliant 

devices. The error messages and operations may vary depending on the device you 

are using.

For errors on non-Canon PictBridge compliant devices, check the error message on 

the LCD and take the appropriate action to clear the error. For details, see “Error 

Message Is Displayed on the LCD” on page 35.

z

For the errors indicated on the PictBridge compliant device and their solution, also 

refer to the instruction manual of the device. For other troubles on the device, contact 

the manufacturer.

Error Message on 

PictBridge-Compliant 

Device

Action

“Printer in use”

Images are being printed from the computer.
Wait until printing ends.
If the printer is warming up, wait until warm-up ends.
When it is ready, the printer starts printing 
automatically.

“No paper”

Load the paper in the Rear Tray, and select 

Continue

* in the display on your PictBridge 

compliant device.
* To resume printing, you can also press the 

OK


button on the printer instead of selecting 

Continue

.

“Paper jam”

Select 

Stop

 in the display on your camera to stop 

printing.
Remove the jammed paper, load new paper, and 
press the 

OK

 button on the printer and try printing 

again.

Summary of Contents for PIXMA mini320 Series

Page 1: ...mentation Provided 2 Printer Parts and Their Functions 3 Loading Printing Paper 8 Printing from a Memory Card 10 Printing Photographs Directly from a Compliant Device 21 Printing Photographs from a Wireless Communication Device 25 Routine Maintenance 27 Changing the Printer Settings 33 Troubleshooting 35 Appendix 47 Direct Photo Guide The following ink tank is compatible with this printer Photo Pr...

Page 2: ...provides up to three full years of service and support coverage at a very attractive price CarePAK offers toll free Canon technical support and includes Canon s superb InstantExchange product replacement program For further information about extending your Canon service and support call 1 800 385 2155 or visit our Web site at www canonesp com CarePAK must be purchased during your product s warrant...

Page 3: ...Photo Printer Direct Photo Guide series ...

Page 4: ... operation Trademark Notices z Microsoft is a registered trademark of Microsoft Corporation z Windows is a trademark of Microsoft Corporation registered in the U S and other countries z Windows Vista is a trademark of Microsoft Corporation z Macintosh and Mac are trademarks of Apple Inc registered in the U S and other countries z Adobe and Adobe RGB 1998 are either registered trademarks or tradema...

Page 5: ...the regular maintenance of the printer On screen Manuals User s Guide Read this guide when starting to use the printer If you need further information about the printer please refer to the User s Guide which can be installed from the Setup CD ROM This guide provides detailed instructions for printing from your computer Additional guides are also available for advanced features PC Printing Guide Re...

Page 6: ...unication Device on page 25 Direct Print Port Connect your PictBridge compliant device such as a digital camera here to print directly from it See Printing Photographs Directly from a Compliant Device on page 21 You can also connect the Bluetooth Unit BU 20 to perform wireless printing through Bluetooth communication For details refer to the User s Guide on screen manual Rear Tray Load paper here ...

Page 7: ...nk refer to your setup sheet Interior Print Head Lock Lever Locks the Print Head Important Do not pull this lever up If you have accidentally pulled them up adjust the print head position See Aligning the Print Head on page 29 Paper Thickness Lever Move to the right when printing Move to the left if ink smudges or the printed surface is stained Return to the right after printing See The Paper Thic...

Page 8: ...tton taking the HOME screen as an example 1 Press the HOME button The HOME screen will appear 2 Turn the Easy Scroll Wheel to select the menu then press the OK button You can turn the Easy Scroll Wheel left or right You can also use the or button to select setting items Move the icon of the desired menu to position A The selected menu screen will appear You can select the following menus on the HO...

Page 9: ...pends on the screen that is displayed and which Function button you press When you press them on the other than the HOME screen the operation procedure or the menus is displayed z Back button 6 You can return the LCD to the previous screen z NAVI button 4 When you do not know how to use the print function for the frequent use or how to load paper you can easily get the explanation from the navigat...

Page 10: ...printer is turned on the LCD goes into Screen saver mode automatically Press the OK button to resume the LCD Note If the Alarm lamp is lit orange and an error message is displayed on the LCD see Error Message Is Displayed on the LCD on page 35 Important The Access lamp flashes while the printer is reading or writing data from to the memory card Removing the memory card or turning off the printer w...

Page 11: ...in the position where you can see it clearly Note If paper is curled gently bend the corners in the opposite direction until the paper becomes flat See Paper is curled on page 42 Important Always load paper in portrait orientation Note When printing set the Paper Thickness Lever to the right Set the Paper Thickness Lever to the left only if ink smudges or the printed surface is stained Return the ...

Page 12: ...aper that is too thin weighing less than 17 lb 64 gsm z Picture postcards z Postcards affixed with photos or stickers z Any type of paper with holes z Paper that is not rectangular z Paper bound with staples or glue z Paper with adhesives z Paper decorated with glitter etc Media Type and Model Printer Setting for Media Type Glossy Photo Paper GP 401 Glossy Photo Paper Glossy Photo Paper Everyday U...

Page 13: ...II 3 3 V z Microdrive z miniSD Card 1 z microSD Card 2 z MEMORY STICK z MEMORY STICK PRO z xD Picture Card 3 z MEMORY STICK Duo 1 z MEMORY STICK PRO Duo 1 Important z If you shot or saved photos on a type of memory card that is not guaranteed operation to be used on your digital camera the image may be unreadable on this printer Attempting to read such data on this printer may damage the data For ...

Page 14: ...age 33 z When you use a computer to edit or process photos saved on a memory card be sure to print them from the computer If you print using the Operation Panel the data may not be printed correctly Caution When using miniSD Card microSD Card xD Picture Card MEMORY STICK Duo MEMORY STICK PRO Duo or RS MMC be sure to use a card adapter when inserting these cards into the Card Slot If one of these c...

Page 15: ... on page 11 2 Select Select and print on the Home screen then press the OK button 3 Confirm the page size media type and other settings then select Next and then press the OK button The photo selection screen is displayed Important If you used the Card Slot as the memory card drive of the computer you need to do a safe removal operation on your computer before physically removing the memory card f...

Page 16: ... change the display for photos See Changing the Display Change display on page 19 z You can search for photos with the shooting date See Searching for Photos with the Shooting Date Search on page 20 z You can print a specified area See Printing a Specified Area Trimming on page 19 2 Use the or button to specify the number of copies 3 Repeat steps 1 and 2 to specify the number of copies for each ph...

Page 17: ... press the OK button The photo is pasted on the layout Note z Press the Back button to cancel pasting the specified photo z Press the left Function button not to paste a photo in the selected frame z You cannot paste photos on more than one page Start printing once you have pasted photos on one page You can do z You can search for photos with the shooting date See Searching for Photos with the Sho...

Page 18: ...ess the left Function button in the print settings confirmation screen the Auto image fix screen is displayed When Auto image fix ON is selected the scene or person s face of a shot photo is recognized and the most suitable correction for each photo is made automatically It makes a darkened face by backlight brighter to print It also analyzes a scene such as scenery night scene person etc and corr...

Page 19: ...n then press the OK button Printing menus on the Create item screen Printing menus on the Special photo print screen Note Under conditions listed below even if both Date ON and File no ON are set only the shooting date will be printed If you want to print the file no select Date OFF z Layout print or Calendar print is selected z Credit card is selected in Page size z Calendar print See Creating a ...

Page 20: ...Calendar print on the Create item screen 2 Select the format the photo to print the background color etc then press the Print button 1 Select Sticker print on the Create item screen 2 Select Stickers x16 layout the photo to print the frame and the number of copies then press the Print button Note z Load a single sheet at a time z To print without a frame press the left Function button in the frame...

Page 21: ... press the Print button Note When using index printing the number of images printed on a single sheet of paper depends on the page size as follows 5 7 127 0 177 8 mm 35 photos 4 6 101 6 152 4 mm 24 photos Credit card 6 photos Wide 101 x 180 mm 28 photos Note z The printer supports the following DPOF functions Version Based on ver 1 00 Supported image types CIFF Exif JPEG TIFF and JFIF Print Style ...

Page 22: ...hoto is displayed Normal screen display Shows one photo Thumbnail display Shows nine photos at a time Select the photo using the Easy Scroll Wheel or the or button then press the buttons to specify the number of copies Full screen display Shows one photo at full screen Enlarged display Shows enlarged photo twice as much as the original Move the area to show using the or button Press the OK button ...

Page 23: ...ected One date only z If you selected Select date range 4 Press the OK button to start searching The printer starts searching and the photos within the specified date range are displayed Note If the number of copies to print is already specified for some photos before searching with the shooting date or if some photos are already pasted on a layout those photos will still be selected for printing ...

Page 24: ...device to the printer 1 Make sure that the PictBridge compliant device is turned off 2 Connect the PictBridge compliant device to the printer using a USB cable recommended by the manufacturer of the device The device turns on automatically If your device does not turn on automatically turn it on manually 3 Set up the PictBridge compliant device for direct printing will appear on the LCD of the dev...

Page 25: ...vely used to print photo stickers When printing on sticker paper see Layout Setting below z Layout Setting Various layout options are available z Bordered Borderless You can select whether or not to print an image with a border z When printing onto Photo Stickers PS 101 16 up use the following settings 1 Select 10x15cm 4 x6 for the Paper size and Photo for the Paper type 2 Select N up for the Layo...

Page 26: ...nter on page 6 2 Display the PictBridge settings screen 1 Select Settings on the HOME screen then press the OK button 2 Select Device settings then press the OK button 3 Select PictBridge settings then press the OK button 3 Confirm and change the settings 1 Select the item to set then press the OK button 2 Select the item then press the OK button 3 Confirm the print settings select Next then press...

Page 27: ...9 10 11 12 13 14 1 2 3 4 5 6 7 8 5 Photo opt pro Automatically optimizes brightness and tone of a photo Image optimize 6 Vivid photo Makes green and blue more lively 7 Face brightener Brightens a darkened face on the photo taken against the light 8 Noise reduction Reduces the noise on blue areas like the sky as well as on black areas 9 Image optimizer Corrects and smooths the jagged contours for p...

Page 28: ...See Turning On Off the Printer on page 6 2 Display the Wireless print settings screen 1 Select Settings on the HOME screen then press the OK button 2 Select Device settings then press the OK button 3 Select Wireless print settings then press the OK button The Wireless print settings screen is displayed 3 Confirm or change the settings 1 Select the item to set then press the OK button 2 Change the ...

Page 29: ...he manual of your mobile phone or PDA B IrDA Port of the printer C D A Infrared Port Note z Do not place any obstacle between the infrared ports of the printer and mobile phone or PDA it will block data transmission z During printing be careful not to interrupt infrared communication with the printer If it is interrupted send the data from the mobile phone or PDA again z Depending on your device t...

Page 30: ...t column Step 1 Print Head Cleaning on page 28 Step 2 If the problem remains after performing Print Head Cleaning twice Print Head Deep Cleaning on page 29 Step 3 If the pattern is printed normally select All A If the print quality is poor perform Print Head Cleaning After Print Head Cleaning print the nozzle check pattern Note Before performing maintenance z Open the Printer Cover and make sure t...

Page 31: ...ter See Turning On Off the Printer on page 6 2 Start Print Head Cleaning 1 Select Settings on the Home screen then press the OK button 2 Select Maintenance then press the OK button 3 Print the nozzle check pattern to verify that the Print Head Nozzles are clean When Print Head Cleaning finishes the confirmation message is displayed Select Yes to print the Nozzle Check Pattern and verify the Print ...

Page 32: ...the Rear Tray 3 Make sure that the Paper Thickness Lever is set to the right 2 Adjust the print head position 1 Select Settings on the Home screen then press the OK button 2 Select Maintenance then press the OK button 4 Select Yes then press the OK button The pattern is printed and the Print Head is aligned automatically This takes about 3 minutes Important Do not perform any other operations unti...

Page 33: ...n The ink tank is correctly set and there is enough ink remaining to print z Ink lamp is flashing Flashing slowly at around 3 second intervals Repeats Ink is low You can continue printing for a while but we recommend you to have a new ink tank available Flashing quickly at around 1 second intervals Repeats The ink tank is empty Replace it with a new one z Ink lamp is off The tank is not set proper...

Page 34: ...his will cause the ink tank to dry out and the printer may not operate properly when it is reinstalled To maintain optimal printing quality use an ink tank within six months of first use z Color ink is consumed in Print Head Cleaning and Print Head Deep Cleaning which may be necessary to maintain the printer s performance When an ink tank is out of ink replace it immediately with a new one 1 Slide...

Page 35: ...ctive cap is removed as this may prevent the ink from being ejected properly A B 1 Insert the new ink tank slightly slanted to meet the on the ink tank to on the printer 1 2 Push down on the mark on the ink tank until it clicks into place Ensure that the ink lamp is lit red 2 Important If the front innermost part of the ink tank A is sticking up push down on the Canon logo on the ink tank as illus...

Page 36: ...u 1 Select the setting item then press the OK button The setting screen for the selected item is displayed 2 Select the menu then press the OK button 4 Change the settings 1 Select the setting item then press the OK button Print settings Ink drying wait time Use this setting only if the print surface becomes smudged Wireless print settings For details see Setting the Page Size Media Type and Layou...

Page 37: ...format is as specified in the DPOF setting from DPOF printing Important z Remove the memory card before changing this setting For details refer to the User s Guide on screen manual z When you write the data on the memory card connect the printer with the AC adapter The printer cannot be set to the Read write mode with using the optional battery The printer can be set to the Read write mode when us...

Page 38: ...tank is recommended If printing is in progress and you want to continue printing press the OK button with the ink tank installed Then printing can continue Replacing the ink tank is recommended after the printing The printer may be damaged if printing is continued under the ink out condition See Replacing an Ink Tank on page 30 The print head lock lever is not properly applied Open the cover and p...

Page 39: ...in the remaining ink volume screen on the LCD See Getting the Ink Status Information on page 30 Cause Action There are no photos in memory card z There are no image data saved on the memory card that can be read by this printer z The printer may not recognize the file if the file name or the folder path contains certain characters Use only alphanumeric characters z Photo data edited or processed o...

Page 40: ...llows z Paper of size other than 5 x 7 127 0 x 177 8 mm is loaded in the Rear Tray Press the OK button on the printer to dismiss the error message then load one sheet of the supplied 5 x 7 127 0 x 177 8 mm paper or same sized Canon genuine paper in the Rear Tray z Paper is not loaded in the Rear Tray Press the OK button on the printer to dismiss the error message and then load paper in the Rear Tr...

Page 41: ... noticeable streaks then press the OK button 8 Make sure that the paper is loaded then press the OK button The second Print Head alignment pattern is printed 9 In the same way select the best patterns for columns F to H then press the OK button 10 In the same way print the third sheet and select the best patterns for columns I to N then press the OK button LCD Cannot Be Seen At All An Unintended L...

Page 42: ...ter icon on the desktop 2 Double click the CD ROM icon on the displayed window Note To use the Run command to start the setup program specify your disc drive and then the name of the setup program MSETUP4 EXE The drive letter of the disc drive depends on your computer Double click the CD ROM icon on your desktop to start installation If the CD ROM icon is not displayed restart your computer If the...

Page 43: ...er will operate at a lower speed provided under USB 1 1 In this case the printer operates properly but printing speed may slow down due to communication speed Check the following to ensure that your system environment supports USB 2 0 Hi Speed connection z The USB port on your computer supports USB 2 0 Hi Speed connection z The USB cable and the USB hub if you are using one support USB 2 0 Hi Spee...

Page 44: ...misaligned If you unlocked the Print Head Lock Lever accidentally make sure to align the Print Head after relocking the lock lever See Aligning the Print Head on page 29 and perform Automatic Print Head Alignment If this does not solve the problem see Adjusting the Print Head Manually on page 38 and perform Manual Print Head Alignment Cause Action Print Head nozzles are clogged See When Printing B...

Page 45: ...e Paper Thickness Lever to the right Depending on the printing content the printed surface may become scratched In this case set the Paper Thickness Lever to the left Return the Paper Thickness Lever to the right after printing If you do not return the lever the distance between the Print Head and printing paper stays broadened and the inside of the printer will easily get dirty The image quality ...

Page 46: ... against the right side of the Rear Tray and slide the Paper Guide so that it just touches the left edge of the stack Foreign object in the Rear Tray Make sure that there are no foreign objects in the Rear Tray Cause Action Paper jammed in the Paper Output Slot or the Rear Tray Remove the paper following the procedure below 1 Slowly pull the paper out either from the Rear Tray or from the paper ou...

Page 47: ...ause Action Note z This section describes errors that are indicated on Canon brand PictBridge compliant devices The error messages and operations may vary depending on the device you are using For errors on non Canon PictBridge compliant devices check the error message on the LCD and take the appropriate action to clear the error For details see Error Message Is Displayed on the LCD on page 35 z F...

Page 48: ...alled properly or is out of ink See the error message on the LCD and take the appropriate action to resolve the error See Error Message Is Displayed on the LCD on page 35 Ink error An ink tank that was once empty is installed For details on how to resolve the error see Printer detected ink out condition of the following ink Replace the ink tank U180 on page 36 Hardware Error The optional battery h...

Page 49: ...is inadequate When printing through infrared communication confirm that the IrDA ports on the printer and the mobile phone are placed face to face with each other at a proper angle and distance and that there is nothing blocking them Then retry printing Operational distance and angle vary depending on the specifications of your mobile phone and your operating environment but generally place the pr...

Page 50: ...intable number of pages when using the battery Approx 110 pages PP 101 4 x 6 101 6 x 152 4 mm Page number was measured under the following conditions Battery New battery fully charged Printing method Continuous printing from an SD card at 23 C 73 F The printable number depends on the size and content of the photo data z Bluetooth Unit BU 20 The Bluetooth unit BU 20 is the unit which enables wirele...

Page 51: ...ink tank installed Print Head Total 1 536 nozzles C M each 512 nozzles Y Dye BK each 256 nozzles AC Adapter External dimensions Approx 4 7 W x 2 3 D x 1 3 H inches Approx 118 W x 58 D x 32 H mm excluding protruding portion Approx 5 2 W x 2 3 D x 1 3 H inches Approx 130 W x 58 D x 32 H mm including protruding portion Weight Approx 230 g Approx 8 2 oz Rated input AC 100 240 V Rated output DC 16 V 2 ...

Page 52: ...werPC G3 256 MB Mac OS X v 10 2 8 v 10 3 PowerPC G3 128 MB Note Hard disk must be formatted as Mac OS Extended Journaled or Mac OS Extended Browser Internet Explorer 6 0 Safari Hard Disk Space 400 MB Note For bundled software installation 200 MB Note For bundled software installation CD ROM Drive Required Other restrictions SVGA 800 x 600 Additional System Requirements for On Screen Manuals Browse...

Page 53: ...or damage to the printer depending on the thunder storm Use the power cable included with the printer Use only power supplies listed in the user instructions Canon AC Adapter K30285 and or Li ion Battery Pack Canon K30274 Do not use them for other products Cleaning the printer Use a damp cloth to clean the printer Never use flammable solvents such as alcohol benzene or thinners If flammable solven...

Page 54: ...r Support contacts please see the back cover of the European Warranty Systems EWS Booklet or visit www canon europe com Do not use an extension lead cord Working around the printer Never put your hands or fingers in the printer while it is printing Do not place any object on the printer Do not place metal objects paper clips staples etc or containers of flammable solvents alcohol thinners etc on t...

Page 55: ...f original purchase when delivered to you in new condition in its original container or b for 90 days from the date of original purchase for refurbished Products Product returned to a Canon USA repair facility or a Canon USA Authorized Service Facility ASF and proven to be defective upon inspection will be a repaired utilizing new remanufactured repaired and or recycled parts b exchanged for new o...

Page 56: ...R THAN THE ORIGINAL PURCHASER OF THE PRODUCT OR THE PERSON FOR WHOM IT WAS PURCHASED AS A GIFT AND STATES YOUR EXCLUSIVE REMEDY Canon USA offers a range of customer technical support options z Interactive troubleshooting e mail technical support the latest driver downloads and answers to frequently asked questions www canontechsupport com z Toll free live technical support Monday Saturday excludin...

Page 57: ...nd you may also have other rights which vary from state to state Support program specifics are subject to change without notice InstantExchange warranty service is subject to the availability of refurbished or new replacement units Canon U S A Inc One Canon Plaza Lake Success NY 11042 USA Canon is a registered trademark of Canon Inc 2007 Canon U S A Inc Canon is a registered trademark of Canon Inc...

Page 58: ...provides up to three full years of service and support coverage at a very attractive price CarePAK offers toll free Canon technical support and includes Canon s superb InstantExchange product replacement program For further information about extending your Canon service and support call 1 800 385 2155 or visit our Web site at www canonesp com CarePAK must be purchased during your product s warrant...

Page 59: ...mentation Provided 2 Printer Parts and Their Functions 3 Loading Printing Paper 8 Printing from a Memory Card 10 Printing Photographs Directly from a Compliant Device 21 Printing Photographs from a Wireless Communication Device 25 Routine Maintenance 27 Changing the Printer Settings 33 Troubleshooting 35 Appendix 47 Direct Photo Guide The following ink tank is compatible with this printer Photo Pr...

Reviews: