Scanning Using the Control Panel (Windows XP Only)
You can scan images via the Control Panel of Windows XP using the WIA driver.
Important
• When using the scanner or printer with network connection, you cannot scan using the WIA driver.
1. From the
Start
menu, select
Control Panel
.
2. Click
Printers and Other Hardware
>
Scanners and Cameras
, then double-click
Canon
XXX series
(where "XXX" is the model name).
The
Scanner and Camera Wizard
dialog box appears.
3. Click
Next
.
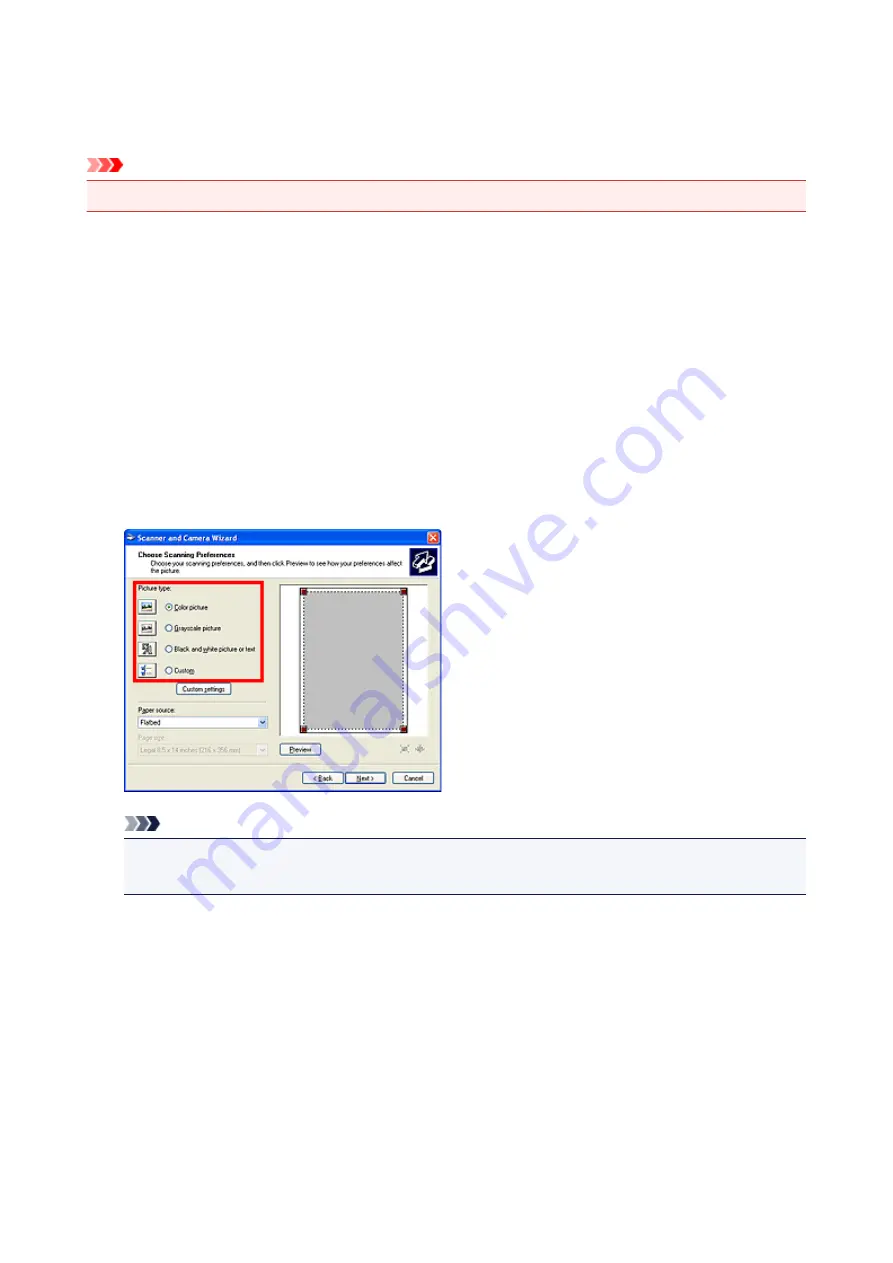
4. Select
Picture type
according to the item to be scanned.
To scan from the platen, select
Flatbed
for
Paper source
. To scan from the ADF (Auto Document
Feeder), select
Document Feeder
.
Note
• To scan with the values previously set in
Custom settings
, select
Custom
.
• Selecting
Document Feeder
for
Paper source
enables you to select
Page size
.
5. Click
Custom settings
to set the preferences as required.
678
Summary of Contents for MX530 series
Page 70: ... 8 Display area The display changes based on the menu you select 70 ...
Page 84: ...Safety Guide Safety Precautions Regulatory and Safety Information 84 ...
Page 93: ...Main Components Front View Rear View Inside View Operation Panel 93 ...
Page 99: ...99 ...
Page 110: ...Loading Paper Originals Loading Paper Loading Originals Inserting the USB Flash Drive 110 ...
Page 136: ...136 ...
Page 141: ...Inserting the USB Flash Drive Inserting the USB Flash Drive Removing the USB Flash Drive 141 ...
Page 144: ...Replacing a FINE Cartridge Replacing a FINE Cartridge Checking the Ink Status 144 ...
Page 192: ...Note The effects of the quiet mode may be less depending on the print quality settings 192 ...
Page 197: ...About Quiet setting 197 ...
Page 218: ...Information about Network Connection Useful Information about Network Connection 218 ...
Page 264: ...5 Delete Deletes the selected IP address from the list 264 ...
Page 323: ...Note Selecting Scaled changes the printable area of the document 323 ...
Page 358: ...Note During Grayscale Printing inks other than black ink may be used as well 358 ...
Page 363: ...Adjusting Brightness Adjusting Intensity Adjusting Contrast 363 ...
Page 453: ...Handling Precautions Shipping the Bluetooth Unit 453 ...
Page 458: ...Important Store the Bluetooth unit with the cap attached 458 ...
Page 471: ...Now the settings for printing via Bluetooth communication are ready 471 ...
Page 478: ...Bluetooth Settings Setting Bluetooth Printing Bluetooth settings Screen 478 ...
Page 582: ...Related Topic Scanning Items Larger than the Platen Image Stitch 582 ...
Page 603: ...603 ...
Page 656: ...656 ...
Page 682: ...682 ...
Page 692: ... Scan resolution Select the resolution for scanning Ex 692 ...
Page 846: ...Problems with Printing Quality Print Results Not Satisfactory Ink Is Not Ejected 846 ...
Page 950: ...1202 Cause The paper output cover is open Action Close the paper output cover 950 ...
Page 992: ...5B02 Cause Printer error has occurred Action Contact the service center 992 ...
Page 993: ...5B03 Cause Printer error has occurred Action Contact the service center 993 ...
Page 994: ...5B04 Cause Printer error has occurred Action Contact the service center 994 ...
Page 995: ...5B05 Cause Printer error has occurred Action Contact the service center 995 ...
Page 996: ...5B12 Cause Printer error has occurred Action Contact the service center 996 ...
Page 997: ...5B13 Cause Printer error has occurred Action Contact the service center 997 ...
Page 998: ...5B14 Cause Printer error has occurred Action Contact the service center 998 ...
Page 999: ...5B15 Cause Printer error has occurred Action Contact the service center 999 ...


