background image

3

In

tr

od
uc
tio
n

E

Using this Manual

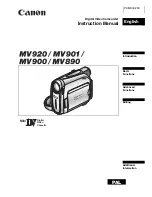
Thank you for purchasing the Canon MV920/MV901/MV900/MV890. Please read this 
manual carefully before you use the camcorder and retain it for future reference. Should 
your camcorder fail to operate correctly, refer to the 

Troubleshooting table (

 76).

Change the display language before you begin (

59).

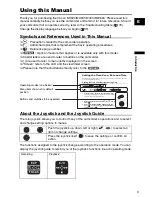
Symbols and References Used in This Manual



: Precautions related to the camcorder operation.



: Additional topics that complement the basic operating procedures.



: Reference page number.



 : Option or feature that applies or is available only with this model.



Capital letters are used to refer to buttons on the camcorder.



[ ] are used to refer to menu items displayed on the screen.



“Screen” refers to the LCD and the viewfinder screen.



Please note that the illustrations mainly refer to the 

.

About the Joystick and the Joystick Guide

The mini joystick allows you to control many of the camcorder’s operations and to select 
and change setting options in menus. 

The functions assigned to the joystick change according to the operation mode. You can 
display the joystick guide to remind you of the joystick’s functions in each operating mode.

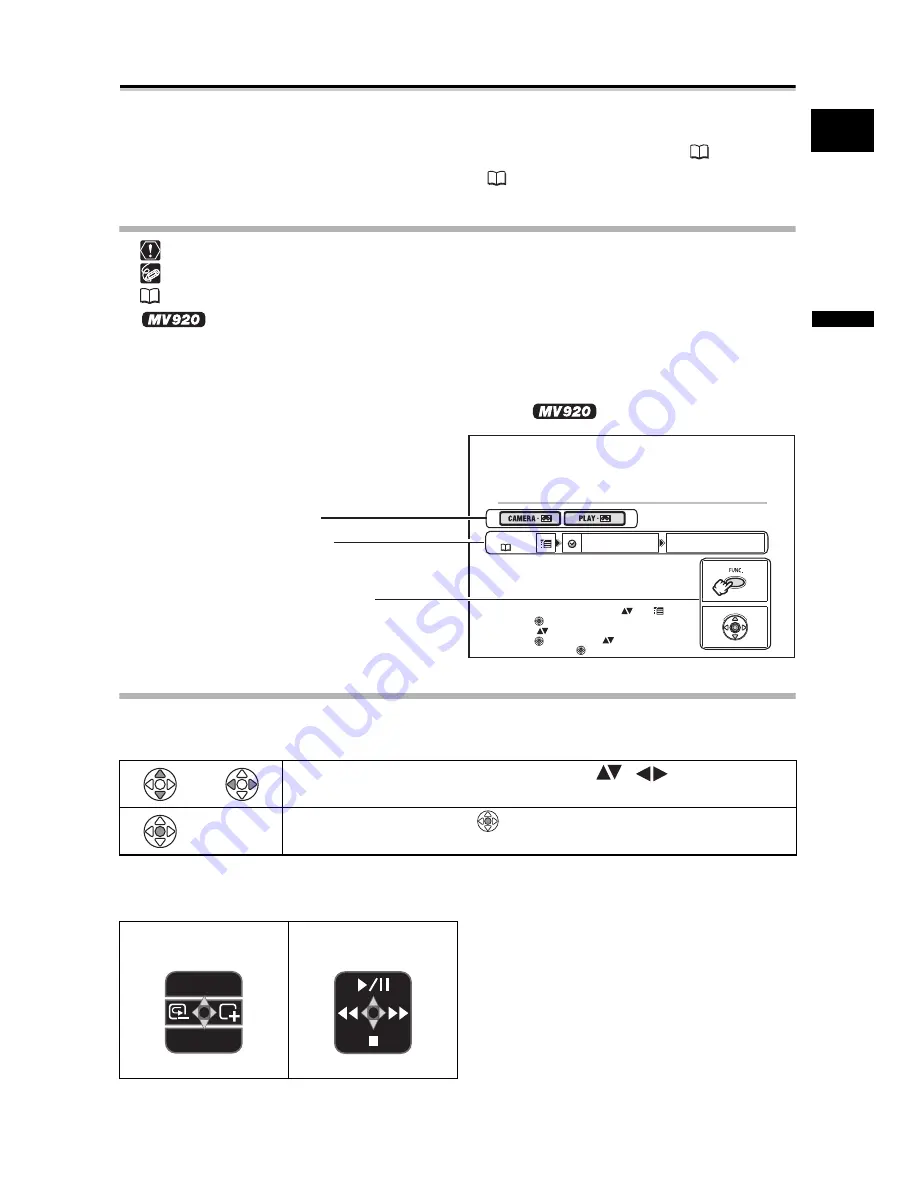
Push the joystick up, down, left or right (

) to select an 

item or change settings.

Press the joystick itself (

) to save the settings or confirm an 

action.

Recording:

Playback:

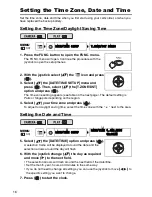
Setting the Time Zone, Date and Time

Set the time zone, date and time when you first start using your camcorder, or when you 
have replaced the backup battery.

Setting the Time Zone/Daylight Saving Time

1. Press the FUNC. button to open the FUNC. menu. 

The FUNC. menu will open. Continue the procedure with the 
multi selector to open the setup menus.

2. With the multi selector select (

) the 

 icon and 

press (

).

3. Select (

) the [DATE/TIME SETUP] menu and 

press (

). Then, select (

) the [T.ZONE/DST] 

option and press (

).

The time one setting appears (see table on the ne t page) The defa lt setting is

MENU

(

33)

DATE

DATE/TIM

/TIME SET

E SETUP

UP

T.ZO

T.ZONE/D

NE/DST P

ST PARIS

ARIS

DATE/TIME SETUP

DATE/TIME 1.JAN.,2006
          12:00 AM

Operating modes (see below)

Menu item shown at its default 
position

Buttons and switches to be operated

EXP

FOCUS

Summary of Contents for MV890

Page 1: ...English PUB DIE 253 PAL English Introduction Basic Functions Advanced Functions Editing Additional Information Digital Video Camcorder Instruction Manual Mini Digital Video Cassette ...

Page 2: ... TO QUALIFIED SERVICE PERSONNEL WARNING TO REDUCE THE RISK OF FIRE OR ELECTRIC SHOCK DO NOT EXPOSE THIS PRODUCT TO RAIN OR MOISTURE CAUTION TO REDUCE THE RISK OF ELECTRIC SHOCK AND TO REDUCE ANNOYING INTERFERENCE USE THE RECOMMENDED ACCESSORIES ONLY CAUTION DISCONNECT THE MAINS PLUG FROM THE SUPPLY SOCKET WHEN NOT IN USE CA 570 identification plate is located on the bottom ...

Page 3: ...ions in menus The functions assigned to the joystick change according to the operation mode You can display the joystick guide to remind you of the joystick s functions in each operating mode Push the joystick up down left or right to select an item or change settings Press the joystick itself to save the settings or confirm an action Recording Playback Setting the Time Zone Date and Time Set the ...

Page 4: ...trademark or trademark of Microsoft Corporation in the United States and or other countries Macintosh and Mac OS are trademarks of Apple Computer Inc registered in the United States and other countries Other names and products not mentioned above may be registered trademarks or trademarks of their respective companies Operating Modes Switch Icon Display Operation CAMERA Recording movies on a tape ...

Page 5: ...3 Recording Using the Recording Programs 36 Adjusting the Exposure Manually 40 Adjusting the Focus Manually 41 Setting the White Balance 43 Selecting an Image Effect 44 Setting the Shutter Speed 45 Using the Self Timer 47 Changing the Recording Mode SP LP 48 Audio Recording 49 Using Digital Effects 51 Widescreen TV Recording 16 9 54 Playback Magnifying the Image 55 Displaying the Data Code 56 End ...

Page 6: ...6 List of Messages 70 Maintenance Others 71 Troubleshooting 76 System Diagram Availability differs from area to area 79 Optional Accessories 80 Specifications 82 Index 84 ...

Page 7: ...g the Supplied Accessories Europe only Not included with the CA 570 Compact Power Adapter incl power cord BP 2L5 Battery Pack Lithium Button Battery CR1616 SS 900 Shoulder Strap STV 250N Stereo Video Cable PC A10 SCART Adapter ...

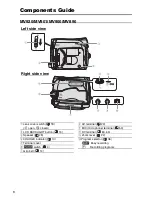
Page 8: ...ht side view Lens cover switch 18 open closed LCD BACKLIGHT button 15 Speaker 28 CHARGE indicator 10 Terminal cover switch 4 Grip belt 14 AV terminal 29 MIC microphone terminal 50 DV terminal 63 65 Zoom lever 22 Program selector 36 Easy recording Recording programs ...

Page 9: ...ery release button 10 LCD screen 15 Joystick 3 FUNC button 33 D EFFECTS button 51 WIDE SCR button 54 DATA CODE button 56 Backup battery compartment 12 Start stop button 18 Battery attachment unit 10 Serial number DC IN terminal 10 Cassette compartment 13 Cassette compartment cover 13 OPEN EJECT switch 13 Tripod socket 25 ...

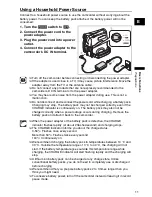
Page 10: ...1 Connect the power cord to the adapter 2 Plug the power cord into a power outlet 3 Connect the power adapter to the camcorder s DC IN terminal The CHARGE indicator starts flashing The indicator will stay on when the charging is completed 4 When the charging is completed disconnect the power adapter from the camcorder Unplug the power cord from the power outlet and disconnect it from the adapter 5...

Page 11: ... correctly even if the CHARGE indicator is continuously on The battery pack may also not be charged correctly when a power outage occurs during charging Remove the battery pack and attach it back to the camcorder When the power adapter or the battery pack is defective the CHARGE indicator flashes rapidly at about 2 flashes second and charging stops The CHARGE indicator informs you about the charge...

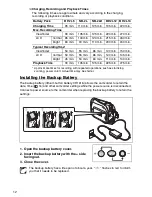
Page 12: ...kup battery to retain the settings 1 Open the backup battery cover 2 Insert the backup battery with the side facing out 3 Close the cover The backup battery has a life span of about a year flashes in red to inform you that it needs to be replaced Battery Pack BP 2L5 NB 2L NB 2LH BP 2L12 BP 2L14 Charging Time 95 min 110 min 125 min 195 min 220 min Max Recording Time Viewfinder 90 min 105 min 125 mi...

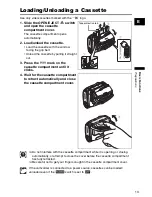
Page 13: ...t out 3 Press the mark on the cassette compartment until it clicks 4 Wait for the cassette compartment to retract automatically and close the cassette compartment cover Do not interfere with the cassette compartment while it is opening or closing automatically or attempt to close the cover before the cassette compartment has fully retracted Be careful not to get your fingers caught in the cassette...

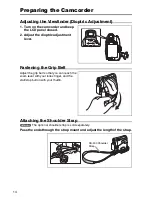
Page 14: ...ioptric adjustment lever Fastening the Grip Belt Adjust the grip belt so that you can reach the zoom lever with your index finger and the start stop button with your thumb Attaching the Shoulder Strap The optional shoulder strap is sold separately Pass the ends through the strap mount and adjust the length of the strap SS 900 Shoulder Strap ...

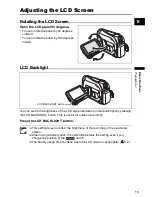
Page 15: ...rightness of the LCD screen between normal and bright by pressing the LCD BACKLIGHT button This is useful for outdoor recordings Press the LCD BACKLIGHT button This setting does not affect the brightness of the recording or the viewfinder screen When using a battery pack the camcorder retains the setting even if you change the position of the switch The battery usage time shortens when the LCD scr...

Page 16: ...or Singapore depending on the region 4 Select your time zone and press To adjust for daylight saving time select the time zone with the next to the area Setting the Date and Time 5 Select the DATE TIME option and press A selection frame will be displayed around the date and the selection arrows around the day will flash 6 With the joystick change the day as required and move to the next field The ...

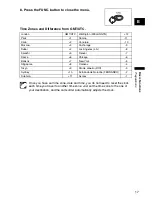
Page 17: ...o another time zone Just set the time zone to the one of your destination and the camcorder automatically adjusts the clock London GMT UTC Wellington WELLINGTN 12 Paris 1 Samoa 11 Cairo 2 Honolulu 10 Moscow 3 Anchorage 9 Dubai 4 Los Angeles L A 8 Karachi 5 Denver 7 Dacca 6 Chicago 6 Bankok 7 New York 5 Singapore 8 Caracas 4 Tokyo 9 Rio de Janeiro RIO 3 Sydney 10 Fernando de Noronha FERNANDO 2 Solo...

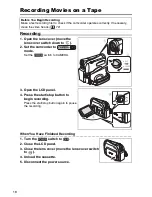
Page 18: ...p button to begin recording Press the start stop button again to pause the recording When You Have Finished Recording 1 Turn the switch to 2 Close the LCD panel 3 Close the lens cover move the lens cover switch to 4 Unload the cassette 5 Disconnect the power source Before You Begin Recording Make a test recording first to check if the camcorder operates correctly If necessary clean the video heads...

Page 19: ...lank sections between the recordings even if you turn the camcorder off Bright light may make it difficult to use the LCD screen In such case use the viewfinder instead When recording near loud sounds such as fireworks drums or concerts sound may become distorted or may be recorded not in the actual sound level This is not a malfunction Allowing the Subject to Monitor the LCD Screen You can rotate...

Page 20: ...onds and returns to record pause mode Record Search In record pause mode this function allows you to play back the tape forward or reverse to locate the point where you wish to begin recording 1 Set the program selector to 2 If the joystick guide does not appear on screen press to display it 3 Hold the joystick pushed towards to search back towards the beginning of the recording or pushed towards ...

Page 21: ... may not appear Depending on the type of the tape the indication may not be displayed correctly Remaining battery charge The battery symbol indicates the charge status of the battery pack starts flashing in red when the battery pack is empty When you attach an empty battery pack the power may turn off without displaying The actual battery charge may not be indicated accurately depending on the con...

Page 22: ...rd W to zoom out wide angle Move it toward T to zoom in telephoto You can also change the zoom speed 24 Keep at least 1 m to the subject At wide angle you can focus on a subject as close as 1 cm The zoom speed is slightly faster in record pause mode 25x optical zoom 22x optical zoom Zoom out Zoom in Zoom lever ...

Page 23: ... press 3 Select the CAMERA SETUP menu and press Then select the D ZOOM option and press 4 Select either 100x or 800x or 88x or 700x and press to save the changes 5 Press the FUNC button to close the menu Digital zoom cannot be used in the Night recording program A zoom indicator appears for 4 seconds It extends in light blue when the digital zoom is set to 100x or 88x and extends further in dark b...

Page 24: ...oom 1 Press the FUNC button to open the FUNC menu 2 With the joystick select the icon and press 3 Select the CAMERA SETUP menu and press Then select the ZOOM SPEED option and press 4 Select a setting option and press to save the changes 5 Press the FUNC button to close the menu The fastest zoom speed can be achieved with the VARIABLE setting Among the fixed zoom speeds SPEED 3 is the fastest and S...

Page 25: ...ility Lighting When recording outdoors we recommend recording with the sun at your back When using a tripod do not leave the viewfinder exposed to direct sunlight as it may melt due to concentration of the light by the lens Do not use tripods with fastening screws longer than 5 5 mm as it may damage the camcorder The camcorder cannot be mounted on tripods with fixed non retractable camera position...

Page 26: ...wards to play back the tape Push again to pause the playback 6 Push the joystick towards to stop the playback To use the viewfinder close the LCD panel About the screen display During playback the time code gives the hours minutes seconds and frames The remaining tape time may not appear when the time left is less than 15 seconds If the playback picture is distorted clean the video heads using a C...

Page 27: ...s normal speed forward or reverse During normal playback hold the joystick pushed towards or pushed towards Release the joystick to return to normal playback There is no sound during special playback The picture may become distorted during some special playback modes The camcorder stops the tape automatically after 5 minutes in playback pause to protect the tape and video heads Joystick ...

Page 28: ... be muted when the LCD panel is closed 1 Press the FUNC button to open the FUNC menu 2 With the joystick select the speaker volume icon 3 Adjust the volume as required 4 Press the FUNC button to save the setting and close the menu If you turn off the volume completely the volume display will change to MENU 33 SPEAKER VOLUME Speaker Joystick ...

Page 29: ...the STV 250N Stereo Video Cable to the camcorder s AV terminal and the audio terminals on the SCART Adapter Connect the white plug to the white AUDIO terminal L left and the red plug to the red AUDIO terminal R right and the yellow plug to the yellow VIDEO terminal 4 If connecting to a TV set the input selector to VIDEO If connecting to a VCR set the input selector to LINE Open the terminal cover ...

Page 30: ... terminals on the TV VCR Connect the white plug to the white audio terminal L left the red plug to the red audio terminal R right and the yellow plug to the yellow video terminal VIDEO 3 If connecting to a TV set the input selector to VIDEO If connecting to a VCR set the input selector to LINE We recommend powering the camcorder from a household power source STV 250N Stereo Video Cable supplied Op...

Page 31: ...16 9 aspect ratio NORMAL TV TV sets with 4 3 aspect ratio 5 Press the FUNC button to close the menu Playing back recordings made in the widescreen mode on a normal TV If the TV type is set to NORMAL TV the recording will be played back in letterbox display If the TV type is set to WIDE TV the image will appear horizontally squeezed If you connect the camcorder to a TV with Video ID 1 system record...

Page 32: ...icon and press 3 Select the AUDIO SETUP menu and press Then select the OUTPUT CH option and press 4 Select a setting option and press to save the changes L R Stereo L R channels Bilingual Main Sub L L Stereo L channel Bilingual Main R R Stereo R channel Bilingual Sub 5 Press the FUNC button to close the menu The setting resets to the L R setting when you turn the camcorder off MENU 33 AUDIO SETUP ...

Page 33: ...selections with the joystick In such cases a joystick icon next to the bottom bar or small arrows around the setting option will be displayed as an additional operation guide 4 Press the FUNC button to save the setting and close the menu Setup menus 1 Press the FUNC button to open the FUNC menu 2 With the joystick select the icon and press 3 Select a setup menu and press 4 Select a menu item and p...

Page 34: ...TR SPEED AUTO 1 50 1 120 1 250 1 500 1 1000 1 2000 45 A SL SHUTTER ON OFF 46 D ZOOM 23 OFF 100x 800x OFF 88x 700x ZOOM SPEED VARIABLE SPEED 3 SPEED 2 SPEED 1 24 IMG STAB ON OFF 61 VCR SETUP REC MODE STD PLAY LONG PLAY 48 AUDIO SETUP WIND SCREEN AUTO OFF 49 AUDIO MODE 16bit 12bit 49 DISPLAY SETUP BRIGHTNESS 60 TV SCREEN ON OFF 68 LEVEL MARKER ON OFF 19 LANGUAGE See list of languages 59 DEMO MODE ON...

Page 35: ...AUDIO STEREO1 STEREO2 MIX FIXED MIX VAR 58 MIX BALANCE 58 AUDIO MODE 16bit 12bit 49 DISPLAY SETUP BRIGHTNESS 60 TV SCREEN ON OFF 68 DISPLAYS ON OFF PLAYBK 68 6SEC DATE ON OFF 56 DATA CODE DATE TIME DATE TIME 56 LANGUAGE See list of languages 59 SYSTEM SETUP BEEP HIGH VOLUME LOW VOLUME OFF 60 START UP IMG ON OFF 61 DATE TIME SETUP T ZONE DST See list of time zones 16 DATE TIME 16 DATE FORMAT Y M D ...

Page 36: ...However you have the option of adjusting the settings manually Portrait Use this mode to give accent to your subject by blurring the background or foreground The blur effect increases the more you zoom to telephoto Sports Use this mode to record sports scenes such as tennis or golf or moving objects such as roller coasters Night Use this mode to record in dimly lit places Snow Use this mode to rec...

Page 37: ...h Use this mode to record on a sunny beach It prevents the subject from being underexposed Sunset Use this mode to record sunsets in vibrant colors Spotlight Use this mode to record spotlit scenes Fireworks Use this mode to record fireworks ...

Page 38: ...le A Auto setting Selecting the Easy Recording Program Set the program selector to appears Program Selector Recording Program Image Stabilizer on Focus A White Balance A Wind Screen A Shutter Speed A A Exposure Adjustment A Digital Effects Joystick Program selector ...

Page 39: ...ss of the image may change abruptly Portrait Sports mode The picture may not appear smooth when played back Snow Beach mode The subject may become overexposed in dark surroundings Check the image on the screen The picture may not appear smooth when played back Night mode Moving subjects may leave a trailing afterimage Picture quality may not be as good as in other modes White points may appear on ...

Page 40: ...Adjust the brightness of the image as necessary To return to the automatic exposure push the joystick towards EXP once more The exposure adjustment indicator will disappear and EXP will turn white again 5 Push the joystick towards BACK to save the exposure setting When you operate the zoom during exposure lock the brightness of the image may change The adjustment range depends on the brightness at...

Page 41: ...tick guide does not appear on screen press to display it 4 Push the joystick towards FOCUS to activate the manual focus FOCUS on the joystick guide will be displayed in light blue and MF appears on the screen 5 Adjust the focus as necessary Push the joystick towards for a farther focal distance or push it towards for a closer focal distance Reflective surfaces Subjects with low contrast or without...

Page 42: ...focus on faraway subjects such as mountains or fireworks 1 In the manual focus mode press to display the joystick guide 2 Keep the joystick pushed towards FOCUS for more than 2 seconds At first MF will appear on the screen and then it will be replaced by the symbol In the infinity focus mode If you operate the zoom or the joystick or if you turn the camcorder off the infinity focus will be cancele...

Page 43: ...you select SET 5 Point the camcorder at a white object zoom in until it fills the whole screen and press Keep the camcorder zoomed in at the white object until step 6 is completed The icon flashes and stops flashing when the adjustment is completed 6 Press the FUNC button to save the setting and close the menu AUTO Settings are automatically set by the camcorder DAYLIGHT For recording outdoors on ...

Page 44: ...orescent lights Selecting an Image Effect You can record with different color saturation and contrast effects 1 Press the FUNC button to open the FUNC menu 2 With the joystick select the image effects icon 3 Select the image effect from the options on the bottom bar 4 Press the FUNC button to save the setting and close the menu The image effects cannot be used when the program selector is set to S...

Page 45: ...and press Then select the SHUTTR SPEED option and press 6 Select a setting option and press to save the changes 7 Press the FUNC button to close the menu Do not point the camcorder directly at the sun when the shutter speed is set to 1 1000 or higher The image may flicker when recording with high shutter speeds The shutter speed resets to AUTO when you set the program selector to or when you chang...

Page 46: ...ecording in places with insufficient lighting However you can set the camcorder not to use a slow shutter speed 1 Open the FUNC menu select the icon and press 2 Select the CAMERA SETUP menu and press Then select the A SL SHUTTER option and press 3 Set it to OFF and press to save the changes then close the menu When set to ON moving subjects may leave a trailing afterimage MENU 33 CAMERA SETUP A SL...

Page 47: ...button The camcorder starts recording after a 10 second countdown The countdown appears on the screen To cancel the self timer select SELF TIMER OFF in step 2 above Once the countdown has begun you can also press the start stop button to cancel the self timer The self timer will be canceled when you turn off the camcorder MENU 33 SELF TIMER OFF Start stop button FUNC button ...

Page 48: ... then close the menu Depending on the nature and usage condition of the tape picture and sound recorded in LP mode may be distorted We recommend using the SP mode for important recordings If you record in both SP and LP modes on the same tape the playback picture may become distorted and the time code may not be written correctly If you play back a tape that has been recorded in LP mode with anoth...

Page 49: ...2bit and press to save the changes then close the menu The selected audio mode is displayed for approximately 4 seconds Wind Screen The camcorder reduces the wind noise automatically only when recording audio with the built in microphone However you can turn off the wind screen when recording indoors or when you want the microphone to be as sensitive as possible 1 Open the FUNC menu select the ico...

Page 50: ...he MIC terminal Use commercially available condenser microphones with their own power supply You can connect almost any stereo microphone equipped with a Ø 3 5 mm plug but the audio level will be different than with the built in microphone MIC terminal Open the terminal cover ...

Page 51: ...ctions Recording E Using Digital Effects Faders 52 Begin or end scenes with a fade to or from black Fade Trigger FADE T Wipe WIPE Corner Wipe CORNER Jump JUMP Flip FLIP Puzzle PUZZLE Zigzag ZIGZAG Beam BEAM Tide TIDE ...

Page 52: ... icon 2 Select the FADER option and press 3 Select a setting option press and close the menu The symbol of the selected fader will appear on screen 4 Fade in In record pause mode press the D EFFECTS button and begin recording by pressing the start stop button Black and White BLK WHT Sepia SEPIA Art ART Mosaic MOSAIC Ball BALL Cube CUBE Wave WAVE Color Mask COLOR Mirror MIRROR MENU 33 D EFFECT OFF ...

Page 53: ...selector to Not available if the TV type is set to NORMAL TV 1 Open the FUNC menu and select the digital effects icon 2 Select the EFFECT option and press 3 Select a setting option press and close the menu The symbol of the selected effect will appear on screen 4 Press the D EFFECTS button The symbol of the selected effect will turn green The effect can be activated deactivated by pressing the D E...

Page 54: ...ay normally video in 4 3 aspect ratio will appear with black side bars On the viewfinder screen Widescreen video will appear in letterbox display video in 4 3 aspect ratio will display normally Playing back recordings made in the widescreen mode on a normal TV If the TV type is set to NORMAL TV the recording will be played back in letterbox display If the TV type is set to WIDE TV the image will a...

Page 55: ...ed area To further enlarge the image move the zoom lever toward T To shrink the image below 2 times magnification move the zoom lever toward W 2 Select the magnified area with the joystick To cancel the magnification move the zoom lever toward W until the frame disappears While the magnification position frame is displayed it will replace the joystick guide Cancel the magnification to return to no...

Page 56: ...display the data code during playback Press the DATA CODE button The data code will not display the next time you turn on the camcorder Six Second Auto Date Date and time appear for 6 seconds when you begin playback or to indicate that date or time zone has changed 1 Open the FUNC menu select the icon and press 2 Select the DISPLAY SETUP menu and press Then select the 6SEC DATE option and press 3 ...

Page 57: ...nd search icon and press 2 Select EXECUTE and press to start the search END SEARCH appears The camcorder rewinds fast forwards the tape plays back the last few seconds of the recording and stops the tape Operating the joystick will cancel the search End search cannot be used once you unload the cassette End search may not work properly if a blank section exists on the tape Joystick FUNC button ...

Page 58: ...FIXED Plays back Stereo 1 and Stereo 2 in the same level MIX VAR Plays back Stereo 1 and Stereo 2 The mix balance can be adjusted If you select an audio setting other than MIX VAR close the menu To adjust the mix level when you select MIX VAR 4 From the AUDIO SETUP menu select the MIX BALANCE option and press 5 Adjust the mix level between ST 1 and ST 2 and press to save the changes then close the...

Page 59: ... mark next to the menu item to change the setting The display FUNC at the bottom of the screen refers to the button s name on the camcorder and will not change when you change the language Changing the Date Format You can select between three date formats For example 1 JAN 2006 JAN 1 2006 and 2006 1 1 1 Open the FUNC menu select the icon and press 2 Select the DATE TIME SETUP menu and press Then s...

Page 60: ...and press Then select the BEEP option and press 3 Set it to OFF and press to save the changes then close the menu Adjusting the Brightness of the LCD Screen 1 Open the FUNC menu select the icon and press 2 Select the DISPLAY SETUP menu and press Then select the BRIGHTNESS option and press 3 Adjust the brightness level and press to save the changes then close the menu Changing the brightness of the...

Page 61: ...rs The image stabilizer cannot be turned off when the program selector is set to The image stabilizer is designed to compensate a normal degree of camcorder shake The image stabilizer might not be as effective when using the Night recording program Changing the Display of the Start Up Image You can set whether the Canon logo will be displayed or not when you turn on the camcorder To turn off the s...

Page 62: ...you can set the camcorder not to start the demonstration mode To deactivate the demonstration mode 1 Open the FUNC menu select the icon and press 2 Select the DISPLAY SETUP menu and press Then select the DEMO MODE option and press 3 Set it to OFF and press to save the changes then close the menu To cancel the demo mode once it has begun press any button turn off the camcorder or load a recording m...

Page 63: ...a Digital Video Device Use the optional CV 150F 4 pin 4 pin or CV 250F 4 pin 6 pin DV Cable Refer also to the instruction manual of the digital video device Recording 1 Set the camcorder to mode and load a recorded cassette 2 Connected device Load a blank cassette and set the device to record pause mode 3 Locate the scene you wish to copy and pause playback shortly before the scene 4 Play back the...

Page 64: ...ll be slightly lower than that of the original When connecting a digital video device If the picture does not appear reconnect the DV cable or turn the camcorder off and back on again Proper operation cannot be guaranteed for all digital video devices equipped with a DV terminal If operation does not work use the AV terminal ...

Page 65: ...lay back the tape or disc 7 If the joystick guide does not appear on screen press to display it 8 Push the joystick towards when the scene you wish to record appears Recording starts Push the joystick towards again to pause resume the recording 9 Push the joystick towards to stop recording 10 Connected Device Stop playback Blank sections may be recorded as anomalous picture If the picture does not...

Page 66: ...ntains copyright control signals for protection of software COPYRIGHT PROTECTED PLAYBACK IS RESTRICTED appears for a few seconds and the camcorder displays a blank blue screen You cannot playback the contents of the tape During recording If you try to record from software that contains copyright control signals for protection of software COPYRIGHT PROTECTED DUBBING RESTRICTED appears You cannot re...

Page 67: ...r than Mac OS 9 and will be installed automatically Use the optional CV 150F 4 pin 4 pin or CV 250F 4 pin 6 pin DV Cable Operation may not work correctly depending on the software and the specifications settings of your computer If the computer freezes while you have connected the camcorder disconnect and reconnect the DV cable If the problem persists disconnect the interface cable turn off camcor...

Page 68: ...urned on The displays appear while a playback image is magnified or a digital effect is activated Tape operation displays appear for 2 seconds Hiding Showing the Displays on the TV Screen When you connect a TV for recording you can select to hide the camcorder displays on the TV screen For playback you can show the camcorder displays on the TV screen 1 Open the FUNC menu select the icon and press ...

Page 69: ...e operation Time code 21 Remaining tape 21 Operating mode 4 Zoom 22 Exposure adjustment 41 Widescreen mode 54 Wind screen 49 Recording program 36 Audio mode 49 White balance 43 Condensation warning 72 Image effects 44 Level marker 19 12 bit audio 58 End search 57 Tape operation Joystick guide 3 Data code 56 Recording Record pause Stop Eject Playback Fast forward Rewind Fast forward playback rewind...

Page 70: ...d digital device is turned off 65 CONDENSATION HAS BEEN DETECTED Condensation has been detected in the camcorder 72 CONDENSATION HAS BEEN DETECTED REMOVE THE CASSETTE Condensation has been detected in the camcorder Unload the cassette 72 TAPE END Tape reached the end Rewind the tape or replace the cassette INCORRECT TAPE SPECIFICATION PLAYBACK IS RESTRICTED You attempted to play back a tape record...

Page 71: ...y consult qualified service personnel Handle the camcorder with care Do not subject the camcorder to shocks or vibration as this may cause damage Avoid sudden changes in temperature Moving the camcorder rapidly between hot and cold temperatures may cause condensation to form on its internal surfaces 72 Storage If you do not intend to use the camcorder for a long time store it in a place free of du...

Page 72: ...wet type cleaning cassettes as this may damage the camcorder Condensation Moving the camcorder rapidly between hot and cold temperature may cause condensation water droplets to form on its internal surfaces Stop using the camcorder if condensation is detected Continued use may damage the camcorder Condensation may form in the following cases How to avoid condensation Unload the cassette place the ...

Page 73: ...terminals may cause a poor contact between the battery pack and the camcorder Wipe the terminals with a soft cloth Since storing a charged battery pack for a long time about 1 year can shorten its lifecycle or affect performance we recommend to discharge the battery pack fully and to store it in a dry place at temperatures no higher than 30 C If you do not use the battery pack for long periods cha...

Page 74: ...e cassette in the camcorder after use Do not use spliced tapes or nonstandard cassettes as they may damage the camcorder Do not use tapes that have been jammed as video heads may become dirty Do not insert anything into the small holes of the cassette or cover them with cellophane tape Handle cassettes with care Do not drop or subject them to severe impact as this may damage the cassettes Rewind t...

Page 75: ...y country with power supply between 100 and 240 V AC 50 60 Hz Consult the Canon Service Center for information on plug adapters for overseas use Playback on a TV Screen You can only play back your recordings on TVs with PAL system The PAL system is used in the following countries areas Algeria Australia Austria Bangladesh Belgium Brunei China Denmark Finland Germany Hong Kong Special Administrativ...

Page 76: ...e or charge the battery pack 10 The camcorder malfunctions Consult a Canon Service Center LCD viewfinder switches on and off Battery pack is exhausted Replace or charge the battery pack 10 Battery pack will not charge Battery packs will not charge outside the temperature range of 0 C and 40 C Charge the battery pack in temperatures between 0 C and 40 C Battery packs become hot with use and may not...

Page 77: ...d the tape or replace the cassette 13 Cassette is protected flashes on the screen Change the position of the protect switch 75 Camcorder is set to a mode other than the mode Set the camcorder to mode 18 Camcorder will not focus Autofocus does not work on that subject Focus manually 41 Viewfinder is not adjusted Adjust the viewfinder with the dioptric adjustment lever 14 Lens is dirty Clean the len...

Page 78: ...s on the screen Rewind the tape 26 Tape is running but image will not appear on the TV screen TV VIDEO selector on the TV is not set to VIDEO Set the selector to VIDEO 29 Video heads are dirty Clean the video heads 72 You attempted to play back or dub copyright protected tape Stop playback dubbing No sound from the built in speaker Speaker volume is turned off Adjust the volume with the SPEAKER VO...

Page 79: ...arger CBC NB2 Car Battery Charger STV 250N Stereo Video Cable CA 570 Compact Power Adapter CV 150F CV 250F DV Cable SC 2000 Soft Carrying Case WS 20 Wrist Strap Shoulder Strap TV VCR Digital Device MiniDV Video Cassette PC A10 SCART Adapter NB 2L NB 2LH BP 2L5 BP 2L12 BP 2L14 Battery Pack CB 2LWE Battery Charger NB 2L NB 2LH BP 2L5 BP 2L12 BP 2L14 Battery Pack ...

Page 80: ...rap Use this for extra additional protection for active shooting Use of genuine Canon accessories is recommended This product is designed to achieve excellent performance when used with genuine Canon accessories Canon shall not be liable for any damage to this product and or accidents such as fire etc caused by the malfunction of non genuine Canon accessories e g a leakage and or explosion of a ba...

Page 81: ...ng Case A handy camcorder bag with padded compartments and plenty of space for accessories This mark identifies genuine Canon video accessories When you use Canon video equipment we recommend Canon brand accessories or products bearing the same mark ...

Page 82: ...ectret condenser microphone Lens f 2 6 65 mm F 1 8 4 4 25x power zoom 35 mm equivalent Tape 16 9 with image stabilizer 43 6 1090 mm 16 9 no image stabilizer 41 0 1025 mm 4 3 recording 49 8 1245 mm f 2 6 57 2 mm F 1 8 3 9 22x power zoom 35 mm equivalent Tape 16 9 with image stabilizer 43 6 959 mm 16 9 no image stabilizer 41 0 902 mm 4 3 recording 49 8 1096 mm Lens Configuration 10 elements in 8 gro...

Page 83: ...g LCD screen in normal brightness Operating temperature 0 40 C Dimensions W x H x D 49 x 92 x 115 mm excluding protrusions Weight camcorder body only 375 g Power supply 100 240 V AC 50 60 Hz Power consumption 17W Rated output 8 4 V DC 1 5 A Operating temperature 0 40 C Dimensions 52 x 90 x 29 mm Weight 135 g Battery type Rechargeable Lithium Ion Battery Rated voltage 7 4 V DC Operating temperature...

Page 84: ...de 62 Digital effects 51 Digital zoom 23 DV dubbing 65 DV terminal 63 67 E Easy mode 36 Effects 52 End search 57 Exposure 40 F Faders 51 Fireworks recording program 37 Focus 41 G Grip belt 14 H Handling precautions 71 I Image effects 44 Image stabilizer 61 Infinity focus 42 L Language 59 LCD backlight 15 LCD brightness 60 LCD screen 15 LP mode 48 M Magnification of playback image 55 Maintenance 71...

Page 85: ...ram 36 SP mode 48 Speaker volume 28 Sports recording program 36 Spotlight recording program 37 Start up image 61 Sunset recording program 37 T Time zone 16 Transferring video to a computer 67 Tripod 25 Troubleshooting 76 V Video heads 72 Videocassettes 13 Viewfinder dioptric adjustment 14 Volume 28 W White balance 43 Widescreen 54 Wind screen 49 Z Zoom 22 Zoom speed 24 ...

Page 86: ...non New Zealand Ltd Customer Care 09 489 0470 www canon co nz Canon Singapore Pte Ltd 1 HarbourFront Avenue 04 01 Keppel Bay Tower Singapore 098632 Tel 65 6799 8888 Fax 65 6799 8882 Canon Hongkong Company Ltd 19 F The Metropolis Tower 10 Metropolis Drive Hunghom Kowloon Hong Kong Canon Latin America Inc Sales Enquiries 703 Waterford Way Suite 400 Miami FL 33126 USA 0056W487 PUB DIE 253 00000 Ni0 0...

Reviews: