background image

20

BASIC OPERATION

TURNING ON THE PROJECTOR

TURNING ON / OFF PROJECTOR 

Connect the projector’s AC power cord into an AC
outlet. The LAMP indicator lights RED, and the READY
indicator lights GREEN.

Press the POWER button on the top control or on the
remote control unit. The LAMP indicator dims, and the
cooling fans start to operate. The preparation display
appears on the screen and the countdown starts. 

2

3

1

30

The preparation display disappears after 30 seconds.

4

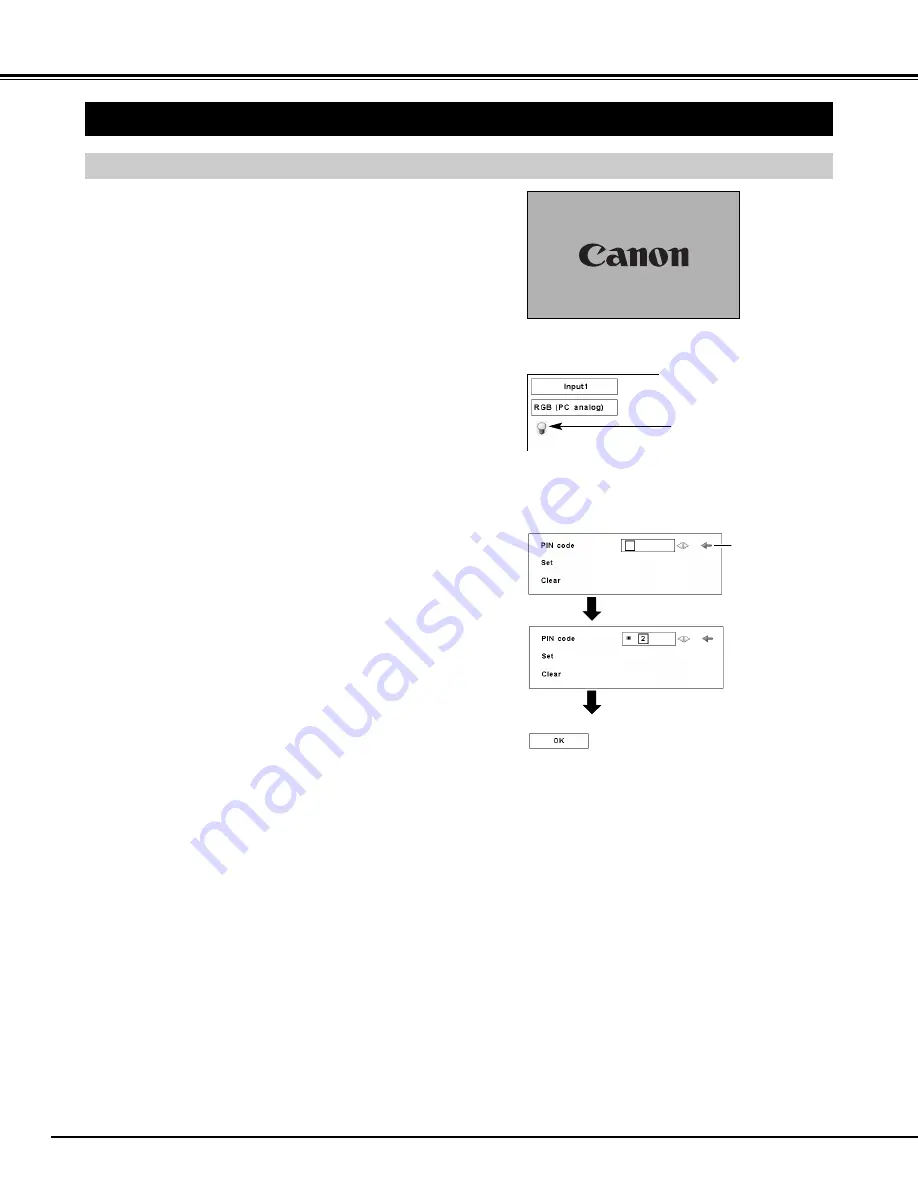
After the countdown, the input source that was
selected the last time and the Lamp mode status icon
(see page 41) appear on the screen.

If the projector is locked with a PIN code, a PIN code
Input Dialog Box appears. Enter the PIN code as
instructed below.

Selected Input Source and Lamp mode

Complete peripheral connections (with a computer,
VCR, etc.) before turning on the projector.  

What is PIN code?

PIN (Personal Identification Number) code is a security code that
allows the person who knows it to operate the projector. Setting
a PIN code prevents unauthorized use of the projector. 

A PIN code consists of a four-digit number. Refer to the PIN code
lock function in the SETTING Menu on page 43 for locking
operation of the projector with your PIN code.

Pointer

PIN code Input Dialog Box

To Enter a PIN code

Select a number by pressing the POINT LEFT/RIGHT button and
fix the number with the OK button. The number changes to “

.”

If you fixed a wrong number, move the pointer to “Set” or
“Clear” once by pressing the POINT DOWN button, then return
to “PIN code.” Enter the correct number.

Repeat this step to complete entering a four-digit number. 

When the four-digit number is fixed, the pointer automatically
moves to “Set.” Press the OK button so that you can start to
operate the projector.

If you entered a wrong PIN code, “PIN code” and the number
(

✳✳✳✳

) turn red and disappear. Enter a PIN code all over again.

After the OK icon
disappears, you can
operate the projector.  

Lamp mode status

Summary of Contents for LV-7575

Page 1: ...LV 7575 User s Manual MULTIMEDIA PROJECTOR...

Page 2: ...the projector in a proper position If not it may result in a fire hazard Provide appropriate space on the top sides and rear of the projector cabinet for allowing air circulation and cooling the proj...

Page 3: ...nto this projector through cabinet slots as they may touch dangerous voltage points or short out parts that could result in a fire or electric shock Never spill liquid of any kind on the projector Do...

Page 4: ...he equipment and receiver Connect the equipment into an outlet on a circuit different from that to which the receiver is connected Consult the dealer or an experienced radio TV technician for help Use...

Page 5: ...Windows and PowerPoint are registered trademarks of Microsoft Corporation Each name of corporations or products in the user s manual is a trademark or a registered trademark of its respective corpora...

Page 6: ...deo signals are recognized and the best adjustment is automatically set by the Auto PC Adjustment function No complicated setup is necessary and the projection is always precise Digital Zoom for Compu...

Page 7: ...rts Refer to the user s manual of the optional Network Imager Do not turn on the projector with the lens cap attached High temperature from light beam may damage the lens cap and result in fire hazard...

Page 8: ...voltage It is designed to work with single phase power systems having a grounded neutral conductor To reduce risk of electrical shock do not plug into any other type of power system If you are not sur...

Page 9: ...GHT Brightness in a room has a great influence on the picture quality It is recommended to limit ambient lighting in order to provide the best image Min Zoom Max Zoom 100 76 3 6 m 11 8 150 114 5 4 m 1...

Page 10: ...ADJUSTABLE FEET Lift the front of the projector and pull the FEET LOCK LATCHES in each side of the projector 1 Release the FEET LOCK LATCHES to lock the ADJUSTABLE FEET and rotate the ADJUSTABLE FEET...

Page 11: ...unsuitable transport case This may cause damage to the projector To transport the projector by courier or any other transport service consult your dealer for the best way MOVING PROJECTOR Use the Carr...

Page 12: ...2 14 and connect properly This projector uses a micro processor to control the unit and only occasionally this micro processor may malfunction and need to be reset This can be done by pressing the RES...

Page 13: ...eo USB port VGA Cable HDB 15 pin DVI Digital Cable for Single Link T M D S BNC Cable Control Cable for Serial Port Control Cable for PS2 Port or ADB Port USB Cable Audio Cables Mini Plug stereo x 2 Te...

Page 14: ...omposite Video Output Component Video Output Y Cb Pb Cr Pr Component Video Output Y Cb Pb Cr Pr Y Cb Pb Cr Pr Video Cables RCA x 1 or RCA x 3 BNC Cable Audio Output Composite Video Output VIDEO Video...

Page 15: ...er for more than one minute release this button and press it again Used as a PC mouse in Wireless Mouse Operation p 45 MOUSE POINTER Used as a PC mouse in Wireless Mouse Operation p 45 RIGHT CLICK BUT...

Page 16: ...to adjust zoom p 22 ZOOM BUTTON NO SHOW BUTTON Used to turn the picture into a black image p 23 D ZOOM BUTTON Used to select the DIGITAL ZOOM mode and resize the image p 30 FREEZE BUTTON Used to free...

Page 17: ...up pp 48 56 57 Blinks red when the internal temperature of the projector is too high pp 46 56 57 Used to select an input source pp 24 31 Used to select an item or adjust a value in On Screen Menu They...

Page 18: ...nu FLOW OF ON SCREEN MENU OPERATION Display ON SCREEN MENU Press the MENU button to display the On Screen Menu a MENU BAR A red frame is a POINTER Move the POINTER red frame to a MENU ICON that you wa...

Page 19: ...the sound See page 23 IMAGE ADJUST MENU Used to adjust the computer image Contrast Brightness Color Tint Color management Auto picture control Color temp White balance R G B Sharpness Gamma Noise red...

Page 20: ...N Personal Identification Number code is a security code that allows the person who knows it to operate the projector Setting a PIN code prevents unauthorized use of the projector A PIN code consists...

Page 21: ...LIFE 3 When the projector has cooled down the READY indicator lights GREEN again and you can turn projector on After cooling down completely unplug the AC power cord Power off disappears after 4 seco...

Page 22: ...emote control unit or select Keystone in the SETTING Menu See page 38 The Keystone dialog box appears 2 Correct keystone distortion by pressing the POINT UP DOWN LEFT RIGHT buttons Press the POINT UP...

Page 23: ...UTE button again or press the VOLUME buttons To increase the volume press the POINT RIGHT button to decrease the volume press the POINT LEFT button Press the POINT UP DOWN buttons to move the red fram...

Page 24: ...PC analog COMPUTER INPUT NOTE INPUT SOURCE changes if the INPUT 1 button on the remote control unit is pressed HDCP High bandwidth Digital Content Protection is a system for protecting digital enterta...

Page 25: ...w pointer to the desired system and then press OK button 1 2 PC SYSTEM MENU This projector automatically selects PC system among those provided in this projector however PC system can be also selected...

Page 26: ...the remote control unit PC ADJUST MENU Auto PC adj To store the adjusted parameters The system parameters from Auto PC Adjustment can be memorized in this projector Once the parameters are stored the...

Page 27: ...ons to adjust the value Eliminate a flicker from the display Press the POINT LEFT RIGHT buttons to adjust the value from 0 to 31 Fine sync Adjust the number of total dots in one horizontal period Pres...

Page 28: ...ments return to their previous figures To store adjustment data To clear adjustment data To clear adjusted parameters previously set move the red frame pointer to the Mode free icon and then press the...

Page 29: ...High contrast User preset picture adjustment in the IMAGE ADJUST Menu pp 35 37 Custom 1 10 IMAGE LEVEL SELECT Select an image level from among Standard High contrast and Custom by pressing the IMAGE...

Page 30: ...d on the PC SYSTEM Menu p 25 This projector cannot display any resolution higher than 1600 x 1200 If your computer s screen resolution is higher than 1600 x 1200 lower the resolution before connecting...

Page 31: ...POINT LEFT RIGHT buttons to move the red frame pointer to the INPUT Menu icon 1 Move the pointer to a source that you want to select and then press the OK button 3 Press the POINT UP DOWN buttons to m...

Page 32: ...or automatically detects an incoming video signal and adjusts itself to optimize its performance When the Video System is 1035i or 1080i select the system manually If the projector cannot reproduce pr...

Page 33: ...e IMAGE button on the top control or on the remote control unit Move the red frame pointer to a level and press the OK button IMAGE SELECT Menu icon Normal picture level preset on this projector Pictu...

Page 34: ...con Press the POINT DOWN button and move the red frame pointer to the desired function and then press the OK button 1 2 NOTE SCREEN Menu can not be operated when 720p 1035i or 1080i is selected in the...

Page 35: ...gement data 1 Press the POINT UP DOWN buttons to move the red frame pointer to Color management and then press the OK button The image being projected freezes and the COLOR MANAGEMENT POINTER appears...

Page 36: ...l projection screen but any settings that have been changed will not be stored To store the changed settings be sure to select MENU to return to the IMAGE ADJUST Menu and store the settings LIST MODE...

Page 37: ...ove the red frame pointer to any of the Custom 1 to 10 where you want to set and then press the OK button Store icon Press the OK button at this icon to store the adjustment PICTURE IMAGE Press the PO...

Page 38: ...ons p 22 Store stores the keystone correction even if the AC power cord is unplugged Reset resets the keystone correction when the AC power cord is unplugged This projector has Setting menu that allow...

Page 39: ...p display After capturing the projected image go to the Logo select function and set it to User Then the captured image will be displayed when turning on the projector the next time To capture the ima...

Page 40: ...appears on the screen to start the countdown The countdown time can be set between 1 and 30 minutes Select one of the following operations Ready When the lamp has been fully cooled down the READY indi...

Page 41: ...operate properly SETTING Remote control The eight different remote control codes Code 1 8 are assigned to this projector the factory set initial code Code 1 and the other seven codes Code 2 to Code 8...

Page 42: ...son unlocked locks operation of the top control To unlock use the remote control unit locks operation of the remote control unit To unlock use the top control If the top control accidentally becomes l...

Page 43: ...N code Whenever you change the PIN Code Lock setting or the PIN code the four digit number you are required to enter the PIN code 1234 is set as the initial PIN code at the factory PIN code lock When...

Page 44: ...9 for operation Lamp counter Factory default This function returns all setting values except for the User logo Key lock PIN code lock Logo PIN code lock and the Lamp counter to the factory default set...

Page 45: ...ing the PC mouse pointer use the MOUSE POINTER DRAG ON OFF button LEFT CLICK button and RIGHT CLICK button on the remote control unit Used to move the PC mouse pointer The pointer moves to the directi...

Page 46: ...obstructed The air filters may be clogged with dust particles Clean them by following the section AIR FILTER CARE AND CLEANING on the next page If the WARNING TEMP indicator remains on after performi...

Page 47: ...of use However if the projector is being operated in a somewhat dusty or smoky environment the air filters should be cleaned more often for consistently good projector operation and performance timely...

Page 48: ...nter when the projection lamp is not replaced LAMP REPLACEMENT When the projection lamp of this projector reaches its end of life the LAMP REPLACE indicator lights orange If this indicator lights oran...

Page 49: ...use of the lamp with the LAMP REPLACE indicator lighted may increase the risk of lamp explosion Lamp may explode as a result of vibration shock or degradation as a result of hours of use as its lifet...

Page 50: ...or turns off 2 After 90 seconds the READY indicator lights green again and the projector may be turned on by pressing the POWER button Check the WARNING TEMP and READY indicators If both indicators bl...

Page 51: ...ee page 41 Check if the remote control keys are locked See page 42 Problem Try these Solutions Wireless mouse function does not work Check the cable connection between the projector and your computer...

Page 52: ...to System 2 System 1 Input 2 Input 3 Mode 1 Mode 2 SVGA 1 SVGA 2 SVGA 3 PC Adjust Auto PC adj Fine sync Total dots Position H Position V Current mode Clamp Display area H Display area V Reset Mode fr...

Page 53: ...t Color management Auto picture control Color temp 0 63 Off L1 L2 Mid Low XLow 0 63 0 63 0 63 0 31 0 15 Off L1 L2 Off On Film 0 63 0 63 0 63 Color Gamma List Color M Menu All Del Menu Color M High Red...

Page 54: ...ear On Off Menu position On Off Power management Background Logo PIN code change Quit Simple menu Ready Off Shut down 1 30 Min Quit On Off Auto Normal Silent On start Lamp mode Code 1 Remote Control C...

Page 55: ...SXGA 13 1280 x 1024 Interlace 63 98 60 02 SXGA 14 1280 x 1024 Interlace 61 20 65 20 71 40 75 60 50 00 86 00 720p Progressive 50 00 94 00 37 50 50 00 XGA 1 1024 x 768 XGA 2 1024 x 768 XGA 3 1024 x 768...

Page 56: ...0 D SXGA 1 1400 x 1050 63 97 60 19 INDICATORS AND PROJECTOR CONDITION Check the indicators for projector condition Depending on the condition of signals and the type and length of cables these signals...

Page 57: ...ojector If the projector is turned off again disconnect the AC power cord and contact the dealer or the service center for service and checkup Do not leave the projector on It may cause electric shock...

Page 58: ...esolution Number of Pixels Color System Scanning Frequency Horizontal Resolution Built in Speakers Operating Temperature Storage Temperature LCD Panel System 318 watt type Projection Lamp 0 to 10 5 Fe...

Page 59: ...B GND GND PS 2 Serial ADB 1 2 3 4 5 6 7 8 COMPUTER INPUT 1 TERMINAL DIGITAL Terminal DVI 24 pin 1 9 17 2 10 18 3 11 19 4 12 20 5 13 21 6 14 22 7 15 23 8 16 24 T M D S Data2 No Connect T M D S Data2 No...

Page 60: ...attempt to install and replace the lens by yourself as it may cause injury After installing the lens attach the lens cap to the lens when setting up the projector Do not hold the lens when carrying or...

Page 61: ...0 6 2 39 10 5 429 5 16 8 319 0 12 6 168 0 6 61 91 5 3 60 142 0 5 59 141 5 5 57 Screw Holes for Ceiling Mount Screw M6 Depth 10 0 0 393 230 0 9 06 134 0 5 28 114 0 4 49 115 5 4 55 117 0 4 61 95 0 3 74...

Page 62: ...62 APPENDIX Put on the label below supplied in a prominent place of the projector s body while it is locked with a PIN code While the projector is locked with the PIN code...

Page 63: ...rmany CANON ITALIA S p A Via Milano 8 San Donato M se 20097 MI Italy CANON Schweiz A G Industriestrasse 12 8305 Dietlikon Switzerland CANON BELGIUM N V S A Bessenveldstraat 7 1831 Diegem Belgium CANON...

Reviews: