Canon Laser Shot LBP-1120 User Manual Download Page 139


Replacing the Toner Cartridge


4-6


Maintenance


4


Replacing the Toner Cartridge


Follow the instructions below to replace the toner cartridge.

WARNING


To avoid a fire or personal injury, never attempt to incinerate a used toner 
cartridge. Toner residue inside the cartridge is flammable.

CAUTION


If you get loose toner powder on your hands or clothing, wash it off with cold 
water immediately.


Do not put your hand inside the front cover immediately after the printer has 
been used as the fixing assembly inside the printer gets extremely hot. Be 
careful not to touch any of the parts inside the cover except those specified in 
this manual. Doing so may result in personal injury or burns.
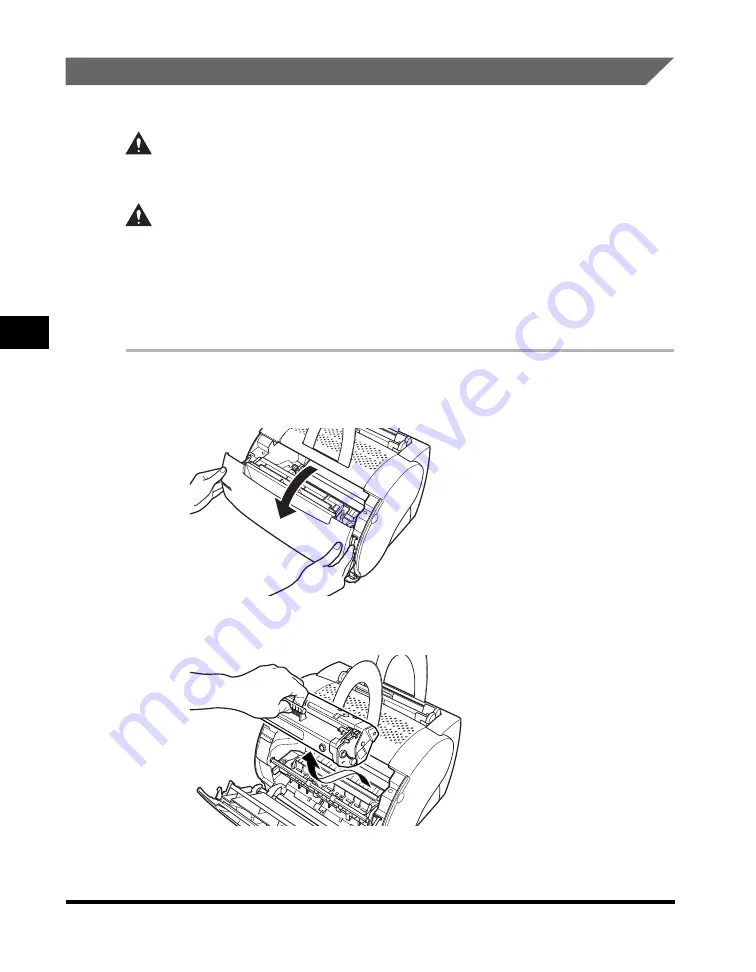
 

1


Grasp the top of the front cover on both sides, then gently pull 
the cover until it is fully open.


2


Grasp the cartridge by its handle and lift it out of the printer.

Summary of Contents for Laser Shot LBP-1120

Page 1: ...Laser Beam Printer User s Guide ENG ...

Page 2: ...LBP 1120 Laser Printer User s Guide ...

Page 3: ...ides with this symbol are PDF manuals included on the attached CD ROM Installing and Setting Up the Printer Connecting the Printer to a PC Installing the Printer Driver Getting Started Guide CD ROM Using the Printer Printer Settings Maintenance and Troubleshooting User s Guide This Document CD ROM The printer illustration on the cover may differ slightly from your printer ...

Page 4: ...er 1 Chapter 2 Chapter 3 Chapter 4 Chapter 5 Chapter 6 Some of the data contained herein may not exactly reflect the current model of the particular product with which this manual has been included If you have a need for an exact specification please contact Canon for the current specification No part of this document may be photocopied reproduced or translated into another language without prior ...

Page 5: ... Your Product and the Use of Images xii Important Safety Instructions xiii Installation xiii Power Supply xiv Handling xv Maintenance and Inspections xvi Consumables xvii Chapter 1 Before You Start Using This Printer Features and Benefits 1 2 Parts and Their Functions 1 4 Parts of the Printer 1 4 Inside the Front Cover 1 6 Turning the Printer ON OFF 1 7 Turning the Printer ON 1 7 Turning the Print...

Page 6: ...0 Group 3 43 Uninstalling the CAPT 3 45 Printing a Document 3 47 Cancel the Print Job 3 48 Accessing the Properties Dialog Box 3 49 For Windows 98 Me 3 49 For Windows 2000 XP 3 49 Using the Printing Options 3 51 For Windows 98 Me 3 51 For Windows 2000 XP 3 57 Printing Multiple Pages on One Sheet 3 65 Scaling a Document 3 67 Selecting the Custom Paper Size Setting 3 69 Using the Overlay Printing 3 ...

Page 7: ...ng 5 2 Problems and Solutions Without Messages 5 4 Print Quality Problems 5 4 Printer Problems 5 5 CAPT Problems 5 7 Clearing Paper Jams 5 9 Before Removing Paper Jams Inside the Printer 5 11 Paper Jam in the Paper Feed Area 5 13 Paper Jams Near the Imaging Area 5 15 Paper Jam in the Face Down Delivery Area 5 17 Paper Jam in the Face Up Delivery Area 5 18 Using the Trouble Shooter 5 21 Features of...

Page 8: ...order to use the printer safely always pay attention to these warnings CAUTION Indicates a caution concerning operations that may lead to injury to persons or damage to property if not performed correctly In order to use the printer safely always pay attention to these cautions IMPORTANT Indicates operational requirements and restrictions Be sure to read these items carefully in order to operate t...

Page 9: ...se harmful interference to radio or television reception which can be determined by turning the equipment off and on the user is encouraged to try to correct the interference by one or more of the following measures Reorient or relocate the receiving antenna Increase the separation between the equipment and receiver Connect the equipment into an outlet on a different circuit than the one to which ...

Page 10: ... of this equipment in a residential area is likely to cause harmful interference in which case the user will be required to correct the interference at his own expense Use of shielded cable is required to comply with Class A limits in Subpart B of Part 15 of FCC Rules Do not make any changes or modifications to the equipment unless otherwise specified in the manual If such changes or modifications...

Page 11: ...DE CLASSE 1 220 240 V model only WARNING Performance of procedures other than those specified in this manual may result in hazardous radiation exposure RAYONNEMENT LASER INVISIBLE EN CAS D OUVERTURE EXPOSITION DANGEREUSE AU FAISCEAU UNSICHTBARE LASERSTRAHLUNG WENN ABDECKUNG GEÖFNET NICHT DEM STRAHL AUSSETZEN RADIAZIONE LASER INVISIBLE IN CASO DI APERTURA EVITARE L ESPOSIZIONE AL FASCIO RADICION LA...

Page 12: ...by any information storage or retrieval system without the prior written permission of Canon Inc As an ENERGY STAR Partner Canon USA Inc has determined that this product meets the ENERGY STAR Program for energy efficiency The International ENERGY STAR Office Equipment Program is an international program that promotes energy saving through the use of computers and other office equipment The program...

Page 13: ...your product may be prohibited by law and may result in criminal and or civil liability A non exhaustive list of these documents is set forth below This list is intended to be a guide only If you are uncertain about the legality of using your product to scan print or otherwise reproduce any particular document and or of the use of the images scanned printed or otherwise reproduced you should consu...

Page 14: ...r or other flammable substances If flammable substances come into contact with electrical parts inside the printer it may result in a fire or electrical shock Do not place the following items on the printer If these items come into contact with a high voltage area inside the printer it may result in a fire or electrical shock If these items are dropped or spilled inside the printer immediately tur...

Page 15: ... according to the instruction in this manual If not connected properly it may result in a malfunction or electrical shock When moving the printer follow the instructions in this manual to hold it correctly Failure to do so may cause you to drop the printer resulting in personal injury Power Supply WARNING Do not damage or modify the power cord Also do not place heavy objects on the power cord or p...

Page 16: ...not let them touch any electrical contacts or gears that are exposed If the printer makes strange noises or gives off smoke heat or unusual smells immediately turn OFF the power switch and unplug the power plug from the outlet Then contact your local authorized Canon dealer Continued use of the printer in this condition may result in a fire or electrical shock Do not use highly flammable sprays ne...

Page 17: ... caution label attached to the laser scanner unit inside the printer If the laser beam escapes from the printer exposure may cause serious damage to your eyes Maintenance and Inspections WARNING When cleaning the printer first turn OFF the main power switch then unplug the power plug Failure to observe these steps may result in a fire or electrical shock Unplug the power plug from the outlet regul...

Page 18: ...h cold water Washing with warm water will set the toner and make it impossible to remove the toner stains When removing paper which has become jammed inside the printer remove the jammed paper gently to prevent the toner on the paper from scattering and entering your eyes or mouth If toner enters your eyes or mouth wash them immediately with cold water and immediately consult a physician When load...

Page 19: ...per in places exposed to open flames as this may cause the toner or paper to ignite resulting in burns or a fire CAUTION Keep toner and other consumables out of the reach of small children If these items are ingested consult a physician immediately ...

Page 20: ... major features the functions of the printer and how to turn the printer ON and OFF Features and Benefits 1 2 Parts and Their Functions 1 4 Parts of the Printer 1 4 Inside the Front Cover 1 6 Turning the Printer ON OFF 1 7 Turning the Printer ON 1 7 Turning the Printer OFF 1 8 ...

Page 21: ...efficient power management system Power consumption is very low particularly when idle Stylish compact design The printer provides compact lightweight easy to use functionality in a smooth stylish design The small footprint gives you more work space to help you meet your needs CAPT Printing Software The CAPT is easy to install and with it you can set custom paper sizes overlay bitmaps on documents...

Page 22: ...cutive as well as transparencies labels envelopes postcards and other special paper The multi purpose tray handles up to 125 sheets of 64 g m2 plain paper with a maximum stack height of 12 5 mm For manual feeding sheets are fed one at a time Delivery can be face down for plain paper or face up for all paper types Network Connection You can connect to the LBP 1120 over a network going through a ser...

Page 23: ...t Use when you load print media manually one sheet at a time See Printing from the Manual Feed Slot on p 2 19 d d d d Paper Delivery Selector Use to choose face up or face down delivery See Selecting Paper Delivery on p 2 8 e e e e Face Up Delivery Slot Printouts come out from the slot face up See Face Up Delivery on p 2 9 f f f f Front Cover Open to install the toner cartridge clear paper jams an...

Page 24: ...al number is indicated to identify the printer Refer to this number when calling a service technician This label also shows the current and average power consumption c c c c USB Port Interface Connector Connects to a USB interface cable Use this port when connecting the printer to a computer with the printer cable d d d d Power Switch Press to turn the printer ON OFF See Turning the Printer ON OFF...

Page 25: ...You Start Using This Printer 1 Inside the Front Cover a a a a Transfer Roller This delicate roller should be kept free of fingerprints and oil to prevent print quality deterioration b b b b Fixing Unit Fixes the toner onto print media 1 2 ...

Page 26: ...switch is located on the back side of the printer NOTE If the power does not turn on even when the printer is plugged into an AC outlet check the following items Close the front cover if open Make sure that the EP 22 cartridge is installed If the EP 22 cartridge is already installed remove and reinstall it To reset the printer turn off the power using the power switch and unplug the power cord Wai...

Page 27: ...inter is connected to a network make sure that the printer is not printing data from another personal computer before turning OFF the power Do not turn OFF the power to the printer while it is printing Turn the printer ON about 10 seconds after it was turned OFF 1 Turn the power switch to OFF side The power switch is located on the back side of the printer ...

Page 28: ...table Paper 2 2 Paper You Cannot Use 2 6 Storing Paper 2 7 Handling Paper 2 7 Paper Delivery 2 8 Selecting Paper Delivery 2 8 Face Down Delivery 2 9 Face Up Delivery 2 9 Printing from the Multi Purpose Tray 2 11 Loading Paper 2 11 Printing Envelopes from the Multi Purpose Tray 2 14 Preparing Envelopes 2 14 Loading Envelopes 2 16 Printing from the Manual Feed Slot 2 19 ...

Page 29: ... to protective functions working in order to prevent troubles such as breakdown caused by heating Type of Paper Paper Size Weight Paper Source Capacity Multi Purpose Tray Manual Feed Slot Plain paper 76 2 127 216 356 mm A4 210 297 mm B5 182 257 mm Legal 216 356 mm Letter 216 279 mm Executive 184 267 mm 64 g m2 Max height 12 5 mm About 125 sheets of 64 g m2 paper 1 sheet Heavy paper 91 135 g m2 Max...

Page 30: ...uides on the multi purpose tray uses the following abbreviations Type of Paper Paper Source Multi Purpose Tray Manual Feed Slot Plain Paper 64 g m2 About 125 sheets 1 sheet Heavy Paper 91 135 g m2 About 85 sheets 1 sheet Transparencies About 100 sheets 1 sheet Label sheets About 80 sheets 1 sheet Postcards About 45 sheets 1 sheet Envelopes About 7 sheets 1 sheet Type of Paper Paper Delivery Tray F...

Page 31: ...out 190 C 374 F Do not use thermal or carbon paper or paper with glue staples clips or ribbons For colored paper use colors that are not damaged by the heat of the printer s fixing unit about 190 C or 374 F Transparencies The acceptable sizes are Letter or A4 The transparencies must be able to withstand the heat generated by the fixing unit about 190 C or 374 F without damage Heavy Thick Paper Thi...

Page 32: ... jams to occur Envelopes Follow these guidelines when printing on envelopes IMPORTANT Envelopes must not have any fasteners snaps or windows or be made of artificial materials Do not use envelopes that discolor or melt at about 190 C 374 F envelopes which might emit dangerous fumes when heated or envelopes that seal with pressure sensitive adhesives Do not use envelopes which are damaged curled or...

Page 33: ...ne or other laser printers The back side of this paper is also unusable However note that you can use the manual feed slot to perform manual duplex printing on the reverse side of a sheet of paper that has already been printed on using this printer You cannot print on the same side of a sheet of paper that has already been printed on Paper that changes its quality at high temperature Paper that us...

Page 34: ...ge box Avoid direct sunlight Exposure to direct sunlight can dramatically degrade paper quality Store paper away from sunlight and keep unused paper in its wrapper Avoid sudden changes in temperature or humidity If paper is moved between locations that differ widely in temperature or humidity it may curl If this situation cannot be avoided store the paper in the work area by the printer for at lea...

Page 35: ...r Delivery Use the paper delivery selector to select face up or face down delivery IMPORTANT Do not switch the paper delivery selector until the printout has completely come out of the delivery slots Switching the paper delivery selector while printing may cause a paper jam Type of Paper Paper Delivery Paper Stack Capacity Plain Paper Face up 1 sheet 64 g m2 Face down About 50 sheets 64 g m2 Trans...

Page 36: ...e face down mark IMPORTANT Do not replace paper in the face down delivery slot once it is removed from the slot This could result in damage to the flaps inside the slot Never insert paper or other objects into the face down delivery slot Face Up Delivery Use face up delivery for envelopes and transparencies as well as other special paper including non standard sized plain paper Printouts come out ...

Page 37: ... the face up delivery slot after it has been printed IMPORTANT Do not pull out the printout while it is still emerging from the face up delivery slot Make sure that there is enough room at the front of the printer for paper to exit NOTE The printer is not equipped with a face up delivery tray The delivered paper must be removed manually ...

Page 38: ...se tray first select the paper delivery See Paper Delivery on p 2 8 NOTE The maximum number of sheets of paper that can be loaded into the multi purpose tray may vary depending on the type of paper See Printable Paper on p 2 2 IMPORTANT Make sure that the input paper support is inserted into its slot in the printer Loading Paper Loading Paper Other Than Envelopes To load plain paper thick paper la...

Page 39: ...hem Not fanning them properly may cause the transparencies to overlap causing paper jams Take care not to mark stain the print side of the transparencies with fingerprints dust or oil This may cause poor print quality If the leading edge of the paper is bent or curled straighten out the paper before loading it into the tray 2 Load the stack of paper into the multi purpose tray as illustration belo...

Page 40: ...r guides with the icons inside the multi purpose tray IMPORTANT Be sure to match the paper guides to the paper width Misfeeds or paper jams may occur if the paper guides are too loose or too tight When reloading be sure to remove any paper remaining in the multi purpose tray Stack it together with the new sheets before loading Loading paper in the multi purpose tray is complete ...

Page 41: ...Purpose Tray Preparing Envelopes Before you load envelopes in the multi purpose tray the following precautions should be observed 1 Fan the stack of envelopes to make sure none of the envelopes stick together 2 Place the envelopes on a clean flat surface press down on all of the corners to flatten the envelopes ...

Page 42: ...o remove any stiffness Check all corners If the corners are curled straighten them IMPORTANT Be sure to flatten out the leading edges of the envelopes if they are curled down This may cause a paper jam to occur 4 Correct any curled corners align the edges of the stack of envelopes by tapping them on a flat surface ...

Page 43: ...nto the multi purpose tray follow the procedure below 1 Align the stack of envelopes so that the side to be printed on faces the front of the printer Slide the stack in until it stops 2 Adjust the paper guides to the width of the stack of envelopes NOTE Most applications allow you to choose which way envelopes feed into the printer Make sure your printer settings before you print ...

Page 44: ...dges of the envelope Insert the envelopes one at a time into the multi purpose tray in the direction shown in the illustration If the flap is along the long edge of the envelope insert each envelope with the flap at the back and on the right If the flap is along the short edge of the envelope insert envelopes with the flap at the bottom and at the back ...

Page 45: ... the flaps of each of the envelopes separate If the flaps of the envelopes overlap paper jams or misfeeds will occur The illustrations below show the acceptable and unacceptable arrangement of the flaps for the envelopes in the stack Acceptable The flap of each envelope should be separate not overlapping the edges of any of the other envelopes in the stack Unacceptable If the flap of any of the en...

Page 46: ...d plain paper which is useful when you want to use paper that is a different size from the paper in the multi purpose tray Before loading paper manually always select the paper delivery first See Paper Delivery on p 2 8 1 Align the sheet of paper so that the side to be printed on faces the front of the printer and the top of the paper is inserted first Slide the sheet of paper into the manual feed...

Page 47: ...Often applications will let you change the feeding direction of envelopes Confirm the feeding direction of envelopes before printing If a postcard is not fed smoothly into the printer gently push the top of the postcard downwards until the roller inside the printer takes the card and feeds it into the printer When printing on postcards the printing quality for non characters e g grayscale illustra...

Page 48: ...3 47 Cancel the Print Job 3 48 Accessing the Properties Dialog Box 3 49 For Windows 98 Me 3 49 For Windows 2000 XP 3 49 Using the Printing Options 3 51 For Windows 98 Me 3 51 For Windows 2000 XP 3 57 Printing Multiple Pages on One Sheet 3 65 Scaling a Document 3 67 Selecting the Custom Paper Size Setting 3 69 Using the Overlay Printing 3 70 Specifying the Print Quality 3 73 Specifying the Toner De...

Page 49: ...3 2 Using the Canon Advanced Printing Technology 3 Status Options 3 84 Network Printer Status 3 86 ...

Page 50: ... LBP 1120 Already on Your Network on p 3 42 If you want to install the LBP 1120 as a network printer see Connecting the LBP 1120 as a Network Printer on p 3 38 For Windows 98 Me CD ROM Installation The screens shown in the instructions below are from Windows 98 1 Turn off the printer 2 Turn on your computer and start up Windows 98 Me 3 Insert the User Software CD ROM into your CD ROM drive Canon L...

Page 51: ...chnology 3 4 Click Canon LBP 1120 Install 5 The Canon LBP 1120 Install dialog box appears Click Yes to install the CAPT in the language displayed The setup for the installation completes and then installation of the CAPT Canon Advanced Printing Technology starts ...

Page 52: ... Advanced Printing Technology 3 6 The Welcome screen appears Click Next The Software License Agreement screen appears 7 Check the contents of Software License Agreement and then click Yes The Select printer connection port dialog box appears ...

Page 53: ...t Setup When the USB port can be found in the port list go to step 13 9 Click Yes to continue the setting up of the LBP 1120 10 Connect the USB cable to the printer and your computer and turn on the printer For detailed information see the Getting Started Guide USB port is automatically detected and the USB driver will be installed ...

Page 54: ...e Add New Hardware Wizard dialog box appears Unless you cancel see the procedure for Plug Play on p 3 9 12 Click Canon LBP 1120 Install Repeat the procedure from step 5 to step 7 13 Select a USB port such as USBPRN01 for Windows 98 or USB001 for Windows Me from the port list and then click Next ...

Page 55: ... not displayed in the list repeat from step 8 14 A dialog box asking you to proceed with the installation appears Press Yes 15 When the installation is complete the following dialog box appears Click Finish to close the dialog box Installation of the USB driver and the printer driver is complete ...

Page 56: ...ORTANT Before you install the software make sure that you do the following Connect the printer to your computer See the Getting Started Guide Turn on the printer See Turning the Printer ON OFF on p 1 7 1 Turn on your computer and start up Windows 98 Me The USB port is automatically detected The Add New Hardware Wizard dialog box appears Click Next ...

Page 57: ...r device Recommended in the Add New Hardware Wizard dialog box and click Next For Windows Me select Specify the location of the driver Advanced and click Next in the Add New Hardware Wizard dialog box The dialog box to specify the location of the driver appears 3 Insert the User Software CD ROM into the CD ROM drive ...

Page 58: ...D ROM drive is drive D browse to D English Win98 then click OK For Windows Me check only the Specify the location check box and then click Browse to select the driver in the language that you want to install For example if your CD ROM drive is drive D browse to D English WinMe then click OK 5 Confirm that the folder to browse is selected under Specify a location then click Next The screen displays...

Page 59: ...alling the CAPT 3 12 Using the Canon Advanced Printing Technology 3 6 Click Next Installation of the USB driver starts 7 Click Finish The Add New Hardware Wizard Canon LASER SHOT LBP 1120 dialog box appears ...

Page 60: ...Installing the CAPT 3 13 Using the Canon Advanced Printing Technology 3 8 Click Next 9 Repeat the procedure from step 2 to step 5 10 Click Next Installation of the printer driver starts ...

Page 61: ...on Advanced Printing Technology 3 11 Click Finish to accept the default printer name or enter the name you wish to use then click Finish 12 When the installation is complete the following dialog box appears Click OK to close the dialog box ...

Page 62: ... Finish in the Add New Hardware Wizard dialog box Installation of the USB driver and the printer driver is complete Add Printer Wizard The screens shown in the instructions below are from Windows 98 1 Click Start point to Settings and then click Printers The Printers folder appears ...

Page 63: ...Installing the CAPT 3 16 Using the Canon Advanced Printing Technology 3 2 Double click Add Printer The Add PrinterWizard dialog box appears Click Next 3 Select Local printer and click Next ...

Page 64: ...nufacturers Printers dialog box The Install From Disk dialog box appears 5 Use Browse to select the directory or enter the path name that contains the CAPT then click OK For example if you are using the CD ROM to install the CAPT and your CD ROM drive is drive D the path name would be D English Win98 ...

Page 65: ...nced Printing Technology 3 6 Select your printer model from the list of printers displayed then click Next 7 Select the printer port you want to use and then click Next NOTE Always select the USB port If you select any other port you cannot print ...

Page 66: ...ialog box appears Click OK to close the dialog box Windows creates the Canon LASER SHOT LBP 1120 group folder on the Desktop and the Canon LASER SHOT LBP 1120 icon is added to the Printers folder For Windows 2000 Plug Play IMPORTANT Before you install the software make sure you that do the following Connect the printer to your computer See the Getting Started Guide Turn on the printer See Turning ...

Page 67: ... and start Windows 2000 Plug Play is being carried out and the USB driver USB Printing Support is automatically detected and installed 2 Log on as the Administrator NOTE Full access rights are necessary for the installation of the CAPT 3 The Found New Hardware Wizard dialog box appears Click Next ...

Page 68: ...ing Technology 3 4 Select Search for a suitable driver for my device recommended in the Found New Hardware Wizard dialog box and click Next NOTE Unknown may be displayed as the name of the device 5 Check only the Specify a location check box and click Next ...

Page 69: ...select the driver in the language that you want to install For example if your CD ROM drive is drive D browse to D English Win2000 then click OK 7 Click Next on Driver Files Search Results Click Yes if the Digital Signature Not Found dialog box appears 8 When installation is complete the following dialog box appears Click OK to close the dialog box ...

Page 70: ... Hardware Wizard dialog box Installation of the USB driver and the printer driver is complete Add Printer Wizard 1 Log on as the Administrator NOTE Full control access rights are necessary for the installation of the CAPT 2 Click Start point to Settings and then click Printers The Printers folder appears ...

Page 71: ...rinting Technology 3 3 Double click Add Printer The Add PrinterWizard dialog box appears Click Next 4 Select Local printer and click Next NOTE Placing a check in the Automatically detect and install my Plug and Play printer check box is not recommended ...

Page 72: ...nting Technology 3 5 Select the printer port you want to use then click Next NOTE Always select the USB port If you select any other port you cannot print 6 Click Have Disk in the Manufacturers Printers dialog box The Install From Disk dialog box appears ...

Page 73: ...lect the directory or enter the path name that contains the CAPT then click OK For example if you are using the CD ROM to install the CAPT and your CD ROM drive is drive D the path name would be D English Win2000 8 Select your printer model from the list of printers displayed then click Next ...

Page 74: ...ext to accept the default printer name or enter the name you wish to use then click Next 10 Select whether this printer is shared or not shared with other computers Click Next 11 Click Yes if you want to print a test page or No if you do not want to print a test page then click Next ...

Page 75: ...s complete the following dialog box appears Click OK to close the dialog box Windows creates the Canon LASER SHOT LBP 1120 group folder on the Desktop and the Canon LASER SHOT LBP 1120 icon is added to the Printers folder 14 If you opted to print a test page the page prints after installation completes and the following dialog box appears If the page printed correctly click OK ...

Page 76: ...ng the Printer ON OFF on p 1 7 1 Turn on your computer and start Windows XP Plug Play is being carried out and the USB driver USB Printing Support is automatically detected and installed 2 Log on as the Administrator NOTE Full access rights are necessary for the installation of the CAPT 3 The Found New Hardware Wizard dialog box appears Insert the User Software CD ROM into your CD ROM drive 4 Sele...

Page 77: ...Select Include this location in the search and click Browse to select the driver in the language that you want to install For example if your CD ROM drive is drive D browse to D English WinXP then click Next Click Continue Anyway if the Hardware Installation dialog box appears 7 When the installation is complete the following dialog box appears Click OK to close the dialog box ...

Page 78: ... Hardware Wizard dialog box Installation of the USB class driver and the printer driver is complete Add Printer Wizard 1 Log on as the Administrator NOTE Full access rights are necessary for the installation of the CAPT 2 From the Start menu select Printers and Faxes The Printers and Faxes folder appears ...

Page 79: ...ogy 3 3 Double click Add a printer The Add Printer Wizard dialog box appears Click Next 4 Select Local printer attached to this computer then click Next NOTE Placing a check in the Automatically detect and install my Plug and Play printer check box is not recommended ...

Page 80: ...irm that Use the following port is selected and select the printer port you want to use then click Next NOTE Always select the USB port If you select any other port you cannot print 6 Click Have Disk in the Manufacturer Printers dialog box The Install From Disk dialog box appears ...

Page 81: ...elect the directory or enter the path name that contains the CAPT then click OK For example if you are using the CD ROM to install the CAPT and your CD ROM drive is drive D the path name would be D English WinXP 8 Select your printer model from the list of printers displayed then click Next ...

Page 82: ...ing the Canon Advanced Printing Technology 3 9 Click Next to accept the default printer name or enter the name you wish to use then click Next 10 Select whether this printer is shared or not shared with other computers Click Next ...

Page 83: ...est page or No if you do not want to print a test page then click Next 12 Click Finish Click Continue Anyway if the Hardware Installation dialog box appears Windows creates the Canon LASER SHOT LBP 1120 group folder on the Desktop and the Canon LASER SHOT LBP 1120 icon is added to the Printers and Faxes folder ...

Page 84: ...logy 3 13 When the installation is complete the following dialog box appears Click OK to close the dialog box 14 If you opted to print a test page the page prints after installation completes and the following dialog box appears If the page printed correctly click OK ...

Page 85: ...2000 XP printer server or vice versa IMPORTANT Using the LBP 1120 on your network requires that both the print server and the client devices are using Windows 98 or later NOTE Even if the server was not running when the client was started you can start printing simply by starting the server If the server is running on Windows 2000 XP you can print even if no one is logged into the server However t...

Page 86: ... then click Add 4 Select Microsoft in the Manufacturers list box 5 Select File and printer sharing for Microsoft Networks in the Network Services box and then click OK 6 Click File and Print Sharing NOTE Be sure there is a check in the I want to be able to allow others to print to my printer s check box 7 Select the Access Control tab and check either Share level access control or User level acces...

Page 87: ...1 Open the Canon LASER SHOT LBP 1120 Properties dialog box then check Shared As in the Sharing tab 2 Enter Share Name and Comment as needed 3 Click Add and select the users allowed to access the printer 4 Click OK when you are done adding users 5 Click OK again NOTE Do not enter a space or special characters in Share Name Windows 2000 XP Server Settings Add Server Service Windows 2000 1 Click Star...

Page 88: ... Add Server Service Windows XP 1 Click Network and Internet Connections in Control Panel 2 Click Network Connections 3 Right click Local Area Connection then select Properties from the menu The Local Area Connection Properties dialog box appears 4 If File and Printer Sharing for Microsoft Networks exists in the list click OK Otherwise click Install 5 Select Service then click Add 6 Select File and...

Page 89: ...t ways The easiest way is using automatic network download If network download is not available you can use the Add Printer Wizard NOTE If you want to use the Add Printer Wizard to install the printer driver perform the same procedure as CD ROM Installation on p 3 3 or Plug Play on p 3 9 Network Download Windows 98 Me and Windows 2000 XP clients can download the drivers for the LBP 1120 automatica...

Page 90: ...f the Canon LASER SHOT LBP 1120 group are displayed Canon LASER SHOT LBP 1120 Uninstallation Starts the uninstall program for the CAPT If the CAPT is not working properly it might help to uninstall and then install it again See Uninstalling the CAPT on p 3 45 Canon LASER SHOT LBP 1120 Status Window Printing status and the printer s status will be shown by animations and sound There are also functi...

Page 91: ...gy 3 Canon LASER SHOT LBP 1120 Trouble Shooter Starts the Trouble Shooter program for the CAPT It helps you solve printing problems in Windows 98 Me or 2000 XP See Using the Trouble Shooter on p 5 21 Canon LASER SHOT LBP 1120 Help Selects the Canon LBP 1120 Help file for the CAPT ...

Page 92: ...e CAPT follow the procedure below IMPORTANT Before uninstalling the CAPT all running applications must be closed 1 Make sure that you close all running applications 2 Open the Canon LASER SHOT LBP 1120 folder on the Desktop and then double click Canon LASER SHOT LBP 1120 Uninstallation The Canon LASER SHOT LBP 1120 Uninstallation dialog box appears 3 Click OK Uninstallation is carried out and the ...

Page 93: ... Windows is restarted NOTE To remove the USB port see the Getting Started Guide When the software is not installed correctly and you need to reinstall it uninstall first and then install it again In Windows 2000 XP you cannot uninstall the CAPT unless you have administrative privileges ...

Page 94: ...ox opens 3 Specify the various print settings in the Properties dialog box To switch between sheets click the tabs for the Page Setup Finishing and Quality sheets You can also specify the various print settings by selecting a profile NOTE For detailed information on using the print options see Using the Printing Options on p 3 51 or the online help 4 After all the print settings have been specifie...

Page 95: ...t print job on the Canon LBP 1120 Status Window To cancel the print job follow the procedure below 1 Start printing The Status Window appears 2 Click the button on the toolbar You can perform other print job operations on the Status Window Temporarily halts printing the current document Continues printing after a pause ...

Page 96: ...specify your printer driver settings for every print job Accessing the Printer Properties Dialog Box from the Application 1 In the application select Print to display the Print dialog box 2 Select your printer name from the drop down list box and then click Properties Accessing the Printer Properties Dialog Box from the Printers Folder 1 Click Start point to Settings and then click Printers 2 In t...

Page 97: ...ters folder you can specify the printer driver settings for every print job NOTE To access the Printing Preferences dialog box from the Printers folder you need full access rights for the printer If you cannot access the Printing Preferences dialog box from the Printers folder access it from the application 1 Click Start point to Settings and then click Printers 2 In the Printers folder right clic...

Page 98: ...ends on how you have your system set up This section explains the printing options you can set up in the Properties dialog box and provides instructions for specifying the various settings for printing a document NOTE For more information about the following features see the online help To display the online help select the item you want more information about and press F1 or click in the title ba...

Page 99: ...g the Printing Options 3 52 Using the Canon Advanced Printing Technology 3 Details Tab Specifies the printer port and time out settings Refer to your operating system documentation for further instructions ...

Page 100: ... Technology 3 Sharing Tab Specifies the printer sharing settings This tab is available only when file and printer sharing is turned on Refer to your operating system documentation for further instructions Page Setup Tab Specifies the printer settings described below ...

Page 101: ...1 999 Orientation Lets you select the direction of printing relative to the paper Portrait Landscape Page Layout Lets you select the number of pages to print per sheet 1 2 4 8 9 When you select more than1 the image may be reduced to fit on the selected output size See Printing Multiple Pages on One Sheet on p 3 65 Manual Scaling Page Order Lets you shrink or enlarge images This option only appears...

Page 102: ... Displays the list of your current printer settings See Viewing the Printer Settings on p 3 80 Custom Paper Size Allows you to define custom paper sizes forms for quick selection See Selecting the Custom Paper Size Setting on p 3 69 Overlay Allows you to add data you use often such as a logo to the print data from an application See Using the Overlay Printing on p 3 70 Finishing Tab Specifies whet...

Page 103: ...nt even when the paper size does not match If this is not checked you will be asked to change paper when a paper size mismatch is detected Quality Tab Specifies the resolution halftoning method brightness and contrast settings Resolution Lets you specify the printer s resolution in dots per inch 600 300 See Specifying the Print Quality on p 3 73 Halftoning Lets you specify the halftoning methods P...

Page 104: ... darkest areas of an image See Specifying the Print Quality on p 3 73 More Options Accesses the settings for Toner Density Toner Saver and Automatic Image Refinement See Specifying the Toner Density on p 3 74 and Using the Automatic Image Refinement on p 3 76 For Windows 2000 XP Screens examples are Windows 2000 General Tab Lets you print a test page or display the Printing Preferences dialog box ...

Page 105: ... Technology 3 Sharing Tab Specifies the printer sharing settings Refer to your operating system documentation for further instructions Ports Tab Specifies the port to which the printer is attached Refer to your operating system documentation for further instructions ...

Page 106: ...Printing Technology 3 Advanced Tab Lets you define print spool settings Refer to your operating system documentation for further instructions Security Tab Lets you specify security settings Refer to your operating system documentation for further instructions ...

Page 107: ...ions Selected Forms Shows the three form names Change Forms Opens the Change Forms dialog box This dialog box contains a listing of the available forms and their definitions Available Forms have Height 12 70 35 56 cm and Width 7 62 21 59 cm that were set in the Forms tab in the print server s Properties dialog box Only forms that conform to the printer s specifications are listed as available When...

Page 108: ...lope 10 Envelope C5 Envelope Monarch Index Card and 3 custom paper sizes The names for custom paper sizes can be defined by users Output Size Lets you select the paper size to print on NOTE Select Match Page Size if you want to print in the paper size you are working with in your application If your output size is anything other than Match Page Size the image will be automatically reduced or enlar...

Page 109: ...per Type Displays the Paper Type pull down menu and lets you select the appropriate paper type to print on The paper types you can select are as follows Plain Paper Transparencies label sheets and plain paper 64 90 g m2 Heavy Paper Plain paper 91 135 g m2 and bond paper 90 g m2 Heavy Paper High Postcards envelopes and custom paper with a width less than or equal to182 mm NOTE If you are using a po...

Page 110: ...ng even when Paper Size Mismatch detected The check box lets you force pages to print even when the paper size does not match If this is not checked you will be asked to change paper when a paper size mismatch is detected EMF Spooling The check box sets the spool file format If there is a check in the check box it is spooled in metafile format If there is no check in the check box it is spooled in...

Page 111: ...Pattern 2 and Smooth See Specifying the Print Quality on p 3 73 Brightness Lets you specify the relative proportion of the light and dark areas of an image in the range from 80 to 80 See Specifying the Print Quality on p 3 73 Contrast Adjusts the degree of difference between the lightest and darkest areas of an image See Specifying the Print Quality on p 3 73 More Options Accesses the settings for...

Page 112: ... Canon Advanced Printing Technology 3 Printing Multiple Pages on One Sheet Multiple pages can be printed on one sheet of paper The number of document pages which can be printed on one sheet of paper is 2 4 8 or 9 1 Display the Page Setup sheet ...

Page 113: ...Using the Printing Options 3 66 Using the Canon Advanced Printing Technology 3 2 Select the required page layout from Page Layout 3 Select the required page order from Page Order 4 Click OK ...

Page 114: ...ally Scaling a Document Automatically 1 Display the Page Setup sheet 2 Select the page size from Page Size If this driver setting is inaccessible from the application click Printer Settings or Page Settings depending on the application on the File menu to specify the page size 3 Select the actual paper size to print on from Output Size 4 Click OK The scaling is set automatically according to the s...

Page 115: ...e page size from Page Size If this driver setting is inaccessible from the application click Printer Settings or Page Settings depending on the application on the File menu to specify the page size 3 Select the actual paper size to print on from Output Size 4 Select Manual Scaling and then specify the desired scaling value from 10 to 200 5 Click OK ...

Page 116: ...aper Size Setting To define the custom paper sizes follow the procedure below 1 Display the Page Setup sheet and then click Custom Paper Size The Custom Paper Size Setting dialog box appears 2 Select a paper size form from Custom Paper List and then specify the height and width of the paper to be used ...

Page 117: ... file in an application and then register and store in your computer as form file for overlay printing You can use only the following two file types as form file for overlay printing Windows metafile Windows bitmap IMPORTANT Form files created in LIPS format cannot be used Creating the Form File Form files can be created with software bundled with Windows 98 Me 2000 XP or other software sold separ...

Page 118: ...ing with an Overlay To perform overlay printing using a form file stored in your computer follow the procedure below 1 In the application select Print and then click Properties in the Print dialog box 2 Display the Page Setup sheet and then click Overlay The Overlay dialog box appears ...

Page 119: ...ng Overlay Placement Background If you want the overlay to appear in back of the application data check the Background check box Overlay Placement Foreground If you want the overlay to appear in front of the application data check the Foreground check box Position Left Top Specifies the position of the overlay based on its distance from paper s left and top edges 0 42 cm Size Width Height Specifie...

Page 120: ...k OK in the Print dialog box The document is printed with the selected form file overlaid Specifying the Print Quality The Quality sheet enable you to specify print quality settings Follow the procedure below to specify the print quality settings 1 In the application select Print and then click Properties in the Print dialog box 2 Display the Quality sheet ...

Page 121: ...letters and figures are printed with a higher resolution Smooth For printing at near photographic quality 5 Move the slide bar left and right to change the brightness and the contrast 6 Make sure that all the settings have been specified and click OK in the Quality sheet 7 Click OK in the Print dialog box The document is printed under the print quality settings you have specified Specifying the To...

Page 122: ...d then click Properties in the Print dialog box 2 Display the Quality sheet and then click More Options The More Options dialog box appears 3 Move the slide bar left and right to change the toner density If you check the Toner Save check box you can print only alternate data bits so that toner consumption is reduced ...

Page 123: ... the toner density setting you have specified Using the Automatic Image Refinement Automatic Image Refinement is a printer technology from Canon with which the printer automatically senses and refines the jagged edges and ragged curves of characters and graphics To use the Automatic Image Refinement follow the procedure below 1 Display the Quality sheet and then click More Options The More Options...

Page 124: ...rinting This section explains what a profile is how to select a profile and how to add or edit profiles What Is a Profile Various printer driver settings are saved as profiles You can also save printer driver settings that you frequently use as profiles When you select a profile the document is printed under the saved settings You can save up to 50 profiles Selecting a Profile for Printing When yo...

Page 125: ...Using the Printing Options 3 78 Using the Canon Advanced Printing Technology 3 1 Display either the Page Setup Finishing or Quality sheet 2 Select the profile you want from Profile 3 Click OK ...

Page 126: ...le The Add Profile or Edit Profile dialog box opens 3 Specify the name and icon of and comment on the profile and then click OK For detailed information on adding or editing a profile right click the item of interest to display the pop up help NOTE If you change the name assigned to your printer you cannot retrieve any profiles saved for that printer To retrieve the profiles rename the printer to ...

Page 127: ... tabs in the View Settings dialog box to view the settings for each sheet 3 Click OK The display returns to either the Page Setup Finishing or Quality sheet You can check the print image on the preview window in each sheet Restoring the Default Settings To restore the default settings click Restore Defaults which is located on the Page Setup Finishing or Quality sheet Only the settings inside the ...

Page 128: ... in both Windows 98 Me and Windows 2000 XP The screens shown in the instructions below are from Windows 98 For detailed information on the functions of the Status Window see the online help Using the Menu Bar Job Menu Performs a print job operation pause resume and delete When the job status that you have no access right is displayed these menus are grayed out Options Menu Changes the settings for...

Page 129: ...ue normal to orange when user action is required or to red when a warning is issued Tab Window Displays print job information on Printing Job Printed Job and Waiting Job sheets by clicking each tab Progress Bar Indicates the progress of the current printing job Toolbar Performs a print job operation pause resume and delete Job Information Area Displays information related to print jobs The type of...

Page 130: ... the selected printer The Status Window opens automatically when you start printing and an error occurs during job processing If Displays Printer Status Window while printing is not selected in the Status Options dialog box the Status Window does not open when you start printing See Status Options on p 3 84 Closing the Status Window You can close the Status Window by right clicking the Status Wind...

Page 131: ...play when there are errors Status Window Display Printer Status Window while printing The Status Window opens automatically each time you print Only display Printer Status Window for errors The Status Window opens only when an error occurs Sounds Play all sounds A sound plays whenever there is printer activity Only play warning sounds A sound plays only when there is a printer error Do not play an...

Page 132: ...nter status only while the Status Window is being displayed Watches over the status only while printing The Status Window is monitoring the printer only when printing a job Always On Top Places the Status Window on top of all windows on the Desktop 1 Select Status Options from the Options menu The Status Options dialog box appears 2 After all the Status Window settings have been specified click OK...

Page 133: ...perform the print job operation on the Printing Job sheet and the Waiting Job sheet Plays the sound messages If the print server is Windows 2000 XP the status is not displayed if no one is logged on Client s Status You can perform the client print job operation on the Printing Job sheet Clients cannot perform the print job operation on the Waiting Job sheet Only users or computers with the same na...

Page 134: ...r cartridge and cleaning procedures Replacing the Toner Cartridge 4 2 Before Replacing the Toner Cartridge 4 3 Replacing the Toner Cartridge 4 6 Cleaning 4 10 Handling Toner Cartridges 4 11 Storing Toner Cartridges 4 13 Cleaning and Handling the Printer 4 14 Cleaning the Printer 4 14 Handling the Printer 4 16 ...

Page 135: ...any of the parts inside the cover except those specified in this manual Doing so may result in personal injury or burns IMPORTANT Never touch the high voltage contact points inside the front cover This could damage the printer NOTE The EP 22 cartridge typically lasts for about 2 500 prints of Letter or A4 size paper This assumes that the printer is used for standard word processing documents print...

Page 136: ...mediately NOTE If the printed text is still streaked or faded it is time to replace the toner cartridge Follow the procedure in the next section to replace the toner cartridge 1 Grasp the top of the front cover on both sides then gently pull the cover until it is fully open 2 Grasp the cartridge by its handle and lift it out of the printer IMPORTANT Be sure to handle the toner cartridge correctly ...

Page 137: ...he drum s protective shutter Avoid holding the cartridge in such a way that your hand is touching the drum s protective shutter 3 Hold the cartridge then gently rock it from side to side five or six times to distribute the toner evenly inside the cartridge Rock the toner cartridge gently taking care not to spill the toner ...

Page 138: ... 5 Close the front cover immediately after inserting a cartridge IMPORTANT If the toner cartridge is not correctly installed the front cover cannot be closed completely Do not try to force the front cover shut as this may damage it If you cannot close the front cover completely open it and check the installation of the toner cartridge Do not leave the front cover open for a long time after install...

Page 139: ... your hands or clothing wash it off with cold water immediately Do not put your hand inside the front cover immediately after the printer has been used as the fixing assembly inside the printer gets extremely hot Be careful not to touch any of the parts inside the cover except those specified in this manual Doing so may result in personal injury or burns 1 Grasp the top of the front cover on both ...

Page 140: ... Before you install the cartridge check the expiration date printed on the box Old toner cartridges can cause poor print quality Always use a cartridge before its expiration date Save the protective bag You may need it later if you have to remove the toner cartridge from the printer 4 Hold the cartridge then gently rock it from side to side five or six times to distribute the toner evenly inside t...

Page 141: ... To avoid breaking the tape do not pull the tape out at an upwards or downwards angle If the tab breaks off the tape pull the tape out by pulling on the end of the tape where the tab was originally attached Do not stop pulling out the sealing tape If you stop pulling it loose toner can scatter causing a reduction in print quality Dispose of the sealing tape properly If you get loose toner powder o...

Page 142: ...cover cannot close completely Do not try to force the cover shut as this may damage it If you cannot close the front cover completely open it and check the installation of the toner cartridge Do not leave the front cover open for a long time after installing the toner cartridge Replacement of the toner cartridge is complete After you install a new toner cartridge you must clean the printer by usin...

Page 143: ...tatus Window icon in the Windows taskbar to open the Status Window 3 Select Cleaning from the Options menu A cleaning sheet starts printing Recycling Toner Cartridges Canon supports the collection of used toner cartridges for recycling Toner cartridge recycling cannot succeed without your help We would like to encourage you to support the Canon Cartridge Recycling Program and bring your used cartr...

Page 144: ...ion parts Rough handling of the toner cartridge can cause the cartridge to break or reduce the print quality Follow the precautions in this section when installing or removing the toner cartridge WARNING To avoid a fire or personal injury never attempt to incinerate a used toner cartridge Toner residue inside the cartridge is flammable IMPORTANT If you get loose toner powder on your hands or cloth...

Page 145: ...empt to disassemble a toner cartridge Condensation may form on a toner cartridge if it is subjected to extreme changes in temperature and or humidity adversely affecting print quality If you move the cartridge to a location that is warmer or has higher humidity let it sit out of the box for about an hour This allows it to slowly adjust to the new temperature preventing condensation from forming Be...

Page 146: ...r humidity or where the temperature or humidity can change suddenly The applicable temperature range for storage 0 35 C 32 95 F The applicable humidity range for storage 35 85 RH relative humidity with no condensation Never store the toner cartridge in salty air or where there are corrosive gases e g from aerosol sprays Store the toner cartridge in a clean dry location Keep the toner cartridge awa...

Page 147: ...an the printer Not doing so may cause a fire or electrical shock Never use flammable solvent such as alcohol benzene and paint thinner for cleaning If a flammable solvent adheres to electrical parts inside the printer it may result in a fire or electrical shock IMPORTANT Never use any cleaning solvent other than water or a water diluted neutral detergent to prevent deterioration or cracks in the p...

Page 148: ... wipe the printer with the cloth to remove stains If you use a neutral detergent for cleaning wipe off the neutral detergent remaining on the printer with a soft cloth moistened with water 3 After removing stains wipe the printer with a soft dry cloth to remove the remaining moisture 4 Connect the power cord to the AC outlet after the body surface has dried completely ...

Page 149: ...printing do not rock or move the printer and do not open the front cover If you do the printer might be damaged Do not subject the multi purpose tray and the manual feed slot area to direct sunlight or other strong light After unplugging it from the AC outlet wait until the printer has cooled off completely before covering it with a dust cover If you are not going to use the printer for an extende...

Page 150: ...rinting 5 2 Problems and Solutions Without Messages 5 4 Print Quality Problems 5 4 Printer Problems 5 5 CAPT Problems 5 7 Clearing Paper Jams 5 9 Before Removing Paper Jams Inside the Printer 5 11 Paper Jam in the Paper Feed Area 5 13 Paper Jams Near the Imaging Area 5 15 Paper Jam in the Face Down Delivery Area 5 17 Paper Jam in the Face Up Delivery Area 5 18 Using the Trouble Shooter 5 21 Featur...

Page 151: ...unable to print Error message displayed on the Status Window No Yes No Yes Yes Follow the instructions displayed on the Status Window See Checking the Status of a Print Job on p 3 81 Follow the instructions described in the online help See Turning the Printer ON OFF on p 1 7 Power cord is not connected to the AC outlet Power switch of the printer is turned off The printer is not connected to your ...

Page 152: ...he Trouble Shooter to check an error See Using the Trouble Shooter on p 5 21 See Replacing the Toner Cartridge on p 4 2 The printer is not connected to the USB port See the Getting Started Guide The printer driver is not installed correctly See Uninstalling the CAPT on p 3 45 See Installing the CAPT on p 3 3 The USB class driver is not installed correctly See Uninstalling the CAPT on p 3 45 See In...

Page 153: ...dge from the printer Rock the cartridge gently from side to side five or six times to evenly distribute the toner inside and then insert it back into the printer If the problem persists replace the toner cartridge with a new one See Replacing the Toner Cartridge on p 4 6 Printout has black specks Cause Toner powder adheres to the pressure roller Remedy Use the cleaning function of the CAPT to clea...

Page 154: ...here is move the printer or the light source Printer Problems Printer does not print Cause 1 Paper may not be loaded Remedy Make sure that paper is loaded Cause 2 Print jobs may be stalled Remedy Check the Status Window for stalled jobs Cause 3 The toner cartridge may not be installed correctly Remedy Make sure that the cartridge is installed correctly See the Getting Started Guide Cause 4 Your BI...

Page 155: ...se printing performance may slow down Remedy Printer performance improves if you give your print job priority Printout is wrong Cause There may be a communications problem between the printer and your computer Remedy Make sure that your cable connections are secure Make sure that you are not using a switch box Check that you have selected the correct printer driver in Windows Printer locks up syst...

Page 156: ...here may be a problem with your interface cable Remedy Try a different cable CAPT Problems CAPT is not working properly Cause 1 The CAPT for LBP 1120 is not selected as the default printer driver Remedy Specify the CAPT for the LBP 1120 as the default driver Cause 2 The software may not be installed properly Remedy 1 Launch the Trouble Shooter to detect a problems See Using the Trouble Shooter on ...

Page 157: ...ert notification is unchecked Remedy From Device Manager make sure that Auto insert notification is checked in the CD ROM drive propperties dialog box For detailed information refer to Windows Help File not found on CD ROM error occurs when starting the CD ROM menu Cause The program is loaded from the hard disk drive Remedy Remove the CAP3MNU EXE file from your hard disk drive and restart the CD R...

Page 158: ...ter In this case check various sections of the printer again to remove all pieces of the paper from inside the printer Paper jams can occur in several locations along the print path Refer to the diagram below to help you locate paper jams Locate the area where the paper jam has occurred and follow the instructions for removing jams in that area Be sure to check all areas before resuming printing a...

Page 159: ...y or burns Never touch the high voltage contact points inside the front cover This could damage the printer IMPORTANT If you get loose toner powder on your hands or clothing wash it off with cold water immediately To avoid possible damage to the printer do not touch the pins near the right end of the transfer roller Remove the jammed paper with the power to the printer still on If you turn the pow...

Page 160: ...s follow the procedure below before removing the jammed paper from the affected area CAUTION Remove watches and any bracelets or rings when touching the inside of the printer These items may be damaged if they come into contact with parts inside the printer IMPORTANT To avoid damaging the printer check that the pressure release levers black were released when the front cover was opened If the pres...

Page 161: ...with both hands until it stops 3 Remove the cartridge by grasping the cartridge s handle and lifting it out of the printer IMPORTANT Do not expose the cartridge to light for more than 5 minutes If necessary put the cartridge in its original protective bag or wrap it with a thick cloth to prevent exposure to light ...

Page 162: ...Use both hands to remove jammed paper from the printer Be careful not to tear the paper when pulling If the paper is torn remove the paper scraps from the printer If the paper has moved completely into the printer 1 Remove the toner cartridge from the printer See Before Removing Paper Jams Inside the Printer on p 5 11 2 Remove any paper from the input area by gently pulling it forward IMPORTANT Us...

Page 163: ...side of the roll 4 Gently pull the rolled up paper out of the printer If the leading edge of the paper is visible but has not entered the imaging area pull the paper forwards and roll it inwards Do not pull the paper upwards from the paper input slot as this may damage the printer Gently pull the paper out of the printer ...

Page 164: ...lease levers automatically return to their original positions Paper Jams Near the Imaging Area If you can see the rear edge of the paper 1 Remove the toner cartridge from the printer See Before Removing Paper Jams Inside the Printer on p 5 11 2 Roll the paper inwards from the rear edge so that the printed surface is on the inside of the roll and the paper is pulled back out from the imaging area I...

Page 165: ...itions If you cannot see the rear edge of the paper 1 Remove the toner cartridge from the printer See Before Removing Paper Jams Inside the Printer on p 5 11 2 Carefully pull the jammed paper forwards and out of the printer IMPORTANT Use both hands to remove jammed paper from the printer 3 Replace the cartridge and close the front cover The paper release levers automatically return to their origin...

Page 166: ...er between the face down delivery rollers until the leading edge emerges from the printer IMPORTANT Use both hands to remove jammed paper from the printer 3 Carefully pull the jammed paper through the rollers and out of the printer IMPORTANT Never pull the paper out of the printer by pulling it forwards if the paper is behind the face down delivery rollers This could result in damage to the face d...

Page 167: ...the front edge of the paper 1 Remove the toner cartridge from the printer Before Removing Paper Jams Inside the Printer on p 5 11 2 While holding the printer steady carefully pull the jammed paper out as illustrated below IMPORTANT Use both hands to remove jammed paper from the printer If the jammed paper is badly folded similar to the folds of an accordion ease the jammed paper loose and then pul...

Page 168: ...ANT If the paper does not come out of the printer easily check that the pressure release levers black have been released See Before Removing Paper Jams Inside the Printer on p 5 11 1 Remove the toner cartridge from the printer See Before Removing Paper Jams Inside the Printer on p 5 11 2 Gently bend the paper backwards and feed the paper back through the paper transport slit at the back of the fix...

Page 169: ...eplace the cartridge and close the front cover the printer should be ready for printing If the printer returns to the ready state for printing troubleshooting has been successful If the printer does not return to the ready state for printing paper may still be jammed in the printer While removing the jammed paper some toner may stain the inside of the printer which will make the first few printout...

Page 170: ...owing and corrects any problems Selected printer port The Trouble Shooter checks to see if usable Installed files Free disk space in the drive containing the Windows directory and free memory Registries Printer Properties settings Language monitor Printer Driver Status Window Canon LASER SHOT LBP 1120 program folder Network If the Trouble Shooter is used on a network it performs network related ch...

Page 171: ...ooting 5 3 Select the printer that troubleshooting will be carried out for click Yes The Trouble Shooter checks your file 4 If a problem is found messages are displayed on the screen Follow the instructions on the screen to solve the problem ...

Page 172: ... appears Click OK The Windows Restart dialog box appears If a problem is not found the display returns to Windows NOTE Check the Save Result check box if you want to save the results as a text file 6 Click Windows Restart You must restart Windows for corrections made by the Trouble Shooter to take effect Troubleshooting is complete ...

Page 173: ...u add paper the Status Window displays Printer Ready automatically Change paper to Cause The paper in the printer and the specified paper are not the same size Remedy Replace the paper so that it matches the specified paper size or use the Resume Job menu option in the Status Window to start printing on the paper in the printer Check Printer Cable Cause Your computer and printer are not communicat...

Page 174: ...lable memory Remedy 1 Close other applications while printing this job Remedy 2 Print the job in smaller sections Remedy 3 Try reprinting the job with a lower resolution such as 300 dpi Remedy 4 Reformat the most complicated pages in the print job to reduce graphics and other complex formatting Port Busy Cause The printer port is being used by other equipment Remedy Wait a while until the printer ...

Page 175: ...has detected an internal problem in the LBP 1120 engine Remedy Follow the procedure described below to solve the problem 1 Turn off and unplug the printer 2 Open the front cover and remove the toner cartridge 3 Plug in and turn on your printer 4 If the error persists contact your authorized Canon representative ...

Page 176: ...CHAPTER 6 1 6 Appendix This chapter summarizes and contains the index and glossary for this manual and the specifications of the printer Specifications 6 2 Glossary 6 4 Index 6 14 ...

Page 177: ...ote printing on A4 size paper using the multi purpose tray at 20 C 68 F Paper Sizes Multi purpose tray Plain paper Legal A4 Letter Executive B5 Maximum capacity approximately 125 sheets of 64 g m2 Special paper transparency films labels envelopes postcards index cards colored paper Maximum capacity 12 5 mm stack height except for envelopes Envelope capacity 6 to 10 envelopes Manual feed slot Plain...

Page 178: ...nts for storage Storage temperature 0 to 35 C 32 to 95 F Humidity 10 to 80 RH no condensation Power Source 100 127 V 10 50 60 Hz 2 Hz 220 240 V 10 6 50 Hz 2Hz Power Consumption 20 C or 68 F 100 127 V During printing approximately 250 W Average During standby approximately 5 W 220 240 V During printing approximately 250 W Average During standby approximately 5 W Mass Printer body Approximately 6 0 ...

Page 179: ...es Audio messages notify the user of the printer operations shown in the Status Window Automatic Image Refinement A printer technology from Canon with which the printer automatically senses and refines the jagged edges and ragged curves of characters and graphics B Bi directional communications Allows information to pass back and forth between the Canon Advanced Printing Technology software and a ...

Page 180: ...lls the printer to perform a certain function Commands are sent from the computer to the printer via the interface cable when the printer is ready Contrast The degree of difference between the lightest and darkest areas of an image Decreasing contrast lightens the dark areas and darkens the light areas increasing it darkens the dark areas and lightens the light areas Control Panels The set of Wind...

Page 181: ...older A container in which documents program files and other folders are stored on your disks Formerly referred to as a directory Font A complete set of characters of the same size and style for example 12 point Courier bold Form A custom paper size with width and height defined by the user G Grayscale image A bitmap image that stores data for each dot as a shade of gray rather than as black or wh...

Page 182: ...emove jammed paper before you can continue printing K Kilobyte KB A unit of measurement representing the binary number 1024 used to describe printer or computer memory size in thousand byte units L Landscape The printing of text and graphics along the length of the page Local printer A printer that is directly connected to your computer using a USB cable M Megabyte MB A unit of measurement represe...

Page 183: ...created when paper becomes caught along the paper path You must remove jammed paper before you can continue printing Paper path The route that paper travels through the printer PDF Stands for Portable Document Format A widely used format for transmitting and viewing documents on computers PDF documents can be read or printed out with Adobe s Acrobat Reader program Peer to peer connection A network...

Page 184: ...gy you are using its printer driver Printers folder The container in which your printer information is stored Profile A profile is a file that stores the printer s settings so those settings can be recreated simply by selecting the profile from a menu Progress bar In the Status Window or its icon a horizontal bar that graphically indicates the percentage of the print job that has actually printed ...

Page 185: ... with 300 or 600 dpi resolution Resolution values are represented by horizontal data and vertical data for example 600 x 600 dpi S Scalable fonts Scalable fonts allow characters to be printed in various sizes and rotation angles This is different from bitmap fonts which are printed in fixed sizes and angles Scaling Enlarging or reducing the printed image SCoA ScoA is an original Canon print data c...

Page 186: ... work you do on your computer such as starting a program opening a document finding a file and getting help You open the Start menu by clicking the Start button displayed on the Desktop Status options Settings which determine when the Printer Status Window opens and whether sounds play with messages Status Window A window that the Canon Advanced Printing Technology uses to display messages about t...

Page 187: ...s bus automatically recognizes connections Plug Play to allow plugging and unplugging connectors with the power still turned on to the PC or peripheral equipment V Virtual Memory Space on the hard disk that Windows uses for temporary data storage as if it were actually random access memory RAM Windows does this by means of a swap file This provides Windows with more usable memory but reduces speed...

Page 188: ...ppendix 6 WYSIWYG Pronounced wizzy wig an acronym for what you see is what you get For example when you format a paragraph the line breaks that appear on the printed page are exactly the same as they are on the screen ...

Page 189: ...Printer Cable Message 5 24 Check Toner Cartridge Message 5 24 Cleaning Function Described 4 10 Clear Paper Jam Message 5 25 Close Printer Cover Message 5 25 Collate 3 63 Colored Paper Requirements 2 4 Condensation Preventing 4 13 Custom Paper Size Selecting 3 69 D Density Toner 3 74 E Envelopes Loading in Multi Purpose Tray 2 16 Requirements 2 5 Error Messages 5 24 F Face Down Delivery Slot Descri...

Page 190: ...9 Messages List of 5 24 Multi Purpose Tray Described 1 4 Loading 2 11 N Network Connecting to 3 38 Network Printer Connecting through print server 3 42 Status 3 86 O Options Menu Described 3 81 Overlay Overview 3 70 Printing with 3 71 P Page Setup Tab Copies 3 54 3 61 Custom Paper Size 3 55 Manual Scaling 3 54 3 62 Orientation 3 54 3 61 Output Size 3 54 3 61 Overlay 3 55 3 62 Page Layout 3 54 3 62...

Page 191: ...1 Print Quality Selecting 3 73 Printer Cleaning 4 14 Handling 4 16 Turning OFF 1 8 Turning ON 1 7 Using on network 3 38 Printer Properties Accessing for Windows 2000 XP 3 49 Accessing for Windows 98 Me 3 49 Advanced Tab 3 59 Details Tab 3 52 Finishing Tab 3 55 General Tab 3 51 3 57 Page Setup Tab 3 53 Ports Tab 3 58 Quality Tab 3 56 Security Tab 3 59 Select Forms Tab 3 60 Sharing Tab 3 53 3 58 Pri...

Page 192: ...nimation Area 3 82 Closing 3 83 Error Message Area 3 82 Job Information Area 3 82 Menu bar 3 81 Opening 3 83 Printer Icon 3 82 Printer Status Message Area 3 82 Progress Bar 3 82 Status Bar 3 82 Tab Window 3 82 Toolbar 3 82 T Terminology Glossary 6 4 Toner Cartridge Before replacing 4 3 Handling 4 11 Recycling 4 10 Replacing 4 2 4 6 Storing 4 13 Toner Density Adjusting 3 74 Transfer Roller Describe...

Page 193: ...Index 6 18 Appendix 6 ...

Page 194: ...lombes Cedex France CANON U K LTD Woodhatch Reigate Surrey RH2 8BF United Kingdom CANON DEUTSCHLAND GmbH Europark Fichtenhain A10 47807 Krefeld Germany CANON ITALIA S p A Palazzo L Strada 6 20089 Milanofiori Rozzano MI Italy CANON LATIN AMERICA INC 703 Waterford Way Suite 400 Miami Florida 33126 U S A CANON AUSTRALIA PTY LTD 1 Thomas Holt Drive North Ryde Sydney N S W 2113 Australia CANON SINGAPOR...

Reviews: