background image

Loading Paper

2-5

Ro

ut

ine Ma

int

e

n

ance

2

5

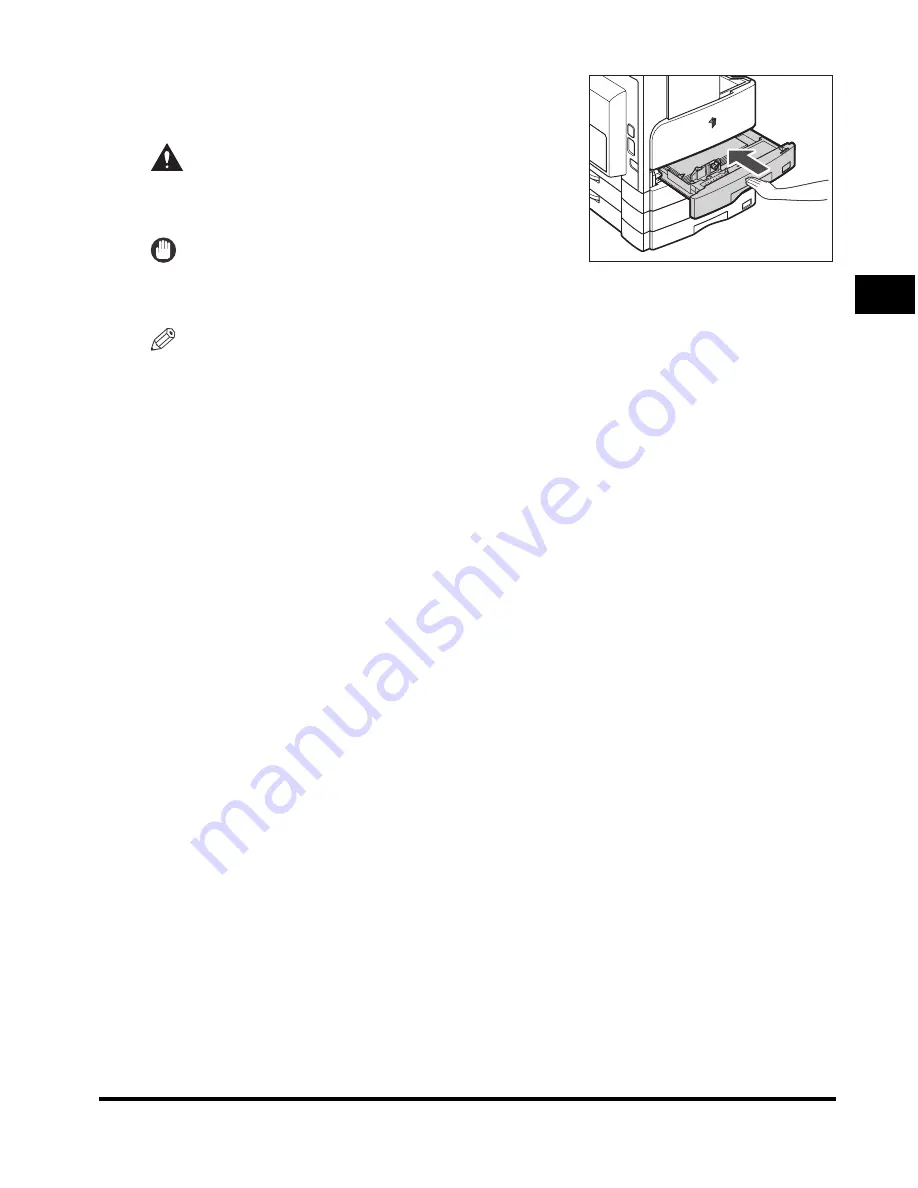
Gently push the paper drawer back into the 
machine until it clicks into place in the 
closed position.

CAUTION

When returning the paper drawer to its original 
position, be careful not to get your fingers caught, as 
this may result in personal injury.

IMPORTANT

You will not be able to make copies or prints if you load 
paper that exceeds the loading limit, or if the paper drawer is not completely pushed into the machine. 
Always check that the paper drawers are in place, and that the paper does not exceed the loading limit.

NOTE

If paper runs out during copying or printing, load a new paper stack, and follow the instructions on the 
touch panel display. The machine automatically restarts, and produces the remaining copies or prints.

Summary of Contents for iR2030

Page 1: ...Read this guide first Please read this guide before operating this product After you finish reading this guide store it in a safe place for future reference User s Guide ENGLISH...

Page 2: ......

Page 3: ...iR2030 iR2025 iR2022i iR2018i User s Guide...

Page 4: ...nstructions Sending and Facsimile Guide Installing the Disc Software and Setting Up the Network Connection Network Quick Start Guide Remote User Interface Instructions Remote UI Guide Network Connecti...

Page 5: ...sed in This Manual xi Trademarks xi Copyright xii Disclaimers xii Legal Limitations on the Usage of Your Product and the Use of Images xii Important Safety Instructions xiii Installation xiii Power Su...

Page 6: ...5 Control Panel Parts and Functions 1 16 Touch Panel Display 1 17 Main Power and Control Panel Power 1 19 How to Turn ON the Main Power 1 19 Things You Must Do Before Using This Machine 1 21 Selecting...

Page 7: ...trictions handling precautions and instructions that should be observed for safety WARNING Indicates a warning concerning operations that may lead to death or injury to persons if not performed correc...

Page 8: ...ustrations Used in This Manual Illustrations used in this manual are those displayed when the iR2022i has the following optional equipment attached to it the Finisher U2 Additional Finisher Tray C1 an...

Page 9: ...asis Available Unavailable opt optional 1 Only the feeder is available 2 The platen cover or the feeder can be selected at the time of purchase NOTE For more information on the optional equipment see...

Page 10: ...o not remove protective housings or external covers except as directed by the equipment s Reference Guide This equipment F189800 conforms with the essential requirements of EC Directive 1999 5 EC and...

Page 11: ...elow are attached to the laser scanner unit inside the machine and next to the toner cartridge behind the front cover This product has been classified under IEC60825 1 1993 A1 1997 A2 2001 EN60825 1 1...

Page 12: ...rs facsimiles and copiers The standards and logos are uniform among participating nations European Union and EEA only This symbol indicates that this product is not to be disposed of with your househo...

Page 13: ...operating system Windows Vista Microsoft Windows operating system Windows Trademarks Canon the Canon logo iR and NetSpot are trademarks of Canon Inc Adobe and Adobe Acrobat are trademarks of Adobe Sy...

Page 14: ...Using your product to scan print or otherwise reproduce certain documents and the use of such images as scanned printed or otherwise reproduced by your product may be prohibited by law and may result...

Page 15: ...age area inside the machine it may result in a fire or electrical shock If these items are dropped or spilled inside the machine immediately turn OFF the main power switch and disconnect the power cor...

Page 16: ...han the power cord provided as this may result in a fire or electrical shock As a general rule do not use extension cords Using an extension cord may result in a fire or electrical shock If an extensi...

Page 17: ...hese items come into contact with a high voltage area inside the machine it may result in a fire or electrical shock If these items are dropped or spilled inside the machine immediately turn OFF the m...

Page 18: ...these steps may result in a fire or electrical shock Disconnect the power cord from the power outlet regularly and clean the area around the base of the power plug s metal pins and the power outlet w...

Page 19: ...s into your eyes or mouth wash them immediately with cold water and immediately consult a physician When loading paper or removing jammed originals or paper take care not to cut your hands on the edge...

Page 20: ...ely Do not dismantle the toner cartridge as dismantling it may cause toner dust to scatter on your skin or clothes Immediately brush the toner off your clothes but do not wash the clothing with hot wa...

Page 21: ...ent Documentation Kit included in box This contains the English French Italian German and Spanish versions of the following guides Easy Operation Guide Basic Features Contains the basic operation inst...

Page 22: ...ot operate correctly If the PDF manual does not open from the Disc Menu open the PDF file directly from the manuals folder on the User Manual Disc Windows Macintosh OS Windows 98 Windows Me Windows 20...

Page 23: ...ot displayed for the Manual Disc supplied with the optional Barcode Printing Kit Open an appropriate folder in the Disc to read the PDF manual The screen shot shown above may differ from the one you a...

Page 24: ...xxii...

Page 25: ...1 8 What This Machine Can Do 1 11 System Configuration and Parts 1 14 Optional Equipment 1 14 External View and Internal View 1 15 Control Panel Parts and Functions 1 16 Touch Panel Display 1 17 Main...

Page 26: ...ing the Machine in the Following Locations Avoid locations subject to extremes of temperature and humidity whether low or high For example avoid installing the machine near water faucets hot water hea...

Page 27: ...tion runs especially in poorly ventilated rooms It is recommended that the room be appropriately ventilated sufficient to maintain a comfortable working environment in areas of machine operation Avoid...

Page 28: ...an an original or the copies having no printed image at all Avoid installing the machine near computers or other precision electronic equipment Electrical interference and vibrations generated by the...

Page 29: ...afe and has a steady voltage Do not connect other electrical equipment to the same power outlet to which the machine is connected Do not connect the power cord to a multiplug power strip as this may c...

Page 30: ...even to a location on the same floor of your building contact your local authorized Canon dealer beforehand The machine is heavy and requires two or more people to lift it Therefore do not attempt to...

Page 31: ...You Start Using This Machine 1 When carrying the machine be sure to hold the handles as indicated below Failure to do so may cause the machine to be dropped and result in personal injury Pull out and...

Page 32: ...specting the inside of the machine Do not carry out any inspections not described in this manual Do not attempt to disassemble or modify the machine Be careful not to spill liquid or drop any foreign...

Page 33: ...horized Canon dealer Using the machine in this state may cause a fire or electrical shock Also avoid placing objects around the power plug so that the machine can be disconnected whenever necessary Do...

Page 34: ...t is recommended that the room be appropriately ventilated sufficient to maintain a comfortable working environment in areas of machine operation For safety reasons turn OFF the control panel power sw...

Page 35: ...r copying originals of different sizes together in one copy operation are provided to increase your productivity Sending See the Sending and Facsimile Guide The Send function enables you to send scann...

Page 36: ...ize file processing and achieve maximum performance Also the PCL Printer enables you to use the machine as an emulation printer of PCL5e and PCL6 With the optional Barcode Printing Kit you can also us...

Page 37: ...018i as a conventional scanner You can scan a document using the machine and read the data in an application you are using on your computer To use this function the machine is required to be connected...

Page 38: ...andard equipment for the iR2030 iR2025 The optional Inner 2 Way Tray E2 cannot be used with the optional Finisher U2 a Platen Cover Type J b Inner 2 Way Tray E2 c Cassette Feeding Module P1 For the iR...

Page 39: ...ay C1 and Cassette Feeding Module Q1 attached a Stack Bypass b Main Control Panel c Feeder DADF P2 d Main Power Switch e Paper Drawer 1 f Paper Drawer 2 Optional equipment for the iR2018i a Platen Gla...

Page 40: ...display the copy and print count totals and the machine s serial number on the touch panel display h Stop key Press to stop a job in progress such as a scan copy or fax job scanning only i Start key P...

Page 41: ...lect or cancel the automatic exposure control b Original Type Selection Press to make copies according to the type of original Text Text Photo or Photo c Special Features Press to select a Special Fea...

Page 42: ...1 18 Before You Start Using This Machine 1 Icon Type of Job Description Copy Job Send Job Fax Job Printer Job Report Job Additional Functions Job Icon Machine Status Description Error Paper Jam Stapl...

Page 43: ...ct the power cord with wet hands as this may result in electrical shock 2 Press the main power switch to I side The main power switch is located on the right side of the machine If you want to turn th...

Page 44: ...displayed when the machine is ready to scan IMPORTANT If you turn OFF the main power wait at least 10 seconds before turning the main power back ON Do not turn the main power OFF if the optional Color...

Page 45: ...ion correctly the machine may not function properly Network settings have to be specified in order to send scanned documents to an e mail address an I fax address or a file server See Basic Network Se...

Page 46: ...Press User Settings under Fax Settings 3 Press Tel Line Type I 4 Select the type of telephone line press OK If you do not know the telephone line type call your telephone service provider for details...

Page 47: ...ons Timer Settings Date Time Settings GMT The time at the Greenwich Observatory in England is called GMT Greenwich Mean Time Time Zone The standard time zones of the world are expressed globally in te...

Page 48: ...sing numeric keys If you are setting the Time Zone Press Time Zone Setting select the time zone where the machine is located press OK NOTE The default setting is GMT 0 00 If the desired time zone is n...

Page 49: ...Press OK Press End Date make the settings in the same way as Start Date press OK Press OK NOTE If you set Daylight Saving Time the machine automatically sets the standard time of the machine one hour...

Page 50: ...so be displayed on the touch panel display of the receiving party s machine depending on their type of machine NOTE This setting is required only when the optional Super G3 FAX Board is installed 1 Pr...

Page 51: ...y during transmission NOTE If the optional Super G3 FAX Board is installed the unit name can be printed in the TX Terminal ID You can register only one unit name If User ID Management is set to On the...

Page 52: ...Things You Must Do Before Using This Machine 1 28 Before You Start Using This Machine 1...

Page 53: ...CHAPTER 2 1 2 Routine Maintenance This chapter describes how to load paper and replace the toner cartridge Loading Paper 2 2 Replacing the Toner Cartridge 2 6...

Page 54: ...color images have been copied Do not copy on the reverse side either Paper which has been printed on using a thermal transfer printer Do not print on the reverse side of this paper either Fan the stac...

Page 55: ...UTION When loading paper take care not to cut your hands on the edges of the paper IMPORTANT Rewrap any remaining paper in its original package and store it in a dry place away from direct sunlight NO...

Page 56: ...ght of the paper stack does not exceed the loading limit mark at the back of the paper drawer and the corners are below the paper size guide clips Be sure to set the paper size detecting lever correct...

Page 57: ...jury IMPORTANT You will not be able to make copies or prints if you load paper that exceeds the loading limit or if the paper drawer is not completely pushed into the machine Always check that the pap...

Page 58: ...display Follow the instructions shown on the screen If you press Recover Later you can continue operations such as setting modes and scanning originals without replacing the toner cartridge immediate...

Page 59: ...o not replace toner cartridge until the message prompting you to do so appears Do not attempt to replace the toner cartridge while the machine is printing NOTE It is recommended to replace the toner c...

Page 60: ...ight 4 Rock the new toner cartridge five or six times to distribute the toner evenly inside the toner cartridge WARNING Do not throw used toner cartridges into open flames as they may ignite the toner...

Page 61: ...e seal slowly otherwise the scattered toner may soil your clothes etc Pull out the seal completely otherwise the print error may occur Pulling the seal upwards or downwards may break the seal If the s...

Page 62: ...the toner cartridge fully until it locks into place 8 Close the front cover CAUTION When closing the front cover be careful not to get your fingers caught as this may result in personal injury IMPORT...

Page 63: ...ER 3 1 3 Troubleshooting This chapter explains what to do in response to a paper jam and an error message display Clearing Paper Jams 3 2 List of Error Messages 3 6 List of Error Codes without Message...

Page 64: ...our hands or clothing as this will dirty your hands or clothing If they become dirty wash them immediately with cold water Washing them with warm water will set the toner and make it impossible to rem...

Page 65: ...t continue operating the machine Follow the directions on the touch panel display to clear the paper jam See Feeder DADF P2 in the Reference Guide NOTE Some areas that are shown to have paper jams may...

Page 66: ...de b Inner 2 Way Tray E2 See Inner 2 Way Tray E2 Optional in the Reference Guide c Duplex Unit See Duplex Unit Duplex Unit B1 in the Reference Guide d Cassette Feeding Module P1 Q1 See Paper Drawers 2...

Page 67: ...you have removed all of the jammed paper in locations other than the feeder printing or copying resumes If there is paper that still needs to be removed a screen indicating how to clear that paper jam...

Page 68: ...printed in the Results column on the Activity Report and TX Report See Chapter 11 Printing Communication Reports in the Sending and Facsimile Guide Perform the necessary procedures according to the e...

Page 69: ...ry again See Entering the Department ID and Password in the Reference Guide 749 Cause You could not execute the job because a service call message is being displayed Remedy Turn the main power OFF wai...

Page 70: ...List of Error Messages 3 8 Troubleshooting 3...

Page 71: ...CHAPTER 4 1 4 Appendix This chapter provides other useful information Multifunctional Operations 4 2 Available Paper Stock 4 3...

Page 72: ...le Unavailable Available but with conditions Available Unavailable Available but with conditions Current Jobs Copy Printer Next Jobs Scanning Printing Receiving Data Printing Copy Send Scanning Direct...

Page 73: ...e machine beforehand See Identifying the Type of Paper in a Paper Source in the Reference Guide Available Unavailable 1 From 64 g m2 to 80 g m2 2 From 75 g m2 to 90 g m2 3 Use only A4 transparencies m...

Page 74: ...2 3 and 4 are optional for the iR2018i Paper Drawers 3 and 4 are optional for the iR2030 iR2025 iR2022i Paper Size Width x Length Paper Source Paper Drawer 1 Paper Drawer 2 3 4 Stack Bypass A3 297 mm...

Page 75: ......

Page 76: ...opa N V 2007 Canon Middle East FZ LLC P O Box 27616 Dubai United Arab Emirates email info canon me com Canon Inc 30 2 Shimomaruko 3 chome Ohta ku Tokyo 146 8501 Japan Europe Africa and Middle East Can...

Reviews: