Chapter 2
2-3
F-2-2
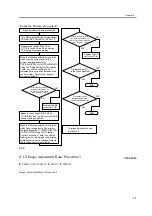
2.1.3
Image Adjustment Basic Procedure 3
0005-4337
iR C6800C / iR C6800CN / iR 5800C / iR 5800CN
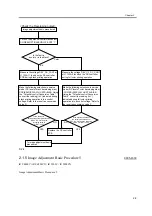
Image Adjustment Basic Procedure 3
YES
NO
YES
NO
NO
YES
NO
YES
Is the difference between
the actual measurement of
PR-CNT and the foregoing
value A /-10%?
Try replacing HVT1.
Is the fault corrected?
Is the difference between
the actual measurement of
GRID-CNT and the foregoing
value B /-10%?
Replace the DC
controller PCB.
Replace the DC
controller PCB.
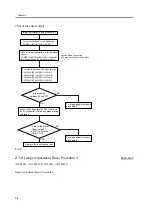
<Check the Primary / Grid output>
Image adjustment basic procedure 2
Turn off the potential control mechanism:
COPIER>OPTION>BODY>P0-CNT '0'
Measure the voltage PR-CNT at
J1111B-9 found on the DC controller
PCB during copying operation.
Make the following selections in service
mode (primary current level of the
primary charging assembly):
COPIER>DISPLAY>HV-STS>PRIMARY.
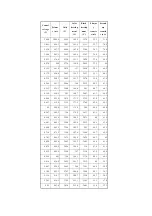
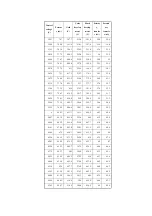
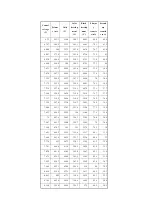
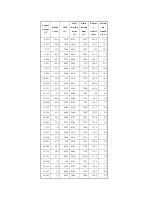
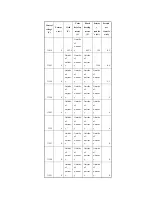
Using the "Potential Control Conversion
Table," convert the reading (in uA)
indicated during printing operation into a
control voltage. Refer to the result as
conversion value A.
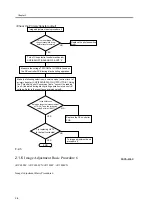
Measure the voltage GRID-CNT at
J111B-8 found on the DC controller PCB
during copying operation.
Make the following selections in service
mode (grid voltage level of the primary
charging assembly): COPIER>DISPLAY>
HV-STS>GRID. Using the "Potential
Control Conversion Table," convert the
reading (unit V) indicated during printing
operation into a control voltage. Refer to
the result as conversion value B.
Try replacing the
photosensitive drum.
Is the fault corrected?
To image adjustment basic
procedure 3
END
END
Summary of Contents for iR C6800 Series
Page 1: ...Jan 20 2005 Portable Manual iR C6800 Series ...
Page 2: ......
Page 6: ......
Page 12: ......
Page 13: ...Chapter 1 Maintenance and Inspection ...
Page 14: ......
Page 16: ......
Page 20: ...Chapter 1 1 4 Under high humidity and high temperature condition 85 000 images ...
Page 51: ...Chapter 2 Standards and Adjustments ...
Page 52: ......
Page 79: ...F 2 27 1 ...
Page 99: ...F 2 88 F 2 89 1 OK NG NG ...
Page 110: ......
Page 111: ...Chapter 3 Error Code ...
Page 112: ......
Page 114: ......
Page 172: ......
Page 173: ...Chapter 4 User Mode Items ...
Page 174: ......
Page 176: ......
Page 188: ...LIPS emulation 12 items utility printer initialize yes no Item Description ...
Page 190: ......
Page 191: ...Chapter 5 Service Mode ...
Page 192: ......
Page 380: ......
Page 381: ...Chapter 6 Outline of Components ...
Page 382: ......
Page 384: ......
Page 387: ...F 6 1 SL7 CL3 CL2 SL6 SL8 SL9 SL2 SL1 SL4 SL3 SL5 CL1 SL10 SL11 SL12 ...
Page 397: ...F 6 5 FM2 FM10 FM11 FM12 FM6 FM3 FM4 FM8 FM9 FM5 FM7 FM1 ...
Page 407: ...F 6 9 PS65 PS38 PS39 PS46 PS44 PS45 PS52 PS53 PS58 PS59 PS37 ...
Page 417: ...F 6 13 13 2 5 3 14 15 16 9 6 12 7 1 11 4 25 24 21 23 19 20 31 29 28 27 26 22 18 17 32 30 10 8 ...
Page 418: ......
Page 419: ...Chapter 7 System Construction ...
Page 420: ......
Page 422: ......
Page 443: ...Chapter 8 Upgrading ...
Page 444: ......
Page 446: ......
Page 455: ...Jan 20 2005 ...
Page 456: ......


