Canon imageRUNNER ADVANCE DX 527iF Faq Manual Download Page 16

B

lack S

treak

s Ap

p

e

ar in Ima

g

es

16

  Black Streaks Appear in 
Images

Is the document feed scanning area 
dirty?

1.

 Turn OFF the machine, and unplug the power 

plug from the AC power outlet.

2.

 Open the feeder cover, and wipe the roller with 

a damp, well wrung-out cloth.

3.

 After all dirt is cleaned off, wipe the roller with a 

dry soft cloth.

CAUTION!

Rotate the roller while cleaning.

4.

 Close the feeder cover.
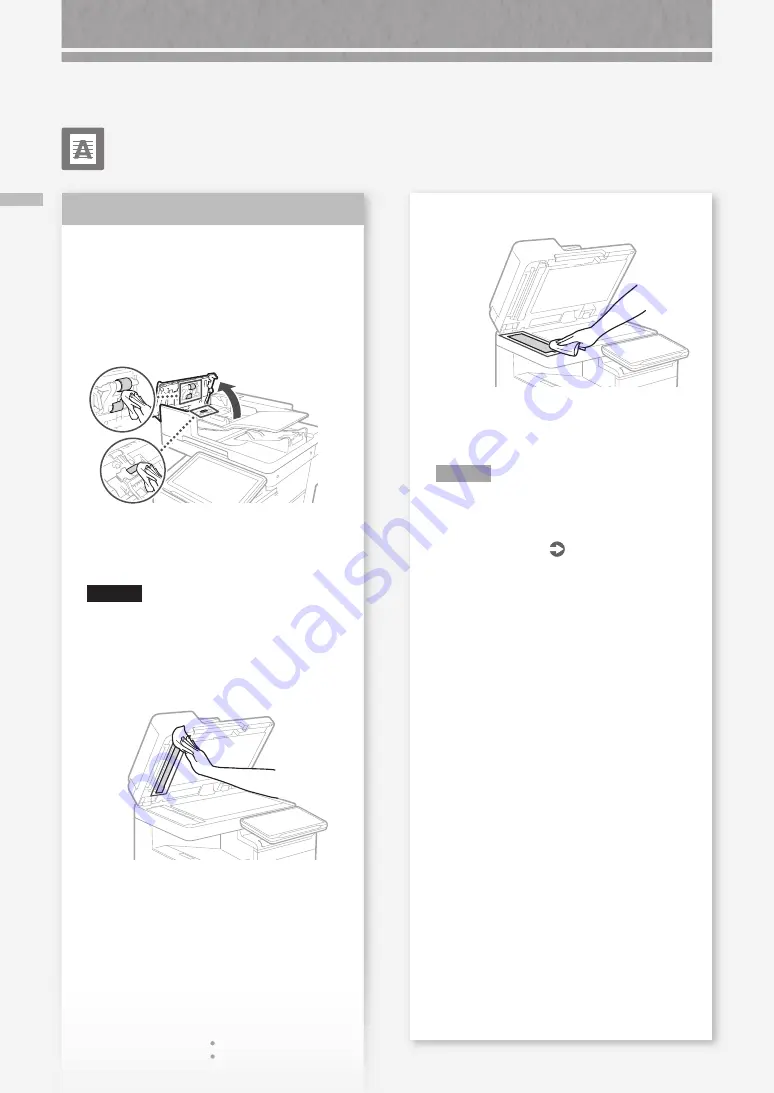
5.

 Open the feeder, and clean the upper side thin 

and long glass area using the supplied glass-
cleaning sheet.

Solution 

6.

 Clean the lower side thin and long glass area 

using the supplied glass-cleaning sheet.

7.

  Close the feeder.

8.

 Insert the power plug into the power outlet, and 

turn the power ON.

N O T E

If black streaks still appear after dirt removal, 
perform the following procedure to execute [Clean 
Feeder]. 

For more information  


User's Guide

 Printing Results Are Not Satisfactory

Summary of Contents for imageRUNNER ADVANCE DX 527iF

Page 1: ...FAQ Guide ...

Page 2: ......

Page 3: ...lease read Important Safety Instructions before operating this product P 38 After you finish reading this guide store it in a safe place for future reference The information in this document is subject to change without notice https oip manual canon 3 ...

Page 4: ...n and Send 24 Stopping Scanning Faxing 24 Scanned Documents Cannot Be E Mailed 25 If You Cannot Send Forward Faxes 26 If You Cannot Receive Faxes 27 The Machine Does Not Operate P 6 Scan Fax Cannot Be Performed Successfully Loading Paper in the Paper Drawer 8 When You Have Loaded a Different Type of Paper than the Preset One 8 Loading Paper in the Multi Purpose Tray 10 Loading Paper with Printed L...

Page 5: ...tisfactory P 15 Loading Paper or Paper Settings Cannot Be Done Successfully Illustrated Index P 34 Appendix P 38 You Can Consult the User s Guide 46 If You Notice a Search Number 46 Do You Want to Know More P 46 P 20 Paper Is Not Fed 20 If the Load paper Message Is Displayed 21 Printing Cannot Be Performed on the Expected Side of Paper 22 Printing Cannot Be Performed with the Expected Size 22 In T...

Page 6: ... check the power plug Main power indicator I ON Note that the power plug or outlet may be different in shape depending on the region Check 3 Is sleep mode activated Tap the touch panel display to cancel Sleep mode Check 2 Is the machine correctly connected to the computer Check the network connection Search 108A 006 Setting up the Network Environment User s Guide How to use the search number P 46 ...

Page 7: ...ing to be printed 2 Check that the main power indicator has turned off 3 Press the power switch again Install the printer driver again N OT E For more information P 29 Solution 1 Solution 2 The Machine Does Not Respond to the Computer The Authentication Screen Logon Screen Is Displayed and You Cannot Go Further Log on to the machine using a registered user ID To continue the operation when the aut...

Page 8: ... paper drawer back into the machine CAUTION Be careful not to get your fingers caught between the paper drawer and the machine POINT When you have changed the paper size replace the paper size label with an appropriate one as necessary P 34 When you have loaded a different type of paper than the preset one be sure to change the paper type setting on the right half of this page 1 2 Press Preference...

Page 9: ... loaded paper 2 Press OK 6 Press OK When you have loaded custom size paper Specify the paper size manually Search 0YAS 02E Specifying Paper Size and Type in the Paper Drawer User s Guide How to use the search number P 46 1 Select the paper type Search AVPP TBM Available Paper How to use the search number P 46 For available paper see the following ...

Page 10: ... Tray extension POINT Pull out the tray extension when loading large sized paper 3 Fan the paper stack well align the edges on a flat surface and then load it Make sure that this line is not exceeded The print side face down 4 If the paper type setting does not match the paper you have loaded Change the setting manually 1 2 3 Press OK 2 Press 1 Select the paper size Press 1 Select the paper type 2...

Page 11: ...number P 46 Printing on the back side of printed paper 1 Load paper in the multi purpose tray the print side face down 2 In the Paper Type selection screen press 2nd Side of 2 Sided Page CAUTION For this operation paper can only be loaded in the multi purpose tray POINT You can use only paper printed with this machine Search AVPP TBM Available Paper How to use the search number P 46 For available ...

Page 12: ...Example When printing on LTR size paper Orientation Printing result Paper Drawer Multi Purpose Tray Co Ltd Paper Drawer Paper Logo C o t d L Multi Purpose Tray A B C Co Ltd Co td L ABC Co Ltd N OT E When copying to paper with printed logos User s Guide N OT E Basic Paper Loading Operations For paper drawer P 8 For multi purpose tray P 10 Co Ltd ...

Page 13: ...lopes with the front side face down For the loading orientation see the table below Multi Purpose Tray No 10 COM10 ISO C5 DL Monarch Multi Purpose Tray Envelope Preparation before Loading Envelopes 1 Take five or so pieces of envelopes fan them well to eliminate curls and level the stack flat Press the stack along the four side edges 2 To prevent the sealing edge of the seal flap from floating fro...

Page 14: ...loading envelopes in the multi purpose tray 1 Check the orientation of the stack of envelopes and load it in the multi purpose tray N OT E Basic Handling Operations for the Multi Purpose Tray P 10 2 3 4 Press OK Press Select the type of envelopes ...

Page 15: ...Multi purpose tray Solution The paper may have absorbed moisture Replace it with paper that has not absorbed moisture Perform gradation adjustment 1 Press 2 Press Adjustment Maintenance Adjust Image Quality Auto Adjust Gradation Follow the instructions in the screen to perform gradation adjustment For more information see the User s Guide Search 108A 0HS Adjusting Gradation User s Guide How to use...

Page 16: ...N Rotate the roller while cleaning 4 Close the feeder cover 5 Open the feeder and clean the upper side thin and long glass area using the supplied glass cleaning sheet Solution 6 Clean the lower side thin and long glass area using the supplied glass cleaning sheet 7 Close the feeder 8 Insert the power plug into the power outlet and turn the power ON N OT E If black streaks still appear after dirt ...

Page 17: ...observed with the original setting a lower background density can improve the problem giving a neat copy 1 Press 2 Select the function 3 Press Options 4 Press Example Fax 5 Press POINT To make a manual adjustment press Adjust and adjust the background density with and press OK 6 Press OK Solution ...

Page 18: ...am locations Use these buttons and bar to operate the video POINT The screen disappears once all the jammed paper is removed and all the machine s covers and drawers are closed correctly If you do not understand the remedy by referring to the screen See the User s Guide to make sure of the remedy Search 108A 0K0 Clearing Paper Jams User s Guide How to use the search number P 46 If Paper Jams Occur...

Page 19: ...ou forcibly remove the jammed paper torn scraps of paper may remain in the main unit or optional devices If paper tears check that there are no scraps of paper inside and try to remove all of the scraps Do not try to pull out the jammed paper forcibly Solution 3 Solution 4 Adjust the paper guides Adjust the guide exactly Multi purpose tray Check the paper feed If paper jams occur due to overlappin...

Page 20: ...or available paper see the following Search AVPP TBM Available Paper User s Guide How to use the search number P 46 Solution 1 Remove the excess amount of paper Make sure that the paper stack does not exceed the load limit line Load paper of the same size and same type in the same paper source You cannot load paper of different sizes or different types in one paper source Check the paper type sett...

Page 21: ...match the loaded paper change the setting For paper drawer P 8 For multi purpose tray P 10 For optional paper sources User s Guide Make sure that the original size and output paper size are correct 1 Check the original size and possible output sizes on the Printing Preferences screen of the printer driver 2 Load paper of the size matching the original size setting POINT To print on paper of a size...

Page 22: ...r for correct orientation and correct printing side The print side face up Multi Purpose Tray The print side face down N OT E For optional paper sources User s Guide 2 If the check result indicates that the paper is not loaded correctly reload the paper correctly Solution Make sure that the paper size setting matches the size of the loaded paper 1 Replace the loaded paper with paper of the size yo...

Page 23: ... direction 2 In the Printing Preferences screen of the driver set Orientation for the direction selected in step 1 3 While viewing the preview image make settings in the order of Page Layout Page Order 1 sided 2 sided Booklet Printing Binding Location POINT Page Order is only displayed when you set Page Layout to 2 on 1 or other option for printing multiple pages on one physical 2 3 Orientation Po...

Page 24: ... the registered information Example Address book POINT To check the connection after changing the registered information press Check Connection N OT E For more information P 25 To change registered information Solution To stop the paper feed 1 Press 2 Press Yes POINT You can also stop the paper feed by pressing To cancel the sending of scanned data 1 Press 2 Press 3 Select the document you want to...

Page 25: ... for the SMTP DNS server For the setting procedures see the User s Guide To specify the port number for SMTP TX POP RX 1 Press 2 Press Function Settings Send E Mail I Fax Settings Specify Port Number for SMTP TX POP RX 3 Specify the port number 4 Press OK Search 0YAS 017 Search 108A 00X Setting E mail I Fax Communication User s Guide Making DNS Settings User s Guide How to use the search number P ...

Page 26: ...e connected to the destination fax number no fax dial tone is heard There may be a problem with the destination or your telephone carrier Contact the destination If you cannot forward faxes Check the information of the forwarding destination registered to the address book one touch buttons If anything is wrong with the information correct it 1 Press 2 Press Dest Fwd Settings Register Destinations ...

Page 27: ... remedy using the error code Search 108A 0JY Countermeasures for Each Error Code User s Guide How to use the search number P 46 Solution 1 Solution 2 If you are using an optical line or IP telephone line Communication errors may occur depending on the line quality For more information contact your telephone carrier Reduce the fax transmission speed Reducing the fax transmission speed may result in...

Page 28: ... a copy job waiting to be output 4 Press 2 Select Copy from the drop down list 3 Select the copy job you want to cancel 1 Press 5 Press Yes For Windows OS 1 In the computer screen double click the printer icon 2 Select the file you want to cancel 3 Click 4 Select Cancel 5 Click Yes For Mac OS 1 In the computer screen click the printer icon on the Dock 2 Select the file you want to cancel 3 Click D...

Page 29: ...ion see the Driver Installation Guide The Guide can be downloaded from or viewed on the same page of the Canon website as for the printer driver Latest OS support information See the Canon website https global canon If a printer driver for this machine is already installed on your computer Depending on your system environment it is necessary to uninstall the old driver and install the new one For ...

Page 30: ... display Replace the consumable in question by referring to the screen 1 POINT Depending on the condition of the consumable a screen like the one shown under step 2 may appear first 2 Prepare the consumable Check the item number This is an item number identifying a Canon genuine consumables For high quality printouts we recommend that you use Canon genuine consumables N OT E List of Consumables P ...

Page 31: ...tridges in a cool place not exposed to direct sunlight A preferable environment is one where temperature is not higher than 30 C and humidity is not higher than 80 Be careful of counterfeit toners Please be aware that there are counterfeit Canon toners in the marketplace Use of counterfeit toner may result in poor print quality or machine performance Canon is not responsible for any malfunction ac...

Page 32: ...follow the procedure below to contact the service representative 1 Make a note of the code number displayed on the screen POINT Multiple code numbers may be displayed 2 Turn the machine OFF and disconnect the power plug from the power outlet 3 Contact the service representative CAUTION For any inquiries have the following information ready Product name Dealer where you purchased the machine Detail...

Page 33: ...e machine enters the limited functions mode When the problem is resolved the Call service representative message disappears in the screen at the bottom left Search 0YAS 0K0 A Message Saying to Contact a Local Authorized Canon Dealer Is Displayed User s Guide How to use the search number P 46 POINT When you select a restricted function in the limited functions mode the following screen appears Pres...

Page 34: ...llustrations assume that the machine is equipped with a High Capacity Cassette Feeding Unit D High Capacity Cassette Feeding Unit D Main Unit Paper size label P 8 8 5 11 8 5 11 Attach the paper size label so that it aligns with the cassette number indicator horizontally Separate by approx 1 4 5 mm Cassette number indicator 1 3 ...

Page 35: ...Main Unit 35 Power switch P 7 Multi purpose tray P 10 Tray extension Paper guides Paper guides Paper drawer P 8 ...

Page 36: ...ions 2 Settings Registration P 8 Press to specify settings or make a registration 3 Menu Customize the screen such as by rearranging buttons or creating shortcut keys 4 Energy Saver P 6 Press to put the machine into sleep mode 5 Log in Log out Press this to log in out when a login service has been set When logged in the user name of the currently logged in user is displayed 6 Home P 17 Press to di...

Page 37: ...ays a log for settings specified in Copy Scan and Send 8 Counter Device Information Press to display the copy and print count totals on the touch panel display 9 Stop P 24 Press to stop the current operation 10 Main Power indicator P 6 Lights when the power is turned ON 11 Error indicator Flashes or lights if there is an error in the machine When the Error indicator maintains a steady red light co...

Page 38: ...extended use or long production runs in poorly ventilated rooms To maintain a comfortable working environment it is recommended that the room where the machine operates be appropriately ventilated Also avoid locations where people would be exposed to emissions from the machine Do not install in a location where condensation occurs Water droplets condensation may form inside the machine when the ro...

Page 39: ...ctive housings and external covers the laser beam cannot escape from the machine during any phase of user operation Read the following remarks and instructions for safety Never open covers other than those instructed in the manuals for this machine If the laser beam should escape and enter your eyes exposure may cause damage to your eyes Make sure that the power supply for the machine is safe and ...

Page 40: ...mage Check the machine for rust dents scratches cracks or excessive heat generation Use of poorly maintained equipment may result in a fire or electrical shock CAUTION The inside of the machine has high temperature and high voltage components Touching these components may result in burns Do not touch any part of the machine that is not indicated in the manual When loading paper or removing jammed ...

Page 41: ...ers Checks Money Orders Food Stamps Certificates of Deposit Passports Postage Stamps canceled or uncanceled Immigration Papers Identifying Badges or Insignias Internal Revenue Stamps canceled or uncanceled Selective Service or Draft Papers Bonds or Other Certificates of Indebtedness Checks or Drafts Issued by Governmental Agencies Stock Certificates Motor Vehicle Licenses and Certificates of Title...

Page 42: ...eans of a certified connector assembly telephone extension cord The customer should be aware that compliance with the above conditions may not prevent deterioration of service in some situations The Ringer Equivalence Number REN indicates the maximum number of devices allowed to be connected to a telephone interface The termination of an interface may consist of any combination of devices subject ...

Page 43: ...l canon By using the PRODUCT you shall be deemed to have agreed to all applicable license conditions If you do not agree to these license conditions please contact your service representative ACCEPTANCE THE TERMS OF THIS THIRD PARTY SOFTWARE STATED HERE OR IN RELATED WARRANTY PROVISIONS SHALL BE DEEMED ACCEPTED UPON YOUR USE OF THE PRODUCT FOR ONE OR MORE OF ITS NORMAL PURPOSES IF THERE HAS BEEN N...

Page 44: ...on that you have an internet connection and internal network bandwidth available for the Canon Server to download files to each of the Products receiving the CDS Service Downloaded files may vary in size some will be on the order of several hundred MB The CDS Service Technology White Paper contains further details iii authorization by you for the Canon Seller to establish and perform during the pe...

Page 45: ...tion marks or serial numbers have been defaced removed or altered ANY SOFTWARE THAT IS DISTRIBUTED WITH THE PRODUCT AND HAS AN ASSOCIATED END USER AGREEMENT IS LICENSED WARRANTED AND PROVIDED ACCORDING TO THE TERMS OF THAT AGREEMENT INCLUDING ANY LIMITATIONS AND DISCLAIMERS THEREIN SUCH SOFTWARE IS SOLD WITHOUT WARRANTY OF ANY KIND BY CANON PLEASE CONTACT CANON IMMEDIATELY IF YOU HAVE NOT RECEIVED...

Page 46: ...ide describes all functions of the machine Search by Contents Search by Search Opening the User s Guide Display the online manual website https oip manual canon The wanted page appears in no time at all You can search through the User s Guide by the search number Search number Example Search ABCD 123 Setting the network environment User s Guide How to use the search number P 46 ...

Page 47: ...ñol Lea las Instrucciones de seguridad importantes antes de utilizar este producto P 82 Al acabar de leer esta guia guardela en un lugar seguro para futuras consultas La informacion de este documento puede ser modificada sin previo aviso https oip manual canon 47 ...

Page 48: ...empleando Leer y enviar 68 Detención del escaneado envío por fax 68 No se pueden enviar por correo electrónico los documentos escaneados 69 Si no puede enviar reenviar faxes 70 Si no puede recibir faxes 71 El equipo no funciona P 50 No se puede escanear enviar por fax correctamente Carga de papel en el casete 52 Si ha cargado un tipo de papel distinto del preestablecido 52 Carga de papel en la ban...

Page 49: ...cia 61 Los resultados de impresión no son satisfactorios P 59 No se puede cargar papel o configurar las opciones de papel correctamente Índice ilustrado P 78 Apéndice P 82 Podrá consultar la Guía de usuario 89 Si ve un número de búsqueda 89 Quiere saber más P 89 P 64 El papel no se alimenta 64 Si aparece el mensaje Cargue papel 65 No se puede imprimir en la cara prevista del papel 66 No se puede i...

Page 50: ...el enchufe Indicador Alimentación principal I ON Tenga en cuenta que el enchufe o la toma de corriente pueden tener una forma diferente en función de la región Compruebe 3 Está activado el modo de reposo Pulse la pantalla táctil para cancelar el modo de reposo Compruebe 2 Está bien conectado el equipo al ordenador Revise la conexión de red Buscar 108A 006 Configuración del entorno de red Guía de u...

Page 51: ...ruebe que el indicador de alimentación principal se ha apagado 3 Vuelva a pulsar el interruptor de alimentación Vuelva a instalar el controlador de impresora NOTA Para obtener más información P 73 Solución 1 Solución 2 El equipo no responde al ordenador Aparece la pantalla de autenticación pantalla de inicio de sesión y no se puede avanzar más Inicie una sesión en el equipo con un ID de un usuario...

Page 52: ...colocar el casete en el equipo ATENCIÓN Tenga cuidado de no pillarse los dedos entre el casete y el equipo NOTA Cuando cambie el tamaño de papel sustituya la etiqueta de tamaño de papel por otra según corresponda P 78 Si ha cargado un tipo de papel distinto del preestablecido recuerde cambiar el tipo de papel configurado en la mitad derecha de esta página 1 2 Pulse Preferencias Opciones de papel O...

Page 53: ...Aceptar 6 Pulse Aceptar Si ha cargado papel de tamaño personalizado Especifique el tamaño de papel manualmente Buscar 0YAS 02E Especificación del tamaño y tipo de papel en el casete Guía de usuario Cómo utilizar el número de búsqueda P 89 1 Seleccione el tipo de papel Buscar AVPP TBM Papel disponible Cómo utilizar el número de búsqueda P 89 Consulte aquí el papel disponible ...

Page 54: ...a NOTA Extraiga la extensión de la bandeja cuando cargue papel de tamaño grande 3 Airee perfectamente la pila de papel alinee los bordes sobre una superficie plana y cárguela Asegúrese de que no se supere esta línea La cara de impresión hacia abajo 4 Si el valor de tipo del papel no coincide con el papel que ha cargado Cambie el valor manualmente 1 2 3 Pulse Aceptar 2 Pulse 1 Seleccione el tamaño ...

Page 55: ...eda P 89 Impresión en el reverso de papel impreso 1 Cargue papel en la bandeja multiuso con la cara de impresión hacia abajo 2 En la pantalla de selección Tipo de papel pulse 2 ª cara hoja a doble cara ATENCIÓN Para esta operación solo se puede cargar papel en la bandeja multiuso NOTA Solo podrá utilizar papel que se haya imprimido con este equipo Buscar AVPP TBM Papel disponible Cómo utilizar el ...

Page 56: ...esos Ejemplo Cuando imprima en papel de tamaño LTR Orientación Resultado de impresión Casete Bandeja multiuso Co Ltd Casete Papel Logotipo C o t d L Bandeja multiuso A B C Co Ltd Co td L ABC Co Ltd NOTA Cuando copie en papel con logotipos impresos Guía de usuario NOTA Operaciones básicas de carga de papel Para el casete P 52 Para la bandeja multiuso P 54 Co Ltd ...

Page 57: ...sobres con la cara frontal hacia abajo Para ver la orientación en que se deben cargar consulte la tabla siguiente Bandeja multiuso N º 10 COM10 ISO C5 DL Monarch Bandeja multiuso Sobres Preparativos para cargar los sobres 1 Coja un taco de unos cinco sobres airéelo para eliminar las dobleces y aplánelo bien Presione los cuatro bordes del taco 2 Para evitar que el borde de cierre de la solapa se le...

Page 58: ...uando cargue sobres en la bandeja multiuso 1 Compruebe la orientación del taco de sobres y cárguelo en la bandeja multiuso NOTA Operaciones básicas de manejo de la bandeja multiuso P 54 2 3 4 Pulse Aceptar Pulse Seleccione el tipo de sobres ...

Page 59: ...e la guía exactamente Bandeja multiuso Solución El papel podría haber absorbido humedad Sustitúyalo por papel que no haya absorbido humedad Lleve a cabo un ajuste de la gradación 1 Pulse 2 Pulse Ajuste Mantenimiento Ajustar calidad de imagen Ajuste auto de gradación Siga las instrucciones de la pantalla para realizar el ajuste de la gradación Para obtener más información consulte la Guía de usuari...

Page 60: ...ierre la tapa del alimentador 5 Abra el alimentador y limpie la parte superior del área de cristal fina y alargada utilizando la hoja de limpieza del cristal suministrada Solución 6 Limpie la parte inferior del área de cristal fina y alargada utilizando la hoja de limpieza del cristal suministrada 7 Cierre el alimentador 8 Conecte el enchufe a la toma de corriente y encienda el equipo NOTA Si sigu...

Page 61: ...a en el reverso del original la configuración de una densidad de fondo inferior podría mejorar el problema y proporcionar una copia limpia 1 Pulse 2 Seleccione la función 3 Pulse Opciones 4 Pulse Ejemplo Fax 5 Pulse NOTA Para efectuar un ajuste manual pulse Ajustar y ajuste la densidad de fondo con y pulse Aceptar 6 Pulse Aceptar Solución ...

Page 62: ...s de papel Utilice estos botones y la barra para controlar el vídeo NOTA La pantalla desaparecerá cuando se retire todo el papel atascado y se cierren correctamente todas las tapas y los casetes del equipo Si no entiende el remedio consultando la pantalla Consulte la Guía de usuario para confirmar los detalles de la solución Buscar 108A 0K0 Eliminar atascos de papel Guía de usuario Cómo utilizar e...

Page 63: ... papel atascado a la fuerza el papel podría romperse y algún trozo podría quedarse en la unidad principal o en los dispositivos opcionales Si el papel se rasgara compruebe que no existan trozos de papel en el interior y procure retirar todos trozos no intente extraer el papel atascado a la fuerza Solución 3 Solución 4 Ajuste las guías del papel Ajuste la guía exactamente Bandeja multiuso Compruebe...

Page 64: ...uí el papel disponible Buscar AVPP TBM Papel disponible Guía de usuario Cómo utilizar el número de búsqueda P 89 Solución 1 Retire la cantidad sobrante de papel Asegúrese de que la pila de papel no exceda la línea de límite de carga Cargue papel del mismo tamaño y del mismo tipo en el mismo origen de papel No podrá cargar papel de distintos tamaños o distintos tipos en un origen de papel Compruebe...

Page 65: ...ión Para el casete P 52 Para la bandeja multiuso P 54 Para orígenes de papel opcionales Guía de usuario Asegúrese de que el tamaño del original y el tamaño del papel de impresión son correctos 1 Compruebe el tamaño del original y los posibles tamaños de impresión en la pantalla Preferencias de impresión del controlador de impresora 2 Cargue papel del mismo tamaño que la configuración de tamaño del...

Page 66: ...ón correctas La cara de impresión hacia arriba Bandeja multiuso La cara de impresión hacia abajo NOTA Para orígenes de papel opcionales Guía de usuario 2 Si el resultado de la comprobación indica que el papel no está bien cargado vuelva a cargarlo correctamente Solución Asegúrese de que el tamaño del papel configurado coincide con el tamaño del papel cargado 1 Sustituya el papel cargado por papel ...

Page 67: ...la Preferencias de impresión del controlador establezca Orientación en la dirección seleccionada en el paso 1 3 Mientras ve la imagen de vista preliminar configure las siguientes opciones en este orden Formato de página Orden de páginas Una cara Doble cara Impresión en cuadernillo Ubicación de la encuadernación NOTA Orden de páginas solo aparece cuando se establece Formato de página en 2 en 1 o en...

Page 68: ...ie la información registrada Ejemplo Libreta de direcciones NOTA Para comprobar la conexión tras cambiar la información registrada pulse Compruebe conexión NOTA Para obtener más información P 69 Para cambiar la información registrada Solución Para detener la alimentación de papel 1 Pulse 2 Pulse Sí NOTA También podrá detener la alimentación de papel pulsando Para cancelar el envío de datos escanea...

Page 69: ...P DNS Para ver los procedimientos de configuración consulte la Guía de usuario Para especificar el número de puerto para TX SMTP RX POP 1 Pulse 2 Pulse Opciones de funciones Envío Opciones de e mail I fax Especifique número de puerto para TX SMTP RX POP 3 Especifique el número de puerto 4 Pulse Aceptar Buscar 0YAS 017 Buscar 108A 00X Configurar la comunicación de correo electrónico I Fax Guía de u...

Page 70: ... al número de fax de destino no se oye ningún tono de marcación de fax Es posible que haya algún problema con el destino o la compañía telefónica Póngase en contacto con el destino Si no puede reenviar faxes Compruebe la información del destino de reenvío registrada en la libreta de direcciones botones de acceso directo Si la información es incorrecta corríjala 1 Pulse 2 Pulse Opciones dest reenv ...

Page 71: ...0JY Soluciones para los códigos de error Guía de usuario Cómo utilizar el número de búsqueda P 89 Solución 1 Solución 2 Si utiliza una línea de fibra óptica o de telefonía a través de IP Podrían producirse errores de comunicación en función de la calidad de la línea Para obtener más información póngase en contacto con su compañía telefónica Reduzca la velocidad de transmisión del fax Reducir la ve...

Page 72: ...un trabajo de copia a la espera de realizarse 4 Pulse 2 Seleccione Copia en la lista desplegable 3 Seleccione el trabajo de copia que desee cancelar 1 Pulse 5 Pulse Sí Para el SO Windows 1 En la pantalla del ordenador haga doble clic en el icono de la impresora 2 Seleccione el archivo que desee cancelar 3 Haga clic 4 Seleccione Cancelar 5 Haga clic en Sí Para Mac OS 1 En la pantalla del ordenador ...

Page 73: ...consulte la Guía de instalación del controlador Dicha guía puede descargarse de la misma página del sitio web de Canon que el controlador de impresora o bien consultarse allí Información más reciente de asistencia del SO Consulte el sitio web de Canon https global canon Si ya hay un controlador de impresora para este equipo instalado en su ordenador En función de su entorno de sistema podría ser p...

Page 74: ...cuestión consultando la pantalla 1 NOTA En función del estado del consumible podría aparecer primero una pantalla como la que se muestra en el paso 2 2 Prepare el consumible Compruebe el número de artículo Se trata de un número de artículo que identifica un consumible original de Canon Para conseguir una alta calidad de impresión se recomienda utilizar consumibles originales de Canon NOTA Lista de...

Page 75: ...co no expuesto a la luz solar directa Es preferible un entorno donde la temperatura no supere los 30 C y la humedad no pase del 80 Tenga cuidado con el tóner falsificado Le informamos que existe tóner Canon falsificado en el mercado El uso de tóner falsificado puede producir mala calidad de impresión o un funcionamiento deficiente de la máquina Canon no se hace responsable de posibles defectos de ...

Page 76: ...l siguiente procedimiento para ponerse en contacto con el servicio al cliente 1 Apunte el número de código que aparece en la pantalla NOTA Podrían aparecer varios números de código 2 Apague el equipo y desconecte el enchufe de la toma de corriente 3 Póngase en contacto con el representante del servicio técnico ATENCIÓN Para cualquier solicitud o pregunta tenga preparada la siguiente información No...

Page 77: ...asta que se resuelva el problema aparecerá en pantalla el mensaje Llame a un representante del servicio técnico en la esquina inferior izquierda de la pantalla Buscar 0YAS 0K0 Aparece un mensaje que le pide que se ponga en contacto con su distribuidor autorizado de Canon Guía de usuario Cómo utilizar el número de búsqueda P 89 NOTA Cuando seleccione una función restringida en el modo de funciones ...

Page 78: ... equipo está equipado con un Pedestal Cassette Alta Capacidad D Pedestal Cassette Alta Capacidad D Unidad principal Etiqueta de tamaño de papel P 52 8 5 11 8 5 11 Acople la etiqueta de tamaño de papel de modo que quede alineada con el indicador de número de casete horizontalmente Deje una separación de 1 4 5 mm aproximadamente Indicador de número del casete 1 3 ...

Page 79: ...Unidad principal 79 Interruptor de alimentación P 51 Bandeja multiuso P 54 Extensión de la bandeja Guías del papel Guías del papel Casete P 52 ...

Page 80: ...ar opciones o realizar un registro 3 Menú Personalice la pantalla por ejemplo reorganizando los botones o creando teclas de acceso directo 4 Ahorro de energía P 50 Pulse poner el equipo en el modo de reposo 5 Iniciar sesión Finalizar sesión Pulse para iniciar cerrar una sesión si se hubiera configurado un servicio de inicio de sesión Cuando se haya iniciado una sesión se mostrará el nombre de usua...

Page 81: ...o de las opciones especificadas en Copiar Leer y Enviar 8 Información de dispositivo contador Pulse para ver los recuentos totales de copia e impresión en la pantalla táctil 9 Detener P 68 Pulse para detener la operación actual 10 Indicador Alimentación principal P 50 Se ilumina si la alimentación está encendida 11 Indicador Error Parpadea o se ilumina si hay un error en el equipo Si el indicador ...

Page 82: ... Lugares que pudieran deformarse debido al peso del equipo o lugares en los que el equipo pudiera hundirse alfombras etc Evite los lugares con poca ventilación Este equipo genera una ligera cantidad de ozono y otras emisiones durante el uso normal Dichas emisiones no son perjudiciales para la salud No obstante podrían percibirse con mayor facilidad durante el uso prolongado del equipo o durante lo...

Page 83: ...Mantenga las manos y la ropa alejadas de los rodillos del área de salida Si sus manos o su ropa se quedaran atrapadas entre los rodillos podrían producirse lesiones personales La parte interna del equipo y la ranura de impresión se calientan mucho durante e inmediatamente después de su uso Evite tocar estas zonas para evitar quemaduras Asimismo el papel impreso podría estar caliente justo después ...

Page 84: ...nte un período de tiempo prolongado De otro modo podría sufrir quemaduras por baja temperatura incluso si no tocara la unidad de fijación y su entorno directamente IMPORTANTE Respete las instrucciones de precaución de las etiquetas y similares colocadas sobre el equipo No someta el equipo a golpes fuertes o vibraciones No abra ni cierre puertas tapas u otras piezas a la fuerza De otro modo podrían...

Page 85: ...This equipment complies with ISED radiation exposure limits set forth for an uncontrolled environment and meets RSS 102 of the ISED radio frequency RF Exposure rules as this equipment has very low levels of RF energy But it is desirable that it should be installed and operated keeping the radiator at least 20cm or more away from person s body Français French L émetteur récepteur exempt de licence ...

Page 86: ...izado para la reparación del equipo Si su equipo presentara fallos de funcionamiento póngase en contacto con el distribuidor autorizado local de Canon al que adquirió el equipo si estuviera bajo garantía o con quien tenga firmado un contrato de servicio técnico Si no está seguro acerca de con quién ponerse en contacto y ha adquirido y está utilizando el equipo en los EE UU consulte la página SUPPO...

Page 87: ...écopieur à un système téléphonique à poussoirs car la plupart de ces systèmes émettent des signaux d appel non normalisés ou des codes spéciaux qui risquent de perturber le fonctionnement du télécopieur C Condition d alimentation Raccordez le télécopieur à une prise de courant plus terre à trois branches du type simple ou double et qui ne sert pas à alimenter un copieur un appareil de chauffage un...

Page 88: ...otorgar sublicencias comercializar distribuir o transferir el SOFTWARE a ningún tercero sin el consentimiento previo por escrito de los titulares de los derechos del SOFTWARE 5 Sin perjuicio de lo anterior podrá transferir el SOFTWARE únicamente cuando a ceda todos sus derechos respecto al PRODUCTO y todos los derechos y obligaciones establecidos en las condiciones que rigen el SOFTWARE y el PRODU...

Page 89: ...as las funciones del equipo Búsqueda por Contenido Buscar por Búsqueda Apertura de la Guía de usuario Visualice el sitio web del manual en línea https oip manual canon La página deseada aparecerá enseguida Podrá buscar en la Guía de usuario con el número de búsqueda Número de búsqueda ejemplo Buscar ABCD 123 Configuración del entorno de red Guía de usuario Cómo utilizar el número de búsqueda P 46 ...

Page 90: ......

Page 91: ......

Page 92: ... 11747 U S A CANON CANADA INC 8000 Mississauga Road Brampton ON L6Y 5Z7 Canada CANON EUROPA N V Bovenkerkerweg 59 1185 XB Amstelveen The Netherlands See http www canon europe com for details on your regional dealer CANON AUSTRALIA PTY LTD Building A The Park Estate 5 Talavera Road Macquarie Park NSW 2113 Australia CANON SINGAPORE PTE LTD 1 Fusionopolis Place 15 10 Galaxis Singapore 138522 ...

Reviews: