background image

36

Co

nt

ro

l P

an

el

7

5

8 9

10

11

19

15

13

14

12

6

4

16

1

17

2

18

3

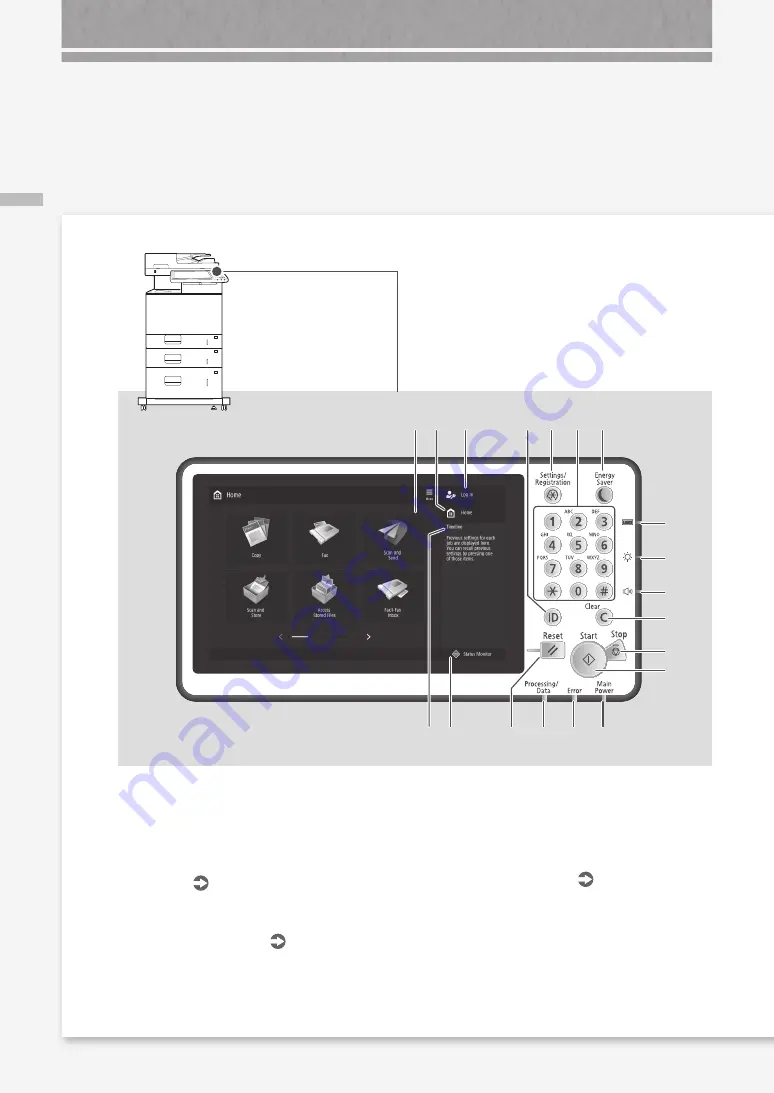
Illustrated Index

  1

  Login user name

The user name that is currently logged in is 
displayed.

  2

  [Home] 


P.17

Press to display the Home screen.

  3

  Touch panel display 


P.6

Displays the settings screen and messages. 
Touch the panel to perform setting and other 
operations.

  4

  [Timeline]

Displays a log for settings specified in Copy/
Scan and Send.

  5

  [Status Monitor] 


P.19

Press to check the status of a job or cancel a 
job.

  6

  Reset key

Press to cancel the settings and restore the 
previously specified settings.

Control Panel

Summary of Contents for imageRUNNER ADVANCE 525iF III

Page 1: ...What is Your Question FAQ Guide English P 3 Español P 49 ...

Page 2: ......

Page 3: ...fore operating this product P 38 After you finish reading this guide store it in a safe place for future reference The information in this document is subject to change without notice You can access https oip manual canon to read the User s Guide that describes all functions of this machine 3 ...

Page 4: ...n and Send 24 Stopping Scanning Faxing 24 Scanned Documents Cannot Be E Mailed 25 If You Cannot Send Forward Faxes 26 If You Cannot Receive Faxes 27 The Machine Does Not Operate P 6 Scan Fax Cannot Be Performed Successfully Loading Paper in the Paper Drawer 8 When You Have Loaded a Different Type of Paper than the Preset One 8 Loading Paper in the Multi Purpose Tray 10 Loading Paper with Printed L...

Page 5: ...tisfactory P 15 Loading Paper or Paper Settings Cannot Be Done Successfully Illustrated Index P 34 Appendix P 38 You Can Consult the User s Guide 47 If You Notice a Search Number 47 Do You Want to Know More P 47 P 20 Paper Is Not Fed 20 If the Load paper Message Is Displayed 21 Printing Cannot Be Performed on the Expected Side of Paper 22 Printing Cannot Be Performed with the Expected Size 22 In T...

Page 6: ... the main power ON check the power plug Main power indicator I ON Note that the power plug or outlet may be different in shape depending on the region Check 3 Is lit Press this to cancel the Sleep mode Check 2 Is the machine correctly connected to the computer Check the network connection 0YAS 006 Setting up the Network Environment User s Guide How to use the search number P 47 Check 4 The Machine...

Page 7: ...g to be processed 2 Check that the main power indicator has turned off 3 Press the power switch again Download the printer driver again N OT E For more information P 29 Solution 1 Solution 2 The Machine Does Not Respond to the Computer The Authentication Screen Logon Screen Is Displayed and You Cannot Go Further Log on to the machine using a registered user ID To continue the operation when the au...

Page 8: ...rint side face up 4 Place the paper drawer back into the machine CAUTION Be careful not to get your fingers caught between the paper drawer and the machine POINT When you have changed the paper size replace the paper size label with an appropriate one as necessary P 34 When you have loaded a different type of paper than the preset one be sure to change the paper type setting on the right half of t...

Page 9: ...te basis weight 2 Press OK 6 Press OK When you have loaded custom size paper Specify the paper size manually 0YAS 02E Specifying custom size paper User s Guide How to use the search number P 47 1 Select the paper type 0YAS 0KU Hardware Specifications How to use the search number P 47 For available paper see the following ...

Page 10: ...n when loading large sized paper 3 First fan the paper stack well align the edges on a flat surface and then load it Make sure that this line is not exceeded The print side face down 4 If the paper type setting does not match the paper you have loaded Change the setting manually 1 2 3 Press OK 2 Press 1 Select the paper size Press 1 Select the paper type 2 Press Loading Paper in the Multi Purpose ...

Page 11: ...ide of printed paper 1 Load paper in the multi purpose tray the print side face down 2 In the Paper Type selection screen press 2nd Side of 2 Sided Page CAUTION For this operation paper can only be loaded in the multi purpose tray POINT You can use only paper printed with this machine 0YAS 0KU Hardware Specifications How to use the search number P 47 For available paper see the following ...

Page 12: ...Example When printing on LTR size paper Orientation Printing result Paper Drawer Multi Purpose Tray Co Ltd Paper Drawer Paper Logo C o t d L Multi Purpose Tray A B C Co Ltd Co td L ABC Co Ltd N OT E When copying to paper with printed logos User s Guide N OT E Basic Paper Loading Operations For paper drawer P 8 For multi purpose tray P 10 Co Ltd ...

Page 13: ...the glued areas For the multi purpose tray load envelopes with the front side face down For the loading orientation see the table below Multi Purpose Tray No 10 COM10 ISO C5 DL Monarch Multi Purpose Tray Envelope Preparation before Loading Envelopes 1 Take five or so pieces of envelopes fan them well to eliminate curls and level the stack flat Press the stack along the four side edges 2 To prevent...

Page 14: ...loading envelopes in the multi purpose tray 1 Check the orientation of the stack of envelopes and load it in the multi purpose tray N OT E Basic Handling Operations for the Multi Purpose Tray P 10 2 3 4 Press OK Press Select the type of envelopes ...

Page 15: ...s 2 Press Adjustment Maintenance Adjust Image Quality Auto Adjust Gradation on the touch panel display Follow the instructions in the screen to perform gradation adjustment For more information see the User s Guide 0YAS 0HU Adjusting Gradation User s Guide How to use the search number P 47 Solution 1 Solution 2 Printing Results Are Not Satisfactory Images Are Shifted Slanted Adjust the paper guide...

Page 16: ...he roller while cleaning 4 Close the feeder cover 5 Open the feeder and clean the upper side white plate and thin and long glass area using the supplied glass cleaning sheet Solution 6 Clean the lower side white plate and thin and long glass area using the supplied glass cleaning sheet 7 Close the feeder 8 Insert the power plug into the power outlet and turn the power ON N OT E If black streaks st...

Page 17: ...17 Bleed through Occurs Bleed through Occurs Adjust a background density 1 Press 2 Select the function on the touch panel display 3 Press Options 4 Press Example Fax 5 Press 6 Press OK Solution ...

Page 18: ...er jam locations Use these buttons and bar to operate the video POINT The screen disappears once all the jammed paper is removed and all the machine s covers and drawers are closed correctly If you do not understand the remedy by referring to the screen See the User s Guide to make sure of the remedy 0YAS 0JF Clearing Paper Jams User s Guide How to use the search number P 47 If Paper Jams Occur ...

Page 19: ...u forcibly remove the jammed paper torn scraps of paper may remain in the main unit or optional devices If paper tears check that there are no scraps of paper inside and try to remove all of the scraps Do not try to pull out the jammed paper forcibly Solution 3 Solution 4 Adjust the paper guides Adjust the guide exactly Multi purpose tray Check the paper feed If paper jams occur due to overlapping...

Page 20: ...e For available paper see the following 0YAS 0KU Available paper User s Guide How to use the search number P 47 Solution 1 Remove the excess amount of paper Make sure that the paper stack does not exceed the load limit line Load paper of the same size and same type in the same paper source You cannot load paper of different sizes or different types in one paper source Check the paper type setting ...

Page 21: ...atch the loaded paper change the setting For paper drawer P 8 For multi purpose tray P 10 For optional paper sources User s Guide Make sure that the original size and output paper size are correct 1 Check the original size and possible output sizes on the Printing Preferences screen of the printer driver 2 Load paper of the size matching the original size setting POINT To print on paper of a size ...

Page 22: ...correct orientation and correct printing side Paper Drawer The print side face up Multi Purpose Tray The print side face down N OT E For optional paper sources User s Guide 2 If the check result indicates that the paper is not loaded correctly reload the paper correctly Solution Make sure that the paper size setting matches the size of the loaded paper 1 Replace the loaded paper with paper of the ...

Page 23: ... direction 2 In the Printing Preferences screen of the driver set Orientation for the direction selected in step 1 3 While viewing the preview image make settings in the order of Page Layout Page Order 1 sided 2 sided Booklet Printing Binding Location POINT Page Order is only displayed when you set Page Layout to 2 on 1 or other option for printing multiple pages on one physical 2 3 Orientation Po...

Page 24: ...ttons 1 Press 2 Press Dest Fwd Settings Register Destinations on the touch panel display 6 Press 4 Press 3 Select the destination 5 Change the registered information Example Address book POINT To check the connection after changing the registered information press Check Connection N OT E For more information P 25 Editing the address book one touch buttons Solution To stop the paper feed 1 Press 2 ...

Page 25: ...r the SMTP DNS server For the setting procedures see the User s Guide To specify the port number for SMTP TX POP RX 1 Press 2 On the touch panel display press Function Settings Send E Mail I Fax Settings Specify Port Number for SMTP TX POP RX 3 Specify the port number 4 Press OK 0YAS 017 0YAS 00X Setting E mail I Fax Communication User s Guide Making DNS Settings User s Guide How to use the search...

Page 26: ...if the machine cannot be connected to the destination fax number no fax dial tone is heard There may be a problem with the destination or your telephone carrier Contact the destination If you cannot forward faxes Check the information of the forwarding destination registered to the address book one touch buttons If anything is wrong with the information correct it 1 Press 2 Press Dest Fwd Settings...

Page 27: ... using the error code 0YAS 0K2 Countermeasures for Each Error Code User s Guide How to use the search number P 47 Solution 1 Solution 2 If you are using an optical line or IP telephone line Communication errors may occur depending on the line quality For more information contact your telephone carrier Reduce the fax transmission speed Reducing the fax transmission speed may result in a communicati...

Page 28: ...l To cancel a copy job waiting to be output 1 Press 4 Press 2 Select Copy from the drop down list 3 Select the copy job you want to cancel 5 Press Yes For Windows OS 1 In the computer screen double click the printer icon 2 Select the file you want to cancel 3 Click 4 Select Cancel 5 Click Yes For Mac OS 1 In the computer screen click the printer icon on the Dock 2 Select the file you want to cance...

Page 29: ...on see the Driver Installation Guide The Guide can be downloaded from or viewed on the same page of the Canon website as for the printer driver Latest OS support information See the Canon website https global canon If a printer driver for this machine is already installed on your computer Depending on your system environment it is necessary to uninstall the old driver and install the new one For t...

Page 30: ... the screen 1 Prepare the consumable Check the item name This is an item name identifying a Canon genuine consumables For high quality printouts we recommend that you use Canon genuine consumables N OT E List of Consumables P 31 To check the item name of a consumable in the normal operation screen 1 Press on the touch panel display 2 Check Consumables Others Check Consumables on the touch panel di...

Page 31: ... environment is one where temperature is not higher than 30 C and humidity is not higher than 80 Be careful of counterfeit toner cartridges Please be aware that there are counterfeit Canon toner cartridges in the marketplace Use of counterfeit toner cartridge may result in poor print quality or machine performance Canon is not responsible for any malfunction accident or damage caused by the use of...

Page 32: ...the procedure below to contact the service representative 1 Make a note of the code number displayed on the screen POINT Multiple code numbers may be displayed 2 Turn the machine OFF and disconnect the power plug from the power outlet 3 Contact the service representative CAUTION For any inquiries have the following information ready Product name Dealer where you purchased the machine Detailsofyour...

Page 33: ...he machine enters the limited functions mode When the problem is resolved the Call service representative message disappears in the screen at the bottom left POINT When you select a restricted function in the limited functions mode the following screen appears Press on the touch panel display to return to the Home and then select a different function 140K 04Y Functions available in the limited fun...

Page 34: ...ify the name of a part and find the page where that part is described Main Unit Paper size label P 8 Attach the paper size label so that it aligns with the cassette number indicator horizontally Separate by approx 1 4 5 mm Cassette number indicator 1 3 ...

Page 35: ...35 Main Unit Power switch P 7 Multi purpose tray P 10 Tray extension Paper guides Paper guides Paper drawer P 8 ...

Page 36: ... the Home screen 3 Touch panel display P 6 Displays the settings screen and messages Touch the panel to perform setting and other operations 4 Timeline Displays a log for settings specified in Copy Scan and Send 5 Status Monitor P 19 Press to check the status of a job or cancel a job 6 Reset key Press to cancel the settings and restore the previously specified settings Control Panel ...

Page 37: ...his to start an operation or data reading 11 Stop key P 24 Press to stop the current operation 12 Clear key Press to clear the entered values or characters 13 Volume Settings key Press to adjust the sound volume 14 Brightness Adjustment key Adjusts the brightness of the screen 15 Counter Device Information key Press to display the copy and print count totals on the touch panel display 16 Energy Sa...

Page 38: ...extended use or long production runs in poorly ventilated rooms To maintain a comfortable working environment it is recommended that the room where the machine operates be appropriately ventilated Also avoid locations where people would be exposed to emissions from the machine Do not install in a location where condensation occurs Water droplets condensation may form inside the machine when the ro...

Page 39: ...side the product is completely confined within protective housings and external covers the laser beam cannot escape from the machine during any phase of user operation Read the following remarks and instructions for safety Never open covers other than those instructed in the manuals for this machine If the laser beam should escape and enter your eyes exposure may cause damage to your eyes Use of c...

Page 40: ...sement or near swimming pool 2 Avoid using a telephone during an electrical storm There may be remote risk of electric shock form lightning 3 Do not use the telephone to report a gas leak in the vicinity of the leak Notice Product Name Safety regulations require the product s name to be registered In some regions where this product is sold the following name s in parentheses may be registered inst...

Page 41: ...r with whom you have a servicing contract If you are not sure who to contact and have both purchased and are using the equipment in the U S A please refer to the SUPPORT page on Canon U S A s Web site http www usa canon com Rights of the Telephone Company 715iFZ III 715iF III 615iFZ III 615iF III 525iFZ III 525iF III causes harm to the telephone network the telephone company may temporarily discon...

Page 42: ...à L installation d un Télécopieur Canon NOTE La fonction de Fax est disponible uniquement lorsqu une carte FAX est installee A Emplacement Prévoir une table un meuble ou un bureau suffisamment solide et de taille appropriée voir Spécifications dans le guide de l utilisateur pour les indications de poids et dimensions B Installation téléphonique 1 Une seule ligne téléphonique tonalités ou impulsion...

Page 43: ...bled but it interacts with the iWR Plug in program of imageWARE Enterprise Management Console EMC software then Canon USA Canon Canada or their respective authorized independent Canon retail dealers can access Product meter readings and receive notifications of certain service errors automatically via the internet You can read more about iWR in Canon published materials available from your dealer ...

Page 44: ... CDS Server may rely on internet addresses you assign to Products and that using the internet has benefits but also certain risks ACCORDINGLY YOU AGREE THAT THE CDS SERVICE IS PROVIDED WITHOUT WARRANTY OF ANY KIND THAT ANY WARRANTIES ARE DISCLAIMED AND THAT NO CANON SELLER OR CANON AFFILIATE IS RESPONSIBLE FOR ANY INJURY TO YOUR NETWORK OR TO DATA OR DEVICES NOT SUPPLIED BY A CANON SELLER You will...

Page 45: ...e original identification marks or serial numbers have been defaced removed or altered ANY SOFTWARE THAT IS DISTRIBUTED WITH THE PRODUCT AND HAS AN ASSOCIATED END USER AGREEMENT IS LICENSED WARRANTED AND PROVIDED ACCORDING TO THE TERMS OF THAT AGREEMENT INCLUDING ANY LIMITATIONS AND DISCLAIMERS THEREIN SUCH SOFTWARE IS SOLD WITHOUT WARRANTY OF ANY KIND BY CANON PLEASE CONTACT CANON IMMEDIATELY IF ...

Page 46: ......

Page 47: ...at all You can search through the User s Guide by the search number If you notice a search number in a topic in this guide you are reading Search number Example ABCD 123 Setting the network environment User s Guide How to use the search number P 47 Opening the User s Guide 1 Display the online manual website https oip manual canon 2 Select the appropriate user s guide imageRUNNER ADVANCE Black Whi...

Page 48: ......

Page 49: ...ntes de utilizar este producto P 84 Al acabar de leer esta guía guárdela en un lugar seguro para futuras consultas La información de este documento puede ser modificada sin previo aviso En https oip manual canon tiene a su disposición la Guía de usuario en la que se describen todas las funciones de este equipo 49 ...

Page 50: ...vidor empleando Leer y enviar 70 Parar de escanear enviar por fax 70 No se pueden enviar por correo electrónico los documentos escaneados 71 Si no puede enviar reenviar faxes 72 Si no puede recibir faxes 73 El equipo no funciona P 52 Nosehapodidoescanear enviarporfaxcorrectamente Carga de papel en el casete 54 Si ha cargado un tipo de papel distinto del preestablecido 54 Carga de papel en la bande...

Page 51: ... 63 Losresultadosdeimpresión nosonsatisfactorios P 61 No se puede cargar papel o configurar las opciones de papel correctamente Índice ilustrado P 80 Apéndice P 84 Puede consultar la Guía de usuario 90 Si ve un número de búsqueda 90 Quiere saber más P 90 P 66 El papel no entra en el equipo 66 Si aparece el mensaje Cargue papel 67 No se puede imprimir en la cara prevista del papel 68 No se puede im...

Page 52: ...incipal compruebe el enchufe Indicador de alimentación principal I ON Tenga en cuenta que el enchufe o la toma de corriente pueden tener formas diferentes dependiendo de la región Compruebe 3 Está encendido Púlselo para cancelar el modo de reposo Compruebe 2 Está bien conectado el equipo al ordenador Revise la conexión de red Buscar 0YAS 006 Configuración del entorno de red Guía de usuario Cómouti...

Page 53: ...cesados 2 Compruebe si el indicador de alimentación principal se ha apagado 3 Vuelva a pulsar el interruptor de alimentación Vuelva a descargarse el controlador de impresora NOTA Para obtener más información P 75 Solución 1 Solución 2 El equipo no responde al ordenador Aparecelapantalladeautenticación pantalladeiniciodesesión ynose puedeavanzarmás Inicie sesión en el equipo con un ID de un usuario...

Page 54: ...ón hacia arriba 4 Vuelva a colocar el casete en el equipo ATENCIÓN Tenga cuidado de no pillarse los dedos entre el casete y el equipo PUNTO Cuando cambie el tamaño de papel sustituya la etiqueta de tamaño de papel por otra según corresponda P 80 Si ha cargado un tipo de papel distinto del preestablecido recuerde cambiar el tipo de papel configurado en la mitad derecha de esta página 1 2 Pulse Pref...

Page 55: ...ulse Aceptar Si ha cargado papel de tamaño personalizado Especifique el tamaño de papel manualmente Buscar 0YAS 02E Especificar el papel de tamaño personalizado Guía de usuario Cómoutilizarelnúmerodebúsqueda P 90 1 Seleccione eltipode papel Buscar 0YAS 0KU Especificaciones de hardware Cómo utilizar el número de búsqueda P 90 Consulte aquí el papel disponible ...

Page 56: ...apel de gran tamaño 3 Primero ventile bien la pila de papel alinee los bordes sobre una superficie plana y a continuación cárguela Asegúrese de no superar esta línea La cara de impresión hacia abajo 4 Si el tipo del papel configurado no coincide con el papel que ha cargado Cambie la configuración manualmente 1 2 3 Pulse Aceptar 2 Pulse 1 Seleccione el tamaño de papel Pulse 1 Seleccione el tipo de ...

Page 57: ...de papel impreso 1 Cargue papel en la bandeja multiuso con la cara de impresión hacia abajo 2 En la pantalla de selección Tipo de papel pulse 2 ª cara hoja a doble cara ATENCIÓN Para esta operación solo se puede cargar papel en la bandeja multiuso PUNTO Solo puede utilizar papel impreso con este equipo Buscar 0YAS 0KU Especificaciones de hardware Cómo utilizar el número de búsqueda P 90 Consulte a...

Page 58: ... impresos Ejemplo Al imprimir en papel de tamaño LTR Orientación Resultado de impresión Casete Bandeja multiuso C o t d L Bandeja multiuso A B C Co Ltd Co Ltd Co td L ABC Co Ltd NOTA Al copiar en papel con logotipos impresos Guía de usuario NOTA Operaciones básicas de carga de papel En el casete P 54 En la bandeja multiuso P 56 Co Ltd Casete Papel Logotipo ...

Page 59: ...los sobres con el anverso hacia arriba y en la bandeja multiuso cárguelos con el anverso hacia abajo Consulte en la tabla siguiente la orientación en que deben ser cargados Bandeja multiuso N º 10 COM10 ISO C5 DL Monarch Bandeja multiuso Sobres Preparativos para cargar los sobres 1 Coja un taco de unos cinco sobres airéelo para eliminar las dobleces y aplánelo bien Presione los cuatro bordes del t...

Page 60: ...Al cargar sobres en la bandeja multiuso 1 Compruebe la orientación del taco de sobres y cárguelo en la bandeja multiuso NOTA Operaciones básicas de manejo de la bandeja multiuso P 56 2 3 4 Pulse Aceptar Pulse Seleccione el tipo de sobre ...

Page 61: ...as imágenes Las imágenes tienen poca intensidad El papel puede haber absorbido humedad Sustitúyalo por papel que no haya absorbido humedad Realice el ajuste de gradación 1 Pulse 2 Pulse Ajuste Mantenimiento Ajustar calidad de imagen Ajuste auto de gradación en la pantalla táctil Siga las instrucciones de la pantalla para realizar el ajuste de la gradación Para obtener más información consulte la G...

Page 62: ...imentador y limpie la placa blanca de la parte superior y el área de cristal estrecha y alargada usando la hoja de limpieza del cristal que acompaña al equipo Solución 6 Limpie la placa blanca de la parte inferior y el área de cristal estrecha y alargada usando la hoja de limpieza del cristal que acompaña al equipo 7 Cierre el alimentador 8 Conecte el enchufe a la toma de corriente y encienda el e...

Page 63: ...a tinta traspasa el papel La tinta traspasa el papel Ajuste la densidad del fondo 1 Pulse 2 Seleccione la función en la pantalla táctil 3 Pulse Opciones 4 Pulse Ejemplo Fax 5 Pulse 6 Pulse Aceptar Solución ...

Page 64: ... atascos de papel Utilice estos botones y la barra para controlar el vídeo PUNTO La pantalla desaparece cuando el papel atascado se retira y se cierran correctamente todas las tapas y casetes del equipo Si no entiende la solución consultando la pantalla Consulte la Guía de usuario para confirmar los detalles de la solución Buscar 0YAS 0JF Eliminar atascos de papel Guía de usuario Cómoutilizarelnúm...

Page 65: ...papel Si intenta retirar el papel atascado a la fuerza el papel puede romperse y algún trozo puede quedarse en el equipo Acceda a todos los puntos donde se ha atascado el papel y retire los posibles trozos de papel existentes No trate de sacar el papel atascado a la fuerza Solución 3 Solución 4 Ajuste las guías del papel Ajuste la guía exactamente Bandeja multiuso Compruebe la alimentación del pap...

Page 66: ...aquí el papel disponible Buscar 0YAS 0KU Papel disponible Guía de usuario Cómoutilizarelnúmerodebúsqueda P 90 Solución 1 Retire la cantidad sobrante de papel Asegúrese de que la pila de papel no excede la línea de límite de carga Cargue papel del mismo tamaño y del mismo tipo en el mismo origen de papel No puede cargar papel de distintos tamaños o distintos tipos en un origen de papel Compruebe la...

Page 67: ...asete P 54 En la bandeja multiuso P 56 En orígenes de papel opcionales Guía de usuario 1 Pulse Asegúrese de que el tamaño del original y el tamaño del papel de impresión son correctos 1 Compruebe el tamaño del original y los tamaños de impresión posibles en la pantalla Preferencias de impresión del controlador de impresora 2 Cargue papel del mismo tamaño que la configuración de tamaño del original...

Page 68: ...Bandeja multiuso La cara de impresión hacia abajo NOTA En orígenes de papel opcionales Guía de usuario 2 Si el resultado de la comprobación indica que el papel no está bien cargado vuelva a cargarlo correctamente Solución Asegúrese de que el tamaño del papel configurado coincide con el tamaño del papel cargado 1 Sustituya el papel cargado por papel del tamaño que desee imprimir PUNTO Si desea impr...

Page 69: ...ntalla Preferencias de impresión del controlador establezca Orientación en la dirección seleccionada en el paso 1 3 Al ver la imagen de vista preliminar configure las opciones en este orden Formato de página Orden de páginas Una cara Doble cara Impresión en cuadernillo Ubicación de la encuadernación PUNTO Orden de páginas solo aparece cuando se establece Diseño de página en 2 en 1 o en otra opción...

Page 70: ...e acceso directo 1 Pulse 2 Pulse Opciones dest reenv Guardar destinos en la pantalla táctil 6 Pulse 4 Pulse 3 Seleccione el destino 5 Cambie la información registrada Ejemplo Libreta de direcciones PUNTO Para comprobar la conexión tras cambiar la información registrada pulse Compruebe conexión NOTA Para obtener más información P 71 Editar la libreta de direcciones los botones de acceso directo Sol...

Page 71: ...NS Para ver los procedimientos de configuración consulte la Guía de usuario Para especificar el número de puerto para SMTP TX POP RX 1 Pulse 2 En la pantalla táctil pulse Opciones de funciones Enviar Opciones de e mail I fax Especifique número de puerto paraTX SMTP RX POP 3 Especificar el número de puerto 4 Pulse Aceptar Buscar 0YAS 017 Buscar 0YAS 00X Configurar la comunicación de correo electrón...

Page 72: ...el equipo no puede conectarse al número de fax de destino no se oye ningún tono de marcación de fax Es posible que haya algún problema con el destino o la compañía telefónica Póngase en contacto con el destino Si no puede reenviar faxes Compruebe la información del destino de reenvío registrada en la libreta de direcciones botones de acceso directo Si la información es incorrecta corríjala 1 Pulse...

Page 73: ...es para los códigos de error Guía de usuario Cómoutilizarelnúmerodebúsqueda P 90 Solución 1 Solución 2 Si utiliza una línea de fibra óptica o de telefonía a través de IP Pueden producirse errores de comunicación en función de la calidad de la línea Para obtener más información póngase en contacto con su compañía telefónica Reduzca la velocidad de transmisión del fax Reducir la velocidad de transmi...

Page 74: ...bajo de copia a la espera de realizarse 1 Pulse 4 Pulse 2 Seleccione Copia en la lista desplegable 3 Seleccione el trabajo de copia que desea cancelar 5 Pulse Sí Para el SO Windows 1 En la pantalla del ordenador haga doble clic en el icono de la impresora 2 Seleccione el archivo que desee cancelar 3 Haga clic en 4 Seleccione Cancelar 5 Haga clic en Sí Para el SO Mac 1 En la pantalla del ordenador ...

Page 75: ...la Guía de instalación del controlador Dicha guía puede descargarse de la misma página del sitio web de Canon que el controlador de impresora o bien consultarse allí Información más reciente de asistencia del SO Consulte el sitio web de Canon https global canon Si ya hay un controlador de impresora para este equipo instalado en su ordenador En función de su entorno de sistema puede ser preciso des...

Page 76: ...l número de artículo Se trata de un número de artículo que identifica un consumible original de Canon Para conseguir una alta calidad de impresión se recomienda utilizar consumibles originales de Canon NOTA Lista de consumibles P 77 Para consultar el número de artículo de un consumible en la pantalla de operación normal 1 Pulse en la pantalla táctil 2 Compruebe Consumibl Otros Revisar consumibles ...

Page 77: ...ble un entorno donde la temperatura no supere los 30 C y la humedad no pase del 80 Tenga cuidado con los cartuchos de tóner falsificados Le informamos que existen cartuchos de tóner Canon falsificados en el mercado El uso de cartuchos de tóner falsificados puede producir mala calidad de impresión o un funcionamiento deficiente de la máquina Canon no se hace responsable de posibles defectos de func...

Page 78: ...para ponerse en contacto con el representante del servicio técnico 1 Apunte el número de código que aparece en la pantalla PUNTO Pueden aparecer varios números de código 2 Apague el equipo y desconecte el enchufe de la toma de corriente 3 Póngase en contacto con el representante del servicio técnico ATENCIÓN Para cualquier solicitud o pregunta tenga preparada la siguiente información Nombre del pr...

Page 79: ...l modo de funciones limitadas Cuando se haya solucionado el problema desaparecerá de la pantalla el mensaje Llame al servicio técnico en la esquina inferior izquierda PUNTO Al seleccionar una función restringida en el modo de funciones limitadas aparecerá la pantalla siguiente Pulse en el panel de control para volver al Inicio y seleccione una función distinta Buscar 140K 04Y Funciones disponibles...

Page 80: ... buscar la página donde se describe Unidad principal Coloque la etiqueta de tamaño de papel de tal forma que quede alineada en horizontal con el indicador de número del casete Deje una separación de 1 4 5 mm aproximadamente Indicador de número del casete 1 3 Etiqueta de tamaño de papel P 54 ...

Page 81: ...81 Unidad principal Extensión de la bandeja Guías del papel Interruptor de alimentación P 53 Bandeja multiuso P 56 Guías del papel Casete P 54 ...

Page 82: ...3 Pantalla táctil P 52 Muestra la pantalla de opciones y mensajes Toque el panel para configurar opciones y otras operaciones 4 Cronograma Muestra un registro de las opciones especificadas en Copiar Leer y enviar 5 Monitor estado P 65 Púlselo para consultar el estado de un trabajo o cancelar un trabajo 6 Tecla Reiniciar Pulse aquí para cancelar las opciones y restaurar las opciones que se habían e...

Page 83: ...P 52 Se enciende si la alimentación está encendida 10 Tecla Inicio Púlselo para iniciar una operación o lectura de datos 11 Tecla Detener P 70 Púlselo para detener la operación actual 12 Tecla Borrar Púlselo para borrar los valores o caracteres introducidos 13 Tecla de ajuste del volumen Púlselo para ajustar el volumen del sonido 14 Tecla de ajuste de luminosidad Ajusta el brillo de la pantalla 15...

Page 84: ...fombras etc Evite los lugares con poca ventilación Este equipo genera una pequeña cantidad de ozono y otras emisiones durante el uso normal que no son perjudiciales para la salud No obstante podrían ser percibidas durante el uso prolongado o durante los ciclos de producción largos en salas mal ventiladas Para que el entorno de trabajo sea cómodo se recomienda que la sala en la que vaya a utilizars...

Page 85: ...oducto láser de clase 1 según las normas IEC60825 1 2014 y EN60825 1 2014 CLASS 1 LASER PRODUCT LASER KLASSE 1 APPAREIL À LASER DE CLASSE 1 APPARECCHIO LASER DI CLASSE 1 PRODUCTO LÁSER DE CLASE 1 APARELHO A LASER DE CLASSE 1 LUOKAN 1 LASER TUOTE LASERPRODUKT KLASS 1 El haz de láser puede ser perjudicial para el cuerpo humano Como la radiación que emite el aparato está completamente confinada bajo ...

Page 86: ...Si el tóner entrara en contacto con la piel o la ropa lávelas de inmediato con agua No utilice agua caliente ya que el tóner podría fijarse y dejar una mancha permanente No desmonte el cartucho de tóner ya que puede dispersarse el tóner e introducirse en los ojos o en la boca Si le cae tóner en los ojos o en la boca lávese inmediatamente con agua fría y consulte rápidamente a un médico Si se sale ...

Page 87: ...ondicionado las máquinas de escribir eléctricas las fotocopiadoras y otras máquinas de este tipo generan ruido eléctrico que a menudo interfiere con los equipos de comunicaciones que envían y reciben documentos Conexión del equipo Este equipo es conforme a la Parte 68 de la normativa de la FCC y los requisitos adoptados por la ACTA En el panel posterior de este equipo existe una etiqueta que conti...

Page 88: ...ranch eXchange Centralita sin Llamada en espera con su unidad de fax No se recomiendan los sistemas telefónicos de teclas ya que estos envían señales no estándar a teléfonos individuales para códigos de llamada y especiales lo que podría provocar un error del fax C Requisitos de alimentación La toma de corriente deberá ser un receptáculo de tres dientes con toma de tierra sencilla o doble Deberá s...

Page 89: ... El uso y la distribución de dichos módulos de software incluidas las actualizaciones de los mismos en conjunto el SOFTWARE están sujetos a las condiciones de licencia que se presentan a continuación 1 Usted acepta cumplir todas las leyes restricciones o normativas aplicables relativas al control de las exportaciones de los países implicados en caso de que este PRODUCTO que contiene el SOFTWARE se...

Page 90: ... búsqueda Si ve un número de búsqueda en un tema de esta guía que está leyendo Abrir la Guía de usuario 1 Entre en el sitio web de manuales en línea https oip manual canon 2 Seleccione la guía de usuario correspondiente imageRUNNER ADVANCE Blanco y negro Seleccione este equipo Búsqueda por Contenido Buscar por Búsqueda Número de búsqueda Ejemplo Buscar ABCD 123 Configurar el entorno de red Guía de...

Page 91: ......

Page 92: ... The Netherlands See http www canon europe com for details on your regional dealer CANON AUSTRALIA PTY LTD Building A The Park Estate 5 Talavera Road Macquarie Park NSW 2113 Australia CANON CHINA CO LTD 2F Jinbao Building No 89 Jinbao Street Dongcheng District Beijing 100005 China CANON SINGAPORE PTE LTD 1 Fusionopolis Place 15 10 Galaxis Singapore 138522 FT6 2265 010 XXXXXXXXXX Copyright CANON IN...

Reviews: