background image

10

7

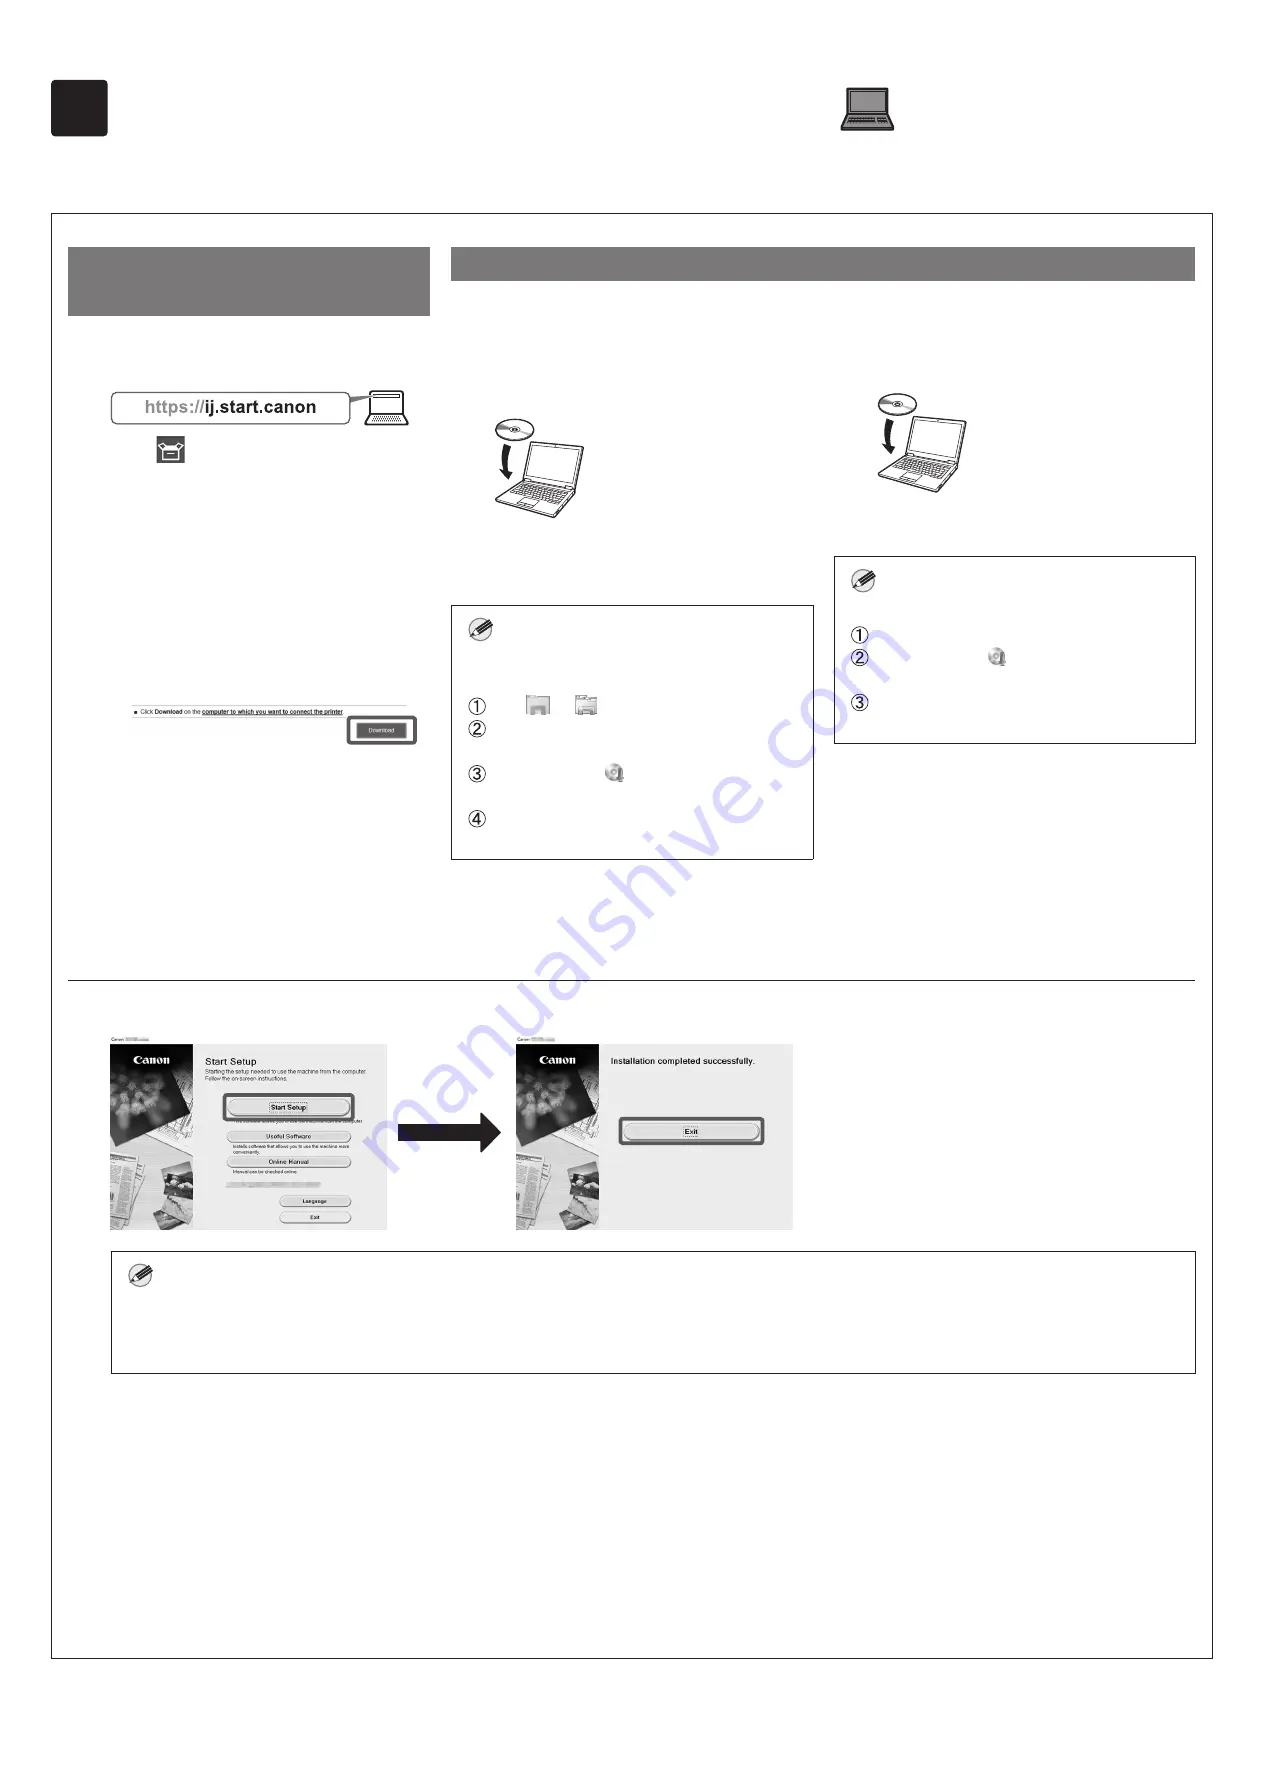
  Installing the Software on Your Computer 

The printer connection settings and software installation are performed using a computer. You can download the setup file from our website. If you are using a 
Windows PC, you can also run the file from the CD-ROM.

Downloading from the website

(Windows/Macintosh)

Go to the Canon website on your 

computer.

Click 


Set Up

. Perform the 

remaining operations by following 

the instructions on the screen.

Click 

Download

 to download the 

setup file and then run the file.

● 

If a warning screen about 

downloading appears, select 

Do not 

block

Allow

, etc. and then proceed 

to the next step.

Booting up from the included CD-ROM 

(Windows)

  If you are using Windows 10 or 

Windows 8.1

Insert the setup CD-ROM into the 

computer.

Click the popup message for the 

disk drive and click 

Run Msetup4.

exe

 on the screen that is displayed.

 Note

If the message does not appear (or has 
disappeared)

   Click 

 or 


File Explorer

 on the taskbar.

   Click 

This PC

 on the left side of the window 

that opens.

  Double-click the 

 CD-ROM icon on the 

right side of the window.

  If the contents of the CD-ROM appear, 

double-click 

Msetup4.exe

.

If the 

User Account Control

 dialog 

box appears, click 

Yes

 and proceed 

to the next step.

  If you are using Windows 7

Insert the setup CD-ROM into the 

computer.

When the 

AutoPlay

 screen appears, 

click 

Run Msetup4.exe

.

 Note

If the 

AutoPlay

 screen does not appear

   Click 

Computer

 from the start menu.

  Double-click the 

 CD-ROM icon in the right 

side of the window that opens.

  If the contents of the CD-ROM appear, 

double-click 

Msetup4.exe

.

If the 

User Account Control

 dialog 

box appears, click 

Yes

 and proceed 

to the next step.

Click 

Start Setup

. Configure the settings by following the instructions on the screen.

 Note

● 

A screen for selecting the printer connection method may be displayed in the middle of configuring the settings. If this happens, select the method 
you selected on p. 9 and then click 

Next

 and continue with the rest of the settings.

● 

Connect the USB cable to the proper location by following the instructions on the screen.

Summary of Contents for imagePROGRAF TA-30

Page 1: ...ervez ce manuel pour toute consultation ult rieure De plus afin de vous assurer que ce produit est utilis en toute s curit lisez galement le Guide rapide manuel distinct FRAN AIS Guia de configura o L...

Page 2: ...the Method of Connecting to Your Computer Page 9 7 Installing the Software on Your Computer Page 10 Loading Paper Page 11 For Best Print Quality Page 11 Printing From a Smartphone or Tablet Page 11 D...

Page 3: ...lation consisting of the five color of C M Y MBK and BK Note that 2 MBK ink tanks are included 3 Only included in regions where it is included as standard Note that it may be packaged in a separate bo...

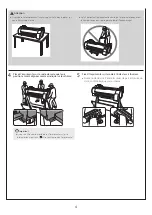
Page 4: ...ge if the printer is dropped When lifting the TA 20 with 2 people do not use the carrying handles B at the rear side This is dangerous and may cause injury and damage if the printer is dropped B A A U...

Page 5: ...ge the printer 4 Place the printer on the stand such that their positions are aligned as shown in the diagram Important If you are not using a stand place the printer in the installation location and...

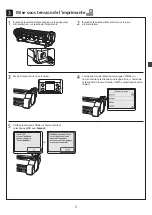
Page 6: ...r 2 Connect the power cord to the power outlet 3 Turn on the printer 4 When the language selection screen appears on the touch screen select a language Then if the screen for selecting a time zone app...

Page 7: ...shake the ink tanks may result in reduced print quality because ink ingredients have settled on the bottom of the tank 4 Open the pouch and remove the ink tank Important Never touch the ink holes or m...

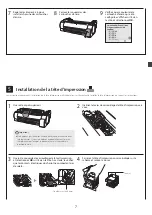
Page 8: ...it will return to its original position 2 Tilt the print head lock lever towards you 3 Open the print head locking cover and select OK on the touch screen At this time check that there is no dirt on t...

Page 9: ...me in Do not reattach the protective caps after removing them Furthermore dispose of them according to local regulations 6 Align the print head so that the area enclosed by a circle in the diagram is...

Page 10: ...ppears 2 Use the LAN cable to connect the wired LAN connector on the side of the printer to the hub port 3 Select OK and proceed to Installing the Software on Your Computer p 10 Wi Fi connection 1 Sel...

Page 11: ...er on the taskbar Click This PC on the left side of the window that opens Double click the CD ROM icon on the right side of the window If the contents of the CD ROM appear double click Msetup4 exe 3 I...

Page 12: ...er and the issue may be easily resolved Common messages and the causes are listed here with corrective actions For details on other messages refer to the Online Manual Message Cause Corrective Action...

Page 13: ...Memo...

Page 14: ...7 6 S lection de la m thode de connexion votre ordinateur Page 9 7 Installation du logiciel sur votre ordinateur Page 10 Chargement du papier Page 11 Pour une qualit d impression optimale Page 11 Imp...

Page 15: ...q couleurs de C M Y MBK et BK Veuillez noter que 2 cartouches d encre MBK sont fournies 3 Fournies uniquement dans les r gions o elles sont incluses en standard Veuillez noter qu elles peuvent tre emb...

Page 16: ...ante si vous la laissez tomber Lorsque vous soulevez le TA 20 2 personnes n utilisez pas les poign es de transport B situ es l arri re Ceci est dangereux et peut causer des blessures et des dommages s...

Page 17: ...pourrait l endommager 4 Placez l imprimante sur le socle de sorte que leurs positions soient align es comme indiqu sur le sch ma Important Si vous n utilisez pas de socle posez l imprimante sur le sit...

Page 18: ...le cordon d alimentation sur la prise d alimentation 3 Mettez l imprimante sous tension 4 Lorsque l cran de s lection de langue s affiche sur l cran tactile s lectionnez une langue Puis si l cran de s...

Page 19: ...re pourrait r duire la qualit d impression car les ingr dients de l encre seraient d pos s en bas de la cartouche 4 Ouvrez la pochette et sortez en la cartouche d encre Important Ne touchez jamais les...

Page 20: ...a position initiale 2 Inclinez le levier de verrouillage de t te d impression vers vous 3 Ouvrez le couvercle de verrouillage de t te d impression et s lectionnez OK sur l cran tactile ce stade le v r...

Page 21: ...es de protection apr s les avoir enlev es En outre mettez les au rebut conform ment aux r glementations locales 6 Alignez la t te d impression de sorte que la zone d limit e par un cercle sur le sch m...

Page 22: ...au pour raccorder le connecteur du r seau c bl au port du concentrateur sur le c t de l imprimante 3 S lectionnez OK et passez Installation du logiciel sur votre ordinateur p 10 Connexion au Wi Fi 1 S...

Page 23: ...s dans la barre de t ches Cliquez sur Ce PC gauche de la fen tre qui s ouvre Double cliquez sur l ic ne CD ROM droite de la fen tre Si le contenu du CD ROM s affiche double cliquez sur Msetup4 exe 3 S...

Page 24: ...nte et que le probl me puisse tre r solu facilement Les messages courants et les causes sont r pertori s ici avec les actions correctives Pour plus de d tails sur les autres messages reportez vous au...

Page 25: ...Note...

Page 26: ...seu computador P gina 9 7 Instala o do software no seu computador P gina 10 Carregamento do papel P gina 11 Para qualidade de impress o ideal P gina 11 Impress o de um smartphone ou tablet P gina 11...

Page 27: ...BK Perceba que est o inclusos 2 cartuchos de tinta MBK 3 Incluso apenas em regi es em que acompanha de f brica Perceba que al m disso pode estar embrulhado em uma caixa separada dependendo da regi o...

Page 28: ...se a impressora cair Ao levantar o TA 20 em 2 pessoas n o use as al as de transporte B na parte de tr s Isso perigoso e pode oferecer risco de ferimentos e danos se a impressora cair B A A A quantida...

Page 29: ...e danificar a impressora 4 Coloque a impressora no suporte de forma que suas posi es estejam alinhadas como ilustrado no diagrama Importante Se n o estiver usando um suporte coloque a impressora no lo...

Page 30: ...Conecte o cabo de alimenta o tomada 3 Ligar a impressora 4 Quando aparecer a tela para sele o do idioma na tela sens vel ao toque selecione um idioma Ent o se aparecer a tela para sele o do fuso hor r...

Page 31: ...artuchos de tinta n o agitados previamente podem resultar em qualidade de impress o reduzida pois os ingredientes da tinta se acumulam no fundo do cartucho 4 Abra o compartimento e remova o cartucho d...

Page 32: ...o original 2 Incline a alavanca de bloqueio da cabe a de impress o em dire o a si 3 Abra a tampa de fixa o da cabe a de impress o e selecione OK na tela sens vel ao toque Neste momento verifique se n...

Page 33: ...remov las Al m disso descarte estes materiais de acordo com a legisla o local 6 Alinhe a cabe a de impress o para que a rea circulada no diagrama esteja voltada em sua dire o e com cuidado empurre a c...

Page 34: ...ocalizado na lateral da impressora porta hub 3 Selecione OK e prossiga para Instala o do software no seu computador p 10 Conex o Wi Fi Wi Fi connection 1 Selecione Conex o Wi Fi Wi Fi connection Verif...

Page 35: ...fas Clique em Este PC This PC no lado esquerdo da janela que abre Clique duas vezes no cone CD ROM no lado direito da janela Se o conte do do CD ROM aparecer clique duas vezes em Msetup4 exe 3 Se apar...

Page 36: ...ode ser facilmente resolvida As mensagens mais comuns e suas causas s o listadas aqui com suas respectivas a es corretivas Para obter detalhes sobre outras mensagens consulte o Manual On line Mensagem...

Page 37: ...Notas...

Page 38: ...6 Selecci n del m todo de conexi n a su ordenador P gina 9 7 Instalaci n del software en su ordenador P gina 10 Carga del papel P gina 11 Para la mejor calidad de impresi n P gina 11 Impresi n desde u...

Page 39: ...ue se incluyen 2 dep sitos de tinta MBK 3 Se incluye nicamente en aquellas regiones en las que se ofrece de manera est ndar Tenga presente que podr a incluirse en una caja aparte dependiendo de la reg...

Page 40: ...TA 20 con 2 personas no use los asideros de elevaci n B de la parte posterior Esto es peligroso y podr a causar lesiones y da os si la impresora cae B A A Use la cantidad de personas que se indica a...

Page 41: ...Coloque la impresora en el soporte de manera tal que sus posiciones est n alineadas tal como se observa en el diagrama Importante Si no est utilizando un soporte coloque la impresora en el lugar de in...

Page 42: ...e de alimentaci n al tomacorriente 3 Encienda la impresora 4 Al aparecer la pantalla de selecci n de idioma en la pantalla t ctil seleccione un idioma Despu s si aparece la pantalla para seleccionar u...

Page 43: ...os dep sitos de tinta puede resultar en la reducci n de la calidad de impresi n debido a que los ingredientes est n sedimentados en el fondo del dep sito 4 Abra la bolsa y extraiga el dep sito de tint...

Page 44: ...riginal 2 Incline la palanca de bloqueo del cabezal de impresi n hacia usted 3 Abra la cubierta de bloqueo del cabezal de impresi n y seleccione OK en la pantalla t ctil En ese momento compruebe que n...

Page 45: ...as despu s de retirarlas Adem s desc rtelas de acuerdo con las normativas locales 6 Alinee el cabezal de impresi n de manera que el rea encerrada en un c rculo en el diagrama est frente a usted y con...

Page 46: ...e LAN cableada en el lado de la impresora al puerto hub 3 Seleccione OK y contin e con Instalaci n del software en su ordenador p 10 Conexi n Wi Fi Wi Fi connection 1 Seleccione Conexi n Wi Fi Wi Fi c...

Page 47: ...ipo This PC en el lado izquierdo de la ventana que se abre Haga doble clic en el icono del CD ROM en el lado derecho de la ventana Si aparece el contenido del CD ROM haga doble clic en Msetup4 exe 3 S...

Page 48: ...o indique un problema con la impresora y que la incidencia pueda resolverse f cilmente Los mensajes y las causas m s comunes se muestran a continuaci n junto con las acciones correctivas Para m s info...

Page 49: ...Notas...

Reviews: