background image

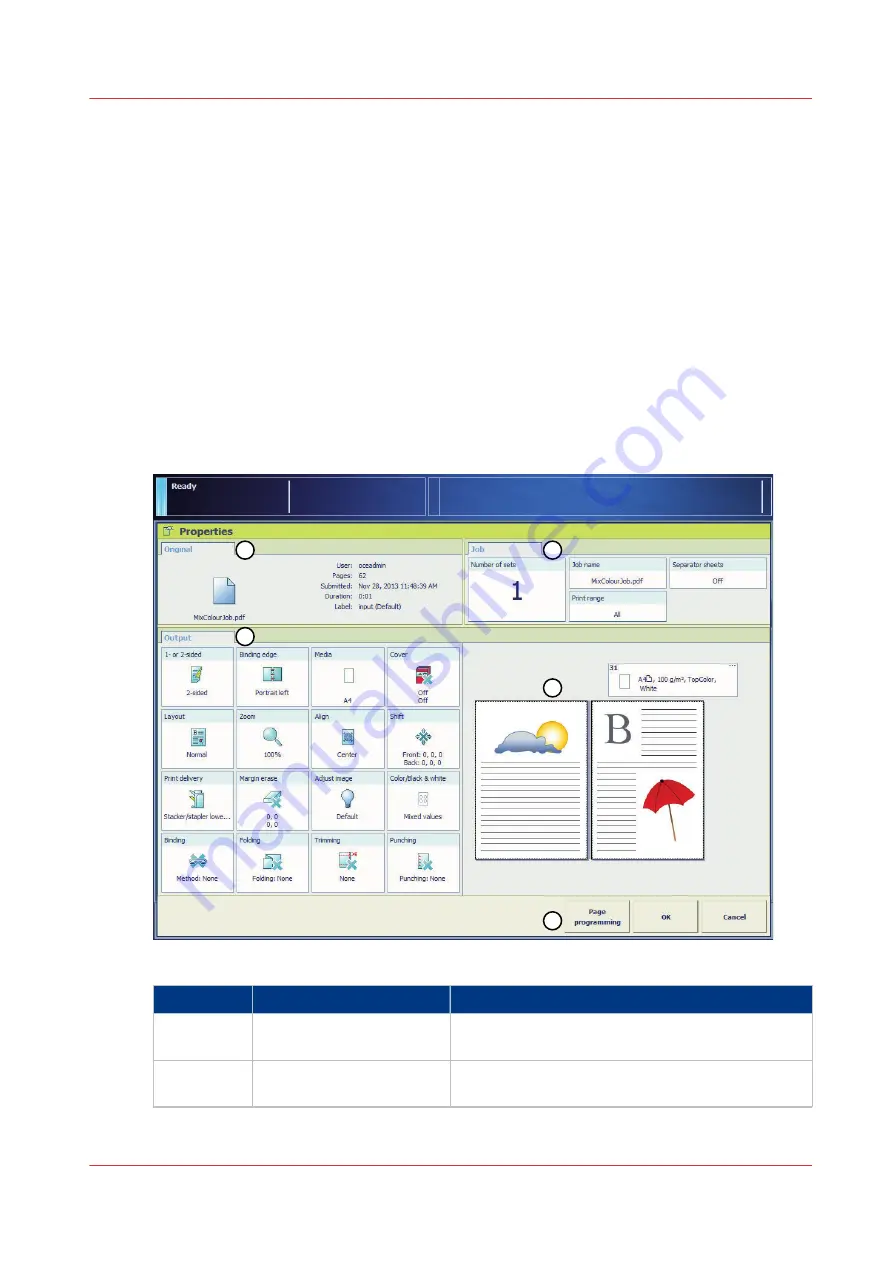
Description of the print job settings

Introduction

With the [Properties] button you view and partly change the job settings of the jobs in the
following queues.
• [Waiting jobs]
• [Scheduled jobs]

You 

cannot

 change the settings of an active job.

• [Printed jobs] (view settings only)

You can partly define the following settings for the jobs in the list of [Waiting jobs] and the list of
[Scheduled jobs].
• The characteristics of the output
• Generic settings that apply to the whole job.

Illustration

1

2

3

4

5

[54] The job properties

Number

Pane

Description

1

[Original]

The [Original] pane shows the settings you can de-
fine for the paper originals

2

[Output]

The [Output] pane shows the generic settings you
can define for the whole job

4

Description of the print job settings

Chapter 8 - Carry out print jobs

157

Summary of Contents for imagePRESS C7011VPS series

Page 1: ...imagePRESS C7011VPS series C7010VPS series Operation guide ...

Page 2: ...served No part of this work may be reproduced copied adapted or transmitted in any form or by any means without written permission from Océ Océ makes no representation or warranties with respect to the contents hereof and specifically disclaims any implied warranties of merchantability or fitness for any particular purpose Furthermore Océ reserves the right to revise this publication and to make c...

Page 3: ...3 Power information 41 The power buttons and power modes 42 Turn on the system 44 Turn off the system 45 Restart the system 46 Chapter 4 Operating concept 47 Operating concept 48 Access the Settings Editor 51 Maintain the Media catalog 53 Maintain the Media families 55 Maintain colors settings with the Settings Editor 56 Maintain the Color presets 56 Maintain the Input profiles 58 Maintain the Out...

Page 4: ...Perform a curl correction 104 Perform a media registration 105 Handle media 107 Load the media into the paper tray 107 Adjust the paper tray to hold a different media size 113 Load the media into the bulk media module optional 117 Adjust the media size for the bulk media module optional 122 Adjust the outer size change plate of the bulk paper module optional 129 Load the media into the special fee...

Page 5: ... workflows access through the Settings Editor 198 Introduction to automated workflows 198 Add an automated workflow 199 Edit an automated workflow 200 Delete an automated workflow 201 Restore the factory default workflow 202 Hotfolders 203 Introduction to hotfolders 203 Activate the hotfolder function 204 Create a hotfolder 205 Create a shared network folder on a workstation 206 Create a hotfolder...

Page 6: ...e the address list file ral csv 263 Use the scan profiles file sjt csv 264 Scan your documents 270 Description of the scan job settings 270 Scan to file 277 Scan to email 278 Scan to USB 279 Scan to DocBox 280 Scan to SMB 281 Create templates to use for recurring jobs 282 Combine subsets into one file 283 Optimize the scan quality 284 Chapter 11 Use the DocBox optional 287 The DocBox function 288 ...

Page 7: ...ean the roller main unit 344 Clean the wire 345 Clean the automatic document feeder rollers 346 Refresh the fixing roller 347 Engine maintenance trained operators 348 Remote Service 349 Reset the day counters 350 Find the meter readings counters 351 Print the billing counters report 352 Ensure high print quality 353 About calibration 353 Calibrate the printer 355 Calibrate a media family 356 Apply...

Page 8: ...Contents 8 ...

Page 9: ...Chapter 1 Preface ...

Page 10: ...t match PANTONE identified standards Consult current PANTONE Color Publications for accurate color PANTONE and other Pantone Inc trademarks are the property of Pantone Inc Pantone Inc 2007 Pantone Inc is the copyright owner of color data and or software which are licensed to insert name of your company to distribute for use only in combination with insert appropriate name of Licensed Materials PAN...

Page 11: ...rved c Copyright 1992 1993 The Regents of the University of California All rights reserved This code is derived from software contributed to Berkeley by Ralph Campbell d 1 4 University of California Berkeley Copyright 1990 The Regents of the University of California All rights reserved 2 4 David M Gay at AT T The author of this software is David M Gay Copyright 1991 by AT T 3 4 Sun Microsystems Co...

Page 12: ...e attention getters Word Icon Indicates WARNING Indicates a warning concerning operations that may lead to death or injury to persons if not performed correctly To use the machine safely always pay at tention to these warnings CAUTION Indicates a caution concerning operations that may lead to injury to persons if not performed correctly To use the machine safely always pay attention to these cauti...

Page 13: ...t Windows Vista operating system Microsoft Windows 7 operating system Microsoft Windows Server 2008 Microsoft Windows operating system Novell NetWare Apple Macintosh Apple Mac Windows 2000 Windows 2000 Professional Windows 2000 Server Windows Server 2003 Windows XP Windows XP Professional Windows Vista Windows 7 Windows Server 2008 Windows NetWare Macintosh Mac Abbreviations used in this manual Ch...

Page 14: ...owing information is available Operating information Operating information for finishers Operator s Maintenance Manual English only Safety Instructions for the printer Safety Information for the controller Material Safety Data Sheets Available documentation 14 Chapter 1 Preface ...

Page 15: ...Chapter 2 Main parts ...

Page 16: ...cheduling of the jobs Furthermore the operator panel helps you to solve errors 2 Operator attention light The operator attention light enables you to check the status of the system from a distance 3 Color scanner and original cover Color Image Reader H1 and Platen Cover Type K Optional The color scanner is used to copy and scan black white and colored originals The original cover holds down the or...

Page 17: ...t hand paper module POD Deck A1 The additional paper module has paper trays that contain the media that will be printed 10 Right hand paper module Secondary POD Deck A1 You can add a secondary paper module to increase the media input capacity 11 Bulk paper module Paper Deck AC1 The bulk paper module contains the me dia that will be printed The bulk paper module contains 1 media type 12 Special fee...

Page 18: ...dge of a booklet 16 Two knife trimmer Two Knife Booklet Trimmer A1 The two knife trimmer trims the short edges of a booklet 17 Puncher Professional Puncher B1 and Professional Puncher Integration Unit C1 The Professional Puncher B1 punches several types of holes The Professional Puncher Integration Unit C1 reverses the paper punched by the Professional Puncher B1 The following items are not applic...

Page 19: ...nit Press to the I side to turn the power ON 3 Imaging unit Marking Engine Gives access to the imaging unit to clear paper jams 4 Open buttons Press to open the paper tray when you need to load paper or check for a paper jam 5 Integrated paper trays Contain the media that will be printed 6 Fusing unit Fixing Station Gives access to the fusing unit to clear pa per jams 7 Power cord Supplies the pow...

Page 20: ...roller Compensates paper skewing or disper sion of side edge 5 Test button Rear Located on the back side of the Power supply unit Press this button to periodi cally test the circuit breaker 6 Breaker Rear Located on the back side of the Power supply unit Detects excess current or leakage current 7 LAN Port Rear Located on the side of the Power supply unit This port supports 100 10BASE T The LAN po...

Page 21: ...bly 2 Secondary fixing assembly Fixes toner securely for some paper types Pull out the secondary Fixing Sta tion to clear a paper jam inside the as sembly 3 Waste toner container tray Pull out this tray to replace waste toner container 4 Reverse unit Reverses paper and returns it to the Mark ing Engine for two sided printing Pull out the delivery reverse unit to clear a paper jam inside the unit 5...

Page 22: ...ay Receives detected double sheets to avoid paper jams 3 Main power switch POD Deck A1 and Secondary POD Deck A1 Press to the I side to turn ON the paper module 4 Open button Press to open the paper tray when you need to load paper or check for a paper jam 5 Horizontal pass cover Gives access to jammed paper 6 Front right cover Gives access to jammed paper 7 Paper trays Contains the media that wil...

Page 23: ...ou to check the amount of paper remaining in the paper tray Total capacity Total capacity including the external paper modules Paper modules Total number of sheets Internal paper trays only 2 000 sheets With 1 external paper module 6 000 sheets With 2 external paper modules 10 000 sheets Total capacity including the bulk paper module Paper modules Total number of sheets Internal paper trays only 2...

Page 24: ...ards 2 Handle Grip this handle to install the tab feeding attachment in the paper trays 3 Location fix frame Embed the location fix frame in the hole of the lifter to fix the tab feeding attach ment to the paper deck 4 Paper size change screw Use this screw to change the tab paper size to A4 or LTR Related information Load tabs via the tab feeder optional on page 138 The tab feeder optional 24 Cha...

Page 25: ...ecial feeder Component Function 1 Slide guides Enables you to match the size of the pa per 2 Auxiliary tray Enables you to guide paper with large sizes NOTE Feed coated paper one sheet at a time Loading several sheets together may cause paper jams Not available in combination with external paper module The special feeder optional Chapter 2 Main parts 25 ...

Page 26: ... placed in the original supply tray 3 Original supply tray Place originals face up here for automatic document feeding 4 Original output tray Receives scanned originals in the order that they are fed 5 SADF tray Single Automatic Document Feeder Tray To feed heavy or lightweight originals one by one face down 6 Slide guides Adjust the slide guides to match the width of the original 7 ADF Access Han...

Page 27: ...ptional ADF or Platen Cover Type K is required IMPORTANT When you use the glass plate to copy or scan thick originals such as books or magazines do not press down hard on the feeder or glass plate cover Color scanner optional 1 Component Function 1 Glass plate Scan bound originals such as books and magazines heavy or lightweight origi nals and transparencies The color scanner optional Chapter 2 Ma...

Page 28: ...rator panel The components of the operator panel Component Function 1 Sleep mode key Depending on whether the printer is currently ac tive or in the sleep mode Put the machine into the sleep mode or Wake up the machine from the sleep mode Shut down the printer and controller 2 Stop key Stop the printer After a set or As soon as possible 3 Paper tray key Get immediate and always access to the Trays...

Page 29: ...pe which is available in one of the paper trays 8 System button Access System view to do the following for exam ple Check the status of the toner staples and other supplies Read the counters Start maintenance Set up the preferred workflows Change a number of default system settings Adjust the brightness and contrast of the LCD panel View the content of the Media catalog or add temporary media to t...

Page 30: ...chine reaches the warning time The warning time is a time you can set to determine when the orange light must illuminate You can set the warning time in the System view of the operator panel By factory default the warning time is set to 10 minutes So 10 minutes before operator attention is required the orange light will illuminate Green The machine is busy printing The machine can print longer tha...

Page 31: ... will stop soon for example because more paper is required Operator attention is required soon The orange light illuminates when the machine reaches the warn ing time The warning time is a time you can set to determine when the orange light must illuminate You can set the warning time in the System section of the operator panel By factory default the warning time is set to 10 minutes So 10 mi nute...

Page 32: ...s High Capacity Stacker G1 High Capacity Stacker F1 High Capacity Stacker C1 Booklet Trimmer D1 Two Knife Booklet Trimmer A1 Perfect Binder B1 The Finisher AJ1 Saddle Finisher AJ2 Puncher Unit BB1 Document Insertion Unit C1 is described in this manual Finishing options 32 Chapter 2 Main parts ...

Page 33: ...eft hand side and Finisher AJ1 right hand side Main parts Component Function 1 Main power switch Press to the I side to turn on the stacker stapler 2 Top cover Open the top cover to clear a paper jam inside the unit 3 Front cover Open the front cover to replace the staple cartridge remove jammed paper or clear a staple jam in the stapler unit and saddle stitcher unit 4 Booklet tray Saddle Finisher...

Page 34: ... 1 Punch waste tray Pull out the punch waste tray to remove punch waste 2 Staple waste tray Pull out the staple waste tray to discard the staple waste Finishing options IMPORTANT Do not place anything other than output paper in the trays of the finisher as doing so may damage the trays Do not place anything under the trays of the finisher as doing so may damage the trays The stacker stapler option...

Page 35: ...rs when a finisher is attached as this may result in personal injury Stapling IMPORTANT During stapling the output trays move downward as the stack of paper that is output increases in quantity and thickness Once an output tray has reached its stacking limit or after 100 sets of prints have been output printing and stapling stop temporarily Remove all of the stapled prints from the output tray and...

Page 36: ...ddle Finisher AJ2 is attached The maximum number of sheets that can be saddle stitched differs depending on the paper weight and type When using plain paper 80 g m 22 lb bond 25 sheets of paper 100 pages can be saddle stitched at once When using coated paper 80 g m 22 lb bond 15 sheets of paper 60 pages can be saddle stitched at once The paper sizes that can be saddle stitched are 330 2 mm x 482 6...

Page 37: ...Folding without stitching Folding folds multiple sheets in 2 folds 5 4 3 2 1 1 12 Originals at the left hand side copies at the right hand side The paper is saddle folded with a maximum of 5 sheets IMPORTANT Saddle folding is available only if the Saddle Finisher AJ2 is attached The paper is saddle folded with a maximum of 5 sheets 80 g m and then output The sizes of paper that can be used with sa...

Page 38: ...tray Lower tray Booklet tray 11 x 17 LGL LTR LTRR EXEC Custom size 139 7 mm x 182 mm to 330 2 mm x 487 7 mm 1 2 1 Only the custom size 7 1 8 x 7 1 8 to 13 x 19 13 64 182 mm x 182 mm to 330 2 mm x 487 7 mm can be output 2 Only the custom size 8 1 4 x 11 to 13 x 19 13 64 210 mm x 279 4 mm to 330 2 mm x 487 7 mm can be output NOTE The Booklet Tray can only be used when the Saddle Finisher AJ2 is atta...

Page 39: ...sories 13 Staple N1 a case that holds staples for stapling 14 Staple P1 a case that holds staples for saddle stitching The stacker stapler optional inserter and optional integrated punch unit Chapter 2 Main parts 39 ...

Page 40: ...Puncher B1 works with the main power switch of the Professional Puncher Integration Unit C1 automatically 15 Power switch of Professional Puncher B1 IMPORTANT If the main power switch of the Professional Puncher B1is turned to the O side turn it to the I side before turning ON the main power switch of the Professional Puncher Integration Unit C1 Illustration I side side a b 16 Professional Puncher...

Page 41: ...Chapter 3 Power information ...

Page 42: ...ing settings in the Settings Editor under Preferences System settings Energy save modes The power modes Power mode Operator panel Description Off Off The printer and the controller are completely off There is no power consumption The printer cannot receive or print any job Ready On The printer is ready to print jobs Low power mode Off The low power mode is an energy save mode To use the low power ...

Page 43: ...y default 40 minutes The printer wakes up when You press the Sleep button on the operator panel or A wake up timer expires or A job arrives in the list of Scheduled jobs provided that the Automatic wake up enabled setting in the Settings Editor is set to Yes Press the Sleep button at the right hand side of the op erator panel to put the printer into the sleep mode man ually The printer goes into t...

Page 44: ...Procedure 1 Turn on the optional equipment 2 Put the main power switch on top of the main unit in the I position 3 Use one of the following options to turn on the controller Press the Sleep button at the right hand side of the operator panel if the system was shut down from the operator panel Press the on off button of the controller The controller needs some time to start up Turn on the system 44...

Page 45: ...l displays the message Are you sure you want to shut down 2 Press Yes A message indicates when the shut down will begin The shut down can take a maximum of 60 minutes IMPORTANT Using the Shut down now option can damage the printer Use the Shut down now option only to turn the printer off and on within 10 minutes When the shut down is complete the operator panel will be off 3 Turn off the optional ...

Page 46: ...Settings Editor under Support Troubleshooting or via the printer operator panel Procedure 1 Touch System Setup Shut down system The operator panel displays the message Are you sure you want to shut down 2 Press Restart Restart the system 46 Chapter 3 Power information ...

Page 47: ...Chapter 4 Operating concept ...

Page 48: ...oduction printing are clearly separated steps in the workflow Media definition is done by choosing from a media catalog instead of selecting trays Operation is intuitive and convenient at all workflow steps The workflow is entirely integrated because all components work together seamlessly Illustration 18 The components of the complete system Operating concept 48 Chapter 4 Operating concept ...

Page 49: ...er print job Send print jobs to the printer 3 PRISMAprepare Optional software Document preparation and job submission Document preparation with full preview for produc tion printing Define settings per page for complex print jobs Send print jobs to the printer Send print jobs to the PostScript printers in the net work 4 PRISMAaccess Optional software Workflow management for production environments...

Page 50: ...jobs Define and handle scan jobs Manage media from the Trays view Change the media that is currently assigned to a pa per tray Assign the media to the paper tray Manage the system from the System view Calibrate the system Perform maintenance tasks Set default workflow and printer settings View the media catalog add temporary media and perform media registration 8 imagePRESS C7011VPS C7010VPS serie...

Page 51: ...setting Be aware that not all tabs are searched Before you begin Make sure you have the following information The IP address or hostname of the controller The key operator password to change all settings except for the settings in the Configuration tab The system administrator password to change all settings including the settings in the Configuration tab Procedure 1 Open the Internet browser 2 At...

Page 52: ...u can now use the Settings Editor to make changes in the above listed areas For more information read the short Help and tool tips in the Settings Editor Access the Settings Editor 52 Chapter 4 Operating concept ...

Page 53: ...avigation bar select the Media tab 2 From the Media tab select Media The Media catalog window appears 19 The Media catalog window 3 From the toolbar select the required option to maintain the Media catalog NOTE When you add change or import new media make sure that you enter the correct values for the following options Weight Media family Surface type The correct values are required for optimal pr...

Page 54: ... 20 The Add new media window Maintain the Media catalog 54 Chapter 4 Operating concept ...

Page 55: ...ly has one output profile for the following halftones Normal Fine Error diffusion Before you begin Make sure you have the following information Key operator password Procedure 1 From the navigation bar select the Media tab 2 From the Media tab select Media family The Media families window appears 21 The Media families window 3 From the toolbar select the required option to maintain the Media famil...

Page 56: ...Microsoft Office documents Microsoft Office documents use the RGB color space Photographic content default to print documents from photo editing or layout applications These documents use the CMYK color space A color expert can create more color pre sets The color pre sets appear in the printer driver and in PRISMAprepare optional software Procedure 1 From the navigation bar select the Color tab 2...

Page 57: ... 24 The Add color preset window Maintain the Color presets Chapter 4 Operating concept 57 ...

Page 58: ...ofile is used to define colors in a device independent way Procedure 1 From the navigation bar select the Color tab 2 From the Color tab select Input profiles The Input profiles window appears 25 The Input profiles window 3 From the toolbar select the required option to maintain the input profiles Maintain the Input profiles 58 Chapter 4 Operating concept ...

Page 59: ...file is used to define colors in a device independent way Procedure 1 From the navigation bar select the Color tab 2 From the Color tab select Output profiles The Output profiles window appears 26 The Output profiles window 3 From the toolbar select the required option to maintain the output profiles Maintain the Output profiles Chapter 4 Operating concept 59 ...

Page 60: ...dure 1 From the navigation bar select the Color tab 2 From the Color tab select Spot color libraries The Spot color libraries window appears 27 The Spot color libraries window 3 From the toolbar select the required option to exchange the spot color libraries Exchange the Spot color libraries optional 60 Chapter 4 Operating concept ...

Page 61: ...f the equipment used to produce the color Procedure 1 From the navigation bar select the Color tab 2 From the Color tab select Spot colors The Spot colors window appears 28 The Spot colors window 3 From the toolbar select the required option to maintain the spot colors Maintain the Spot colors Chapter 4 Operating concept 61 ...

Page 62: ...owing types of layers Layers with cutting or folding marks Layers that indicate a foil that must be applied after printing Layers that indicate a gold print You can leave out layers for printing if you map the specific colors on these layers to a spot color with the value None NOTE You can copy a color mapping from one color mapping group to another color mapping group Procedure 1 From the navigat...

Page 63: ...the color and information bars are available at the printer driver PRISMAprepare the operator panel and the automated workflows Procedure 1 From the navigation bar select the Color tab 2 From the Color tab select Color information bars The Color information bars window appears 31 The Color information bars window 3 From the toolbar select the required option to maintain the color and information b...

Page 64: ...ptional application This procedure describes the most important settings for daily use Procedure 1 Prepare the document 33 Lay out preparation with PRISMAprepare 2 Use the media catalog to define the media With PRISMAprepare you can export the media catalog to PRISMAsync controllers of the black white and color systems Prepare print jobs with PRISMAprepare 64 Chapter 4 Operating concept ...

Page 65: ...fice documents Microsoft Office documents use the RGB color space Select Photographic content default to print documents from photo editing or layout applications These documents use the CMYK color space 4 Define the required finishing options NOTE Please refer to the online help of PRISMAprepare for detailed information Prepare print jobs with PRISMAprepare Chapter 4 Operating concept 65 ...

Page 66: ...edge derived from the application The document size is derived from the software application you use and can occasionally be transferred wrongly 2 Check the preview pane 3 Select the preset for your job if required Check the result at the preview pane 4 Define the specific settings for your job Check the result at the preview pane 5 Define the generic settings for the whole print job 6 Save your s...

Page 67: ...anage all print jobs from the Schedule tab The Remote Monitor enables you to monitor the system status from a distance via an internet browser Procedure 1 Press the Schedule button at the lower left of the operator panel to access the Schedule view 35 The Schedule view Manage production printing Chapter 4 Operating concept 67 ...

Page 68: ...he Internet Browser 2 At the address bar enter http printername remoteinfo or https printername remoteinfo The Remote Monitor displays a fixed time line of 30 minutes 36 The remote monitor Monitor operator intervention remotely optional 68 Chapter 4 Operating concept ...

Page 69: ...Chapter 5 Operator panel views ...

Page 70: ... is required The following illustration shows the dashboard while the machine is busy The vertical status bar is orange Next to the status bar the dashboard displays a message that indicates which action is required soon 1 2 3 4 38 The dashboard Action is required soon NOTE The operator panel can only display one message at a time When there are more messages the operator panel displays the first ...

Page 71: ... is set to By page or when you print stream jobs then the dashboard only displays a sheet count 3 Display the action that you must do now or soon The colors of the ver tical status bar at the left hand side match the colors of the LED on the operator panel and the operator attention light When the color is or ange or red a message indicates the required action Orange means that action is required ...

Page 72: ... colors of the bars and the indication of the required amount of sheets are only valid for document printing For streaming jobs all the bars remain grey until the paper trays are empty or the output locations are full Then the machine stops and the bars become red Furthermore the media toolbar does not indicate the required amount of sheets The Schedule view 39 The Schedule view The Schedule view ...

Page 73: ...rinted jobs section enables you to manage print jobs in the list of Printed jobs The Copy Scan section The Copy Scan section enables you to manage copy and scan jobs using copy templates and scan profiles The Jobs view 40 The scheduled jobs and waiting jobs in the jobs view The job icons may show one or more of the following status icons Icon Description The printer is downloading the document via...

Page 74: ...neously ripping and print ing The job contains an operator note Indicates a streaming job Indicates a proof print The job settings are overruled by the PRISMAsync controller set tings because of conflicting settings Check the job properties Indicates an RIP error The Jobs view 74 Chapter 5 Operator panel views ...

Page 75: ...r trays Change the media that is currently assigned to a paper tray Assign media to a paper tray Unassign media from a paper tray Register the media Illustration 41 Example of a configuration with two paper modules Related information Load the media using the Trays view on page 98 The Trays view Chapter 5 Operator panel views 75 ...

Page 76: ...nters and start the maintenance actions The Setup section Enables you to set up your personal workflow operator panel behavior and advanced system settings The Media section Enables you to view the content of the Media catalog or add temporary media to the Media catalog The Color adjustment section Gives access to the calibration procedures The System view Related information Introduction to the M...

Page 77: ...Chapter 6 Adapt printer settings to your needs ...

Page 78: ...Select a workflow profile or manually define the settings that match your needs Language Change the language of the operator panel Warning time Define the moment when the system warns you about an action that is required soon for example 10 minutes in advance The warning is displayed in the dashboard and indicated through the operator attention light Job name truncation Define the way the system s...

Page 79: ...ced section displays the following buttons Local key operator settings Get direct access to a number of important key operator settings in the Settings Editor on the PRISMAsync controller Introduction to the Setup section Chapter 6 Adapt printer settings to your needs 79 ...

Page 80: ...hich default workflow profile When to use which workflow Profile When to use Standard You need a productive workflow but you still want to have sufficient control over the jobs Job by job You want to start the jobs one by one Each time a job has been prin ted the machine goes on hold Always touch Resume in the dash board to start the next job Check and print You want to check the quality and layou...

Page 81: ...tended Banners Values and effects of the settings The following table describes the effects of the various values of the settings Values and effects of the settings Setting Values Effect Destination of print job Scheduled jobs The jobs are immediately sent to the list of Scheduled jobs The machine will print the jobs in the ripped order You can do the following to rearrange the order in which the ...

Page 82: ...bs You can manually define the order in which the jobs will be prin ted Confirm start of job On The machine always stops before the next scheduled job You must press the Release key to start each job Off The machine prints the scheduled jobs one after the oth er The machine does not stop before the next scheduled job unless there is a reason to stop For example when a media is not available On con...

Page 83: ...s sets Sets as in job Each printed set is delivered to the output location as de fined in the job ticket or copy job Therefore the sets can be stacked in one straight line or with an offset Banners Each banner page of a job is delivered to the output lo cation with an offset This helps you to identify the sepa rate jobs The jobs themselves are stacked in one straight line Off All the printed jobs ...

Page 84: ... do not respond to the warning message the printer will stop Depending on the urgency of the warning message the vertical bar in the dashboard and the operator attention light are orange or red NOTE The operator attention light is linked to the status of the machine For example when the dashboard displays an orange warning the orange light of the operator attention light also lights up You can onl...

Page 85: ...ch System Setup Warning time under Operator panel When the box for Warning in advance has a check mark and states On the function is enabled 2 Touch the Warning in advance button The check mark disappears The status On changes into Off 3 Press OK Related information The dashboard on page 70 The operator attention light on page 31 Disable the warning time Chapter 6 Adapt printer settings to your ne...

Page 86: ...system truncates the job names This allows you to keep the identifying part of the job name You can choose to truncate the job name at the beginning or at the end of the name Procedure 1 Touch System Setup Job name truncation under Operator panel 2 For Truncate job name at select Beginning or End 3 Touch the or button to indicate the number of characters before truncation 4 Press OK Truncate the j...

Page 87: ...ctory default value is 80 Higher values will in crease the brightness Contrast You can increase or decrease the contrast from level 10 to 100 in steps of 1 The factory default value is 50 Higher values will in crease the contrast Procedure 1 Touch System Setup Operator panel settings 2 Touch Auto adjust to optimize the brightness and contrast of the screen automatically 3 Touch OK when the brightn...

Page 88: ...al number and software version of the printer You can also upgrade the printer soft ware through this section Follow the instructions on the operator panel when you upgrade the software Software licenses Upload license When you have a new license to activate a new feature on the printer you can upload the license through this section After uploading the license the feature becomes active Follow th...

Page 89: ...tem settings Date and time System of meas urement Time zone The System settings section contains settings to change the date and time of the system or the system of measurement used When you change the system of measurement all corre sponding values on the system will be changed For example when you change Met ric into Imperial all values will be displayed in inches Procedure 1 Touch System Setup ...

Page 90: ...Access Settings Editor settings via the operator panel 90 Chapter 6 Adapt printer settings to your needs ...

Page 91: ...Chapter 7 Media handling ...

Page 92: ...e media toolbar does not indicate the required amount of sheets The Schedule view 3 5 1 2 4 42 The Schedule view 1 The jobs pane The jobs pane shows the jobs on a timeline The width of the job corresponds to the remaining print time A vertical line separates the jobs The vertical line moves to the left as the printing of a job progresses An icon and the job name represent a job The icon indicates ...

Page 93: ...scale in most cases the operator panel will display bars for these small jobs The possible display of small jobs Image Description Green The required media is available Orange The media is required in the future but not available then For example because the paper trays do not contain sufficient sheets of the required media Red The media is required now but not available The job can only start whe...

Page 94: ...The output location is required but availability is unknown 5 The Zoom Control The zoom control enables you to adjust the time scale visible in the Schedule When you touch the zoom button a drop down list appears Then you can select the desired time scale five minutes eight hours Introduction to the Schedule view 94 Chapter 7 Media handling ...

Page 95: ...r trays or which is available but not in sufficient quantity to finish the job The current job requires more of the same media than is currently loaded in the paper trays You can add more of the required media into another paper tray You already want to load and assign media that are required for the next job work ahead Procedure 1 Press Schedule 2 At Required media select the media you want to lo...

Page 96: ...pens when you press the paper tray key on the operator panel Illustration 1 2 3 4 5 5 43 Example of a configuration with two paper modules The items of the Trays view Description of the Trays view Num ber Item Function 1 Content of the paper trays Indicate the current content and filling level of the paper trays The Trays view displays the parameters of the media that are currently in the paper tr...

Page 97: ... number of holes for punched media The Trays view displays the following icons for each paper tray The meaning of the icons Icon Description The paper tray is empty NOTE Each line indicates the presence of about 100 sheets The paper tray is too full Please remove sheets from the stack The plate inside the paper tray is down The paper tray is open or or The paper tray contains media that are fed ov...

Page 98: ...ready want to load and assign media that are required for the next job work ahead Procedure 1 Press Trays 2 Select the tray where you want to load the media 3 Load the media as described in one of the following references Load the media into the paper tray on page 107 Load the media into the bulk media module optional on page 117 4 Press Assign The Assign media window opens with media names The pr...

Page 99: ... of the Media section Num ber Item Function 1 List of all the media that are available in the Media catalog Display the current content of the Media catalog 2 List of temporary media Display the temporary media that are currently available on the system 3 To catalog button Add temporary media to the media catalog 4 Skew correction Correct skewed and slight rotated images 4 Introduction to the Medi...

Page 100: ...e of Curl correction is indicated at the icon in the list of available media in the Media catalog 6 Registration button Perform a media registration to position the image at the exact position of the media Introduction to the Media section 100 Chapter 7 Media handling ...

Page 101: ...n you use the media catalog the operator panel the printer drivers and other applications all display the same list of predefined media The operator panel and the printer driver automatically retrieve and display the latest version of the media catalog What are temporary media You can also use many other media that are not included in the Media catalog These media become temporary media You can lo...

Page 102: ...ou can add the media to the Media catalog This section describes how to add temporary media to the Media catalog Procedure 1 On the operator panel press the System button 2 Press Media The names of the temporary media are displayed in the Temporary media section 3 Select the media you want to add to the Media catalog 4 Press To catalog The media is added to the Media catalog NOTE If required you c...

Page 103: ... all media 3 Touch Skew correction An instruction windows opens 4 Read the instructions carefully and touch Next Please wait while a media registration sheet is printed 5 Check the registration sheet If the registration sheet is correct you can stop the deskew procedure If the registration sheet is wrong continue with the next step An instruction window opens 6 Follow the instructions on the windo...

Page 104: ...a catalog so that the adjustments are applied to all jobs that use the same media You can find the correction values in the system adjustment settings of the Settings Editor Preferences tab Before you begin Make sure that all media attributes are correct in the media catalog Procedure 1 Start the curl correction procedure from one of the following locations The trays view 1 Touch Trays 2 Select th...

Page 105: ... With manual media registration you can shift the image and adjust elongation Wizard media registration Wizard media registration prints registration charts used for media registration For new media it is best to use wizard media registration 45 The location of the media registration wizard IMPORTANT First check to see whether skew correction is needed Refer to Correct skewed and rotated images on...

Page 106: ... both the front and back side Use Describe front side and Describe back side to toggle between both sides Manual media registration ends here For wizard media registration touch Start at Registration wizard Continue with the next step 4 Read the instructions carefully and touch Next Please wait while a media registration sheet is printed 5 Check the media registration chart If the media registrati...

Page 107: ...nal injury IMPORTANT Do not lift up the lifter inside the paper trays while the main power is ON as this may result in a malfunction or damage to the machine If you need to lift up the lifter for example if you drop objects turn OFF the main power with the paper trays open See Turn off the system on page 45 NOTE The following paper sizes can be loaded into right left paper trays 330 2 mm x 482 6 m...

Page 108: ...Thin straw paper Heavy paper more than 325 g m 86 lb bond Thin paper less than 60 g m 16 lb bond Paper which has been printed on using a thermal transfer printer Do not print on the reverse side of this paper either Fan the stack of paper well before loading it and align the edges of the paper stack on a flat surface NOTE When changing the paper to load into the paper tray from plain paper to coat...

Page 109: ...stops The inside lifter automatically descends to the paper loading position 3 Open the package of paper and remove the paper stack Before loading paper always fan the sheets several times and align the edges to facilitate feeding CAUTION When loading paper take care not to cut your hands on the edges of the paper IMPORTANT Rewrap any remaining paper in its original package and store it in a dry p...

Page 110: ...the paper stack into the paper tray When loading paper into the paper tray for the first time set the size change plate to match the paper size being loaded See reference below When loading paper into the paper tray make sure that the paper size setting is the same size of the paper that is being loaded IMPORTANT Do not subject the paper holder plate to shock when loading paper into the paper tray...

Page 111: ...s loaded into the paper tray the side facing down is the one printed on If problems occur such as poor print quality or paper jams try turning the paper stack over and reload it However you cannot turn the texture paper and 1 Sided Coated paper over Change the new paper 6 Lower the paper holder plate 7 Gently push the paper tray back into the machine until it clicks into place in the closed positi...

Page 112: ...ing or printing load a new paper stack and follow the instructions on the touch panel display The machine automatically restarts and produces the remaining copies or prints Load the media into the paper tray 112 Chapter 7 Media handling ...

Page 113: ... the button on the paper tray that you want to adjust and pull out the paper tray until it stops When the inside lifter automatically descends to the paper loading position lift the paper holder plate and remove all of the remaining paper IMPORTANT If the printer is in the sleep mode you may not be able to open the paper tray even if you press the open button In this case press the Sleep button on...

Page 114: ... as this may result in a malfunction or damage to the machine IMPORTANT Adjust the guides correctly to avoid causing a paper jam dirty prints or make the inside of the machine dirty 4 Lock the lever of the size change plate and fix it 5 Squeeze the lever on the outer size change plate below Without releasing the lever slide the rear guide to align it with the desired paper size Adjust the paper tr...

Page 115: ...ace paper or any other items in the empty part of the paper tray next to the paper stack Doing so may cause paper jams NOTE If there are instructions on the package of paper about which side of the paper to load follow those instructions When paper is loaded into the paper tray the side facing down is the one printed on If problems occur such as poor print quality or paper jams try turning the pap...

Page 116: ...sed position The inside lifter automatically rises and prepares the paper tray for printing CAUTION When closing the paper tray be careful not to get your fingers caught as this may result in personal injury Adjust the paper tray to hold a different media size 116 Chapter 7 Media handling ...

Page 117: ...ck next to the paper stack Doing so may cause paper jams A paper blower is attached inside of the paper tray Do not insert paper clips or other foreign objects into the blower port Paper jams may occur if you load paper into the paper tray in a low humidity environment If paper jams occur follow the instructions on the touch panel display to remove the jammed paper In addition make sure that the l...

Page 118: ...nge bar indicates that a scheduled job requires media which is either not available in the paper trays or which is available but not in sufficient quantity to finish the job The current job requires more of the same media than is currently loaded in the paper trays You can add more of the required media into another paper tray You already want to load and assign media that are required for the nex...

Page 119: ...ller detached may cause paper jams IMPORTANT When loading paper be sure to first lift the feeding support roller If you load paper without raising the feeding support roller it may become detached and paper may not be fed properly Use of the paper tray with the feeding support roller detached may cause paper jams 4 Load the paper stack into the paper tray Make sure that the inside lifter has lower...

Page 120: ...s 330 2 mm x 482 6 mm 320 mm x 450 mm SRA3 304 8 mm x 457 2 mm A3 B4 A4 A4R and B5 paper into the paper tray Other than A4 paper cannot be loaded horizontally 13 x 19 12 60 x 17 72 12 x 18 11 x 17 LGL LTR or LTRR paper into the paper deck Only LTR paper can be loaded horizontally into the paper deck For more information on the size change plate see Adjust the media size for the bulk media module o...

Page 121: ...en returning the paper tray to its original position be careful not to get your fingers caught as this may result in personal injury Load the media into the bulk media module optional Chapter 7 Media handling 121 ...

Page 122: ...r automatically descends to the paper loading position IMPORTANT If the printer is in the sleep mode you may not be able to open the paper tray even if you press the open button In this case press the Sleep button of the operator panel to reactivate the machine and then press the open button 2 Remove all of the loaded paper the paper size sheet and deck base plate 3 Loosen the blue screw on the re...

Page 123: ...rews on the outer size change plate 6 Lift up the outer size change plate 7 Align the outer size change plate with the marks for the desired paper size that you want to load A4 R LGL LTR R B5 B4 A4 A3 12 5 8 17 11 16 320mm SRA3 450mm 330mm 13 19 483mm 11 17 LTR 305mm 12 18 457mm Adjust the media size for the bulk media module optional Chapter 7 Media handling 123 ...

Page 124: ...ssing the outer size change plate towards you the plate may be fixed at an angle If you use the paper tray with a tilted outer size change plate paper may be fed as slanted poor print quality may result and paper jams may occur Therefore make sure to fasten the blue screw while pressing the outer size change plate towards you 9 Align the rear edge retainer with the marks for the desired paper size...

Page 125: ...rom being installed at an angle 11 Remove the two blue screws on the inner size change plate using a coin or something similar 12 Lift up the inner size change plate NOTE Hot air that is blown by the fan may warm the size change plate 13 Align the inner size change plate with the marks for the desired paper size Adjust the media size for the bulk media module optional Chapter 7 Media handling 125 ...

Page 126: ...e slightly holding its center front portion and pressing it away from you IMPORTANT If you fasten the blue screw without pressing the inner size change plate away from you the plate may be fixed at an angle If you use the paper tray with a tilted inner size change plate paper may be fed as slanted poor print quality may result and paper jams may occur Therefore make sure to fasten the blue screw w...

Page 127: ... deck base plate the loaded paper may hang over the lifter and paper jams may occur Never place the deck base plate in the empty part of the paper tray Doing so may lead to a malfunction of the printer Load the size sheet and make sure to set the size change plate and rear edge retainer properly before loading paper into the paper tray If the size change plate and rear edge retainer are not proper...

Page 128: ...ay Doing so may lead to a malfunction of the copier NOTE When loading paper make sure that the height of the paper stack does not exceed 20 mm 13 16 If the height of the paper stack exceeds 20 mm 13 16 the edges of the paper stack may become curled or creased and poor print quality may result 18 Place a magnet label indicating the new paper size on the paper tray 19 Close the paper tray The inside...

Page 129: ...change plates and the paper wider If the paper size is smaller than a standard paper size The entire printed area may be shifted vertically to the top or bottom or may be slanted if the space between the size change plates and the paper is too wide In this case make the space between the size change plates and the paper narrower Illustration 1 2 3 4 47 The direction of the paper transport 1 and th...

Page 130: ...paper in the paper tray may lead to a paper tray malfunction 3 Close the paper tray Wait until the open button stops flashing 4 Continue on the operator panel Touch System Maintenance Touch Start maintenance Touch Adjust paper tray plates Touch Start Wait until an information window pops up IMPORTANT Do NOT touch OK yet Continue with the next step of this procedure 5 Press the open button to open ...

Page 131: ...ge retainer then remove the spacer that is stored in the back of the rear edge retainer 8 Loosen the two black adjustment screws on the outer size change plate using a coin or something similar 9 Insert the spacer horizontally into the space between the paper and the outer size change plate Adjust the outer size change plate of the bulk paper module optional Chapter 7 Media handling 131 ...

Page 132: ... screw on the right using a coin or something similar while slightly pressing the outer size change plate against the paper stack Make sure that the two black adjustment screws are fastened securely 12 Remove the second stack of paper such as A4 paper if you have loaded next to the first stack of paper Adjust the outer size change plate of the bulk paper module optional 132 Chapter 7 Media handlin...

Page 133: ... retainer 14 Align the rear edge retainer with the marks of the desired paper size 15 When you have finished aligning the rear edge retainer with the marks for the desired paper size fasten the rear edge retainer to the outer size change plate with the blue screw using a coin or something similar 16 Make sure that the inside lifter has lowered and load the remaining paper into the paper tray Adjus...

Page 134: ...led or creased and poor print quality may result 17 Close the paper tray CAUTION When returning the paper tray to its original position be careful not to get your fingers caught as this may result in personal injury 18 At the operator panel touch OK to close the information window 19 Touch Finish Adjust the outer size change plate of the bulk paper module optional 134 Chapter 7 Media handling ...

Page 135: ... Feed coated paper one sheet at a time Loading several sheets together may cause paper jams Depending on the type of heavy paper you want to load if you load multiple sheets of heavy paper into the special feeder a paper jam may occur In this case load only one sheet of heavy paper at a time If you are making two sided prints the printed paper may crease depending on the moisture absorption condit...

Page 136: ...auxiliary tray 2 2 3 Load the paper into the special feeder Make sure that the height of the paper stack does not exceed the loading limit mark Straighten out curled paper prior to use as shown below Curled paper may cause a paper jam Load the media into the special feeder optional 136 Chapter 7 Media handling ...

Page 137: ...the slide guides If the paper is not loaded correctly a paper jam may occur NOTE If there are instructions on the paper package about which side of the paper to load follow those instructions When the paper is loaded into the special feeder the side facing up is the one printed on If problems such as poor print quality or paper jams occur try turning the paper stack over and reload it Load the med...

Page 138: ... the paper size of the tab feeder If required change the paper size of the tab feeder See Adjust the media size of the tab feeder optional on page 144 NOTE The following types of tab paper are available 4 3 2 1 1 2 3 4 1 2 Right order tab 1 Reverse order tab 2 How to load the tab paper depends on the situation 1 You want to print on the tab paper 2 You want to print on the tab paper and insert the...

Page 139: ...ab paper and insert the tab as a chapter page Destination How to load tab paper Result Stacker stapler Reverse order tab face down and tabs to the left 4 3 2 1 4 3 2 1 Stacker Right order tab face down and tabs to the left 4 3 2 1 Situation 3 you want to insert a printed tab as a chapter page Destination How to load tab paper Result Stacker stapler Reverse order tab face down and tabs to the left ...

Page 140: ...button of the operator panel to reactivate the machine and then press the open button Procedure 1 Press and release the button on the paper tray in which you want to load tab paper and pull out the paper tray until it stops When the inside lifter automatically descends to the paper loading position lift the paper holder plate and remove all of the remaining paper 2 Squeeze the lever on the rear gu...

Page 141: ...f the tab feeder to the hole of the lifter IMPORTANT Embed the location fix frame in the hole of the lifter properly to prevent a paper jam or the paper tray from being damaged Check that the tab feeder is installed properly from its hole on the top 6 Load approximately 10 sheets of tab paper while lifting up the tab of the paper holder Load tabs via the tab feeder optional Chapter 7 Media handlin...

Page 142: ... feeder 8 Lock the lever of the size change plate and fix it 9 Load all remaining tab paper while lifting up the tab of the paper holder IMPORTANT Hold the tab paper by hand to avoid lifting the paper holder after loading the tab paper Load tabs via the tab feeder optional 142 Chapter 7 Media handling ...

Page 143: ... at the back of the paper tray 10 Gently push the paper tray back into the machine until it clicks into place in the closed position CAUTION When returning the paper tray to its original position be careful not to get your fingers caught as this may result in personal injury IMPORTANT Never place paper or any other items in the open part of the paper tray next to the paper stack Doing so may cause...

Page 144: ...per tray even if you press the open button In this case press the Sleep button of the operator panel to reactivate the machine and then press the open button 2 Hold the tab feeder in its upright position as shown below 3 Loosen the two blue paper size change screws 4 Align the mark with A4 as shown below Adjust the media size of the tab feeder optional 144 Chapter 7 Media handling ...

Page 145: ...lift the tab feeding attachment the screws become loose and a paper jam may occur 5 Fix the paper holder with the two blue paper size change screws IMPORTANT When fastening the screws be sure to confirm that the screws are tightened properly in the oxbow groove Adjust the media size of the tab feeder optional Chapter 7 Media handling 145 ...

Page 146: ...ss plate ABC 1 ABC A B C 1 staple Top left 2 staples Left edge ABC ABC A4 B5 A B C 2 ABC A B C 1 staple Bottom left 2 staples Left edge ABC ABC A3 B4 ABC A B C 1 staple Top right 2 staples Right edge A B C 1 ABC A B C 1 staple Top left 2 staples Left edge A4 B5 ABC ABC ABC A B C 1 staple Top right 2 staples Right edge ABC 2 ABC A B C 1 staple Top left 2 staples Left edge ABC ABC A3 B4 ABC A B C 1 ...

Page 147: ... C 1 staple Bottom right ABC A B C 1 staple Top right 2 staples Right edge A3 B4 ABC ABC 1 ABC A B C Saddle stitch ing ABC 1 Paper can be loaded into both the upper and lower trays Load the paper facing the same side for both the upper and lower trays 2 Paper can be loaded only into the lower tray Procedure 1 Adjust the slide guides to fit the paper size Load the required media into the selected t...

Page 148: ...your hands on the edges of the paper IMPORTANT Rewrap any remaining paper in its original package and store it in a dry place away from direct sunlight NOTE Before loading paper always fan the sheets several times and align the edges to facilitate feeding Load the required media into the selected tray 148 Chapter 7 Media handling ...

Page 149: ... 330 2 mm LTR LTRR EXEC or irregular size 7 1 8 x 7 1 8 to 11 11 16 x 13 Supported media sizes for the lower tray 330 2 mm x 482 6 mm 320 mm x 450 mm SRA3 304 8 mm x 457 2 mm A3 B4 A4 A4R B5 B5R or irregular size 182 mm x 182 mm to 330 2 mm x 487 7 mm 13 x 19 12 60 x 17 72 12 x 18 11 x 17 LGL LTR LTRR EXEC or irregular size 7 1 8 x 7 1 8 to 13 x 19 13 64 A maximum of 200 sheets of paper 80 g m 22 ...

Page 150: ...ur job is the same as the media loaded in the inserter When printing on special types of paper such as heavy paper be sure to correctly set the paper type If the type of paper is not set correctly it could adversely affect the quality of the image Moreover the fixing assembly may become dirty and require a service repair or the paper could jam Load the required media into the selected tray 150 Cha...

Page 151: ...iew Procedure 1 On the operator panel touch the button for the System view 2 Press Printer The status of the punch waste box displays at the right hand side of the operator panel Related information The dashboard on page 70 The main unit on page 19 Check the status of the punch waste box Chapter 7 Media handling 151 ...

Page 152: ...ar paper or staple jams prints may still be output if other optional units are operating normally and are not involved in the paper or staple jam removal procedure NOTE This procedure is necessary only if the optional Puncher Unit BB1 is attached to the optional Finisher AJ1 or Saddle Finisher AJ2 Procedure 1 Open the front cover of the finisher 2 Pull out the punch waste tray 3 Discard the punch ...

Page 153: ...y as far as it can go NOTE If the punch waste tray is not securely in place you cannot make copies or prints in the Hole Punch mode 5 Close the front cover of the finisher CAUTION When closing the front cover of the finisher be careful not to get your fingers caught as this may result in personal injury Removing the punch waste Chapter 7 Media handling 153 ...

Page 154: ...a paper jam occurs follow the instructions on the operator panel IMPORTANT Make sure you follow the instructions precisely in the correct order to avoid unnecessary service calls Handle paper jams 154 Chapter 7 Media handling ...

Page 155: ...Chapter 8 Carry out print jobs ...

Page 156: ...ngs the print job will appear in one of the following destinations List of Waiting jobs List of Scheduled jobs The list of Printed jobs can store jobs temporarily The Schedule view enables you to plan your daily print jobs The Jobs view enables you to manage the print jobs in the different queues Introduction to the print function 53 The scheduled jobs and waiting jobs in the jobs view General inf...

Page 157: ...the following settings for the jobs in the list of Waiting jobs and the list of Scheduled jobs The characteristics of the output Generic settings that apply to the whole job Illustration 1 2 3 4 5 54 The job properties Number Pane Description 1 Original The Original pane shows the settings you can de fine for the paper originals 2 Output The Output pane shows the generic settings you can define fo...

Page 158: ...urn a sheet over the binding edge the image on the back side of the sheet is in readable form This means that every back side of a 2 sided original is upside down compared to the front side Landscape left The output has a horizontal format width height The binding edge of the original is at the left hand side When you turn a sheet over the binding edge the text or im age is in readable form Landsc...

Page 159: ...s the pages with no special layout set tings Booklet The machine prints the pages in booklet order The pages 1 and 4 are printed on the front side of a sheet The pages 2 and 3 are printed on the back side of a sheet Same up The machine prints the same image multiple times next to each other By default the system keeps the size of the origi nals When you print A4 originals with the setting Same up ...

Page 160: ...mage on the sheet Top left moves the image to the upper left corner of the sheet Top center Top center moves the image to the center at the top of the sheet Top right Top right moves the image to the upper right corner of the sheet Center left Center left moves the image to center of the left side of the sheet Center Center moves the image to the center of the sheet Center right Center right moves...

Page 161: ...you can de fine the values for the front side and the back side separate ly Image shift Use this setting to shift the image horizontally or vertically By default the values of the front side and the back side are interlocked This means that the values for the front side and the back side remain identical If you want to define a different value for each side press The icon changes to the unlocked s...

Page 162: ...to an output location will be shifted on top of the previous set This setting is only available when in the workflow profile offset stacking is set to Sets as in job Off All the sets or jobs that get to an output location will be stacked in one straight pile Advanced set tings Sheet order Face up Deliver the prints face up first sheet on top Face up reverse Deliver the prints face up last sheet on...

Page 163: ... Rotates the prints 180 degrees Margin erase Margins of a document sometimes contain notes or punch holes for example The machine allows you to hide these el ements on the print With the and buttons of the Margin erase setting you can define how much margin of the origi nal you want to erase You can enter a value up to 100 mm 3 94 Adjust image Basic mode In the Basic mode you can adjust the calibr...

Page 164: ...ing With trapping you can reduce unwanted white gaps be tween color planes Note that an edge can appear at loca tions where the color planes overlap Define custom trap ping presets at System Color adjustment Trap ping presets editor Color Punching None 2 holes 3 holes 4 holes Die set de pendent Here you can define the amount and location of the punch holes Location Left Top Right Bottom Folding He...

Page 165: ...ob name Displays the job name of the print job You can change the job name of a print job Number of sets Use this setting to define the number of copies You can en ter a value from 1 65 000 The default value is 1 Page range Displays the pages to print When All is selected all pages of the job will be printed When you touch the Page range button a keyboard appears You can define the page range you ...

Page 166: ...ew pane informs you how to solve the contradictions The contradicting settings are marked The system indicates with a green check mark which setting you need to change to resolve the contradiction However if required you can change the other marked settings to resolve the contradiction Contradiction handling 166 Chapter 8 Carry out print jobs ...

Page 167: ...TE To give priority to a job in the list of Waiting jobs you must first touch Print to send the job to the list of Scheduled jobs There you can select the job and touch Print now To give priority to a job in the list of Printed jobs you must first reprint the job When the job is in the list of Scheduled jobs you can select the job and touch Print now Procedure 1 Touch Jobs Queues 2 If collapsed fi...

Page 168: ... position in the list of Scheduled jobs below the active print job The job will be printed when the active print job is ready Procedure 1 Touch Jobs Queues 2 If collapsed first touch to expand the list of Scheduled jobs 3 Touch the job to which you want to give priority 4 Press To top Related information Print an urgent job immediately on page 167 Give priority to a print job 168 Chapter 8 Carry o...

Page 169: ...e Stop button two times to stop the job However the printing continues until the buffer is empty Move the active jobs to the list of Waiting jobs You must touch the Resume button to print the other jobs Procedure 1 Touch Jobs Queues 2 If collapsed first touch to expand the list of Scheduled jobs 3 Touch the job s you want to print later or use the Select button to make a selection To undo the mult...

Page 170: ...ou shut down the printer all jobs remain present in the list of Printed jobs The list of Printed jobs can only store jobs To prevent the disk of your system from becoming full jobs must be deleted manually or automatically on a regular basis In the Settings Editor you can indicate the cleaning period then the clean up is carried out at midnight or at the next start up in general the next morning I...

Page 171: ...ket button is available at the following locations on the operator panel List of Printed jobs if this function is enabled in the Settings Editor List of Scheduled jobs List of Waiting jobs DocBox in the drop down list Procedure 1 Press Jobs 2 Go to one of the locations mentioned above 3 Touch one or more jobs of which you want to print the job ticket 4 Press Ticket The job is sent to the bottom of...

Page 172: ... button The Proof button is available at the following locations List of Waiting jobs DocBox optional NOTE To make a proof of a job in the list of Printed jobs you must first touch Copy to copy the job to the list of Waiting jobs There you can select the job and touch Proof Procedure 1 Touch Jobs Queues 2 If collapsed touch to expand the desired list of Waiting jobs in the DocBox 3 Touch the job o...

Page 173: ...ton to resume printing A page two times The printer stops when the printer buffer is empty as soon as possible The buffer can contain up to 50 pages Because the printer stops when the buffer is empty it is possible that the last printed set is not complete NOTE When you press the Stop button two times the dashboard will immediately dis play a Resume button with a vertical red bar Move the active j...

Page 174: ...e Confirm start of job setting in a Work flow profile is On The printer stops each time at the start of a new job You must start each job manually Procedure 1 Press one time to stop when the current set is completed 2 Press two times to stop as soon as possible 3 To resume printing press the Resume button in the dashboard NOTE To stop printing after a job you must select a job in Jobs Queues Sched...

Page 175: ...n touch Select Jobs with availa ble media Jobs with label Go to the correct location then touch Select Jobs with label Printed jobs in the Doc Box Go to the DocBox then touch Select Printed jobs New jobs in the DocBox Go to the DocBox then touch Select New jobs NOTE For the list of Printed jobs you can indicate in the Settings Editor that the list must be cleaned automatically at specified times T...

Page 176: ...st be printed Procedure 1 Touch Jobs Queues 2 If collapsed first touch to expand the desired list of Waiting jobs 3 Touch the job s you want to print or use the Select button to make a selection To undo the multiple selection and only select 1 job you must touch that job for 2 seconds 4 Press Print The job is moved to the bottom of the list of Scheduled jobs Related information Work with the workf...

Page 177: ...ou may only need to add more of the currently available media types Select button Jobs with label A label is a name or tag that helps you to identify certain jobs on the operator panel When a job is sent to the printer the person who submits the job can add a label to that job The label can be any name that helps to identify certain jobs The label can be de fined in the printer driver in a job tic...

Page 178: ...perator panel displays a warning message To continue you must first split the bundled job then change the individual job settings and finally bundle the jobs again Main actions on the bundle function The table below describes the main actions you can carry out with regard to the bundle function Main bundle functions Main actions Description Bundle When you touch Bundle after selecting 2 or more jo...

Page 179: ...3 Press Bundle A Create bundle window appears that allows you to make some changes 4 If necessary use the Up and Down buttons to change the job order 5 If necessary change the generic job settings such as Number of bundles 6 Press OK Bundle jobs in the list of Waiting jobs Chapter 8 Carry out print jobs 179 ...

Page 180: ...Touch Print to send the file to the list of Scheduled jobs immediately or 6 Touch Save to save a copy of the file to another location on your printer such as the list of Waiting jobs or a DocBox Then you can edit the file first and print the file from the other location The locations you can select depend on your system configuration 7 Touch to eject the USB drive 8 Remove the USB drive from the o...

Page 181: ...ties 3 Check and change the job properties if required 4 Press OK 5 If you want to print a range of records touch Print range to set the range 6 If you want to make a proof print touch Proof to print the first record The first record of the print job is copied as a print job to the bottom of the list of Scheduled jobs 7 If the proof is OK touch Print to print all the records The job is moved to th...

Page 182: ... job on the remote printer indicates that there are contradictions you must resolve NOTE The list of remote printers must be available and configured in the Settings Editor Procedure 1 Touch Jobs 2 Go to the location of the jobs 3 Select the jobs you want to send to another printer or use an option from the Select menu to select multiple jobs together 4 Select Copy to from the button bar or from t...

Page 183: ...nd ready to print documents to the printer queues of all configured printers You must enable and configure PRISMAsync Remote Manager in the Settings Editor Refer to the user manual for the PRISMAsync Remote Manager for the options available when using this product PRISMAsync Remote Manger Option Chapter 8 Carry out print jobs 183 ...

Page 184: ...ge the number of sets NOTE You can only change the settings of the active print job after you stopped the printer press the Stop button two times 3 Touch Properties or touch the job twice to open the Properties window 4 Touch the Number of sets button 5 Enter the desired number of sets between 1 and 65 000 NOTE Touch the arrow button to correct the previous entry or touch Cancel to close the numer...

Page 185: ...om printing a proof Methods to check the first set You can use 1 of the following methods to indicate that you want to check the first set Use a workflow profile where Check first set is enabled Then the printer stops after the first set Enable the function Check first set in the Properties window for a specific job only However you can only change the Check first set setting there when a workflow...

Page 186: ...ed workflows in the Settings Editor However you can change this setting trough the operator panel Procedure 1 Touch Jobs Waiting jobs or Scheduled jobs or select a DocBox 2 Touch the job of which you want to change the settings NOTE You can only change the settings of the active print job after you stopped the printer press the Stop button two times 3 Press Properties 4 Touch the Separator sheets ...

Page 187: ... be a value between 1 and 65536 default 1 NOTE When Sets always is possible the Properties window displays a special button at the upper right hand side which is otherwise not visible Sets as in job You can set the Offset stacking function to On each set will be shifted compared to the previous set or Off all sets are delivered in 1 straight stack Banners No changes possible Off No changes possibl...

Page 188: ...ocation Otherwise the operator panel displays a warning message To continue you must first split the bundled job then change the individual job settings and finally bundle the jobs again Main actions on the bundle function The table below describes the main actions you can carry out with regard to the bundle function Main bundle functions Main actions Description Bundle When you touch Bundle after...

Page 189: ...so touch Select Jobs with label to select all the required jobs at once 3 Press Bundle The operator panel displays an overview of the bundled job 4 If necessary use the Up and Down keys to change the job order 5 Press OK Combine jobs Chapter 8 Carry out print jobs 189 ...

Page 190: ...re 1 Touch Jobs Waiting jobs or select a DocBox 2 Touch the job of which you want to change the number of sets NOTE You can only change the settings of the active print job after you stopped the printer press the Stop button two times 3 Touch Properties or touch the job 2x to open the Properties window 4 Touch the 1 or 2 sided button 5 Touch the desired value 6 Press OK 7 Press OK Change the outpu...

Page 191: ...edge is changed for 2 sided printing the image orientation is automatically adjusted to get the correct layout The orientation of the image on the back side of the page will be changed too Procedure 1 Touch Jobs Waiting jobs or select a DocBox 2 Touch the job you want to change NOTE You can only change the settings of the active print job after you stopped the printer press the Stop button two tim...

Page 192: ... Touch Jobs Waiting jobs or select a DocBox 2 Touch the job you want to change NOTE You can only change the settings of the active print job after you stopped the printer press the Stop button two times 3 Touch Properties or touch the job twice to open the Properties window 4 In the preview pane at the right hand side touch the media you want to change When more than 1 media was defined for a job ...

Page 193: ...isable the use of a cover Select the desired media from the Media catalog Indicate whether the cover must be left empty or printed 1 sided and or 2 sided Procedure 1 Touch Jobs Waiting jobs or select a DocBox 2 Touch the job of which you want to change the cover settings NOTE You cannot change this setting for the active print job 3 Touch Properties or touch the job 2x to open the Properties windo...

Page 194: ...your changes You can also shift the image or margin more precisely Procedure 1 Touch Jobs Waiting jobs or select a DocBox 2 Touch the job you want to change NOTE You cannot change this setting for the active print job 3 Touch Properties or touch the job twice to open the Properties window 4 Touch the Align button 5 Make the required changes 6 Press OK 7 Press OK Shift the image roughly to create b...

Page 195: ... relative to the binding edge Image shift has basically the same function However Image shift also allows you to move the image vertically This gives you more freedom in moving the image exactly to the desired position NOTE By default the values of the front side and the back side are linked To define different values for each side touch The changes you make are valid for the whole document not on...

Page 196: ... setting of the active Workflow profile is set to Sets as in job Advanced settings Finishing equipment often requires that the printed sheets are de livered in a certain order For finishers that are integrated in your printing system the required settings are adapted automatically However sometimes it can be necessary to change a number of settings manually for example when you want to finish the ...

Page 197: ...les Number of punch holes The location of the staples or punch holes Procedure 1 Touch Jobs Waiting jobs or select a DocBox 2 Touch the job you want to change NOTE You can only change the settings of the active print job after you stopped the printer press the Stop button two times 3 Touch Properties or touch the job twice to open the Properties window 4 Touch the Binding button 5 Make the require...

Page 198: ...ion The use of automated workflows has for example the following advantages The print workflow is automated even more which improves the productivity The programming of individual jobs is eliminated which optimizes the job throughput You can more easily distinguish prioritize and produce jobs in different automated workflows with different properties using less operator involvement You can easily ...

Page 199: ... settings When you put a check mark in front of a setting that setting and its values become enabled Procedure 1 Go to Workflow Automated workflows 2 Click the Add button A pop up window displays the attributes you can specify for the new workflow 3 Put a check mark in front of the attributes you want to define 4 Specify or select the values of the attributes 5 Click OK Add an automated workflow C...

Page 200: ...eck mark in front of a setting that setting and its values become enabled Procedure 1 Go to Workflow Automated workflows 2 Put a check mark in front of the workflow you want to edit 3 Click the Edit button A pop up window displays the attributes you can specify for your workflow 4 Change the attributes 5 Click OK Edit an automated workflow 200 Chapter 8 Carry out print jobs ...

Page 201: ...u can delete that workflow NOTE You cannot delete the factory default automated workflow Procedure 1 Go to Workflow Automated workflows 2 Put a check mark in front of the workflow you want to delete 3 Click the Delete button 4 Click OK Delete an automated workflow Chapter 8 Carry out print jobs 201 ...

Page 202: ...lowing consequences All the automated workflows you added will be removed All the changes in the default workflow will be lost Procedure 1 Go to Workflow Automated workflows 2 Click the Restore button The factory default automated workflow is restored Restore the factory default workflow 202 Chapter 8 Carry out print jobs ...

Page 203: ...tionality in combination with the hotfolder default ticket However if you want to use the settings of the automated workflow where the hotfolder is linked to it is advised not to place a hotfolder default ticket in the hotfolder to prevent mixing up settings Furthermore you must make sure that the Overrule the job ticket setting in that automated workflow is enabled tick the checkbox Before you ca...

Page 204: ... Open the web browser and enter the host name or IP address of your PRISMAsync controller 2 Go to the Workflow Hotfolders section 3 Click Configure 4 At Enabled select Yes to activate the hotfolder function 5 Enter a unique User name and Password Make sure that you filled in the user name and password before you continue with the next step 6 Click OK to confirm the activation of the hotfolder func...

Page 205: ...activated once by the system administrator Procedure 1 Open your web browser and enter the host name or IP address of your PRISMAsync controller 2 Go to the Workflow Hotfolders section 3 Click Add 4 Give the hotfolder a logical name 5 Select the workflow folder to which you want to link 6 Click OK Create a hotfolder Chapter 8 Carry out print jobs 205 ...

Page 206: ...orer 2 Click Tools Map Network Drive 3 Select a drive letter for the shared network folder 4 Enter the name of the shared network folder for example 12 34 56 78 Booklet or click the Browse button to navigate to the required location NOTE Instead of 12 34 56 78 you must enter the host name or IP address of the PRISMAsync controller Booklet is the name you gave to the hotfolder when you created the ...

Page 207: ...ettings of the automated workflow overrule the settings of the hotfolder default ticket This procedure is an example of the procedure on a Microsoft Windows XP operating system For other operating systems the procedure can vary Procedure 1 Click Start Settings Printers and Faxes 2 Right click the printer driver of your imagePRESS C7011VPS C7010VPS series and select Printing preferences 3 Define th...

Page 208: ...ou can start transaction jobs you must first activate the transaction mode via the operator panel The Transaction section contains the settings that you need to use transaction printing There you can also shift the image in case of a misalignment The following information is described below An overview of the items in the Transaction section on the operator panel The sequence of steps you must per...

Page 209: ...gs Editor Transaction printing Settings Requested active PDL When the requested active PDL is changed the new PDL becomes effective when you put the printer online 4 Image shift Display and change the active image shift settings for example when the images on the front and back of a sheet are not aligned correctly Sequence of steps to print transaction jobs NOTE Before you begin the list of Schedu...

Page 210: ...inting Settings Switch the printer online or off line 6 Connect to the printer 7 Submit the transaction print jobs 8 Print the transaction print jobs You must perform all the regular activities for example load the media empty the output locations add the supplies and solve errors 9 Put the printer off line when the trans action print jobs are ready Via the operator panel System Transaction Transa...

Page 211: ...e transaction setup are defined in the Settings Editor on the PRISMAsync controller 3 Load the required media into the paper trays if the setup selects the tray to tray mode 4 Touch Transaction online to put the printer online The text on the button changes from Off to On 5 On the host or mainframe connect to the printer and start the job NOTE You can also select a setup and put the printer online...

Page 212: ...e when The transaction print jobs are ready The printer contains no more print data The printer has stopped because all the jobs are ready not because an error has occurred When you switch Transaction online to offline the connection to the host is disconnected automatically 2 Press Transaction printing mode The text on the button changes from On to Off NOTE You can also put the printer offline vi...

Page 213: ...the shift settings for future use you must specify the shift settings in the setup via the Settings Editor Each time that the setup is loaded the shift settings included in the setup will become the active shift settings NOTE Only use the image shift function if you want to shift the image of the whole job The image shift applies to all the media in all the paper trays Procedure 1 On the operator ...

Page 214: ...n printing Setups 2 Click the Add button A pop up window appears 3 Enter a name and description for the transaction setup then click OK 4 Check the box next to the setup then click Open to allow changes to the settings of the setup 5 Depending on the type of setup you created click IPDS setup or PCL setup NOTE PCL is not available for all products If you only have 1 license the other PDL is not av...

Page 215: ...setup you want to change click IPDS setup or PCL setup NOTE PCL is not available for all products If you only have 1 license the other PDL is not available You can change the settings By group click the pencil at the right hand side of the group settings By item click the pencil behind the individual settings After you change the settings of a transaction setup you must load the transaction setup ...

Page 216: ... the Settings Editor Otherwise the changes are not applied Procedure 1 In the Settings Editor click Transaction printing Settings Switch the printer online or offline to switch the printer offline 2 Click Transaction printing Setups select the setup and click Load The transaction setup is now activated Activate a transaction setup 216 Chapter 8 Carry out print jobs ...

Page 217: ...transaction setups on two or more printers Procedure 1 In the Settings Editor click Transaction printing Setups 2 Click Export 3 Save the file 4 To import the setups click Import 5 Browse to the location where the setup file is stored 6 Choose either Replace or Merge NOTE After you imported the setup file you must open and load the transaction setup you want to use Exchange all setups between prin...

Page 218: ...ased machine The tray to media method supports this behavior For IPDS tray to media for tray 1 assign the media catalogue item from the list The list displays all the media in the media catalog The system copies the media attributes from the selected media to the transaction setup When you assign A3 Tabloid like media or want to use short edge feed for other media change the feed direction to Shor...

Page 219: ...ically recover output All pending pages in the printer will be deleted and the stack will be ejected The host system and the operator are responsible for the recovery The operator must restart the job manually on the correct page The tables below describe what happens when either the normal output recovery or the suppressed output recovery is selected Normal output recovery in IPDS Job Job progres...

Page 220: ... mem ory These sheets stay in the host memory When the printer starts printing these pages will be copied and sent to the con troller Suppressed output recovery in IPDS Pages that are copied to the memory of the controller are deleted from the system The operator must send these missing pages as a new transaction print job to the printer Job Job progress states Suppressed output re covery End up i...

Page 221: ...ocation Sheets jammed in the machine The operator panel displays instructions on how to solve the paper jam The opera tor has to remove these the jammed sheets manually These sheets are not delivered to the out put location Sheets in host memo ry Remain in host mem ory Once the error is re solved the printer re starts by printing the first page in the host memory Output recovery in case of an erro...

Page 222: ...media catalog is translated into a format that the controller understands However the controller receives only a limited amount of information name or size of the media This can lead to miscommunication where the controller misses a media requirement Then the controller will ask for the required media via a message on the control panel This Media message indicates the name or size of the missing m...

Page 223: ...a media 2 From the list of media select the media that must be used as the media the controller is asking for and touch OK If you do not select media from the media catalog with the requested size or name the printer will select a media with the default size 3 Select one of the 16 memory locations of the logical tray table to be used for the required media Note that the media that was previously a...

Page 224: ...ree apply only when you chose to assign a media 2 From the list of media select the media that will be used as the media the controller is asking for and touch OK The media will now be displayed with the name that is defined in the media catalog If you do not select media from the media catalog with the requested size or name the printer will select a media with the default size 3 Select the paper...

Page 225: ...Chapter 9 Carry out copy jobs ...

Page 226: ...originals or combining several sets of originals Furthermore you can define customized templates The factory default templates are directly available when you access the copy function When you select one of these templates the system sets the typical settings for the selected type of copy job automatically Next you can define all other settings for the originals and the output The illustration and...

Page 227: ... copy job is set to the first available DocBox The destination is always set to this DocBox even when a different copy job destination has been defined for the active workflow profile However you can change the DocBox to which the job must be sent Booklet job Create booklets from paper originals When you select this template The Layout setting is set to Booklet and The Media setting is set to A3 T...

Page 228: ...automated settings manually The automated settings have the prefix Auto Illustration 1 2 3 4 5 61 The settings window for copy jobs Number Pane Description 1 Original The Original pane shows the settings you can de fine for the paper originals 2 Output The Output pane shows the settings you can de fine for the job 3 Job The Job pane shows the generic settings you can define for the whole job 4 Pre...

Page 229: ...idth The binding edge is at the left hand side When you turn a sheet over the binding edge the image or text is in readable form Portrait top The original has a vertical format height width The binding edge of the original is at the top When you turn a sheet over the binding edge the image or text on the back of the sheet is in readable form Landscape left The original has a horizontal format widt...

Page 230: ...originals au tomatically Portrait Landscape Original on the glass plate indicate the orientation of the original Originals in the automatic document feeder the orientation of the originals is detected automatically Background Background suppression For originals with a vague or yellowish background you can use Background suppression to create copies and scans with a white background Settings for t...

Page 231: ...ontal format width height The binding edge of the original is at the left hand side When you turn a sheet over the binding edge the text or im age is in readable form Landscape top The output has a horizontal format width height The binding edge of the original is at the top When you turn a sheet over the binding edge the image on the back side of the sheet is in readable form This means that ever...

Page 232: ...s the pages with no special layout set tings Booklet The machine prints the pages in booklet order The pages 1 and 4 are printed on the front side of a sheet The pages 2 and 3 are printed on the back side of a sheet Same up The machine prints the same image multiple times next to each other By default the system keeps the size of the origi nals When you copy A4 originals with the setting Same up a...

Page 233: ...in dicate the position of the image on the sheet Top left moves the image to the upper left corner of the sheet Top center Top center moves the image to the center at the top of the sheet Top right Top right moves the image to the upper right corner of the sheet Center left Center left moves the image to center of the left side of the sheet Center Center moves the image to the center of the sheet ...

Page 234: ... you can de fine the values for the front side and the back side separate ly Image shift Use this setting to shift the image horizontally or vertically By default the values of the front side and the back side are interlocked This means that the values for the front side and the back side remain identical If you want to define a different value for each side press The icon changes to the unlocked ...

Page 235: ...shifted on top of the previous set This setting is only available when in the workflow profile offset stacking is set to Sets as in job Off All the sets or jobs that get to an output location will be stacked in one straight pile Advanced set tings Sheet order Auto The automatically set value from the original document Face up Deliver the prints face up first sheet on top Face up reverse Deliver th...

Page 236: ... the bottom side and in landscape position horizontal Advanced set tings Print order Front back Default value The front page on the front the back page on the back Back front Puts the front page on the back and the back page on the front Advanced set tings Rota tion 0 degrees 180 degrees Rotates the prints 180 degrees Margin erase Margins of a document sometimes contain notes or punch holes for ex...

Page 237: ...ck white Color Binding None 1 staple 2 staples Saddle stitch ing Saddle press ing Here you can define the required number of staples Further more you can define where you want the staples with the Location option The available locations for the 1 staple option Top left Top right Bottom left Bottom right The available locations for the 2 staples option Left edge Top edge Bottom edge Right edge Chec...

Page 238: ... and location of the punch holes Location Left Top Right Bottom Settings for the whole job Setting Values Description Job name By default all copy jobs are named Copy job with a se quence number To identify your copy job more easily in the list of waiting jobs or scheduled jobs you can change the name of the copy job When you touch the Job name but ton a keyboard appears Number of sets Use this se...

Page 239: ...n the Separator sheets setting is enabled a separate sheet will be inserted automatically before each set of a job to create a clear distinction between two sets Separator sheets are always empty In the Settings Editor you can se lect a media from the Media catalog to be used as separator sheets There you can also indicate the feed direction of the separator sheets long edge feed or short edge fee...

Page 240: ... lb bond 11 x 17 LGL LTRR 50 to 200 g m 13 to 53 lb bond A3 B4 A4 A4R B5 B5R or A5 A5 originals cannot be placed horizontally A5R 11 x 17 LGL LTR LTRR STMT STMT originals cannot be placed horizontally STMTR Tray Capacity up to 100 sheets 80 g m 22 lb bond IMPORTANT Thin originals may become creased if used in a high temperature or high humidity environment Do not place the following types of origi...

Page 241: ...he originals from the original output tray to avoid paper jams NOTE When you are enlarging an A4 or B5 original onto A3 or B4 paper place the original horizontally The scanned originals are output to the original output area in the order they are fed into the feeder Related information The automatic document feeder ADF optional on page 26 Feed originals to the ADF optional Chapter 9 Carry out copy...

Page 242: ...F tray 2 Adjust the slide guides to fit the size of your original 3 Place your original one sheet at a time face down into the SADF tray sliding it forward gently as far as it will go IMPORTANT Make sure to place only one original at a time If more than one original is placed at a time a paper jam may occur If your original is curled flatten it out as much as possible before placing it into the SA...

Page 243: ...canning is complete close the SADF tray CAUTION Close the SADF tray gently to avoid catching your hand as this may result in personal injury Feed originals to the SADF optional Chapter 9 Carry out copy jobs 243 ...

Page 244: ...ss plate by the arrow in the top left corner Procedure 1 Lift the feeder platen cover 1 IMPORTANT This machine is equipped with an open close sensor on the feeder platen cover see circled area in the above illustration When placing originals on the glass plate lift the feeder platen cover approximately 300 mm 11 8 so that the sensor detaches from the feeder platen cover 2 Place your originals face...

Page 245: ...if the platen cover is attached Procedure 1 Clean the glass plate original feeding belt underside of the platen cover with a cloth dampened with water or a mild cleaning agent and wipe them with a soft dry cloth Move the original feeding belt manually and clean the section that is hidden CAUTION Do not dampen the cloth too much as this may damage the original or break the machine NOTE If black str...

Page 246: ...re that the automatic document feeder does not contain more than 100 sheets 80 g m or 20 lb bond Make sure that the originals are not curled Procedure 1 Place the originals face up into the ADF or place 1 original face down on the glass plate 2 Touch Jobs Copy Scan Copy job 3 If required define the settings and the required number of copies 4 Select Scheduled jobs in the Destination field to start...

Page 247: ...o save the settings to a custom template 5 Enter the name of the custom template and touch OK 6 Press Cancel The custom template is now available at Jobs Copy Scan 7 To edit the template touch the custom template for 2 seconds You can now select the following options Rename Move Touch a blue line in front of a template to indicate the new location The location of the Last used template is set Dele...

Page 248: ...ing the first subset 4 Press Scan 5 Put the next subset into the automatic document feeder or on the glass plate 6 Repeat steps 3 to 5 for all subsequent subsets A number indicates the order in which the subsets have been scanned NOTE When you combine 1 sided and 2 sided originals you can define whether a new subset must continue on a new sheet or on the previous sheet 7 Touch Ready when the last ...

Page 249: ...wever you can access the other functions while you define the settings for your copy job or scan job NOTE The machine will remember all the job settings you already defined Procedure 1 In the job window touch Minimize The Copy Scan view appears The navigation buttons at the bottom of the operator panel become visible and accessible 2 Carry out the desired actions 3 Press Resume job Access other fu...

Page 250: ... glass plate Zoom behavior Original Starting point of the zoom function Automatic document feeder Center Glass plate Upper left hand corner This section describes the characteristics of the zoom function when you use the automatic document feeder or the glass plate NOTE The zoom function works identical for both copy jobs and scan jobs Scan from the automatic document feeder and use the zoom funct...

Page 251: ... the glass plate using the zoom function Illustration Description The original is placed face down and in readable form in the upper left hand corner on the glass plate The upper left hand corner of the glass plate is a fixed point and is used as the origin of the image Result on paper of a scan with a 100 zoom factor Result on paper of a scan with a 50 zoom factor NOTE The upper right hand corner...

Page 252: ...field However you can rename the copy job into a name of your choice This name helps you recognize the job in the list of Scheduled jobs or Waiting jobs or in the DocBox optional Procedure 1 In the job window touch Job name A keyboard appears 2 Touch Backspace until the current name is deleted 3 Touch the characters to enter a new name 4 Press OK Rename a copy job 252 Chapter 9 Carry out copy jobs...

Page 253: ...e cannot detect the dimensions of your original When you copy from the glass plate you must always define the size of your original Procedure 1 Place the originals face up into the ADF or place 1 original face down on the glass plate 2 Touch Jobs Copy Scan Copy job 3 In the Original section touch Size 4 Use the and buttons to enter the correct media size 5 Press OK The Size button displays the def...

Page 254: ...obs The default destination of copy jobs is defined in the workflow profiles Procedure 1 Put the originals face up and in readable form into the automatic document feeder 2 Touch Jobs Copy Scan Copy job 3 Define the settings for your copy job 4 Touch Destination to select Waiting jobs or DocBox 5 If required touch Job name to rename the job This helps you to recognize the job more easily 6 Touch S...

Page 255: ...er of staples and the location of the staples 4 At the Punching setting select the required number of holes 5 At the Folding setting select the folding method 6 At the Trimming setting define the trim settings 7 If required define the other settings for the original document and the output 8 Enter the generic values in the Job section 9 Touch Start Finish the output Chapter 9 Carry out copy jobs 2...

Page 256: ... place 1 original face down on the glass plate 2 Touch Jobs Copy Scan Copy job 3 Press Adjust image A window opens 4 Determine if you need to describe the original or the copy scan If the original is not okay describe the original If the original is okay but you want a different copy or scan describe the copy 5 If required adjust the following settings Brightness Contrast Color 6 Press OK Adjust t...

Page 257: ...Chapter 10 Carry out scan jobs ...

Page 258: ...lash drive Scan to DocBox PRISMAsync controller Scan to SMB SMB server Condition The customer must have a fully configured FTP and SMTP server available The settings in the Settings Editor are intended to realize a connection between the printer and the customer s FTP and SMTP servers Configuration To use the scan to file and scan to email functions the following items must be configured in the Se...

Page 259: ...hrough the USB button in the Jobs section on the control panel The left hand side of the control panel contains the slot for the USB flash drive The scan to DocBox function is accessible through the To DocBox tile in the Copy Scan section Removal of scan jobs The PRISMAsync controller buffers the scan jobs until the jobs are delivered to the specified output location You can remove scan jobs from ...

Page 260: ...scription Connection test Click Connection test to check if the scan to file func tion is configured correctly Scan to file scan to email and scan to SMB enabled This setting must be set to Yes to use the scan func tion Host name IP address The name or IP address of the FTP server that receives the scan jobs Port The TCP port number of the FTP server The default val ue is 21 User name The user nam...

Page 261: ... IP address The name or IP address of the SMTP server that handles the emails containing the scan jobs Port The TCP port number of the SMTP server The default value is 25 User name The user name that is used to access the SMTP server when sending scan jobs Password The password that corresponds with the user name Sender The name that will be displayed as the sender of the email that contains the s...

Page 262: ...DAP server The table below describes the settings the system administrator must configure in the Settings Editor Settings for LDAP in the Settings Editor Setting Description Connection test Click Connection test to check if the connection to the LDAP server works correctly Enabled This setting must be set to Yes to realize a connection between the system and the LDAP server Host name IP address Th...

Page 263: ...n a header line mandatory and at least one line with an email recipient A or separates the items in a record CR or LF separates records The header record shows the fields that the address list uses ruid address comment A profile record contains the unique user codes and matching email addresses ruid and address are mandatory comment is optional Record items Record items Record item Description rui...

Page 264: ...operator panel Syntax of the scan profiles file NOTE In the scan profiles file you can define a maximum of 99 scan profiles The scan profiles file must contain a header line mandatory and at least 1 line with a scan profile A or separates the items in a record CR or LF separates records The header record shows the items that the scan profile uses dispname format ilc prefix minnr maxnr name_nr_titl...

Page 265: ...mpressed images PDF G31 D_MH PDF version 1 3 with Group 3 1D modified Huffman compressed images PDF G42D_Fax PDF version 1 3 with Group 4 2D compressed images PDF LZW PDF version 1 3 with LZW compressed images PDF JPG PDF with JPEG compressed images JPG JPEG ilc Image Logic characteristics The best scan result for a specific purpose 1 600 dpi Optimized for printing on CopyPress systems 2 300 dpi O...

Page 266: ...r code name_nr_title dialogue title The title of the dialogue that appears when the user must enter a code to use the scan profile as defined in minnr and maxnr The title must explain to the user which number is required Maximum 40 characters Do not use CR LF cfname file name feedback Activate an additional dialogue on the printer operator panel after starting a new scan job to write down the gene...

Page 267: ...nals are scanned 1 sided NOTE You can overrule this setting on the printer operator panel OrigKind type of originals The image type of the originals photo The originals contain mainly photos or illustrations text The originals contain mainly text auto The system chooses the best settings automatically mixed The originals contain a mixture of photos and texts NOTE You can overrule this setting on t...

Page 268: ... output The paper size of the resulting scan file Select a paper size from the list described in OrigFormat You cannot select a feed direction NOTE You can overrule this setting on the printer operator panel DestQuality quality of the output Define the quality as a percentage This item is used for file types which support loss compression JPG for ex ample For other file types it is ignored Any val...

Page 269: ...s of Correct Profiles PDF printing PDF G31D_MH 2 scanjob 0 0 n Scan to email PDF G31D_MH 1 email 5 5 Enter your employee number y PRISMAaccess PDF G31D_MH 1 Scanjob 0 0 n ScanLogic Use the scan profiles file sjt csv Chapter 10 Carry out scan jobs 269 ...

Page 270: ...of logical settings for the Original and the Output automatically However you can overrule these automated settings manually The automated settings have the prefix Auto Illustration 1 2 3 4 5 67 The scan job settings Section Description 1 Original The Original section contains the settings to define how the original looks 2 File The File section contains the settings to define how the resulting fi...

Page 271: ...tart scanning With the optional Page programming function you can insert pages and define the media and finishing settings for the page ranges in a job The optional Page pro gramming function is available when you scan subsets into one file Original settings Name of the setting Values Description 1 or 2 sided Auto The automatically set value 1 sided Only 1 side of an original contains an image 2 s...

Page 272: ...t width height The binding edge of the original is at the top When you turn a sheet over the binding edge the image on the back side of the sheet is in readable form Size A4 A3 Letter Ledger etc Original on the glass plate You must indicate the media format of the original You can select a predefined size from the list When your original has a non standard size you can use the and buttons to enter...

Page 273: ...tions Select the TIFF Multi Page format when you require multi ple pages in a general format compatible with a range of graphical applications Compression Define the compression factor to reduce the file size NOTE A higher compression factor results in a scan with lower quality Size A5 A4 Etc Select the media size of the file Resolution Select a value from the list from the lowest to highest reso ...

Page 274: ...e position of the image on the sheet Top left moves the im age to the upper left corner of the sheet Top center Top center moves the image to the center at the top of the sheet Top right Top right moves the image to the upper right corner of the sheet Center left Center left moves the image to center of the left side of the sheet Center Center moves the image to the center of the sheet Center righ...

Page 275: ...osely resemble the colors of the original copy or print Color Black white Black and white Select this setting to make black white scans Grayscale Select this setting to make gray scale scans Color Select this setting to make color scans Color profile sRGB Select sRGB for a smaller color gamut with smaller dif ferences between consecutive colors The sRGB setting reduces the risk of banding AdobeRGB...

Page 276: ... number or telephone number the LDAP server checks if you are a registered user If you are a registered user the system sends the scan job as an attach ment to the corresponding email address NOTE The name of this button depends on the name defined in the scan profile file Account ID Enter the account ID for the current job The Account ID setting is only available when the accounting function on t...

Page 277: ...settings for the original and the file 5 Touch Start The scanner scans the originals The system sends the resulting file to the scan server The file is stored with a predefined name in a designated directory There is no message on the operator panel to inform you that the file was stored successfully You can access the status information on the controller Scan to file Chapter 10 Carry out scan job...

Page 278: ...SMAsync controller adding an email entry with the prefix email in the scan profile and then uploading the changed scan profile to the PRISMAsync controller The properties window opens 4 Define the original settings in the Original pane 5 Define the output settings in the Output pane 6 Touch Destination in the Job pane to enter the Destination Email addresses Subject Account ID 7 Touch Start The sc...

Page 279: ... name to change the default job name Use the keyboard to change the name then touch OK 6 Touch Destination to indicate the folder on your USB drive where you want to save the file 7 If applicable enter the Account ID 8 Touch Start The scanner scans the originals The system sends the resulting file to your USB drive 9 Touch to eject the USB drive 10 Remove the USB drive from the operator panel when...

Page 280: ...for the original and the file 4 Touch Job name to change the default job name Use the keyboard to change the name then touch OK 5 Touch the Destination button 6 From the drop down menu touch DocBox 7 Touch the DocBox button 8 Touch the DocBox to which you want to scan the job 9 Press OK 10 Press Start The scanner scans the originals The system sends the resulting file to the selected DocBox Scan t...

Page 281: ...nal face down on the glass plate 2 On the control panel touch Jobs Copy Scan Scan to SMB The job window opens 3 Change the settings for the original and the file 4 Press Start The scanner scans the originals The system sends the resulting file to the shared device Scan to SMB Chapter 10 Carry out scan jobs 281 ...

Page 282: ... save the settings to a custom template 5 Enter the name of the custom template and touch OK 6 Press Cancel The custom template is now available at Jobs Copy Scan 7 To edit the template touch the custom template for 2 seconds You can now select the following options Rename Move Touch a blue line in front of a template to indicate the new location The location of the Last used template is set Delet...

Page 283: ...out after scanning the first subset 4 Press Scan 5 Put the next subset into the automatic document feeder or on the glass plate 6 Repeat the steps 3 5 for all other subsets A number indicates the order in which the subsets have been scanned NOTE When you combine 1 sided and 2 sided originals you can define whether a new subset must continue on a new sheet or on the previous sheet 7 Touch Ready whe...

Page 284: ...le in the right way Select the correct Original type and Size settings and scan the originals again If the problem remains the application you use can be the cause of the problem Check the results in another ap plication The information on the page is too large or too small This problem can occur when the size of the original and the selec ted size of the target scan are not the same The problem c...

Page 285: ...n area on the output is dark gray but must be black then select a value of 1 to 3 When the area must be lighter then select a value of 1 to 3 9 Press OK Optimize the scan quality Chapter 10 Carry out scan jobs 285 ...

Page 286: ...Optimize the scan quality 286 Chapter 10 Carry out scan jobs ...

Page 287: ...Chapter 11 Use the DocBox optional ...

Page 288: ...up edit and reprint documents These editing options are a subset of the PRISMAprepare job preparation software A DocBox can contain the following jobs Print jobs Scan jobs NOTE In the Settings Editor the system administrator can create as many DocBoxes as required for example a DocBox for each individual customer or department Illustration 68 The starting page for DocBox jobs When to Use the DocBo...

Page 289: ... example change the print quality or layout of a document To combine analogue documents with digital documents To store jobs that must be reprinted regularly for examples reports or books Introduction to the DocBox function Chapter 11 Use the DocBox optional 289 ...

Page 290: ...oller 2 Log on to the Settings Editor as System Administrator 3 Select Workflow DocBox 4 Click Add 5 Enter a new DocBox name Identical DocBoxes are not allowed 6 If you want to secure the new DocBox with a PIN set PIN enabled to Yes and enter a PIN to secure the DocBox Each time you access this DocBox through the operator panel you must enter this PIN 7 Confirm the PIN 8 Click OK Create a new DocB...

Page 291: ...her a print job or scan job some settings cannot be changed When a setting cannot be changed the setting is greyed out Illustration 1 2 3 4 5 70 The job properties Number Pane Description 1 Original The Original pane shows the settings you can set for the paper originals 2 Output The Output pane shows the generic settings you can define for the whole job 3 Jobs The Jobs pane shows the settings you...

Page 292: ...e image on the back side of the sheet is in readable form This means that every back side of a 2 sided original is upside down compared to the front side Landscape left The output has a horizontal format width height The binding edge of the original is at the left hand side When you turn a sheet over the binding edge the text or im age is in readable form Landscape top The output has a horizontal ...

Page 293: ...he pages with no special layout set tings Booklet The machine prints the pages in booklet order The pages 1 and 4 are printed on the front side of a sheet The pages 2 and 3 are printed on the back side of a sheet Same up The machine prints the same image multiple times next to each other By default the system keeps the size of the origi nals When you print A4 originals with the setting Same up and...

Page 294: ...e on the sheet Top left moves the image to the upper left corner of the sheet Top center Top center moves the image to the center at the top of the sheet Top right Top right moves the image to the upper right corner of the sheet Center left Center left moves the image to center of the left side of the sheet Center Center moves the image to the center of the sheet Center right Center right moves th...

Page 295: ...u can de fine the values for the front side and the back side separate ly Image shift Use this setting to shift the image horizontally or vertically By default the values of the front side and the back side are interlocked This means that the values for the front side and the back side remain identical If you want to define a different value for each side press The icon changes to the unlocked sta...

Page 296: ...an output location will be shifted on top of the previous set This setting is only available when in the workflow profile offset stacking is set to Sets as in job Off All the sets or jobs that get to an output location will be stacked in one straight pile Advanced set tings Sheet order Face up Deliver the prints face up first sheet on top Face up reverse Deliver the prints face up last sheet on to...

Page 297: ...otates the prints 180 degrees Margin erase Margins of a document sometimes contain notes or punch holes for example The machine allows you to hide these el ements on the print With the and buttons of the Margin erase setting you can define how much margin of the origi nal you want to erase You can enter a value up to 100 mm 3 94 Adjust image Basic mode In the Basic mode you can adjust the calibrat...

Page 298: ...g With trapping you can reduce unwanted white gaps be tween color planes Note that an edge can appear at loca tions where the color planes overlap Define custom trap ping presets at System Color adjustment Trap ping presets editor Color Punching None 2 holes 3 holes 4 holes Die set de pendent Here you can define the amount and location of the punch holes Location Left Top Right Bottom Folding Here...

Page 299: ... name Displays the job name of the print job You can change the job name of a print job Number of sets Use this setting to define the number of copies You can en ter a value from 1 65 000 The default value is 1 Page range Displays the pages to print When All is selected all pages of the job will be printed When you touch the Page range button a keyboard appears You can define the page range you wa...

Page 300: ...set media and finishing settings for each page and subset Procedure 1 On the control panel touch Jobs DocBox 2 Touch the DocBox that contains the job you want to edit 3 Touch the job you want to edit 4 Touch Properties or double tap the job to open the Properties window 5 If required touch Page programming optional Click Ready to close the Page programming function 6 Change the required settings 7...

Page 301: ...cBox that contains the jobs you want to combine 3 Touch the jobs you want to combine or use an option from the Select menu to select multiple jobs at once 4 Touch the Build button or select Build from the drop down menu A Create build window appears that allows you to make some changes 5 If necessary use the Up and Down buttons to change the job order 6 If necessary change the generic job settings...

Page 302: ...list of Waiting jobs NOTE You can only split a job when the job is not locked Otherwise you must unlock the job first Procedure 1 On the control panel touch Jobs DocBox 2 Touch the DocBox that contains the job you want to split 3 Touch the job you want to split 4 Touch the Split button or select Split from the drop down menu The DocBox displays the original jobs Split a combined job in the DocBox ...

Page 303: ... Illustration 72 Select Lock Procedure 1 On the control panel touch Jobs DocBox 2 Touch the DocBox that contains the job you want to lock 3 Touch one or more jobs that you want to lock or use an option from the Select menu to select multiple jobs at once 4 From the drop down menu select Lock indicates that the job is locked Lock a job in a DocBox Chapter 11 Use the DocBox optional 303 ...

Page 304: ...to the original jobs for example Illustration 73 Select Unlock Procedure 1 On the control panel touch Jobs DocBox 2 Touch the DocBox that contains the job you want to unlock 3 Touch the job that you want to unlock 4 From the drop down menu select Unlock Unlock a job in a DocBox 304 Chapter 11 Use the DocBox optional ...

Page 305: ...l panel touch Jobs DocBox 2 Touch the DocBox button that contains the job you want to move 3 Touch the job you want to move 4 Touch the Move button or select Move from the drop down menu 5 Touch the destination 6 Press OK Move a job from one DocBox to another Chapter 11 Use the DocBox optional 305 ...

Page 306: ...t of Scheduled jobs With urgency immediately The system sends the print job to the top of the list of Scheduled jobs The job currently active is put on hold Procedure 1 On the control panel touch Jobs DocBox 2 Touch the DocBox that contains the job you want to print 3 Touch the desired job 4 Touch Print to print the non urgent job Print the jobs in a DocBox 306 Chapter 11 Use the DocBox optional ...

Page 307: ...urgency immediately The system sends the print job to the top of the list of Scheduled jobs The job currently active is put on hold Procedure 1 On the control panel touch Jobs DocBox 2 Touch the DocBox that contains the job you want to print 3 Touch the desired job 4 Touch Print now to print the urgent job immediately Print an urgent job from the DocBox immediately Chapter 11 Use the DocBox option...

Page 308: ...the jobs that have a label A label is a name that helps you to identify certain jobs on the operator panel for example the name of a customer The label can be defined in the printer driver in a job ticket or via an automated workflow For example the label Custom er XYZ can be added to jobs Then you can select and print all the jobs for Customer XYZ at once Printed jobs These are the jobs that have...

Page 309: ...DocBox 2 Touch the DocBox that contains the jobs you want to print 3 Touch the Select button 4 From the drop down menu select the required option 5 Press Print Select and print multiple jobs from the DocBox Chapter 11 Use the DocBox optional 309 ...

Page 310: ...Select and print multiple jobs from the DocBox 310 Chapter 11 Use the DocBox optional ...

Page 311: ...Chapter 12 Accounting ...

Page 312: ...reate invoices for customers for ex ample Default account ID for streaming jobs Use this setting to define the default account ID that is used when the system processes streaming jobs Account field separator This setting allows you to select the character used in the account log files to separate the information You can select Use semi colon or Use comma UTF 8 header enabled This settings allows y...

Page 313: ...tion recordid All accounts starting in row two must have the ID 4313 accountid This column contains the IDs maximum 40 characters that will be checked for validity when Verification enabled is set to Yes NOTE You can only enter 12 digits on the control panel accountname This column contains the account name maximum 40 characters that corresponds with the account ID in the second column When you en...

Page 314: ...nt log files and import the files into Microsoft Excel for example Data Records An account log file consists of data records The data records contain information about the use of the imagePRESS C7011VPS C7010VPS series For each job a new data record is added to the current account log file The first record of an account log file is the header record The header record always starts with 4302 Every ...

Page 315: ...nted from the mailbox AP Automatic print job a job that was directly printed from the network not from the mailbox SYSTEM A test print that was started in the serv ice mode or service copy mode SCAN A scan to file job SCAN2MBX A job that was scanned to the mail box MBXCOPY A copy job that was printed from the mailbox NOTE The term mailbox is understood to in clude the list of Waiting jobs and the ...

Page 316: ...f an error Stop The job was stopped by the user and moved to the Waiting jobs section When the job is restarted or continued later multiple ac count records will be generated for this job username A text string with a max imum length of 255 characters The user name that is defined for the job for exam ple in the attribute username in an OJT jobname A text string with a max imum length of 255 chara...

Page 317: ... ples A number The number of times that double staples were used in a job NOTE This number does not include the staples from an off line stapler noffinished sets A number The number of finished sets A set is finished after the last sheet is sent to the output location outputdestina tion Names of output loca tions A descriptive name of the output location The ex act names vary per product and depen...

Page 318: ...string with a max imum length of 40 char acters The color of the media used for the job media name 1 16 A text string with a max imum length of 40 char acters The name of the media used for the job cycle length 1 16 A number If subsequent sheets are not identical cyclic me dia the cycle length indicates after how many sheets the same sequence starts again For normal media the cycle length is 1 For...

Page 319: ...s of the first media type in a job are logged in the fields ending on 1 The characteristics of the next different media type are logged in the fields ending with 2 and so on For example mediatype2 and mediaweight2 both correspond to the second type of media used in a job If you use less than 16 media types the remaining fields are empty If you use more than 16 media types they are logged as if the...

Page 320: ...ngs Editor click Configuration Accounting 2 Click Save account log files 3 Click the link to the required file then click Save 4 Browse to the location where you want to save the file then click Save Save an account log file 320 Chapter 12 Accounting ...

Page 321: ...nt ID as defined on the operator panel overrules the account ID that is defined in the printer driver Therefore make sure that you cancel the fixed account ID before you print the job from the Waiting jobs section on the operator panel Procedure 1 In your application click File Print 2 If more printers are available select the required printer from the list 3 Click Properties 4 Click Account 5 Ent...

Page 322: ...Enter an account ID into the printer driver 322 Chapter 12 Accounting ...

Page 323: ...Chapter 13 Add toner and staples ...

Page 324: ...heck the status in the System view The colors of the toner icons The toner icons Toner icon Description A blue toner icon indicates that the toner reservoir is sufficiently filled Do not add toner An orange toner icon indicates that toner reservoir is filled less than 25 The printer can print another 600 sheets You must replace the to ner cartridge as soon as possible A red toner icon indicates th...

Page 325: ...em view 2 Press Printer The Toner section displays the toner and waste toner icons The color of the toner icon indicates the current filling level of the toner reservoir Related information The dashboard on page 70 The main unit on page 19 Check the status of the toner reservoir and waste toner container Chapter 13 Add toner and staples 325 ...

Page 326: ... other consumables out of the reach of small children If these items are ingested consult a physician immediately If toner gets onto your hands or clothing wash it off immediately with cold water Do not use warm water as this may set the toner permanently and you may not be able to remove the toner stains IMPORTANT Do not rotate the toner cartridge Doing so may cause the toner cartridge to leak Us...

Page 327: ...tinue copying and printing in black and white However if a job is interrupted because cyan magenta or yellow toner runs out copying and printing in black and white is only possible for functions other than the function being used for the interrupted job Procedure 1 Open the outer toner replacement cover IMPORTANT The toner cartridge is attached in order of yellow magenta cyan and black from the le...

Page 328: ...hock by hitting it Doing so may cause the toner cartridge to leak 4 Twist the orange protective cap of the new toner cartridge in the direction of the arrow counterclockwise to remove it 5 Push the new toner cartridge into the machine as far as it will go Support the new toner cartridge with one hand from underneath while pushing it into the machine with your other hand Replacing the toner cartrid...

Page 329: ...placement cover 7 Close the outer toner replacement cover CAUTION When closing the toner replacement cover be careful not to get your fingers caught as this may result in personal injury 8 After replacing toner cartridges if printed colors are different from the colors printed before you replaced the toner cartridges perform the Auto gradation adjustment procedure Replacing the toner cartridge Cha...

Page 330: ...t the local regulations for disposal of waste toner Use the provided cap to cover up the opening of the used waste toner container Used toner cannot be reused Do not mix new and used toner together Use only waste toner containers intended for use with this machine Do not replace waste toner container until the message prompting you to do so appears NOTE Complete instructions on how to replace the ...

Page 331: ...m with warm water will set the toner and make it impossible to remove the toner stains 4 Set the new waste toner container 5 Gently push the waste toner container tray into the until it clicks into place in the closed position CAUTION When closing the waste toner container be careful not to get your fingers caught as this may result in personal injury Replacing the waste toner container Chapter 13...

Page 332: ...o the Printer section of the System view The icon for the staple cartridge that must be refilled is orange or red NOTE Even when the staple icon is blue you can still go to the System view to check the number of staples that has been used since the last refill The colors of the staple icon The colors of the staple icon Staple icon Description A blue staple icon indicates that all the staple cartri...

Page 333: ...n window Procedure 1 Check the staple icon in the dashboard 2 When the staple icon is orange or red go to the Printer section of the System view to check which staple cartridge must be refilled Check the status of the staple cartridges Chapter 13 Add toner and staples 333 ...

Page 334: ...r optional units are operating normally and are not involved in the paper or staple jam removal procedure NOTE We recommend that you order staple cartridges from your local authorized dealer before your stock runs out Procedure 1 Open the front cover of the finisher 2 Pull out the staple case from the stapler unit holding it by its green tab NOTE When the stapler unit is at the back and it is diff...

Page 335: ... at a time 5 Gently push the staple case into the stapler unit until it is securely in place Always make sure to insert the staple case as far as it can go 6 Below the stapler unit is the staple waste tray Pull out the staple waste tray 7 Discard the staple waste Replacing the staple cartridge in the stapler unit Chapter 13 Add toner and staples 335 ...

Page 336: ...ry 8 Return the staple waste tray to its original position 9 Close the front cover of the finisher CAUTION When closing the front cover of the finisher be careful not to get your fingers caught as this may result in personal injury Replacing the staple cartridge in the stapler unit 336 Chapter 13 Add toner and staples ...

Page 337: ...oval procedure If necessary remove all of the output paper in the booklet tray before replacing the staple cartridge in the saddle stitcher unit NOTE This procedure is necessary only if the optional Saddle Finisher AJ2 is attached Since both the front and inner staple cartridges need to be replaced when staples run out in the saddle stitcher unit we recommend that you order staple cartridges from ...

Page 338: ...e cartridge Squeeze the arrow indicated in step 4 and its twin on the opposite side to release the empty staple cartridge 6 Insert the new staple cartridge until it clicks into place IMPORTANT When replacing the staple cartridges replace both the front and back staple cartridges 7 Close the staple case cover Replacing the staple cartridge in the saddle stitcher unit 338 Chapter 13 Add toner and st...

Page 339: ...ned as shown in the diagram IMPORTANT Follow steps 3 to 8 to replace the other staple cartridge in the saddle stitcher unit 9 Gently push the saddle stitcher unit F C4 back into the machine Always make sure to push the saddle stitcher unit in as far as it can go Replacing the staple cartridge in the saddle stitcher unit Chapter 13 Add toner and staples 339 ...

Page 340: ...ught as this may result in personal injury 10 Close the front cover of the finisher CAUTION When closing the front cover of the finisher be careful not to get your fingers caught as this may result in personal injury Replacing the staple cartridge in the saddle stitcher unit 340 Chapter 13 Add toner and staples ...

Page 341: ...Chapter 14 Maintenance and print quality ...

Page 342: ...g counters The Billing counters section displays the total number of prints that have been made since the machine was installed Which counters there are visible depends on the region You cannot reset the billing counters Day counters The Day counters section displays the number of prints that have been made since the counter was last reset to 0 You can for example reset the day counters at the beg...

Page 343: ...ion cannot be performed during printing Procedure 1 Touch System Maintenance 2 Touch Start maintenance 3 Touch Auto color mismatch correction and touch Start A wizard opens 4 Touch Next A status message displays 5 Touch Finish 6 Touch Stop to close the Maintenance tasks menu Result If the procedure displays an engine error contact your local service representative Auto color mismatch correction Ch...

Page 344: ... the roller Roller cleaning cannot be performed during printing Procedure 1 Touch System Maintenance 2 Touch Start maintenance 3 Touch Clean the clean roller main unit and touch Start A wizard opens 4 Touch Next A status message displays 5 Touch Finish 6 Touch Stop to close the Maintenance tasks menu Clean the roller main unit 344 Chapter 14 Maintenance and print quality ...

Page 345: ... cleaning cannot be performed during printing Procedure 1 Touch System Maintenance 2 Touch Start maintenance 3 Touch Clean the corona wires and touch Start A wizard opens 4 Touch Next A status message displays 5 Touch Finish 6 Touch Stop to close the Maintenance tasks menu NOTE If the procedure displays an engine error contact your local service representative Clean the wire Chapter 14 Maintenance...

Page 346: ...0 to 80 g m 16 lb bond to 20 lb bond Feeder roller cleaning cannot be performed during printing Procedure 1 Touch System Maintenance 2 Touch Start maintenance 3 Touch Clean the rollers of the ADF and touch Start A wizard opens 4 Put 10 sheets of blank paper into the feeder 5 Touch Next A status message displays 6 Touch Finish 7 Touch Stop to close the Maintenance tasks menu Clean the automatic doc...

Page 347: ...urface IMPORTANT Refreshing the fixing roller decreases the lifetime of the fixing roller largely NOTE Refreshing the fixing roller cannot be performed during printing Illustration A4 A3 1 2 78 The feeding direction 1 and luster streaks 2 Procedure 1 Touch System Maintenance 2 Touch Start maintenance 3 Touch Refresh the fixing roller and touch Start 4 Enter the maintenance PIN and touch OK A wizar...

Page 348: ...uch Maintenance 3 Touch Start maintenance 4 Touch Printer maintenance 5 Touch Start 6 Enter the maintenance PIN and touch OK The Printer maintenance window opens 7 Touch Next and wait a moment while the engine prepares for maintenance NOTE If you are specially trained in engine maintenance you can now perform maintenance tasks using the Operator s Maintenance Manual IMPORTANT Only continue with th...

Page 349: ...ote Assistance With this function the printer dealer can take over the operator panel of the printer remotely to assist in case of a problem for ex ample Using Remote Service In the Settings Editor all settings for the customer s proxy server must be set correctly Configuration Connectivity Proxy server Via the operator panel the remote connection must be enabled System Setup Local key operator se...

Page 350: ...ion first describes the 2 counters in the Maintenance section and how to reset the day counters Procedure 1 On the operator panel press the System button 2 Press Maintenance 3 Touch the Reset day counters button in the Day counters section A dialog box will ask you to confirm that you really want to reset the day counters 4 Touch Yes to reset the day counters to 0 Reset the day counters 350 Chapte...

Page 351: ...e day counters provide information about the number of prints since the last reset You do not need the day counters for the meter reading The day counters are only intended for your own convenience This section describes how to find the counters Procedure 1 On the operator panel press the System button 2 Press Maintenance You can find the required meter readings at the left hand side of the screen...

Page 352: ...ll figures of the configured billing counters The language of the billing counters report is the same as the selected language for the system Procedure 1 Touch System Maintenance Print billing counters report Print the billing counters report 352 Chapter 14 Maintenance and print quality ...

Page 353: ... are strongly advised to configure the shading correction and automatic gradation adjustment for the daily printer calibration The shading correction assures consistent color planes on the print The automatic gradation adjustment includes precise adjustments of the gradation density and color quality A test print is used to scan and correct the irregularities automatically To find the configuratio...

Page 354: ... media with a glossy pearl surface Be aware that it is very difficult to create new output profiles that will increase the print quality The default output profiles in the default media families are the result of months of precise measurements with specific knowledge of the printer and controller When you use device link profiles Device link profiles are assigned to a media family For all applicat...

Page 355: ...for calibration on page 354 Procedure 1 Load the calibration media NOTE Although it is advised to perform the default selected calibration procedures you can touch Printer calibration details to change the following selections Shading correction Auto gradation adjustment 2 Connect the Eye One spectrophotometer to the USB port in the control panel 3 Touch System Color adjustment Start printer calib...

Page 356: ...ation per media size or per media weight Tools Eye One spectrophotometer Procedure 1 Calibrate the printer See Calibrate the printer on page 355 2 Touch System Color adjustment Media family calibration 3 Select the media family to calibrate 4 Select one of the halftones Normal Fine Error diffusion 5 Select a media for the media family calibration 6 Load the calibration media 7 Press OK 8 Follow th...

Page 357: ...he window opens in Basic mode 5 Make the adjustments Use the colored slide bars to adjust the color adjustment curve by color Use the and sign at the right of the K bar to adjust the density in one step 6 If required touch Advanced mode in the upper right corner The window opens by default with the color Cyan On the right select the color to adjust On the left select the areas to adjust At Color c...

Page 358: ...ustments Use the colored slide bars to adjust the color adjustment curve by color Use the and sign at the right of the K bar to adjust the density in one step 5 If required touch Advanced mode in the upper right corner The window opens by default with the color Cyan On the right select the color to adjust On the left select the areas to adjust At Color clipping you can define the clipping ranges A...

Page 359: ... calibration 3 Follow the instructions on the operator panel 4 Select Automatic internal sensor in the Calibration method window 5 At System Color adjustment Printer calibration details 1 Select Auto gradation adjustment 2 Select Shading correction 6 Follow the instructions on the operator panel 7 Select Automatic internal sensor in the Calibration method window After you finish If the Shading cor...

Page 360: ...nted output has white gaps between color panes Perform the automatic color mismatch procedure See Auto color mismatch correction on page 343 When the automatic color mismatch procedure does not solve the problem enable the trapping preset setting You can create new trapping presets see Description of the print job settings on page 157 Opera tion guide trapping An uneven density occurs 1 Perform th...

Page 361: ...Chapter 15 Specifications ...

Page 362: ...e registration Print speed Specification imagePRESS C7010VPS C6010VPS Value A4 LTR 60 325 g m 16 lb bond 120 lb cover 71 6 ppm 61 7 ppm A3 11 x 17 60 209 g m 16 lb bond 78 lb cover 38 5 ppm 33 ppm 210 325 g m 79 lb cover 120 lb cover 36 ppm 30 8 ppm SRA3 60 209 g m 16 lb bond 78 lb cover 36 2 ppm 31 0 ppm 210 325 g m 79 lb cover 120 lb cover 33 6 ppm 28 8 ppm 13 x 19 2 330 2 x 487 7 mm 60 209 g m ...

Page 363: ... lb bond 36 lb bond 31 0 ppm 136 150 g m 37 lb bond 56 lb bond 28 8 ppm 151 220 g m 60 lb cover 81 lb cover 25 0 ppm 221 256 g m 82 lb cover 94 lb cover 21 5 ppm 257 325 g m 95 lb cover 120 lb cover 19 2 ppm 13 x 19 2 330 2 x 487 7 mm 60 135 g m 16 lb bond 36 lb bond 28 8 ppm 136 150 g m 37 lb bond 56 lb bond 26 8 ppm 151 220 g m 60 lb cover 81 lb cover 23 3 ppm 221 256 g m 82 lb cover 94 lb cover...

Page 364: ...ed Coated Pantone solid Uncoated Coated Pantone solid 336 new Uncoated Coated Options X Rite i1 Basic for calibration X Rite i1 Process Control software i1 spectrophotometer non UV X Rite i1 Process Control Production software i1 spectrophotom eter non UV i1 IO scanning table Remote Viewer license Scanning license E shredding license Advanced Color Management license DeviceLink support Color simul...

Page 365: ... 5 mm 0 02 in cross feed di rection Tolerance second side duplex printing varies up to 0 5 mm 0 02 feed direction and 0 5 mm 0 02 in cross feed direction Front to back alignment can vary up to maximum 1 mm 0 039 in feed direction 1 mm 0 039 in cross feed direction and 1 4 mm 0 055 diagonally Environmental Specification Value Sound power level Standby mode 75 7 dB Print mode 82 dB Ozone emissions I...

Page 366: ... 17 13 x 19 2 Media Plain paper Coated paper Recycled paper Colored paper Tex tured paper tabs Prepunched paper Transparencies Labels Postcards Offset media Paper feed technology Suction feed except bulk paper module Air separation Features Double sheet detection Automatic paper tray switching Standard paper trays Specification Value Capacity 2 x 1 000 sheets 80 g m 22 lb bond Paper weight 60 325 ...

Page 367: ...pe tray For automatic shoot out of sheets in case of double sheet feed ing Bulk paper module Paper Deck AC1 Specification Value Description Optional single tray paper module Paper trays 1 x 3 500 sheets 80 g m 22 lb bond Paper weight 64 300 g m 17 lb bond 110 lb cover Paper size A4 A4R A3 SRA3 B5 B4 LTR LTRR LGL Ledger 12 x 18 304 8 x 457 2 mm 13 x 19 330 2mm x 482 6 mm No custom sizes supported D...

Page 368: ... for scan ning to PDF Scan while warming up Standard and user defined scan and copy templates Scan options Specification Value Scan speed A4 LTR 1 sided 20 ipm A4 LTR 2 sided 15 ipm with Automatic Document Feeder For direct scan to print i e copying the scan speed only influen ces the output of the first set From the second copy set the output is at full engine speed First copy time 33 seconds fro...

Page 369: ...scanning or copy ing Option for Scanner Tab feeder Tab Feeding Attachment C1 Specification Value Description Needed for reliable tab feeding One kit is needed per paper tray to support tab feeding Option for For the paper modules of the main unit and the optional POD Deck A1 Secondary POD Deck A1 Stacker Stapler AJ1 Finisher AJ1 Specification Value Description Finisher offering offset stacking and...

Page 370: ...d Unlimited stacking by delivering booklets to external catch tray Paper weight Booklet pages 60 220 g m 16 lb bond 82 lb cover Booklet cover 64 300 g m 17 lb bond 110 lb cover Paper size A4R A3 SRA3 B4 LTR LGL 11 x 17 12 x 18 13 x 19 before folding Custom sizes 210 mm x 279 4 mm 330 2 mm x 487 7 mm 8 27 x 11 13 x 19 2 Dimensions WxDxH 800 mm x 792 mm x 1 180 mm 31 5 x 31 18 x 46 46 1 060 mm x 792...

Page 371: ...m x 213 mm 24 6 x 26 26 x 8 39 Weight 17 kg 38 lb Option for Finisher AJ1 Saddle Finisher AJ2 Trimmer D1 Booklet Trimmer D1 Specification Value Description Leading edge booklet trimmer with Conveyor belt Trim capacity 50 sheets 48 book pages 80 g m 22 lb bond including 2 cover sheets up to 300 g m 110 lb cover Trim width 2 20 mm 0 08 0 8 Output capacity 30 booklets Waste tray capacity 1500 trimmed...

Page 372: ...sheet fold 120 300 g m 32 lb bond 110 lb cover 64 300 g m 17 lb bond 110 lb cover is available as cover sheet but paper weight of cover sheet should be more than body sheet Trim width 2 15 mm 0 08 0 59 top and bottom Minimum book height 190 mm 7 48 Output capacity 30 booklets Conveyor belt of Trimmer is attached to Two Knife Booklet Trim mer A1 Waste tray capacity 1500 trimmed strips Paper size As...

Page 373: ... x 1 040 mm 12 x 31 18 x 40 94 Professional Puncher B1 250 mm x 792 mm x 1 040 mm 9 84 x 1 18 x 40 94 Professio nal Puncher Integration Unit C1 Weight 80 kg 176 lb Professional Puncher B1 40 kg 88 lb Professional Puncher Integration Unit C1 Replaceable punch die sets A4 LTR Loose Leaf 3 Hole 5 Hole Velo Bind 11 hole Plastic Comb 19 hole Twin Loop 21 hole 32 hole ProClick 32 Hole Color Coil 44 hole...

Page 374: ...ution of your computer screen Minimum 640 x 480 pixels Supported web browsers Microsoft Internet Explorer 8 and higher Mozilla Firefox 10 and higher Google Chrome 17 and higher Apple Safari 6 and higher Language As defined in your browser as long as the printer sup ports this language Settings Editor specifications 374 Chapter 15 Specifications ...

Page 375: ...Chapter 16 Third Party Software ...

Page 376: ...der the conditions governing the SOFTWARE and PRODUCT and b such transferee agrees in writing to be bound by all these conditions 6 You may not decrypt decompile reverse engineer disassemble or otherwise reduce the code of the SOFTWARE to human readable form 7 You may not modify adapt translate rent lease or loan the SOFTWARE or create derivative works based on the SOFTWARE 8 You are not entitled ...

Page 377: ...g license conditions Table of Software Names of Software License Terms and Conditions of the License FPU Emulation code The BSD License FPU Emulation code on page 378 J2ME J2ME on page 379 Library for SDE Compiler The BSD License Library for SDE Compiler on page 380 The Software Subjected to the Other Conditions Chapter 16 Third Party Software 377 ...

Page 378: ...ty of California Berkeley and its contributors 4 Neither the name of the University nor the names of its contributors may be used to endorse or promote products derived from this software without specific prior written permission THIS SOFTWARE IS PROVIDED BY THE REGENTS AND CONTRIBUTORS AS IS AND ANY EXPRESS OR IMPLIED WARRANTIES INCLUDING BUT NOT LIMITED TO THE IMPLIED WARRANTIES OF MERCHANTABILI...

Page 379: ...strictly with all such regulations and acknowledges that it has the responsibility to obtain licenses to export re export or import Software Software may not be downloaded or otherwise exported or re exported i into or to a national or resident of Cuba Iraq Iran North Korea Libya Sudan Syria or any country to which the U S has embargoed goods or ii to anyone on the U S Treasury Department s list o...

Page 380: ...is software is David M Gay Copyright 1991 by AT T Permission to use copy modify and distribute this software for any purpose without fee is hereby granted provided that this entire notice is included in all copies of any software which is or includes a copy or modification of this software and in all copies of the supporting documentation for such software THIS SOFTWARE IS BEING PROVIDED AS IS WIT...

Page 381: ...erials related to such distribution and use acknowledge that the software was developed at Cygnus Solutions Cygnus Solutions may not be used to endorse or promote products derived from this software without specific prior written permission THIS SOFTWARE IS PROVIDED AS IS AND WITHOUT ANY EXPRESS OR IMPLIED WARRANTIES INCLUDING WITHOUT LIMITATION THE IMPLIED WARRANTIES OF MERCHANTABILITY AND FITNES...

Page 382: ...Library for SDE Compiler 382 Chapter 16 Third Party Software ...

Page 383: ...s Copy job 228 Print job 157 Scan job 270 Automated workflow Add 199 Delete 201 Edit 200 Restore default 202 Automated workflows Attributes 198 Explanation 198 Automatic Document Feeder 240 Location 16 Main parts 26 Available documentation 14 B Basic copy 246 Billing counters 350 351 Print the report 352 Binding edge 191 Booklet maker 33 Booklet Trimmer D1 Location 18 Bulk media module Adjust for ...

Page 384: ...er 262 Scan to email function 261 Scan to file function 260 Connectivity Default gateway 88 DHCP 88 DNS suffix follows domain 88 Host name 88 Link speed and connection type 88 MAC address 88 Primary DNS suffix 88 Subnet mask 88 TCP P 88 Test TCP IP connection 88 Contradiction handling 166 Controller Concept 48 Turn on 44 Copy 246 Non standard size originals 253 Scan now print later 254 Copy functi...

Page 385: ...r Booklet maker 33 Inserter 33 Punch unit 33 Saddle finisher 33 Stacker stapler 33 Stapler 33 Finishing equipment 17 Finishing method 197 Finishing options Overview 32 Fixing roller 347 Fixing Station Location 17 Main parts 19 Fusing unit Location 17 Main parts 19 G Glass plate 244 Clean 245 H High Capacity Stacker C1 Location 17 High Capacity Stacker F1 Location 17 High Capacity Stacker G1 Locati...

Page 386: ...k speed and connection type 88 Load the media Bulk media module 117 Inserter 146 Paper tray 107 Schedule view 95 Special feeder 135 Tab feeder 138 Trays view 98 Lock settings in DocBox 303 Logging Printing the Configuration Report 88 Save the datadump file 88 Save the zipped log file 88 Low power mode 42 M MAC address 88 Main parts 25 Main unit Location 17 Main parts 19 Maintenance 348 Maintenance...

Page 387: ...ocation 17 Main parts 19 Power switch 42 Primary DNS suffix 88 Print a job from USB drive 180 Print a scheduled job later 169 Print an urgent job DocBox 307 Print delivery settings Offset stacking 196 Output location 196 Print order 196 Rotation 196 Sheet order 196 Sheet orientation 196 Sort by page 196 Sort by set 196 Print immediately 167 Print jobs Bundle several jobs 178 188 Split bundled jobs...

Page 388: ...249 Combined scan job 283 Minimize 249 Zoom 250 Scan job Automated settings 270 File settings 273 Optimize scan quality 284 Original settings 271 Types of settings 270 Scan profiles file Download 264 Edit 264 Records 264 Upload 264 Scan quality 256 Scan templates 247 282 Scan to email Address list file 262 263 Configuration 261 Configure LDAP server 262 Schedule view Introduction 92 Jobs pane 92 L...

Page 389: ... 76 Setup section 78 Transaction section 208 System Restart 46 Turn on 44 T Tab feeder Adjust media size 144 Load media 138 Location 17 Main parts 24 Tab Feeding Attachment C1 Location 17 Main parts 24 TCP P 88 Templates Copy 247 282 Scan 247 282 Temporary media 101 102 Test remote connection 349 Test TCP IP connection 88 Ticket 171 Time zone 88 To top 168 Toner 326 Toner cartridge 326 Toner compa...

Page 390: ...ther location 180 V Version of printer software 88 View Maintenance view 342 W Warning time Disable 85 Waste toner container 324 Replace 330 Waste toner tray Location 17 Wire cleaning 345 Workflow profiles Check and print 80 Function 80 Job by job 80 Manual planning 80 Standard 80 Unattended 80 Z Zoom behavior 250 Index 390 ...

Page 391: ...Way Suite 400 Miami Florida 33126 U S A CANON CHINA CO LTD 15F Jinbao Building No 89 Jinbao Street Dongcheng District Beijing 100005 China CANON SINGAPORE PTE LTD 1 HarbourFront Avenue 04 01 Keppel Bay Tower Singapore 098632 CANON HONGKONG CO LTD 19 F The Metropolis Tower 10 Metropolis Drive Hunghom Kowloon Hong Kong CANON AUSTRALIA PTY LTD 1 Thomas Holt Drive North Ryde Sydney N S W 2113 Australi...

Reviews: