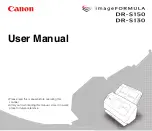
background image

15

Scanning Methods

When the flatbed scanner unit is connected to a scanner and 
computer, you can select one of the following methods to scan 
documents, based on the document type and intended purpose.

Flatbed Scanning

You can use the flatbed to scan documents one sheet at a time, single 
page documents, or documents that cannot be scanned using the 
feeder.

Feeder Scanning

Use the feeder on a connected Canon DR-series scanner to perform 
operations such as multipage document scanning. When scanning 
with this method, the operations on the connected Canon DR-series 
scanner are the same as those during stand-alone use. For details on 
feeder scanning, refer to the 

User Manual

 of the connected Canon 

DR-series scanner.

Limitations

• To use the flatbed, you must install the software included on the 

provided setup disc.

• The software that operates the connected Canon DR-series scanner 

(ISIS/TWAIN driver) must also be installed.

• If WIA driver is installed, the flatbed can operate as a stand-alone 

unit without a Canon DR-series scanner connected. In that case, 
however, there are limitations on the functions available comparing 
with the usual scanning using the ISIS/TWAIN driver.

• Both the flatbed and the connected Canon DR-series scanner must 

be turned ON to scan using the flatbed. If the flatbed is turned ON 
but the Canon DR-series scanner is turned OFF, you cannot scan 
documents using the flatbed. However, you can scan documents 
using the Canon DR-series scanner while it is turned ON, even if the 
flatbed is turned OFF.

• When the conditions for scanning require a large amount of the 

computer’s memory, scanning may not be possible if the memory is 
insufficient. If a memory error appears during scanning, exit the 
application and change the scanning conditions before attempting to 
scan again.

Supported Functions

To scan using the functions supported by the flatbed, the connected 
Canon DR-series scanner must also support the functions used.

Flatbed 
Scanning

Feeder 
Scanning

Support

Function

Supported by 
the Flatbed

• Detect Page size
• Auto Color Detection
• Advanced Text 

Enhancement II

• Document Orientation
• Punch Hole Removal
• Gamma Correction
• Panel-Feeding
• MultiStream
• Text Orientation 

Recognition

• Deskew
• Moire Reduction
• Edge emphasis
• Border Removal
• Prevent Bleed 

Through / Remove 
Background

• Color drop-out / color 

enhance

• Barcodes

Summary of Contents for imageFORMULA 201

Page 1: ...User Manual Please read this manual before operating this scanner After you finish reading this manual store it in a safe place for future reference ...

Page 2: ...roved WEEE scheme or your household waste disposal service For more information regarding return and recycling of WEEE products please visit www canon europe com environment EEA Norway Iceland and Liechtenstein Trademarks Canon and the Canon logo are registered trademarks of Canon Inc in the United States and may also be trademarks or registered trademarks in other countries Microsoft Windows and ...

Page 3: ...ce by one or more of the following measures Reorient or relocate the receiving antenna Increase the separation between the equipment and receiver Connect the equipment into an outlet on a circuit different from that to which the receiver is connected Consult the dealer or an experienced radio TV technician for help Use of shielded cable is required to comply with Class B limits in Subpart B of Par...

Page 4: ...eatures 12 Names and Functions of Parts 13 Documents 14 Placing Documents 14 Scanning Methods 15 Feeder Scanning 15 Limitations 15 Supported Functions 15 Scanning with CapturePerfect 17 Other Methods for Scanning 21 Changing the Feeding Option for Scanning 21 Using Two Scanners 23 Troubleshooting 24 Common Problems and Solutions 24 Appendix 25 Routine Cleaning 25 Auto Power OFF Setting 26 Specific...

Page 5: ...ength 1 8 m AC Adapter Power Cord Connected length 2 6 m User Manual This Document Warranty Card U S A and Canada only Setup Disc Registration Card U S A and Canada only Releasing the Lock Switch The flatbed is shipped with the internal scanning unit locked into place Before using the flatbed set the lock switch on the side of the flatbed to the position to release the scanning unit Lock Switch Pl...

Page 6: ...nu Before Installation Do not connect the scanners to the computer before installing the software Log on to Windows as an Administrator Close all other applications before installing the software Make sure that the driver for the connected Canon DR series document scanner is already installed If you connect a scanner and turn it ON before you install the software the following wizard screen will a...

Page 7: ...R series scanner connected to the flatbed do not connect any other scanners to the computer regardless of compatibility Proper functioning is not guaranteed if multiple scanners are connected When connecting the flatbed and the Canon DR series scanner do not use the USB cable supplied with the DR series scanner Instead use the USB cable supplied with the flatbed ...

Page 8: ...8 Connecting the Scanners to a Power Supply Turning the Scanners ON Turn ON the flatbed first and then turn ON the Canon DR series scanner This completes the setup ...

Page 9: ...restrictions handling precautions and instructions that should be observed for safety WARNING Indicates a warning concerning operations that may lead to death or injury to persons if not performed correctly To use the machine safely always pay attention to these warnings CAUTION Indicates a caution concerning operations that may lead to injury to persons or damage to property if not performed corr...

Page 10: ... Room temperature 50 F to 90 5 F 10 C to 32 5 C Humidity 20 to 80 RH Avoid installing the flatbed near equipment that generates a magnetic field e g speakers televisions or radios AC Adapter Connect the AC adapter only to a power outlet of the rated voltage and power supply frequency 120 V 60 Hz or 220 240 V 50 60 Hz depending on your region Do not connect other electrical equipment to the same po...

Page 11: ...d the power outlet with a dry cloth to ensure that all dust and grime is removed If the power cord is connected for a long period of time in a damp dusty or smoky location dust can build up around the power plug and become damp This may cause a short circuit and result in a fire If the flatbed makes strange noises or gives off smoke heat or strange odors or the flatbed does not function or other a...

Page 12: ...ry When using the flatbed in cold temperatures wait a few moments after turning the power switch ON Failure to do so may result in a condensation error Disposal When disposing the flatbed or AC adapter make sure to follow the local ordinances and laws or consult with your local authorized Canon dealer or service representative When Sending the Flatbed for Repairs If you need to send the flatbed ou...

Page 13: ...on until the power indicator flashes The scanning unit starts to move when the indicator starts flashing and the indicator turns OFF when the moving stops CAUTION Do not disconnect the power cord or lock the lock switch until the scanning unit stops moving NOTE The auto power OFF setting which automatically turns the flatbed OFF if it is not operated for 4 hours is enabled under default conditions...

Page 14: ...top left corner of the scanning glass IMPORTANT Do not place objects other than the document to be scanned onto the scanning glass Doing so may result in damage or personal injury Open and close the document cover gently Excessive force may result in damage to the cover or breaking the scanning glass and personal injury You cannot scan film Make sure to straighten wrinkled or curled documents befo...

Page 15: ...here are limitations on the functions available comparing with the usual scanning using the ISIS TWAIN driver Both the flatbed and the connected Canon DR series scanner must be turned ON to scan using the flatbed If the flatbed is turned ON but the Canon DR series scanner is turned OFF you cannot scan documents using the flatbed However you can scan documents using the Canon DR series scanner whil...

Page 16: ...ch Separation Hi Speed Text Enhancement Drop out color custom JPEG Transfer Advanced Text Enhancement Skip Blank Page Back side settings Double Feed Detection Imprinter Patchcode Speed priority Auto brightness Custom color enhance Rapid recovery system Prescan Margin Background smoothing Erase Dot Erase Notch Character Emphasis Skew Detection Remove shadow Color Elimination Auto resolution detecti...

Page 17: ...ing method documents that are scanned one sheet at a time on the flatbed are saved to the same image file This section describes the scanning procedure in CapturePerfect 3 1 The same procedure can be used in CapturePerfect 3 0 NOTE For details on other scanning methods refer to the CapturePerfect Operation Guide 1 From the Windows Taskbar click Start and select All Programs CapturePerfect 3 1 and ...

Page 18: ...isc provided with the flatbed 4 Click OK to finish scanner selection 5 Select Scan Batch to File from the Scan menu The Scan Batch to File dialog box appears 6 Click Scanner Setting and configure the scanner settings The properties dialog box for the scanner driver appears 7 Configure the Main Scanner Flatbed setting Select Flatbed if the document is placed on the flatbed and select Main Scanner i...

Page 19: ...tails on other settings in the Scan Batch to File Setting dialog box refer to the CapturePerfect Operation Guide 11 Place the documents to be scanned and click Save to start scanning IMPORTANT The method for placing documents differs depending on the Feeding Option setting For details see Changing the Feeding Option for Scanning on p 21 Do not move the document placed on the scanning glass while t...

Page 20: ... Adjust the brightness of scanned images Contrast Adjust the contrast of scanned images Scanning Side When scanning documents placed in the feeder of the connected Canon DR series scanner select which sides of a document to scan Automatically straightens skewed images Click to ensure that if a document is scanned at an angle the slant is detected and straightened out in the scanned image Ambient L...

Page 21: ...nning continues Automatic Feeding When additional documents are placed after a document finishes feeding the scanner automatically detects these documents and continues scanning This feeding option can only be selected when Main Scanner Flatbed is set to Main Scanner Configuring the Feeding Option This section describes how to set Feeding Option to Panel Feeding 1 Open the scanner settings dialog ...

Page 22: ...f the document is placed on the flatbed pressing the start button on the flatbed will start the scan procedure When the document finishes scanning the scanner waits for the next document to be placed 10 Place the next document to be scanned If you selected Auto for Main Scanner Flatbed in step 2 you can place the document in either the feeder or the flatbed to continue scanning 11 Repeat steps 9 a...

Page 23: ...eeding For example perform the following to scan a multipage application form and a passport 1 Start the scan procedure from the application 2 Place the application form in the Canon DR series scanner and press the start button on the DR series scanner 3 When the application form is scanned place the passport on the flatbed and press the start button on the flatbed 4 When you are finished scanning...

Page 24: ...r local authorized Canon dealer Problem 4 Text is not enhanced in scanned images even though Text Enhanced Mode is specified Solution This flatbed only supports Advanced Text Enhancement II When you open the Canon DR series scanner s ISIS TWAIN driver settings dialog box from the flatbed s ISIS TWAIN driver settings dialog box you can specify text enhancement modes other than Advanced Text Enhance...

Page 25: ...c shock Cleaning the Flatbed Use a cloth dampened with water and thoroughly wrung out to clean the outside of the flatbed and use a clean dry cloth to wipe the flatbed dry Cleaning the Scanning Glass and Pressure Board If dirt appears in scanned images or if scanned documents become dirty the scanning glass and pressure board may be dirty Be sure to clean them regularly 1 Open the document cover g...

Page 26: ...y turn OFF To disable this setting perform the following 1 Start CapturePerfect 2 Select Scanner Setting from the Scan menu The scanner settings dialog box appears 3 Click About The version information dialog box appears 4 Disable the Turn off automatically after 4 hours check box 5 Click OK to close the version information dialog box ...

Page 27: ...mm W x D x H Weight without AC adapter Approximately 18 7 lb 8 5 kg Power Supply using AC adapter DC 24 V 2 A Power Consumption Scanning Maximum 21 W In Sleep mode Maximum 3 1 W With power turned OFF Maximum 0 3 W Noise Not more than 59 dB Operating Environment Temperature 10 C to 32 5 C 50 F to 90 5 F Humidity 20 to 80 RH AC Adapter 100 to 240 V type Model Number MG1 4558 Input AC100 to 240V 50 6...

Page 28: ...28 External Dimensions Diagram 22 5 571 mm 17 2 436 mm 19 9 505 mm 19 2 488 mm 3 78 96 mm ...

Page 29: ...SUITE 400 MIAMI FLORIDA 33126 U S A CANON AUSTRALIA PTY LTD 1 THOMAS HOLT DRIVE NORTH RYDE SYDNEY N S W 2113 AUSTRALIA CANON SINGAPORE PTE LTD 1 HARBOUR FRONT AVENUE 04 01 KEPPEL BAY TOWER SINGAPORE 098632 CANON HONGKONG COMPANY LTD 19TH FLOOR THE METROPOLIS TOWER 10 METROPOLIS DRIVE HUNGHOM KOWLOON HONG KONG CANON KOREA BUSINESS SOLUTIONS INC 168 12 SAMSEONG DONG GANGNAM GU SEOUL KOREA CANON INDI...

Reviews: