background image

17


Preface

1

Installing the Machine

2

Configuring and Connecting the Fax

3

Connecting to a Computer and 

Installing the Drivers

4

Appendix


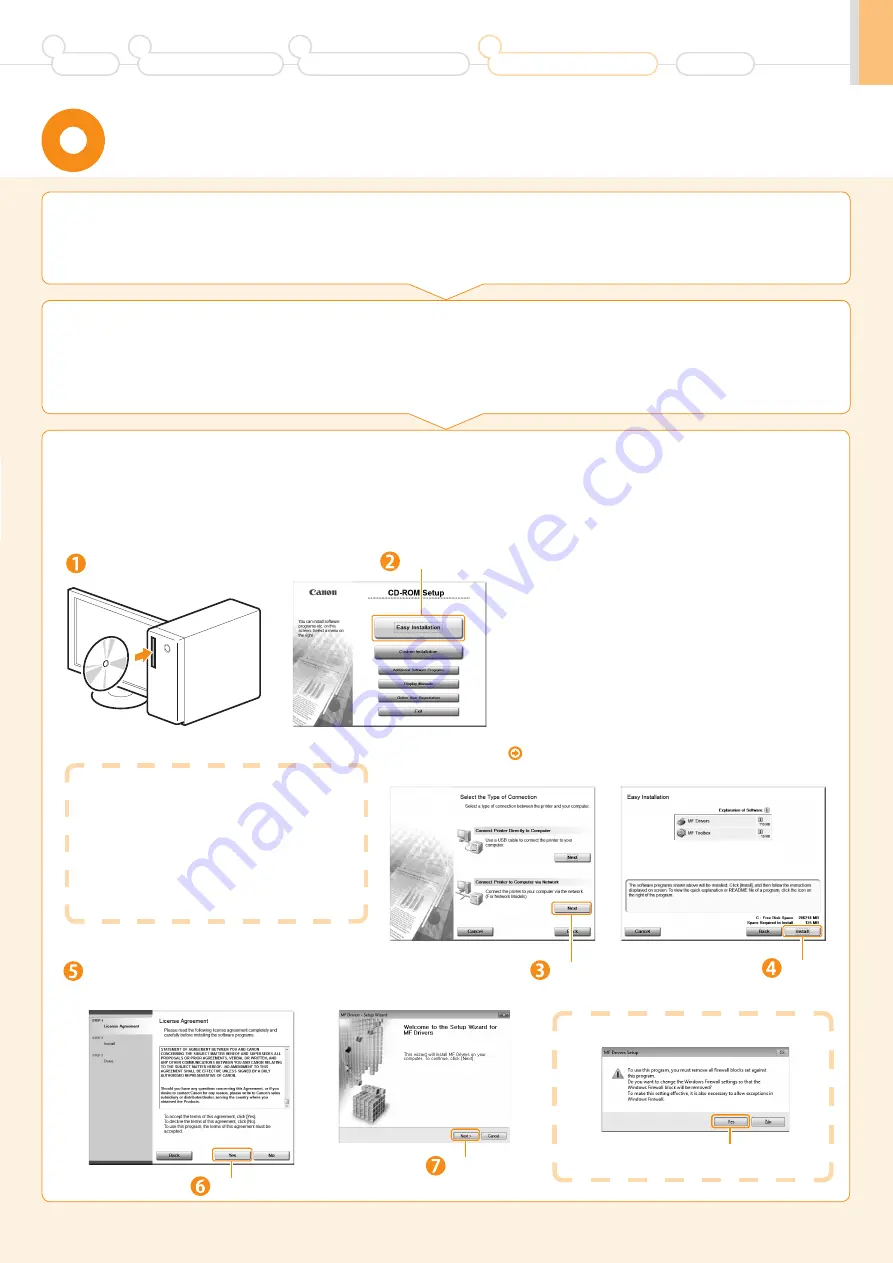
  Installing via Network Connection 

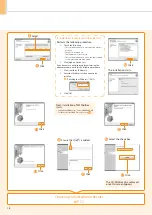
 2.

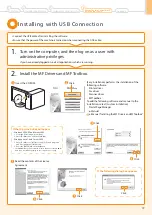
  Turn on the computer, and then log on as a user with 

administrative privileges. 

 3.

  Install the MF Drivers and MF Toolbox. 

 If you have already logged on, exit all applications which are running. 

*   If you are operating in the IPv6 environment, you may not install the drivers or software following the procedures below. 

Refer to “Installing the MF Drivers Via the WSD Network (MF4570dn Only)” in the e-Manual to install MF Drivers.  

*   You may not use the scan function in the IPv6 environment. 


 Insert the CD-ROM. 

 Click. 

 Click. 

 Read the contents of the License 
Agreement. 

 Click. 

 If the top screen does not appear 
• 

 Windows 2000, XP, and Server 2003 

 1.  From the [Start] menu, select [Run]. 
 2.  Enter "D:\Minst.exe", and then click [OK]. 

• 

 Windows Vista, 7, and Server 2008 

 1.  Enter "D:\Minst.exe" in [Search programs and files] or [Start 

Search] under the [Start] menu. 

 2.  Press the [ENTER] key on the keyboard. 

*   The CD-ROM drive name is indicated as "D:" in this manual. The CD-ROM 

drive name may differ depending on the computer you are using. 

 Click. 


If the following dialog box appears


 1.

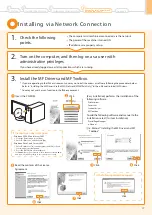
  Check the following 

points. 



 The computer and machine are connected via the network. 



 The power of the machine is turned ON. 



 IP addresses are properly set up. 


 [Easy Installation] performs the installation of the 
following software. 

• 

 Printer  driver 

• 

 Fax  driver 

• 

 Scanner  driver 

• 

 MF  Toolbox 

 To add the following software and manual to the 
installation, select [Custom Installation]. 

• 

 Presto!  PageManager 

• 

 e-Manual 

    e-Manual "Installing the MF Drivers and MF 

Toolbox" 


 Click. 

 Click. 

Summary of Contents for imageCLASS MF4570dn

Page 1: ...to a Computer and Installing the Drivers P 16 Read this guide first Please read this guide before operating this product The remarks for important safety instructions are described in Basic Operation Guide Read the guide also After you finish reading this guide store it in a safe place for future reference Starter Guide ...

Page 2: ...rding to the flowchart below Start settings Carrying the Machine to the Installation Site and Removing the Packing Materials P 4 Turning the Power ON and Specifying the Initial Settings Language Settings Country and Region Settings Current Time Settings P 10 Settings for paper sizes and paper types are required after turning the power ON P 11 Remote UI Network Connection USB Connection Settings in...

Page 3: ... for the determination of toner cartridge yield for monochromatic electrophotographic printers and multi function devices that contain printer components issued by ISO International Organization for Standardization The average yield of the replacement toner cartridge differs from which of the supplied toner cartridge To purchase replacement toner cartridges see About Replacement Toner Cartridge in...

Page 4: ...ata can be printed or saved using the recipient s fax machine Scanner driver You can use the machine as a scanner if you install the scanner driver on your computer Network Scan Utility This software is required for using the scan functions via a network This software is installed with the scanner driver MF Toolbox MF Toolbox MF Toolbox is a program which allows you to easily open an image scanned...

Page 5: ...4 617 mm 29 735 mm 4 100 mm Paper cassette Feeder cover Preface Installing the Machine Configuring and Connecting the Fax Connecting to a Computer and Installing the Drivers Appendix Before Using the Machine Document and Paper Handling Copying Printing from a Computer Registering Destinations in the Address Book Using the Fax Functions Basic Operation Copy Fax Print Scan Network Settings Security ...

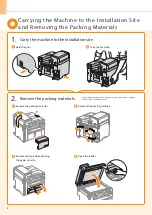
Page 6: ...terials The packing materials may be changed in form or placement or may be added or removed without notice Remove the packing materials Remove the packing materials 1 Carry the machine to the installation site Hold the grips Carry the machine Remove the tape while opening the paper cassette Open the feeder ...

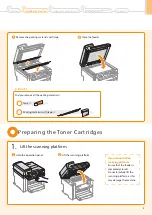
Page 7: ...s with tape Close the feeder Lift the scanning platform Hold the operation panel If you cannot lift the scanning platform Ensure that the feeder is completely closed Do not forcefully lift the scanning platform as this may damage the machine Preface 1 Installing the Machine 2 Configuring and Connecting the Fax 3 Connecting to a Computer and Installing the Drivers 4 Appendix ...

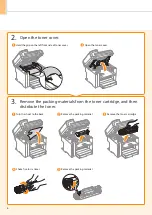
Page 8: ...and then distribute the toner 2 Open the toner cover Open the toner cover Remove the packing material Remove the packing material Hold the grip on the left front side of toner cover Turn the sheet to the back Remove the toner cartridge Shake five to six times ...

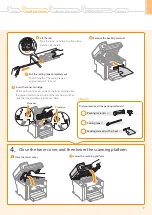
Page 9: ...ape is approximately 20 50 cm Protrusion Protrusion Insert the toner cartridge Fit the protrusions on each side of the toner cartridge into the guides located on each side of the machine and then slide the toner cartridge into the machine Did you remove all the packing materials Check Packing materials x2 Packing material with a sheet x1 Sealing tape x1 Preface 1 Installing the Machine 2 Configuri...

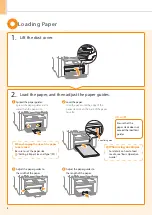
Page 10: ...es Spread the paper guides a little wider than the paper size Adjust the paper guides to the length of the paper Adjust the paper guides to the width of the paper When using envelopes For details on how to load media see Basic Operation Guide Ensure that the paper stack does not exceed the load limit guides Check When changing the size of the paper to be loaded Be sure to set the paper size Settin...

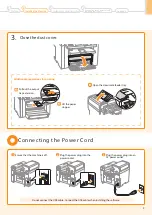
Page 11: ...ct the USB cable Connect the USB cable when installing the software Ensure that the machine is off Plug the power plug into the power socket Plug the power plug into an AC power outlet Additional preparations for printing Preface 1 Installing the Machine 2 Configuring and Connecting the Fax 3 Connecting to a Computer and Installing the Drivers 4 Appendix ...

Page 12: ... Next Next Next Language English French Portuguese Spanish Press or to select and then press OK Select Country Region United States US Canada CA Brazil BR Mexico MX Current Time Set Must rechg battery for 24 hrs to save time settings After turning main Press OK Use the numeric keys to enter values Move the cursor with or Switch to AM or PM with or Current Time Settings 01 01 2011 12 52 AM Copy Pre...

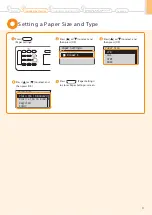
Page 13: ... select and then press OK Press Paper Settings to close Paper Settings screen Paper Settings MP Tray Drawer 1 1 Paper Size LTR LGL STMT EXEC Paper Type Plain 16 lb Bond 24 Plain L 16 lb Bond Recycled Color Preface 1 Installing the Machine 2 Configuring and Connecting the Fax 3 Connecting to a Computer and Installing the Drivers 4 Appendix ...

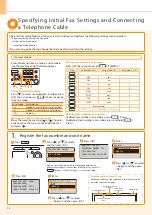
Page 14: ... to select Entry Mode and then press OK You can also press Tone to change the entry mode Entry mode Available text A Alphabet capital letters and symbols a Alphabet small letters and symbols 12 Numbers Moving the cursor entering a space Move the cursor by pressing or To enter a space move the cursor to the end of the text and press Perform fax setup Set up Now Set up Later Register the unit teleph...

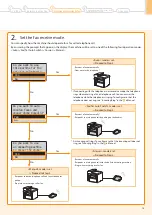
Page 15: ...o use an answering machine to answer the phone Yes No Fax Tel Auto Switch mode is set Proceed to Step 3 Receives a fax automatically Responds to a telephone call by picking up the handset An incoming call rings To configure so that the incoming call does not ring see Incoming Ring in the e Manual Answer mode is set Proceed to Step 3 Receives a fax automatically Responds to a telephone call with th...

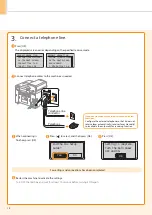
Page 16: ...nector Press to select and then press OK When connecting is finished press OK Fax settings and connections have been completed End the Fax Setup Guide No Yes Restart the machine to activate the settings Turn OFF the machine and wait for at least 10 seconds before turning it ON again Press OK Setting is complete Turn the main power OFF and ON OK If you want to connect an external telephone with fax...

Page 17: ...ollow the procedure below and change the telephone line type setting on the machine to pulse dialing If you do not know the type of telephone line you use contact your local telephone company Press Menu Press or to select Fax TX Settings and then press OK Press or to select Basic Settings and then press OK Press or to select Select Line Type and then press OK Press or to select the line type you a...

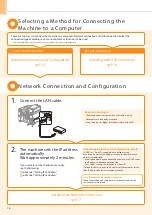
Page 18: ...onnection For USB Connection Network Connection and Configuration P 16 Installing with USB Connection P 19 There are two ways to connect the machine to a computer Network connection and USB connection Select the connection type according to your environment or functions to be used Functions with USB connection and network connection can be used simultaneously About obtaining the IP address automat...

Page 19: ...lick If the top screen does not appear Windows 2000 XP and Server 2003 1 From the Start menu select Run 2 Enter D Minst exe and then click OK Windows Vista 7 and Server 2008 1 Enter D Minst exe in Search programs and files or Start Search under the Start menu 2 Press the ENTER key on the keyboard The CD ROM drive name is indicated as D in this manual The CD ROM drive name may differ depending on t...

Page 20: ...not displayed by performing the above procedure perform the following procedure 1 Click Search by IP Address 2 Enter the IP address of the device to be installed Checking the IP Address P A 3 3 Click OK The installation starts 1 2 Select Next installation of MF Toolbox starts In Windows 2000 Server Server 2003 2008 MF Toolbox is not installed Proceed to Step Select the check box 1 2 Click Checking...

Page 21: ...exe in Start Search or Search programs and files under the Start menu 2 Press the ENTER key on the keyboard The CD ROM drive name is indicated as D in this manual The CD ROM drive name may differ depending on the computer you are using Click Read the contents of the License Agreement Click If the following dialog box appears Click Click Easy Installation performs the installation of the following ...

Page 22: ...e end B Connect to the USB port on the machine When a dialog box is displayed Follow the on screen instructions and complete the installation Click Next installation of MF Toolbox starts In Windows 2000 Server Server 2003 2008 MF Toolbox is not installed Proceed to Step Select the check box 1 2 Click Click Ensure that is added Click Click The CD ROM may be removed once this screen appears ...

Page 23: ...nners and Cameras Windows XP From the Start menu select Control Panel and then click Printers and Other Hardware Scanners and Cameras Windows Vista From the Start menu select Control Panel and then click Hardware and Sound Scanners and Cameras Windows 7 1 Enter scanner in Search programs and files under the Start menu 2 Click View scanners and cameras MF Toolbox Desktop Network Scan Utility Taskba...

Page 24: ...t cut icon MF4500 Series e Manual on the desktop ActiveX may block pop ups in the background If the e Manual is not displayed properly look for an information bar at the top of the page and click the information bar Insert the User Software CD ROM in your computer Click Display Manuals Click for e Manual Displaying the e Manual directly from the CD ROM Depending on the operating system you are usi...

Page 25: ...ddress 192 168 0 215 The IP address of the machine is the address checked in Step Input Example http 192 168 0 215 When the machine is connected to a switching hub You may not be able to connect the machine to a network even though your network settings are appropriate Delaying the machine s network startup time may solve the problem e Manual Specifying the Wait Time until the Machine Connects to ...

Page 26: ...lation software in case you want to re install the drivers You have closed all applications on your computer If you do not need the printer driver fax driver scanner driver or MF Toolbox you can uninstall them with the following procedure If your machine is connected to a computer via the WSD network you may not uninstall the drivers or software following the procedures below Refer to Uninstalling...

Page 27: ... names are registered trademarks trademarks or service marks of their respective owners Copyright 2010 by Canon Inc All rights reserved No part of this publication may be reproduced transmitted transcribed stored in a retrieval system or translated into any language or computer language in any form or by any means electronic mechanical magnetic optical chemical manual or otherwise without the prio...

Page 28: ...on Plaza Lake Success NY 11042 U S A CANON EUROPA N V Bovenkerkerweg 59 61 1185 XB Amstelveen The Netherlands CANON CHINA CO LTD 15F Jinbao Building No 89 Jinbao Street Dongcheng District Beijing 100005 PRC CANON SINGAPORE PTE LTD 1 HarbourFront Avenue 04 01 Keppel Bay Tower Singapore 098632 CANON AUSTRALIA PTY LTD 1 Thomas Holt Drive North Ryde Sydney NSW 2113 Australia CANON GLOBAL WORLDWIDE SIT...

Reviews: