●
You can also configure the setting to receive faxes automatically after the machine rings for a certain
period of time. [Switch to Auto RX](P. 445)
4
Press [Apply].
➠
The [Connect Telephone Line] screen is displayed.
Step 4: Connecting to Telephone Line
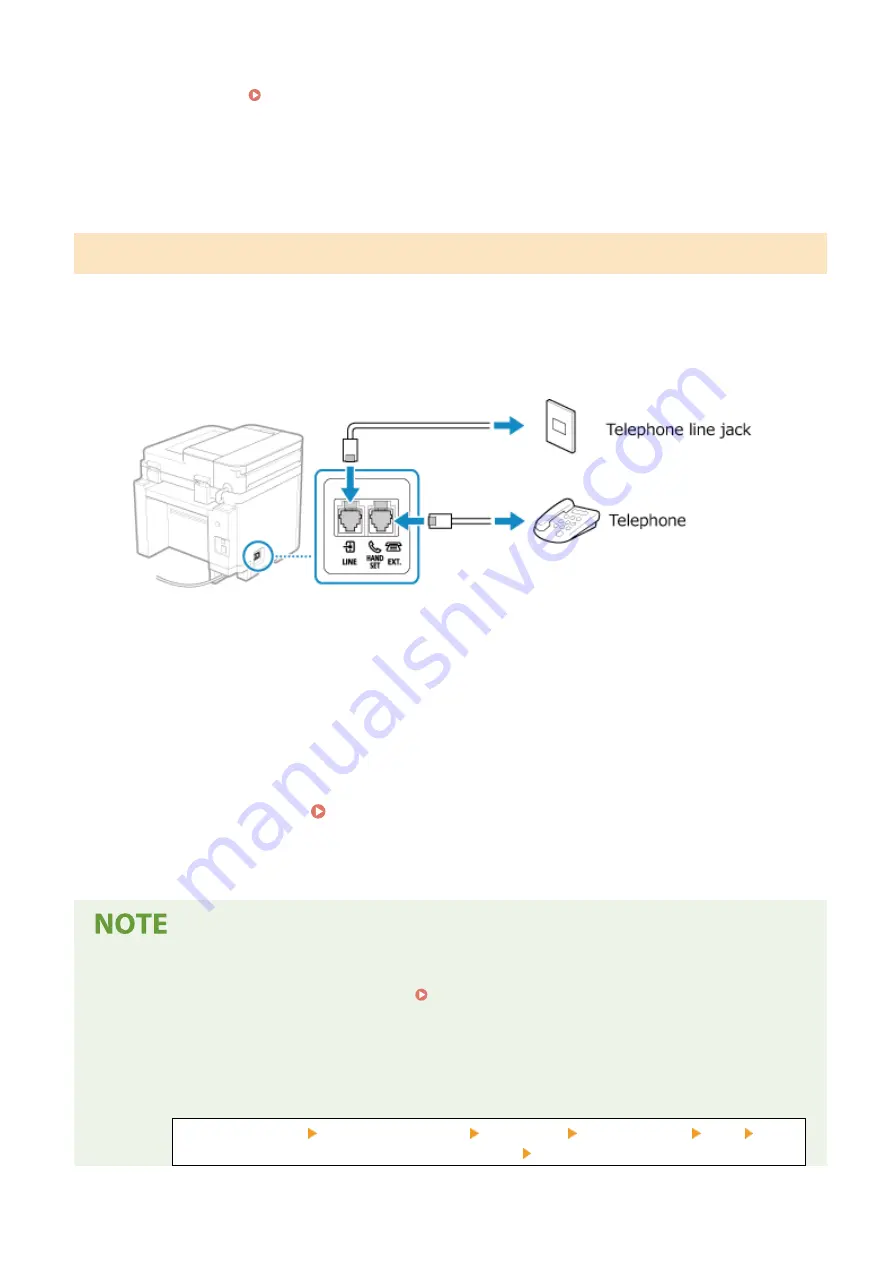
Use the supplied telephone cord to connect the machine to the telephone line.
When using a telephone, connect it to the machine.
1
Connect the supplied telephone cord to the telephone line jack (LINE) on the
machine and the telephone line connector on the wall.
Connect the telephone to the external telephone jack (EXT.) on the machine.
●
When connecting a telephone with fax function, be sure to disable the fax auto receive setting on the
telephone.
●
Depending on the type of telephone connected to it, the machine may not be able to send or receive faxes
properly.
2
On the screen confirming that you want to exit the Fax Setup Guide, press [Yes].
3
Restart the machine. Restarting the Machine(P. 106)
➠
The settings configured in the Fax Setup Guide are applied, and the type of telephone line is configured
automatically.
If the Type of Telephone Line Is Not Configured Automatically
●
Configure the type of telephone line manually. [Select Line Type](P. 438)
* If you do not know the type of your telephone line, contact your telephone company.
Making an Alert Sound When the Handset Is Not Properly Set on the Cradle
●
You can select whether the machine makes an alert sound when the handset of a telephone connected to
the machine is not properly set on the cradle.
Log in to Remote UI [Settings/Registration] [TX Settings] [Fax TX Settings] [Edit] Select
the [Off-Hook Alarm] checkbox and adjust the volume [OK]
Setting Up
97
Summary of Contents for imageCLASS MF273dw
Page 66: ... Shared Key Encryption for WPA WPA2 TKIP AES CCMP IEEE 802 1X Authentication Setting Up 57 ...
Page 90: ... The settings are applied Setting Up 81 ...
Page 130: ...Basic Operations 121 ...
Page 148: ...Paper with logo in landscape orientation Basic Operations 139 ...
Page 225: ...If the job list screen is displayed select the job to cancel and press Yes Scanning 216 ...
Page 285: ...If the job list screen is displayed select the job to cancel and press Cancel Yes Copying 276 ...
Page 319: ...8 Log out from Remote UI Security 310 ...
Page 444: ... Custom 2 Confirm Destination Scan PC Settings Menu Items 435 ...
Page 490: ...Specify to increase the density and to reduce it Maintenance 481 ...
Page 598: ...Manual Display Settings 94LS 0HR Appendix 589 ...


