Canon imageclass MF229DW Getting Started Download Page 8

8

En

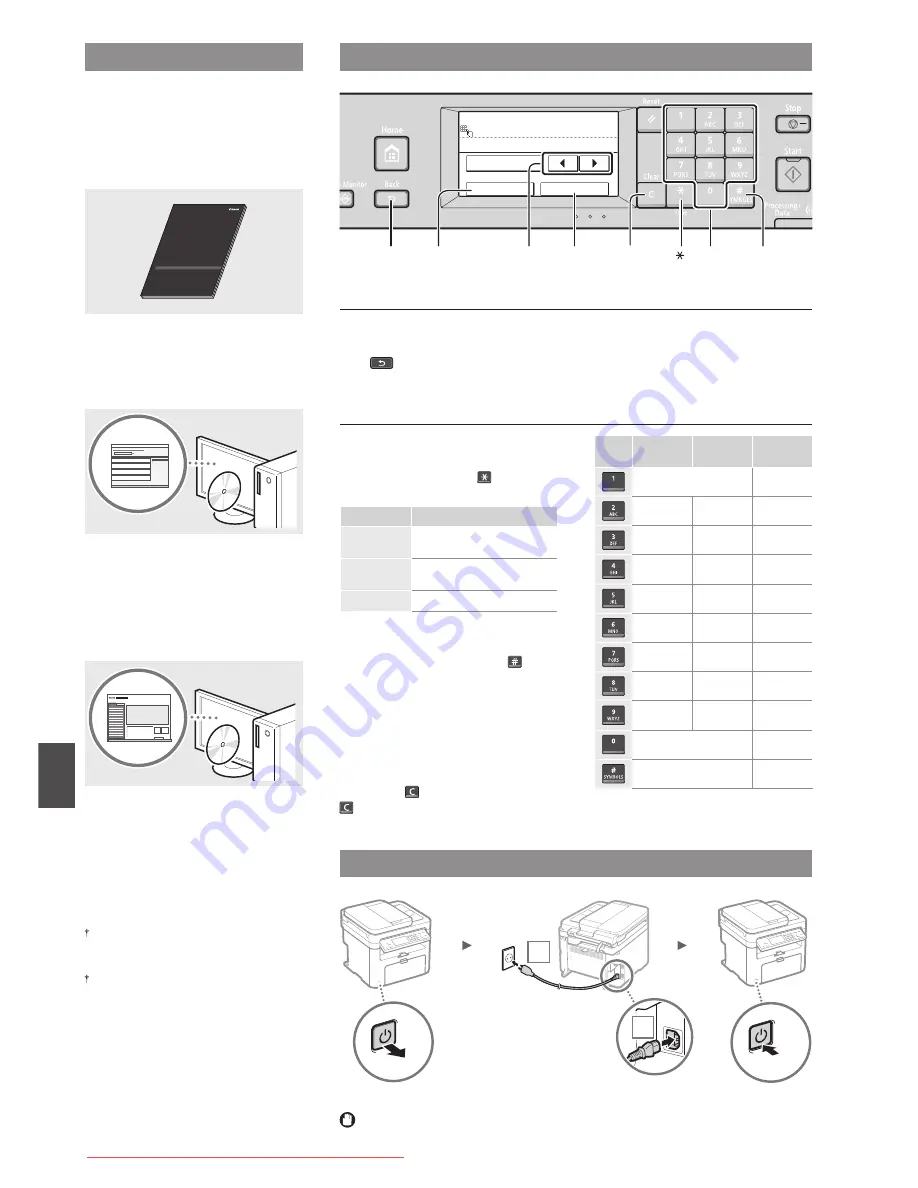
 Navigating the Menu and Text Input Method

Register Unit Name

 Canon-1

A

Apply

A/a/12

Symbol

◀▶

<A/a/12>

Back

<Apply>

#

Clear

Numeric keys

About the Supplied Manuals



Getting Started (This manual):

Read this manual fi rst. This manual 
describes the installation of the 
machine, the settings, and a caution. Be 
sure to read this manual before using 
the machine.

 MF Driver Installation Guide (User 

Software and Manuals DVD-ROM):

Read this manual next. This manual 
describes software installation.

 e-Manual 

(User Software and Manuals DVD-
ROM):

Read the desired chapter to suit your 
needs. The e-Manual is categorized by 
subject to fi nd desired information easily.

Viewing the e-Manual from the DVD-
ROM

1  Insert the User Software and Manuals 

DVD-ROM in your computer.

2 Click [Manuals].
3 Click [e-Manual].

   Depending on the operating system you 

are using, a security protection message 
appears. 

   If the User Software and Manuals DVD-ROM 

has been already inserted in your computer 
and [Manuals] is not displayed, remove the 
DVD-ROM and insert it again.

Connecting the Power Cord and Turning ON the Power

OFF

1

2

ON

  Do not connect the USB cable at this time. Connect it when installing software.

Navigating the Menu

Item selection

Tap an item to select it.
Press 

 to return to the previous 

screen.

Setting confi rmation

Tap the item.
However, when <Apply> appears, tap 
<Apply>.

Text Input Method

Changing entry mode

Tap <A/a/12> to change the entry 
mode. You can also press 

 to change 

the entry mode.

Entry mode

Available text

<A>

Uppercase alphabetic letters 
and symbols

<a>

Lowercase alphabetic letters 
and symbols

<12>

Numbers

Entering text, symbols, and numbers

Enter with the numeric keys or 

 .

Moving the cursor (Entering a space)

Tap <

> or <

> to move the cursor. To 

enter a space, move the cursor to the 
end of the text, and tap <

>.

Deleting characters

Delete with 

 . Pressing and holding 

 deletes all characters.

Entry mode: 

<A>

Entry mode: 

<a>

Entry mode: 

<12>

@ . - _ /

1

ABC

abc

2

DEF

def

3

GHI

ghi

4

JKL

jkl

5

MNO

mno

6

PQRS

pqrs

7

TUV

tuv

8

WXYZ

wxyz

9

(Not available)

0

(space) - . * # ! “ , ; : ^ ` _ = / | ‘ 

? $ @ % & + \ ˜ ( ) [ ] { } < > 

(Not available)

Downloaded from ManualsPrinter.com Manuals

Summary of Contents for imageclass MF229DW

Page 1: ...83 000 Getting Started Getting Started IMPORTANT For Macintosh users please refer to P 13 En Introducción IMPORTANTE Para usuarios de Macintosh consulte la pág 25 Es Downloaded from ManualsPrinter com Manuals ...

Page 2: ...m 45 mm 128 mm 369 mm 99 mm 390 mm 390 mm 360 mm 270 mm 39 mm 128 mm 362 mm 106 mm 360 mm 270 mm 39 mm 128 mm 362 mm 390 mm Installing the Printer The USB cable and Limited Warranty Notice may not be supplied depending on the country where you purchased the machine Downloaded from ManualsPrinter com Manuals ...

Page 3: ...3 Remove all the tape 1 2 Downloaded from ManualsPrinter com Manuals ...

Page 4: ...4 Installing the Printer 1 2 1 2 1 2 Downloaded from ManualsPrinter com Manuals ...

Page 5: ...5 1 2 Downloaded from ManualsPrinter com Manuals ...

Page 6: ...6 Connecting the Handset Option MF229dw MF226dn MF217w MF215 MF229dw MF226dn MF217w MF215 Push the pins in only up to here Downloaded from ManualsPrinter com Manuals ...

Page 7: ...de los manuales suministrados 20 Navegación por el menú y método de introducción de texto 20 Conexión del cable de alimentación y encendido del interruptor de alimentación 20 Especificación de la configuración inicial 21 Selección del método para conectar el equipo al ordenador 21 Selección del método de conexión A través de una red LAN inalámbrica u otro método MF229dw MF226dn MF217w únicamente 2...

Page 8: ...serted in your computer and Manuals is not displayed remove the DVD ROM and insert it again Connecting the Power Cord and Turning ON the Power OFF 1 2 ON Do not connect the USB cable at this time Connect it when installing software Navigating the Menu Item selection Tap an item to select it Press to return to the previous screen Setting confirmation Tap the item However when Apply appears tap Appl...

Page 9: ...o methods depending on the router access point that you are using There is a button You can easily setup if your router access point has a button and if the mark is on the router There is no button If there is no button on your router access point you may manually select SSID and complete the settings Choosing the Method to Connect Via Wireless LAN or Other Method MF229dw MF226dn MF217w Only MF229...

Page 10: ...y see the following items e Manual Network Connecting to a Network Setting IP Addresses 2 Install the driver and software using the User Software and Manuals DVD ROM See For details on the installation procedures P 13 Proceed to Setting a Paper Size and Type P 13 Connecting via a USB Cable Connect the USB cable after installing the MF Drivers and the MF Toolbox NOTE If you connected the USB cable ...

Page 11: ...29dw MF217w Only Push Button Mode 1 Tap Menu in the Home Screen 2 Tap Network Settings 3 Tap Wireless LAN Settings 4 Read the message that is displayed and tap OK 5 Tap WPS Push Button Mode Wireless LAN Settings WPS Push Button Mode WPS PIN Code Mode SSID Settings Power Save Mode Wireless LAN Information 6 Tap Yes 7 Press and hold the button until the lamp lights or blinks You should press the WPS...

Page 12: ...ric keys and tap Apply 5 Tap Wireless LAN Settings 6 Read the message that is displayed and tap OK 7 Tap SSID Settings 8 Tap Select Access Point SSID Settings Select Access Point Enter Manually 9 Select a wireless LAN router If multiple matched SSIDs are displayed select the ID that is listed first the one with the strongest signal 10 Enter the network key that you have written down Enter the netw...

Page 13: ...able by referring to the illustration 3 Exit the Fax Setup Guide and then restart the machine Do you want to end Fax Setup Guide Yes No Turn the main power OFF and ON to apply the settings OK Turn OFF the machine and wait for at least 10 seconds before turning it ON again The telephone line types are not detected automatically See the e Manual and set a telephone line manually e Manual Setting Men...

Page 14: ...if you do not need them you can delete them Remote Receiving If an external telephone is connected you can switch to the fax receiving mode immediately by dialing the ID number for fax receiving using the dial buttons of the telephone during a phone call Print Enlarged Reduced Printing 2 Sided Printing Reduced Layout You can reduce multiple documents to print them onto one sheet 2 on 1 4 on 1 Book...

Page 15: ...en to remove the jammed document or paper This manual indicates only areas where paper jams occur For details on each function see the e Manual Paper jammed Press Next to display the steps Previous Next Inside the machine Manual Feed Slot Paper drawer Rear cover MF229dw MF226dn only MF229dw MF226dn MF217w MF215 Feeder Downloaded from ManualsPrinter com Manuals ...

Page 16: ...e memory without being printed Also reports may not be printed even if they are set to be printed automatically If Continue Print When Near Cart Life End in RX Print Settings is set to On however printing will be continued but white streaks or smudges may appear on printouts e Manual Printing Reports and Lists e Manual Setting Menu List When white streaks appear on the output or the output is part...

Page 17: ...l shock Unstable location A location subject to excessive vibrations A location where block the ventilation slots too close to walls bed shaggy rug and other similar objects A damp or dusty location A location exposed to direct sunlight or an outside place A location subject to high temperatures A location near open flames A location with poor ventilation system Although ozone is generated from th...

Page 18: ...ot use alcohol benzenes paint thinners or other flammable substances If these substances come into contact with electrical parts inside the machine this may result in a fire or electric shock Check the power cord and plug regularly for damage Check the machine for rust dents scratches cracks or excessive heat generation Use of poorly maintained equipment may result in a fire or electric shock Cons...

Page 19: ...ult in criminal and or civil liability A non exhaustive list of these documents is set forth below This list is intended to be a guide only If you are uncertain about the legality of using your product to scan print or otherwise reproduce any particular document and or of the use of the images scanned printed or otherwise reproduced you should consult in advance with your legal advisor for guidanc...

Page 20: ... y no apareciera Manuales retire el DVD ROM e insértelo de nuevo Conexióndelcabledealimentaciónyencendidodelinterruptordealimentación APAGADO 1 2 ENCENDIDO No conecte el cable USB en este momento Conéctelo cuando instale el software Navegación por el menú Selección de elementos Pulse sobre un elemento para seleccionarlo Pulse para volver a la pantalla anterior Confirmación de la configuración Puls...

Page 21: ...de acceso que esté utilizando Hay un botón Podrá llevar a cabo fácilmente la configuración si su router punto de acceso tiene un botón y si existe la marca en el router No hay ningún botón Si no hay ningún botón en el router punto de acceso podrá seleccionar el SSID y llevar a cabo la configuración manualmente Selección del método de conexión A través de una red LAN inalámbrica u otro método MF229...

Page 22: ... Red Conexión a una red Configuración de direcciones IP 2 Instale el controlador y el software con el disco User Software and Manuals DVD ROM Consulte Para obtener información detallada sobre los procedimientos de instalación pág 25 Proceda con Ajuste del tamaño y el tipo del papel pág 25 Conexión con un cable USB Una vez instalados los controladores MF y MF Toolbox conecte el cable USB NOTA Si co...

Page 23: ...otón pulsador 1 Pulse Menú en la pantalla de Inicio 2 Pulse Opciones de red 3 Pulse Opciones de red inalámbrica 4 Lea el mensaje mostrado y pulse OK 5 Pulse Modo de pulsador WPS Opc de red inalámbr Modo de pulsador WPS Modo de código PIN WPS Opciones de SSID Modo de ahorro de energía Información de LAN inalámbr 6 Pulse Sí 7 Mantenga pulsado el botón hasta que la luz se encienda o parpadee Deberá p...

Page 24: ...lámbrica 6 Lea el mensaje mostrado y pulse OK 7 Pulse Opciones de SSID 8 Pulse Selec punto de acceso Opciones de SSID Selec punto de acceso Introducir manualmente 9 Seleccione un router de red inalámbrico Si se muestran varios SSID asociados seleccione el ID que aparece primero en la lista el que tiene la señal más fuerte 10 Introduzca la clave de red que tenga anotada Introduzca la clave de red u...

Page 25: ...ica en la ilustración 3 Cierre la Guía de configuración de fax y reinicie el equipo Desea finalizar la Guía de configuración de fax Sí No Apague y encienda la alimentación principal para aplicar las opciones Correcto Apague el equipo y espere 10 segundos como mínimo antes de volver a encenderlo Los tipos de línea telefónica no se detectan automáticamente Consulte el e Manual y establezca una línea...

Page 26: ...mentos almacenados en cualquier momento y si no los necesita podrá eliminarlos Recepción remota Si se conecta un teléfono externo podrá cambiar al modo de recepción de fax inmediatamente marcando el número de ID para la recepción de fax para ello use los botones de marcación del teléfono durante una llamada telefónica Impresión Impresión ampliada reducida Impresión a doble cara Diseño de página re...

Page 27: ...apel atascado En este manual se indican únicamente las áreas en las que se pueden producir atascos de papel Para obtener una información detallada sobre cada función consulte el e Manual Papel atascado Pulse Siguiente para ver los pasos Anterior Siguiente Dentro del equipo Ranura de alimentación manual Casete de papel Tapa trasera MF229dw MF226dn sólo MF229dw MF226dn MF217w MF215 Alimentador Downl...

Page 28: ...ados para que se impriman automáticamente Si Seguir imprim cuando tóner casi agotado en las Opciones impresión RX está establecido en On la impresión continuará pero podrían aparecer rayas blancas o manchas en las impresiones En el e Manual consulte Impresión de informes y listas En el e Manual consulte Lista del menú de configuración Cuando aparezcan rayas blancas en la impresión o la impresión e...

Page 29: ...cesivas Lugares en los que pudieran quedar bloqueadas las ranuras de ventilación demasiado cerca de la pared sobre una cama sobre una alfombra mullida u otros objetos similares Lugares húmedos o polvorientos Lugares al aire libre o en los que el equipo quede expuesto a la luz solar directa Lugares sometidos a altas temperaturas Lugares próximos a llamas abiertas Lugares con sistemas de ventilación...

Page 30: ...ca los paños de limpieza únicamente con agua No emplee alcohol benceno disolventes u otras sustancias inflamables Si dichas sustancias entraran en contacto con los componentes eléctricos del interior del equipo podría producirse un incendio o una descarga eléctrica Compruebe periódicamente si existen daños en el cable de alimentación y en el enchufe Compruebe si existe óxido indentaduras rayas gri...

Page 31: ...r prohibido por la ley e infringir las leyes del código penal y o civil A continuación se presenta una lista no exhaustiva de estos documentos Esta lista es meramente una guía Si no está seguro sobre la legalidad del empleo del producto para escanear imprimir o reproducir de otro modo cualquier documento en particular y o sobre el empleo de las imágenes escaneadas impresas o de otro modo reproduci...

Page 32: ... Netherlands CANON CHINA CO LTD 15F Jinbao Building No 89 Jinbao Street Dongcheng District Beijing 100005 PRC CANON SINGAPORE PTE LTD 1 HarbourFront Avenue 04 01 Keppel Bay Tower Singapore 098632 CANON AUSTRALIA PTY LTD Building A The Park Estate 5 Talavera Road Macquarie Park NSW 2113 Australia CANON GLOBAL WORLDWIDE SITES http www canon com FT6 0883 000 XXXXXXXXXX Copyright CANON INC 2014 PRINTE...

Reviews: