Canon imageCLASS D860 Setup Instructions Download Page 7

Click 

Canon iC D800

Install

.

The 

Add Printer Wizard

dialog box appears. Click

Next

.

Click 

Have Disk

in the

Manufacturers/Printer

dialog box.

The 

Install From Disk

dialog box appears.

The printer selection 
dialog box appears.
Click 

Next

.

The Printer name dialog
box appears.

Select 

Use the 

following port

. Select

the printer port the
machine is connected to
(usually 

LPT1:

(Recommended Printer
Port)

), then click 

Next

.

The Manufacturers/
Printers selection 
dialog box appears.

Use 

Browse

to select

the directory that 
contains the printer 
driver, then click 

OK

.

For example, if your 
CD-ROM drive is drive
D:\English\WinXP, click

Open

.

Click 

Next

.

If you want to change
printer name, type a new
name into the text box.

If you want to set this
printer as the default
printer, select 

Yes

.

If no other printer driver
is installed on your 
computer, this printer 
will be set as the default
priter automatically.
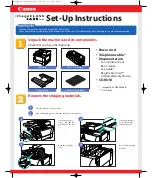
Select 

Local printer

attached to this 
computer

, then click

Next

.

The printer port 
selection dialog box
appears.

Automatically

detect and install my
Plug and Play printer

is

not recommended.

<Windows XP/Server 2003>

Click 

Yes

if you want to

print a test page, or 

No

if

you do not want to print
a test page, then click

Next

.

If this printer is shared
with other computers,
select 

Share name

, and

click 

Next

.

You can modify the 
setting after installation,
from the 

Printer

Properties

dialog box.

Click 

Finish

.

5

6

7

8

9

10

11

12

13

14

Depending on your computer settings, this selection may not be 
displayed.

**E111MB Set-Up Sheet.qxd  7/20/04  2:39 PM  Page 7

Summary of Contents for imageCLASS D860

Page 1: ...p Instructions Basic Guide Fax Guide Registration Card Limited Warranty Notice CD ROM imageCLASS D880 Model U S A only Slide the platen unit to the left until the I4 mark appears Remove the shipping m...

Page 2: ...lose the cartridge cover and slide the platen unit back to the original position Pull out the cassette until it stops Load the paper stack beneath the cassette s length guide 1 and width guides 2 Make...

Page 3: ...tray onto the opening on the left side of the machine 1 External device optional Connect the cord of an extension telephone answering machine or data modem to the jack Telephone line cord Connect the...

Page 4: ...Mode if you want to receive faxes automatically and route voice calls to an answering machine FaxTel when a telephone is connected to the machine the machine automatically switches between faxes and v...

Page 5: ...number use the numeric keys Press Space to enter a space To enter a plus sign before the number press key If you make a mistake press Delete or 4 to delete the last number or press Clear to delete al...

Page 6: ...For example if you are usingWindows 95 98 and your CD ROM drive is drive D browseD English Win9x and click OK Select the port the machine is connected to usually LPT1 then click Next The Printer name...

Page 7: ...type a new name into the text box If you want to set this printer as the default printer select Yes If no other printer driver is installed on your computer this printer will be set as the default pr...

Page 8: ...appears Click OK For installation instructions underWindows 2000 NT 4 0 Printer Guide For installation help and operational instructions call us at 1 800 828 4040 1 800 OK CANON U S A CUSTOMERS CANADA...

Reviews: