Canon imageCLASS D530 Starter Manual Download Page 5

5

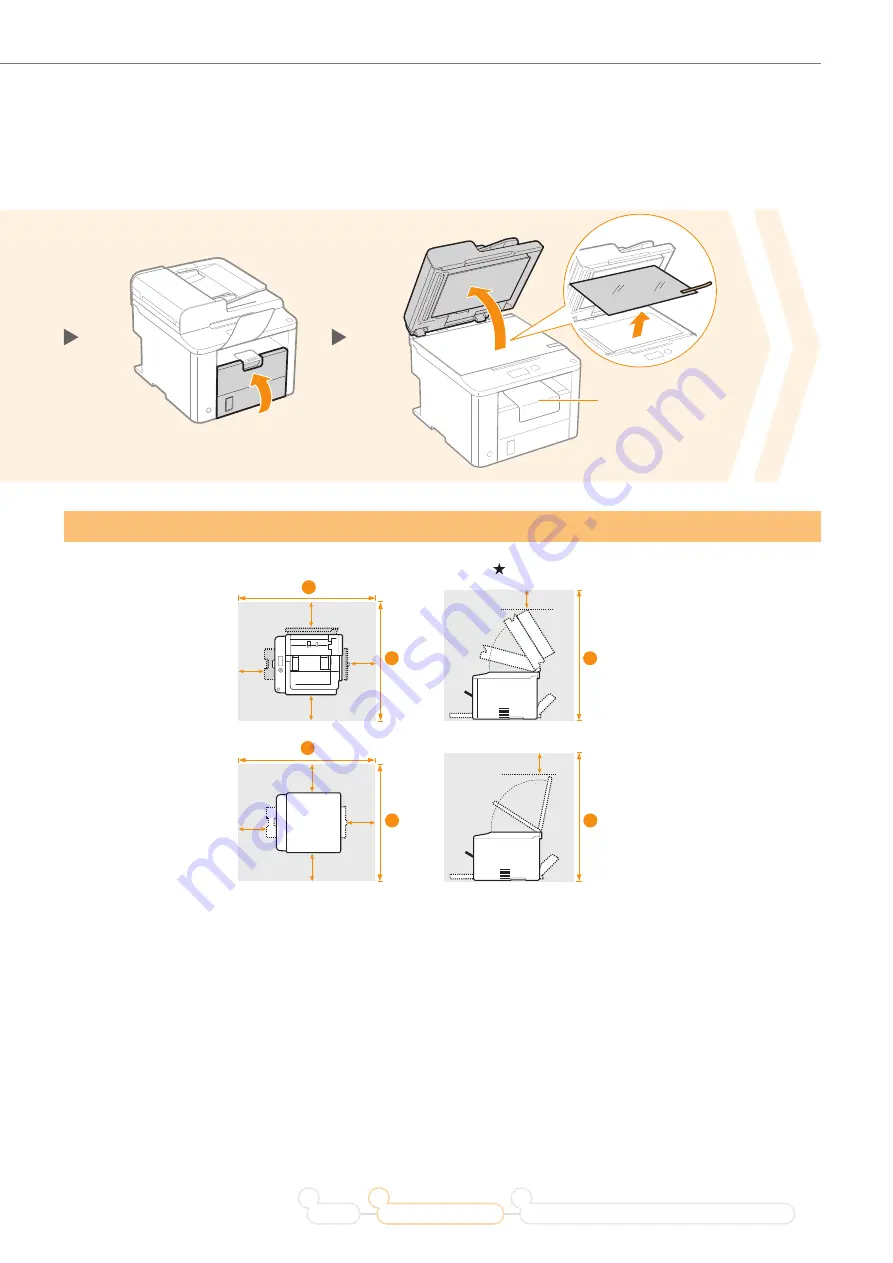
Removing the Packing Materials

3

4

Do not remove this 

packing material yet.

Establishing an Installation Site

 = 4" (100 mm) 

D560 


35 5/8" (904 mm) 


24 5/8" (626 mm) 

 27 3/4" (706 mm)

1

2

3

D530 


35 5/8" (904 mm)


23 1/4" (590 mm) 

 27 3/4" (703 mm)

1

2

3

Do not place the machine near the following:

• 

Alcohol, paint thinner, or other 

fl

 ammable substances 


If 

fl

 ammable substances come into contact with electrical 

parts inside the machine, this may result in a 

fi

 re or electrical shock.

• 

Any medical equipment 


Radio wave emitted from this machine may interfere with medical equipment.

• 

Surfaces that are unstable, subject to excessive vibration, objects that could block the ventilation slot, dampness 

or dust, in direct sunlight or exposed to the elements, subject to high temperatures, open 

fl

 ames, and poor 

ventilation 

 Installing the machine in locations with these characteristics may result in personal injury, 

fi

 re, or 

electric shock.

Ozone from the Unit

Although ozone is generated from the machine during operation, it does not have any a

 ect on the human body. 

However, if you intend to use the machine for long periods of time, ensure that the installation location is well 

ventilated for a comfortable working environment.

Preface

Installing the Machine

2

Connecting to a Computer and Installing the Drivers

3

1

Summary of Contents for imageCLASS D530

Page 1: ...important safety instructions are described in the Basic Operation Guide After you finish reading the Starter Guide store it in a safe place for future reference Operation Guide After you finish read...

Page 2: ...he e Manual The average yield is based on ISO IEC 19752 when printing A4 size paper with the default printing density User Software CD ROM The User Software CD ROM contains the MF Drivers MF Toolbox v...

Page 3: ...s Sta This manual Starter Guide This manual describes the configuration and software installation Basic Operation Guide This manual describes the basic use of the machine Manuals Included in the CD RO...

Page 4: ...acking materials such as orange tape Packing materials may change in form or placement or may be added or removed without prior notice Proper Handling Hold here Hold here Check Are all the packing mat...

Page 5: ...al equipment Surfaces that are unstable subject to excessive vibration objects that could block the ventilation slot dampness or dust in direct sunlight or exposed to the elements subject to high temp...

Page 6: ...lso a packing material Be sure to remove it 2 1 The length of the tape is approximately 20 50 cm Fit the protrusions on each side of the toner cartridge and then slide the toner cartridge into the mac...

Page 7: ...6 times 1 2 Place on a flat surface 11 3 7 4 8 Preface Installing the Machine 2 Connecting to a Computer and Installing the Drivers 3 1 Check Are all the packing materials removed Packing materials S...

Page 8: ...r To load paper other than Letter size such as Legal or Statement see Loading Paper Other than Letter Size P 16 after finishing the initial settings Adjust the paper guides tightly to the width and le...

Page 9: ...ivers 3 1 Use the paper stopper when printing Lift the paper stopper to prevent the paper from falling out of the output tray Load Limit Guide Push until the edge of the paper stack meets the back of...

Page 10: ...The factory default settings for time display is set as 12 Hour Current Time Set 01 01 2012 12 52 AM 0 00 12 59 Connecting the Power Cord OFF Do not connect the USB cable Connect the cable when instal...

Page 11: ...Open frnt cover see if orange packing material is removed Next Check that tabs tape are removed from toner cartridge Next Check that paper is loaded in Drawer 1 Next Preface Installing the Machine 2...

Page 12: ...the dialog box on the right appears disconnect the USB cable from the computer 1 click Cancel 2 and then proceed to step If the USB cable is disconnected and the dialog box disappears proceed to step...

Page 13: ...e Windows After installing the software such as MF Driver connect the USB cable Make sure the software is installed first Preface Installing the Machine 2 Connecting to a Computer and Installing the D...

Page 14: ...he CD ROM icon Double click Double click Follow the instructions on the screen to continue Depending on the system environment the dialog box may not be displayed In this case proceed to next step Cli...

Page 15: ...Macintosh After installing the software such as MF Driver connect the USB cable Make sure the software is installed first Square Connector Connect to the machine Pull the string to remove Flat Connec...

Page 16: ...press OK Press or to highlight a paper size and then press OK Press or to highlight a paper type and then press OK Paper Settings MP Tray Drawer 1 1 Paper Size LTR LGL STMT EXEC Paper Type Plain 16 l...

Page 17: ...at Is Longer than the Length of the Paper Cassette Push the lower front cover and lift the front cover gently Loading Envelopes or Paper with a Letterhead Loading Envelopes or Paper with a Letterhead...

Page 18: ...quickly find the information Click when performing troubleshooting or maintenance of the machine Click a button to access the information that you want Using the Online Help Information such as drive...

Page 19: ...M Insert the User Software CD ROM in your computer click Diplay Manuals and then click for e Manual Depending on the operating system a message will be displayed for security protection to display the...

Page 20: ...20...

Page 21: ...21...

Page 22: ...d States and may also be trademarks or registered trademarks in other countries Apple Mac OS and Macintosh are trademarks or registered trademarks of Apple Inc in the U S and or other countries Micros...

Page 23: ...Z wxyz 9 Not available 0 _ Not available Changing the Entry Mode The machine supports three entry modes A for uppercase a for lowercase and 12 for numbers The default setting is A Press to highlight E...

Page 24: ...6 8501 Japan 30 2 Shimomaruko 3 chome Ohta ku Tokyo 146 8501 Japan CANON MARKETING JAPAN INC CANON MARKETING JAPAN INC 16 6 Konan 2 chome Minato ku Tokyo 108 8011 Japan 16 6 Konan 2 chome Minato ku To...

Reviews: