Canon G4000 series Getting Started Download Page 7

5

ENGLISH

Connecting with Computer

You need connection setup for each computer. Proceed 

with the setup from step 1 for each computer.
The following describes the procedures for Windows and 

Mac OS.

If you use a computer except for Windows or Mac OS 

such as Chrome OS, access "http://canon.com/ijsetup", 

and then follow the instructions on the Canon website to 

set up your computer.
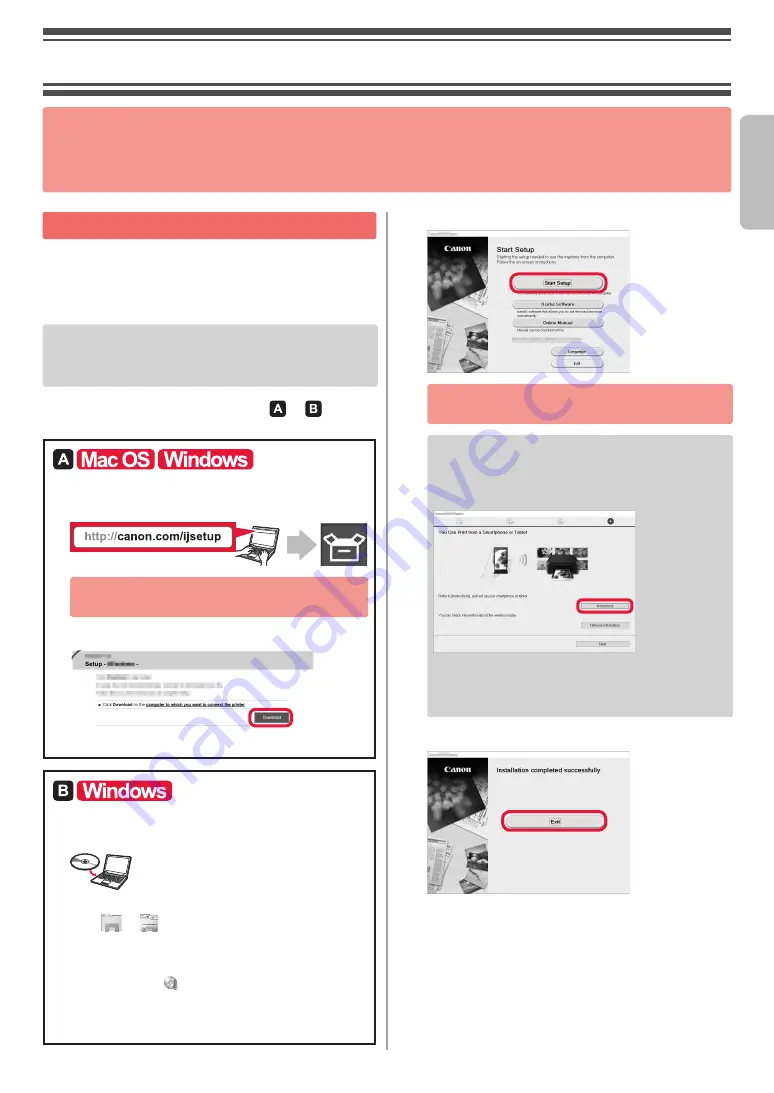
Select one of the following steps   or   to start 

up the setup file.


Accessing the Canon Website

Visit the Canon website below and click 

Set Up

.

Follow the on-screen instructions to proceed 

with the setup.

If the following screen appears, click 

Download

.

Start up the downloaded file.


Using the Setup CD

Insert the setup CD into your computer.

When using Windows 10, Windows 8.1 or Windows 8:

Click 

 or 


File Explorer

 on the taskbar.

Select 

This PC

 or 

Computer

 on the left side of the 

opened window.

Double-click the   CD-ROM icon on the right side 

of the window.
* If the contents of the CD-ROM appear, double-click 

MSETUP4.EXE

.

Click 

Start Setup

.

Follow the on-screen instructions to proceed 

with the setup.

You can set up your smartphone in the middle 

of the steps.

On the following screen, click 

Instructions

 to 

proceed with setup of your smartphone.

*  Depending on your settings, the screen above may 

not appear. In that case, proceed to "Connecting with 

Smartphone" on page 6

 after finishing the connection 

to your computer.

If the following screen appears, click 

Exit

.

The connection with your computer 

is now complete. You can print from 

your computer.

2. Connecting with Computer and Smartphone/Tablet

If you connect the printer to both your computer and your smartphone, connect it to the 

computer first.

To connect the printer only to your smartphone,

 proceed to "Connecting with 

Smartphone" on page 6.

Summary of Contents for G4000 series

Page 1: ...Gu a de inicio Para Come ar D marrage Getting Started...

Page 2: ...ta est o cheios Se a tinta entrar em contato com roupas ou objetos pode ser que ela n o saia Installation de l imprimante page1 Connexion avec un ordinateur et un smartphone ou une tablette page5 L en...

Page 3: ...s Android iOS 1 Remove the packing materials such as tape from outside the printer 2 a Remove the orange tape b Open the scanning unit cover b a 3 Remove the orange tape and the protective material an...

Page 4: ...nning the QR codes Android iOS 1 Open the left ink tank cover 2 Grab and remove the tank cap of the ink tank and then place it on the upper tank cap holder 3 a Take the BK black ink bottle out of its...

Page 5: ...watch the procedure on a movie by scanning the QR codes Android iOS 1 Connect the power cord Do not connect any cables except the power cord yet Back 2 Press the ON button If an error message appears...

Page 6: ...Do not connect on the connection method selecting screen and then press the OK button Follow the on screen instructions to proceed with the setup Wait for about 6 minutes until the following screen a...

Page 7: ...xplorer on the taskbar c Select This PC or Computer on the left side of the opened window d Double click the CD ROM icon on the right side of the window If the contents of the CD ROM appear double cli...

Page 8: ...nter The screen turns off when no operation is made for 10 minutes Press one of the buttons on the operation panel except for the ON button to display the screen If appears the printer can not communi...

Page 9: ...sure that the following screen appears a Tap the installed application software b Follow the on screen instructions to register the printer If a message saying Printer is not registered Perform print...

Page 10: ...Pull out the paper output tray b Open the output tray extension a b Loading Paper Using Fax Function Before using the fax function refer to the following manual to set up the fax function of your prin...

Page 11: ...QR Android iOS 1 Retirez les mat riaux d emballage tels que la bande de l imprimante 2 a Retirez la bande orange b Ouvrez l unit de num risation capot b a 3 Retirez la bande orange et le mat riau pro...

Page 12: ...uvrez le couvercle de cartouche d encre gauche 2 Saisissez et retirez le capuchon de cartouche de la cartouche d encre puis placez le sur le porte capuchon de cartouche sup rieur 3 a Sortez la bouteil...

Page 13: ...pouvez regarder une vid o de la proc dure en num risant les codes QR Android iOS 1 Branchez le cordon d alimentation Ne branchez aucun c ble pour le moment l exception du cordon d alimentation Arri r...

Page 14: ...m thode de connexion puis appuyez sur le bouton OK Suivez les instructions l cran pour poursuivre la configuration Patientez environ 6 minutes jusqu ce que l cran suivant s affiche La configuration e...

Page 15: ...dans la barre des t ches c S lectionnez Ce PC ou Ordinateur dans la partie gauche de la fen tre ouverte d Double cliquez sur l ic ne CD ROM dans la partie droite de la fen tre Si le contenu du CD ROM...

Page 16: ...L cran s teint si aucune action n est effectu e pendant environ 10 minutes Appuyez sur un des boutons du panneau de contr le sauf sur le bouton MARCHE ON pour afficher l cran Si appara t l imprimante...

Page 17: ...ssurez vous que l cran suivant s affiche a Touchez le logiciel d application install b Suivez les instructions l cran pour enregistrer l imprimante Si le message L imprimante n est pas enregistr e Con...

Page 18: ...c de sortie papier b Ouvrez l extension du bac de sortie papier a b Chargement du papier Utilisation de la fonction de t l copie Avant d utiliser la fonction de t l copie reportez vous au manuel suiva...

Page 19: ...eando os c digos QR Android iOS 1 Remova os materiais de embalagem como fita da parte externa da impressora 2 a Remova a fita laranja b Abra a unidade de digitaliza o tampa b a 3 Remova a fita laranja...

Page 20: ...R Android iOS 1 Abra a tampa do cartucho de tinta esquerda 2 Segure e remova a tampa do cartucho de tinta e coloque a sobre o suporte da tampa do cartucho superior 3 a Retire a garrafa de tinta BK pre...

Page 21: ...a Voc pode assistir a um v deo do procedimento escaneando os c digos QR Android iOS 1 Conecte o cabo de alimenta o N o conecte os cabos ainda exceto o cabo de alimenta o Parte traseira 2 Pressione o b...

Page 22: ...connect na tela de sele o do m todo de conex o e pressione o bot o OK Siga as instru es na tela para prosseguir com a configura o Aguarde cerca de 6 minutos at que a tela a seguir seja exibida A conf...

Page 23: ...a barra de ferramentas c Selecione Este PC This PC ou Computador Computer no lado esquerdo da janela aberta d Clique duas vezes no cone do CD ROM no lado direito da janela Se o conte do do CD ROM apar...

Page 24: ...ssora A tela desliga quando nenhuma opera o realizada por 10 minutos Pressione um dos bot es do painel de controle exceto o bot o ATIVADO ON para exibir a tela Se for exibido a impressora n o poder se...

Page 25: ...seja exibida a Toque no software aplicativo instalado b Siga as instru es na tela para registrar a impressora Se a mensagem A impressora n o est registrada Executar configura o da impressora Printer...

Page 26: ...Puxe para fora a bandeja de sa da do papel b Abra a extens o da bandeja de sa da a b Colocando papel Usando a fun o de fax Antes de usar a fun o de fax consulte o seguinte manual para configurar essa...

Page 27: ...los c digos QR Android iOS 1 Retire los materiales de empaquetado como la cinta del exterior de la impresora 2 a Retire la cinta naranja b Abra la cubierta unidad de escaneado b a 3 Retire la cinta n...

Page 28: ...QR Android iOS 1 Abra la cubierta del dep sito de tinta izquierda 2 Sujete y retire la tapa del dep sito del dep sito de tinta y col quela en el soporte de tapa del dep sito superior 3 a Saque el fras...

Page 29: ...e ver el procedimiento en una pel cula escaneando los c digos QR Android iOS 1 Conecte el cable de alimentaci n No conecte ning n cable excepto el de alimentaci n Atr s 2 Pulse el bot n ACTIVADO ON Si...

Page 30: ...en la pantalla de selecci n del m todo de conexi n y a continuaci n pulse el bot n OK Siga las instrucciones en pantalla para continuar con la configuraci n Espere unos 6 minutos hasta que aparezca l...

Page 31: ...ipo This PC o Equipo Computer en la parte izquierda de la ventana que se abra d Haga doble clic en el icono de CD ROM situado en la parte derecha de la ventana Si aparece el contenido del CD ROM haga...

Page 32: ...la impresora Cuando el equipo no se utiliza durante 10 minutos la pantalla se apaga Para mostrar la pantalla pulse cualquier bot n en el panel de control excepto el bot n ACTIVADO ON Si aparece la im...

Page 33: ...tee el software de la aplicaci n instalado b Siga las instrucciones en pantalla para registrar la impresora Si no aparece un mensaje que dice Impresora no registrada Realizar preparaci n de impresora...

Page 34: ...salida del papel b Abra la extensi n de la bandeja de salida a b Cargar el papel Usar la funci n de fax Antes de usar la funci n de fax consulte el siguiente manual para configurar la funci n de fax e...

Page 35: ...RMC Regulatory Model Code K10454...

Page 36: ...en l nea Preguntas m s frecuentes Visite o site Ler o Manual On line Perguntas Frequentes Rendez vous sur le site Web Lire le manuel en ligne Foire aux questions Visit the Website Read Online Manual...

Reviews: