background image

Chapter 3

9

3.2.3 Functions of the DIP Switch

0010-1713

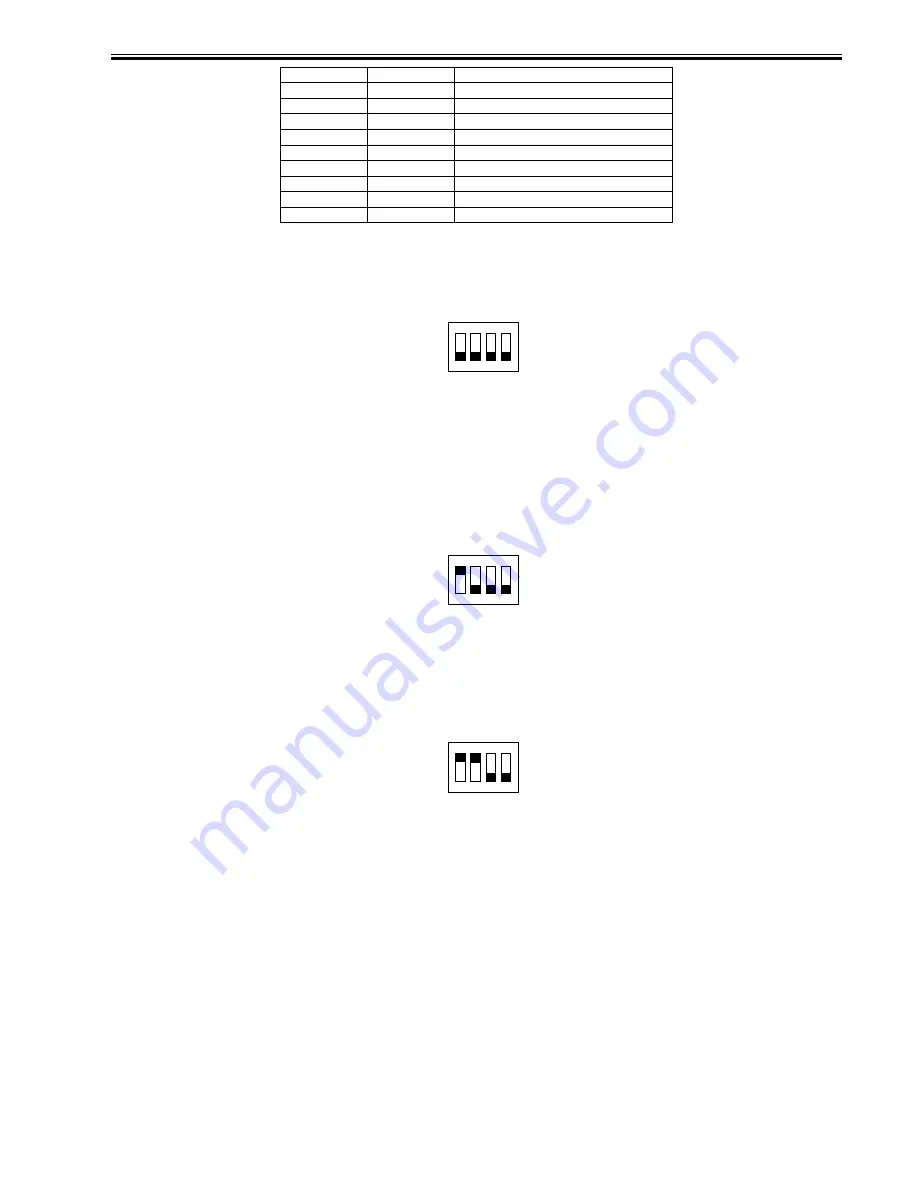
The DipSW (SW1) function of the finisher controller PCB is as follows.

- After setting the DipSW (SW1), the check item is changed in order each time the PushSW (SW2) is pressed.

- Turn OFF all bits of the DipSW (SW1) after checking.

1.Checking operation of the stack tray unit

F-3-4

Points to check:

1) Initial operation of the stack tray is executed. 

(*1) Operation differs depending on initial status

2) Initial operation of the option tray is executed. (When the option tray is attached.)

(*1) Operation differs depending on initial status

3) The stack tray moves to the bottom position (standby position at the time of replacing the offset roller).

(*1) Initial operation of the tray

- When the tray stops at the home position: The tray moves down by 20mm. Then, the tray moves back to the home position with a press of the PushSW (SW2).

- When the tray stops at other than the home position: The tray moves to the home position.

2.Non-paper aging

F-3-5

Points to check:

1) The stack tray moves to the home position, and initial operations of the stack delivery slider and offset roller are executed.

2) After the feeder motor is driven in the feeding direction, copying is executed with the following conditions: Shift mode, 2 sheets in A4 size, 4 sets (8 copies in

total)

3) The copying operation ends.


3.Checking operation of the feeder unit

F-3-6

Points to check:

1) The pickup solenoid is turned ON. 

(*1) Operation differs depending on initial status

2) The feeder motor is driven at 137mm/s in the feeding direction.

3) The speed of the feeder motor is increased to 230mm/s.

4) The speed of the feeder motor is increased to 600mm/s.

5) The feeder motor is driven by 50mm in the feeding direction, and stops.

6) The feeder motor is driven by 40mm in the backward direction, and stops.

7) The feeder motor is driven at 230mm/s in the backward direction.

8) The feeder motor stops.

9) The pickup solenoid is turned OFF.

10) Shutter closing operation (When the option tray is set.)

11)Shutter opening operation (When the option tray is set.)

(*1) When the option tray is attached.

- The shutter is closed: The steps to open the shutter are performed.

- The shutter is opened: The stack delivery slider moves to the tray switching position.

After either of the action above, the step 1) is performed.

(*1) When the option tray is not attached.

- The stack delivery slider moves to the tray switching position.

After the action above, the step 1) is performed.

4.Checking operation of the adjustment unit

J908

M3

stack feed motor

J909

M4

offset motor

J910

SL1

paper retainer solenoid

J911

SL2

offset solenoid

J912

-

stapler

J913

M5

stapler motor

J914

-

front cover safety switch

J915

-

option tray

J916

CL1

shutter clutch

J917

PI15

shutter open/closed sensor

ON

1

2

3

4

ON

1

2

3

4

ON

1

2

3

4

Summary of Contents for Finisher-U1

Page 1: ...Sep 14 2005 Portable Manual Finisher Sorter DeliveryTray Finisher U1 ...

Page 2: ......

Page 3: ... need arises In the event of major changes in the contents of this manual over a long or short period Canon will issue a new edition of this manual The following paragraph does not apply to any countries where such provisions are inconsistent with local law Trademarks The product names and company names used in this manual are the registered trademarks of the individual companies Copyright This ma...

Page 4: ...quiring care to avoid combustion fire Indicates an item prohibiting disassembly to avoid electric shocks or problems Indicates an item requiring disconnection of the power plug from the electric outlet Indicates an item intended to provide notes assisting the understanding of the topic in question Indicates an item of reference assisting the understanding of the topic in question Provides a descri...

Page 5: ...sed to indicate Low The voltage value how ever differs from circuit to circuit In addition the asterisk as in DRMD indicates that the DRMD signal goes on when 0 In practically all cases the internal mechanisms of a microprocessor cannot be checked in the field Therefore the operations of the microprocessors used in the machines are not discussed they are explained in terms of from sensors to the i...

Page 6: ......

Page 7: ...r Code 3 Chapter 3 Outline of Components 3 1 Outline of Electrical Components 7 3 1 1Outline of Electrical Components 7 3 2 Variable Resistors VR Light Emitting Diodes LED and Check Pins by PCB 8 3 2 1Light Emitting Diodes and Check Pins by PCB 8 3 2 2Finisher Controller PCB 8 3 2 3Functions of the DIP Switch 9 Chapter 4 System Construction 4 1 Basic Construction 11 4 1 1Overview 11 4 1 2Outline o...

Page 8: ......

Page 9: ...r more over the period of product warranty because of wear or damage Replace them as needed by referring to the following table T 1 1 The values in the above table are estimates only and are subject to change depending on future data F 1 1 1 Stapler 1 3 Periodical Servicing 1 3 1 Periodical Servicing 0010 1709 The machine does not have items that must be serviced on a periodical basis No Parts nam...

Page 10: ......

Page 11: ... or finisher controller PCB failure Offset HP sensor failure The offset motor was driven for 1000 ms in the HP sensor escape direction but the offset HP sensor did not turn off Check the connector of the offset HP sensor Check the connector of the offset motor Replace the offset HP sensor Replace the offset motor Replace the finisher controller PCB E531 0001 Staple unit failure Staple HP sensor fa...

Page 12: ...ray shift motor Replace the finisher controller PCB 0003 Standard tray shift motor or finisher controller PCB failure Standard tray HP sensor failure Standard tray clock sensor failure Standard tray shift motor load failure The standard tray was operated but it did not reach the sensor within 300 ms Check the connector of the standard tray HP sensor Check the connector of the standard tray clock s...

Page 13: ...ace the optional tray HP sensor Replace the optional tray clock sensor Replace the optional tray shift motor Replace the finisher controller PCB 0005 Optional tray motor or finisher controller PCB failure Optional tray HP sensor failure Optional tray clock sensor failure Optional tray shift motor load failure The encoder clock signal was not detected two or more times when the optional tray was op...

Page 14: ...ter clutch Replace the shutter drive motor Replace the finisher controller PCB 0002 Shutter drive motor or finisher controller PCB failure Shutter open detection sensor failure Shutter clutch failure The shutter open sensor did not turn off when 1000 ms have lapsed since the shutter unit had performed close operation resulting in incomplete close operation Check the connector of the shutter open s...

Page 15: ...mit sensor WG8 5696 J905 Stapler HP sensor built into stapler WG8 5696 J912 1506 Stapler staple sensor built into stapler WG8 5696 J912 Notation Name Part No Description Finisher controller PCB E cord M1 Stack tray shift motor 4K1 4055 moves up down the stack tray J906 540 M2 Feed motor 4H3 0086 moves paper J907 M3 Stack edging motor 4H3 0084 drives the stack edging slider J908 575 M4 Offset motor...

Page 16: ... 3 3 SW1 Use it for mode setting SW2 Use it for adjustment and test start up LED1 Use it for checking the operation T 3 3 Connector Target J1 power supply J2 communication J903 PI1 stack edging HP sensor PI2 handing tray paper sensor PI3 paper surface sensor J904 PI15 inlet sensor PI16 offset HP sensor J905 PI7 tray clock sensor PI8 stack tray paper sensor PI9 tray 300 sensor PI10 tray lower limit...

Page 17: ...s in total 3 The copying operation ends 3 Checking operation of the feeder unit F 3 6 Points to check 1 The pickup solenoid is turned ON 1 Operation differs depending on initial status 2 The feeder motor is driven at 137mm s in the feeding direction 3 The speed of the feeder motor is increased to 230mm s 4 The speed of the feeder motor is increased to 600mm s 5 The feeder motor is driven by 50mm i...

Page 18: ... solenoid is turned OFF 5 The staple unit executes stapling 6 Stack delivery is executed to the standard tray 2 7 The stack delivery unit moves to the tray switching position 8 The pickup solenoid is turned OFF 1 Initial operation If the PushSW SW2 is pressed while the stack delivery slider is in other than the home position the stack delivery slider returns to the home position If the PushSW SW2 ...

Page 19: ...ROM that stores an operation sequence program The finisher controller PCB drives motors in response to the commands sent from the host machine via a serial communication line The finisher controller PCB also sends information about various sensors and switches to the host machine via the serial communication line F 4 2 4 2 Product Specifications 4 2 1 Specifications 0010 1686 T 4 1 Item Descriptio...

Page 20: ...LDR LGL LTRR 150 sheets 80 g m2 or 20 mm Staple Mode A4 B5 LTR 30 sheets or 26 mm A3 B4 A4R LDR LGL LTR R 30 sheets or 20 mm Optional tray Upper tray Small size 26 mm in height Large size 13 mm in height Lower tray Small size 26 mm in height Large size 13 mm in height When optional trays are attached A4 B5 50 sheets 64 80 g m2 A3 B4 A4R 30 sheets 64 80 g m2 Alignment range Staple loading Paper wid...

Page 21: ...50 sheets of small size paper 30 sheets of large size paper Max 2 sheets of 128 g m2 paper 40 sheets of 80 g m2 paper small size Paper thickness 5 5 mm or less Staple loading method Replacement of dedicated staple sheet cartridge 5000 staples No staple detection Detected Manual stapling Disabled Standby function Provided 5 0 2mm 5 0 2mm 45 A3 B4 A4 A4R B5 LDR LGL LTR LTR R ...

Page 22: ......

Page 23: ...Sep 14 2005 ...

Page 24: ......

Reviews: