Canon EOS DIGITAL REBEL XT/350D DIGITAL Instruction Manual Download Page 30

3-10

1

2

3

4

Cover/Table of

 Contents

Introduction

Downloading Images 
from the Camera

Setting the Cameras 
other than the EOS-1D 
Series Cameras

Setting the EOS-1D 
Series Cameras

Troubleshooting

Index

Remote Shooting

Sets the maximum and minimum shutter speeds to be used

O

Select the maximum and minimum shutter speeds from the list box.
For example, if you set 1/2000 sec. as the fastest shutter speed and 1/60 sec. as the 
slowest, the shutter speed range will be 1/2000 to 1/60 sec.

O

This makes shutter speed selection faster and prevents a slow-speed sync. in aperture-
priority AE mode with the flash.

Sets the maximum and minimum apertures to be used

O

Select the maximum and minimum apertures from the list box.
For example, if you set 1.4 for the largest aperture (minimum f/number) and 8.0 for the 
smallest aperture (maximum f/number), the usable aperture range will be f/1.4 to f/8.0.

O

You can better control the apertures used by setting the range of usable apertures.

Registers and switches the shooting mode and metering mode

O

Only while you press the < 

 > button, you can switch to the preset shooting mode, 

exposure setting (such as the aperture for aperture-priority AE), metering mode, and 
exposure compensation amount.

O

Select settings that are appropriate for each shooting mode.

O

The modes and settings are preset with the camera.

O

Convenient when you want to instantly select the preset modes and settings to suit a 
particular shooting situation such as backlit or front-lit conditions.

O

If you set the maximum and/or minimum shutter speed to one that is not a full-stop 
increment (such as 1/750 sec.), the controllable and settable shutter speed range 
might not be as exact as you set it (A slight deviation may occur.). This applies if you 
also set Custom Function C.Fn-6-1 and C.Fn-6-2 and set the maximum and/or 
minimum shutter speed to one that is not a full-stop increment (such as 1/3200 sec.).

O

To ensure that a proper flash sync speed is set in the Program AE mode, a shutter 
speed range of 1/200 sec. to 1/80 sec. cannot be set with the EOS-1D Mark II N, 
EOS-1Ds Mark II, EOS-1D Mark II and EOS-1Ds, and the range of 1/400 sec. to 1/80 
sec. cannot be set with the EOS-1D.

O

If safety shift has been enabled (with C.Fn-16), it will override P.Fn-04’s shutter 
speed range.

O

Specify a minimum aperture value that is smaller than the maximum aperture setting. 
If you select a minimum aperture value that is larger than the maximum aperture, a 
warning message appears and the setting reverts to the default value.

O

If you set the maximum and/or minimum aperture to one that is not a full-stop 
increment (such as f/4.5), the controllable and settable aperture range might not be 
as exact as you set it (A slight deviation may occur.). This applies if you also set 
Custom Function C.Fn-6-1 or C.Fn-6-2 and set the maximum and/or minimum 
aperture to one that is not a full-stop increment (such as f/6.3).

O

If the largest aperture of the attached lens is smaller than the largest aperture you set 
with P.Fn-05, the largest aperture will be set to the lens’ largest aperture. And if the 
largest aperture of the attached lens is smaller than the smallest aperture you set with 
P.Fn-05, the aperture will be set and fixed to the lens’ largest aperture.

O

If safety shift has been enabled (with C.Fn-16), it will override P.Fn-05’s aperture range.

P.Fn-04

P.Fn-05

P.Fn-06

 Registering the Modes and Settings with the Camera

1

Set the shooting mode and shooting mode settings (for 
example, aperture setting for aperture-priority AE mode). Then 
set the metering mode and exposure compensation amount.
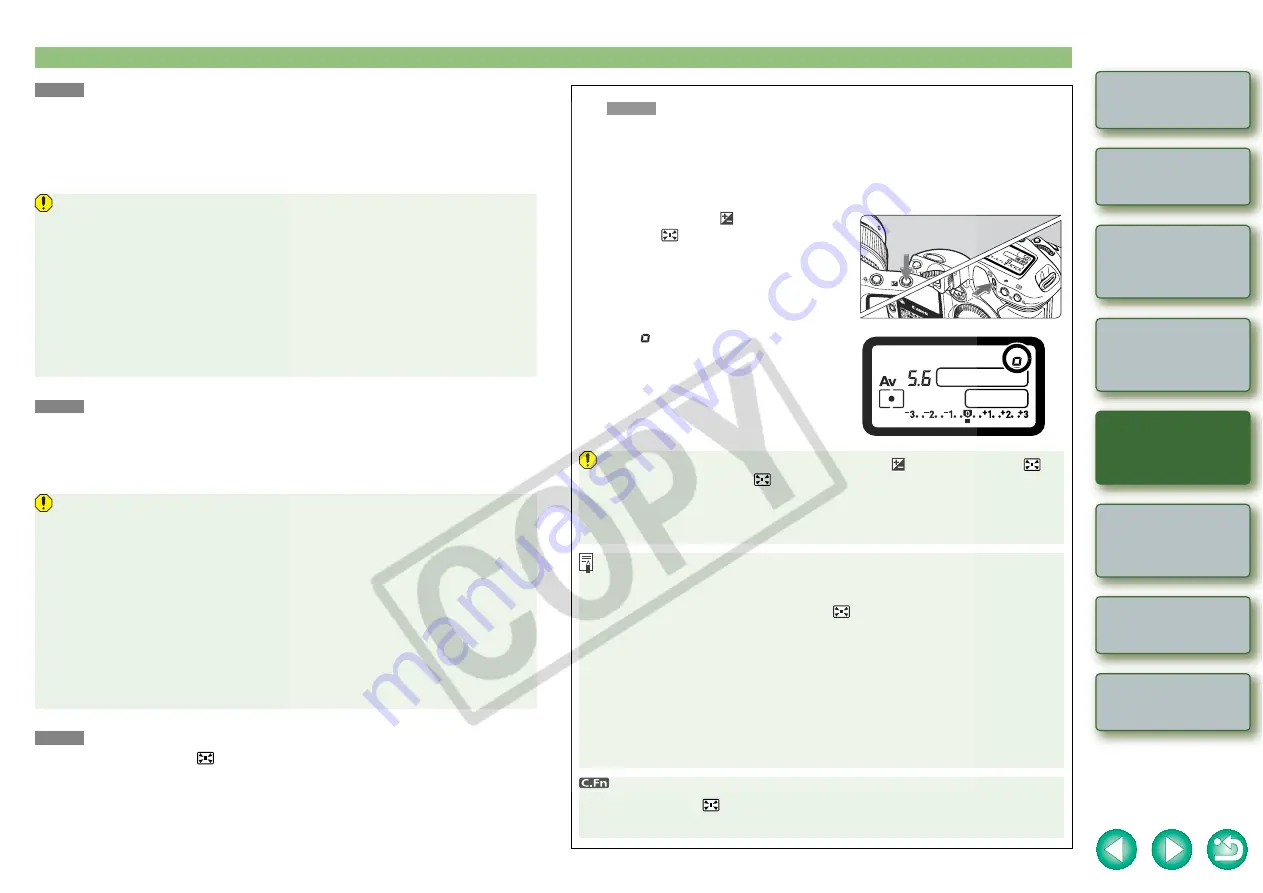
2

Register the modes and settings.

O

First press the < 

 > button, then press 

the < 

 > button.

¿

<   >appears in the LCD panel, 
indicating that the modes and settings 
have registered.

O

The registered modes and settings can 
be modified any number of times.

O

To register the modes and settings, first press the < 

 > button before the < 

 > 

button. If you press the < 

 > button first, the camera will only select the 

registered modes and settings instead.

O

Bulb cannot be preset.

O

You cannot select the registered modes and settings during continuous shooting.

O

If P.Fn-03 has been set to specify the metering mode for manual exposure, and 
P.Fn-06 is used to register the manual exposure mode and a metering mode 
different from the one specified with P.Fn-03, you can select the metering mode 
specified with P.Fn-03 by pressing the < 

 > button.

O

If P.Fn-04 and/or P.Fn-05 has been set, set the shutter speed and aperture within 
the range specified with P.Fn-04 and/or P.Fn-05.

O

If the shooting and metering modes you want to set are excluded by the 
restrictions in P.Fn-01 and P.Fn-02, those Personal Functions must be disabled. 
For information on clearing and resetting Personal Functions, refer to “Clearing 
and Resetting Personal Functions” in the camera’s Instruction Manual supplied 
with the camera.

O

Even if the shooting and metering modes selected by P.Fn-06 are excluded by the 
restrictions in P.Fn-01 and P.Fn-02, they are still valid for P.Fn-06.

O

If C.Fn-4-1 or C.Fn-4-3 has been set, AF and AE will also take effect when you 
press the < 

 > button.

O

When C.Fn-18 is set, P.Fn-06 is disabled.

P.Fn-06

Summary of Contents for EOS DIGITAL REBEL XT/350D DIGITAL

Page 1: ...S Utility Instruction Manual Canon Utilities EOS Utility 1 0 Compatible Models EOS 1D Mark II N EOS 5D EOS 1Ds Mark II EOS 30D EOS 1D Mark II EOS 20D EOS 1Ds EOS 10D EOS 1D EOSDIGITALREBELXT 350DDIGITAL EOSDIGITALREBEL 300DDIGITAL EOS D60 EOS D30 Introduction Setting the Cameras other than the EOS 1D Series Cameras Setting the EOS 1D Series Cameras Remote Shooting Table of Contents Troubleshooting...

Page 2: ...RIES DISTRIBUTORS AND DEALERS DISCLAIM ALL WARRANTIES EXPRESS OR IMPLIED INCLUDING ANY WARRANTY OF MERCHANTABILITY OR FITNESS FOR A PARTICULAR PURPOSE WITH RESPECT TO THE SOFTWARE NEITHER CANON NOR ANY OF CANON S SUBSIDIARIES DISTRIBUTORS OR DEALERS IS LIABLE FOR ANY DAMAGES HOWSOEVER CAUSED INCLUDING WITHOUT LIMITATION DIRECT CONSEQUENTIAL OR INCIDENTAL LOSS OR DAMAGE INCLUDING LOSS OF PROFITS EX...

Page 3: ... software O The content of this Instruction Manual has been reviewed thoroughly However if you should notice any errors or omissions please contact a Canon Service Center O Please note that irrespective of the above mentioned Canon does not take responsibility for the outcome of the operation of the software O Canon and EOS are trademarks of Canon Inc O IBM is a registered trademark of Internation...

Page 4: ...o the source listed below Readme Click the Start button X select All Programs Programs in Windows 2000 X Canon Utilities X EOS Utility X EOS Utility Readme O The camera name is shown in the screens as EOS XXX O Descriptions of camera operations assume that the reader is familiar with the information in the camera s Instruction Manual O In this manual the screens used in the examples are from Windo...

Page 5: ...era and can transfer images to Digital Photo Professional or ZoomBrowser EX p 1 6 O You can download multiple images in a single operation display images as a list and download only selected images p 1 6 to p 1 7 O You can perform various settings for your camera p 2 1 p 3 1 O You can shoot photos by controlling the camera from your computer and download images to your computer p 4 1 Digital Photo...

Page 6: ...onnect the Camera and the Computer and then Start EOS Utility 1 3 Connecting a Camera other than an EOS 1D Series Camera to Your Computer 1 3 Connecting an EOS 1D Series Camera to Your Computer 1 4 Precautions When Connecting the Camera and Computer 1 5 Downloading Images from Your Camera 1 6 Downloading All the Images in a Single Operation 1 6 Downloading Images to Your Computer by Operating the ...

Page 7: ...tting a Camera with Communication Settings Operation window in the EOS 30D Communication settings for different cameras Camera model Menu Setting O EOS 5D Communication PC connect O EOS 30D Communication Print PC O EOS 20D Communication Normal O EOS 10D Communication Normal O EOS DIGITAL REBEL XT 350D DIGITAL Communication PC connection O EOS DIGITAL REBEL 300D DIGITAL Communication Normal About t...

Page 8: ...or information on the terminal areas 2Plug the dedicated cable into your camera O Face the mark on the plug to the front of the camera and connect the plug to the camera s terminal Connecting a Camera other thanan EOS 1D Series Camera to Your Computer 3 Set the camera s power switch to ON EOS Utility starts up and main window is displayed the camera is ready to communicate with your computer Proce...

Page 9: ... cable protector attach the cable protector to the camera and then follow the procedure below to connect the dedicated cable O Make sure the mark on the plug is facing the top of the camera and then connect the plug to the camera s terminal Connecting an EOS 1D Series Camera to Your Computer 3 Set the camera s power switch to ON EOS Utility starts up and main window is displayed the camera is read...

Page 10: ... cable be sure to grip the sides of the plug as you pull it out If you are using the EOS D60 or EOS D30 pull the plug while pressing the PUSH button on it O If you do not perform any operation while the camera and computer are connected a confirmation message may appear on the computer screen asking whether you wish to continue communicating with the camera for some computer systems If you do not ...

Page 11: ...e image download type or the save destination in the dialog box p 1 10 that appears when you click the Preferences button You can change the software that starts up when you download images from ZoomBrowser EX to Digital Photo Professional p 1 10 However if you have downloaded images following Downloading Images Using Your Card Reader p 1 9 the software that can start up is limited to ZoomBrowser ...

Page 12: ...For further instructions refer to the ZoomBrowser EX Instruction Manual O When switching to the main window select the Window menu X Main Window O To exit EOS Utility click the File menu X Exit O When disconnecting the interface cable from the camera and computer be sure to exit EOS Utility and then set the camera s power switch to OFF before disconnecting the cable O is displayed on images previo...

Page 13: ...th the EOS 10D you must change the firmware to version 2 0 0 or later For details on changing refer to the Canon s web site Downloading for Cameras other than the EOS 1D Series Cameras Communication settings for different cameras Camera model Menu Setting O EOS 5D Communication Print PTP O EOS 30D Communication Print PC O EOS 20D Communication PTP O EOS 10D Communication PTP O EOS DIGITAL REBEL XT...

Page 14: ...mages correctly depending on your OS version and computer environment 1 Load the card into the card reader The dialog box in step 2 appears O If the dialog box in step 2 does not appear click the Start button X select All Programs Programs in Windows 2000 X Canon Utilities X CameraWindow X CameraWindowMC X CameraWindow Precautions for the PTP Function Downloading Images Using Your Card Reader 2Sel...

Page 15: ...ng on the camera model connected Monitoring of the folder specified as the transfer origin is cancelled Monitoring of the folder specified as the transfer origin begins Click the Browse button and in the dialog box that appears select the transfer origin folder Close the Monitor Folder dialog box to return to the main window Click the Change button and in the dialog box that appears select the tra...

Page 16: ...an the EOS 1D Series Cameras This chapter explains the functions that can be set in the EOS 5D EOS 30D EOS 20D EOS 10D EOS DIGITAL REBEL XT 350D DIGITAL EOS DIGITAL REBEL 300D DIGITAL EOS D60 and EOS D30 For instructions on connecting your camera and computer and for how to start EOS Utility refer to Chapter 1 p 1 3 O Click on the item to display its page Basic Settings 2 2 Shot Settings 2 3 Pictu...

Page 17: ...pecify the settings The settings are applied to the camera O When switching to the main window select the Window menu X Main Window O If you select the File menu X Exit EOS Utility exits including the camera settings window O The above window shows information displayable when the EOS 30D is connected The displayed information varies depending on the camera model connected Initializing a memory ca...

Page 18: ...ng the camera settings window O The above window shows information displayable when the EOS 30D is connected The displayed information varies depending on the camera model connected The display switches to the image download window p 1 7 Displays the various camera information You can show hide the shot settings window You can show hide the basic settings window p 2 2 Closes the window Returns to ...

Page 19: ...e settings and closes the dialog box Applies the settings to the camera O You can register up to 3 user settings in your camera O When you select Monochrome in the Picture Style list box the Filter effect and Toning effect list boxes appear O Refer to Registering the Picture Style in the camera s Instruction Manual for information about using the Picture Style registered in the camera 4Click the A...

Page 20: ... is compatible with the EOS 5D EOS 30D EOS 20D and EOS DIGITAL REBEL XT 350D DIGITAL 1 Click WB SHIFT The white balance adjustment window appears 2Click the compensation position The settings are applied to the camera 3 Click The display returns to the shot settings window O To revert the corrected values to the original values follow the procedure in step 2 White Balance Adjustment Compensates ma...

Page 21: ... EOS 1Ds and EOS 1D For instructions on connecting your camera and computer and for how to start EOS Utility refer to Chapter 1 p 1 4 O Click on the item to display its page Basic Settings 3 2 Shot Settings 3 3 Picture Style 3 3 Specifying the Personal White Balance 3 5 Specifying the JPEG Quality 3 6 White Balance Adjustment 3 6 Specifying the Parameters 3 7 Specifying the Color Matrix 3 8 Person...

Page 22: ...he settings The settings are applied to the camera O When switching to the main window select the Window menu X Main Window O If you select the File menu X Exit EOS Utility exits including the camera settings window O The above window shows information displayable when the EOS 1D Mark II N is connected The displayed information varies depending on the camera model connected With the EOS 1Ds and EO...

Page 23: ...he camera settings window O The above window shows information displayable when the EOS 1D Mark II N is connected The displayed information varies depending on the camera model connected The display switches to the image download window p 1 7 Displays the various camera information You can show hide the shot settings window You can show hide the basic settings window p 3 2 Closes the window Return...

Page 24: ...e settings and closes the dialog box Applies the settings to the camera O You can register up to 3 user settings in your camera O When you select Monochrome in the Picture Style list box the Filter effect and Toning effect list boxes appear O Refer to Registering the Picture Style in the camera s Instruction Manual for information about using the Picture Style registered in the camera 4Click the A...

Page 25: ...The Personal white balance settings dialog box appears 2Select the personal white balance to be registered Specifying the Personal White Balance 3 Click the Open button The Open dialog box appears 4Open the folder containing the saved white balance file select the file and then click the Open button The white balance file is loaded 5 Enter a title in the Title input box 6Click the Apply to camera ...

Page 26: ...ive a lower compression ratio and higher image quality for any size 3 Click The display returns to the shot settings window Specifying the JPEG Quality You can compensate the white balance and apply it to the camera O This function is compatible with the EOS 1D Mark II N EOS 1Ds Mark II and EOS 1D Mark II 1 Click WB SHIFT The white balance adjustment window appears 2Click the compensation position...

Page 27: ...ameters settings dialog box appears 2Select a tab to be set Specifying the Parameters 3 Specify desired settings 4Click the Apply to Camera button The Confirm settings dialog box appears 5 Confirm the settings and click the OK button The processing parameter is registered on the camera 6Click the Close button The Parameters settings dialog box closes and the display returns to the shot settings wi...

Page 28: ...pears The optional settings Color space Saturation and Color tone in the Color matrix settings dialog box can only be set when 6CM set1 or 7CM set2 is selected in the Color matrix list box Specifying the Color Matrix Personal Function Settings You can set detailed settings for each function and apply them to the camera You can also save the specified settings on your computer and load the saved se...

Page 29: ...n Manual supplied with the camera Disables the shooting modes O Checkmark the shooting modes you do not want to use O Unwanted shooting modes can be skipped while you are selecting the shooting mode O This makes selecting the desired shooting mode faster O With the EOS 1Ds and EOS 1D Disable depth of field AE is also displayed Disables the metering modes O Checkmark the metering modes you do not w...

Page 30: ...nd the setting reverts to the default value O If you set the maximum and or minimum aperture to one that is not a full stop increment such as f 4 5 the controllable and settable aperture range might not be as exact as you set it A slight deviation may occur This applies if you also set Custom Function C Fn 6 1 or C Fn 6 2 and set the maximum and or minimum aperture to one that is not a full stop i...

Page 31: ...ogram shift amount is canceled after you take the picture This Personal Function retains the program shift amount O This function is useful when you want to shift the standard program line so that priority is given to the shutter speed or to the aperture By shifting the program you can change the shutter speed or aperture and still retain the same exposure level Under the same brightness you can s...

Page 32: ...lash will be unable to charge in time for successive shots and will not fire at full charge O If you set the drive mode to continuous shooting set the number of shots in P Fn 20 If you do not use P Fn 20 once the camera focuses on the subject continuous shooting will continue until the capacity of the memory card is reached O P Fn 16 cannot be used with manual focus lenses or with lenses that are ...

Page 33: ...f you set a longer activation time the battery become exhausted more quickly and the number of possible shots will be reduced To turn off the function s activation time midway press the button button or button Note that if you take bulb shots for long periods the battery becomes exhausted more quickly and the number of possible shots will be reduced P Fn 21 P Fn 23 P Fn 24 Sets the default setting...

Page 34: ...isplay format of Shooting information INFO the icon showing the captured image with Original image verification data is displayed For more details refer to Shooting Information Display in the camera s Instruction Manual O To verify whether the image is the original you will need the EOS dedicated accessory Data Verification Kit DVK E2 optional O If you wish to enlarge an image set P Fn 30 to ON du...

Page 35: ...rsonal Function settings are saved to the computer as a Personal Function settings file The Personal Function settings file is not compatible with a camera other than the one the function was set O To update an existing Personal Function settings file click the Save button O Personal Function settings file saved in your computer is compatible with both Windows and Macintosh 1 Click the Open button...

Page 36: ...nterval Timer Shooting 4 2 Specifying the Camera Settings 4 3 Specifying Preferences 4 3 Communication settings for different cameras Camera model Menu Setting O EOS 5D Communication PC connect O EOS 30D Communication Print PC O EOS 20D Communication Normal O EOS 10D Communication Normal O EOS DIGITAL REBEL XT 350D DIGITAL Communication PC connection O EOS DIGITAL REBEL 300D DIGITAL Communication ...

Page 37: ...ou can change the software that starts up when you download images from ZoomBrowser EX to Digital Photo Professional p 4 3 Allows you to specify and check the camera settings p 4 3 You can rotate and download the shot images regardless of the camera position Each time you click the button the image rotates 90 When using the rotation function select the File menu X Preferences and checkmark the Rot...

Page 38: ...es The Preferences dialog box is displayed and you can set the save destination for shot images Metering mode AF mode Drive mode Warning display Displayed when the remote shooting is impossible due to inappropriate settings Shots to Go Displays the number of available shots Battery status When you are using a battery is displayed When you are using the AC Adapter Kit optional or DC Coupler Kit is ...

Page 39: ...isconnect the dedicated cable and then repeat the installation procedure from the beginning O Doesn t the installer panel appear J Use the following procedure to display the installer panel Click the Start button X My Computer In Windows 2000 double click My Computer on the desktop X click on the CD ROM drive containing the CD with the right button on the mouse X select Open from the menu that app...

Page 40: ...edicated cable and delete the driver p 5 3 3 Re install the driver O Is the driver installed correctly J Connect the camera to your computer with the dedicated cable and set the camera s power switch to ON and open Device Manager Click the plus symbol to the left of Other devices or Unknown devices and check whether the connected camera or Canon Digital Camera is displayed J If the connected camer...

Page 41: ... the EOS 1D Mark II N EOS 1Ds Mark II EOS 5D EOS 30D EOS 20D and EOS DIGITAL REBEL XT 350D DIGITAL driver Refer to the software Instruction Manual supplied with the camera about deleting drivers in cameras other than those mentioned above O Log in under Computer administrator Administrator privileges when uninstalling the driver O Before starting the driver uninstallation exit all programs you are...

Page 42: ...d 9999 File name Image type Camera used YYYY JPG JPEG image YYYY CR2 RAW image EOS 1D Mark II N EOS 1Ds Mark II EOS 1D Mark II YYYY TIF EOS 1Ds EOS 1D YYYY WAV Audio file xxxEOS1D Index A About the PTP Setting 1 2 B Basic Settings 2 2 3 2 Basic Settings Window 2 2 3 2 C Camera Settings Window 2 2 3 2 4 1 4 3 Communication Settings for Different Cameras 1 2 1 8 4 1 Compatible Models and Supported I...

Reviews: