1. Starting Up/Shutting Down the CXDI
– 4 –
1.1.3 Exposure Screen Display
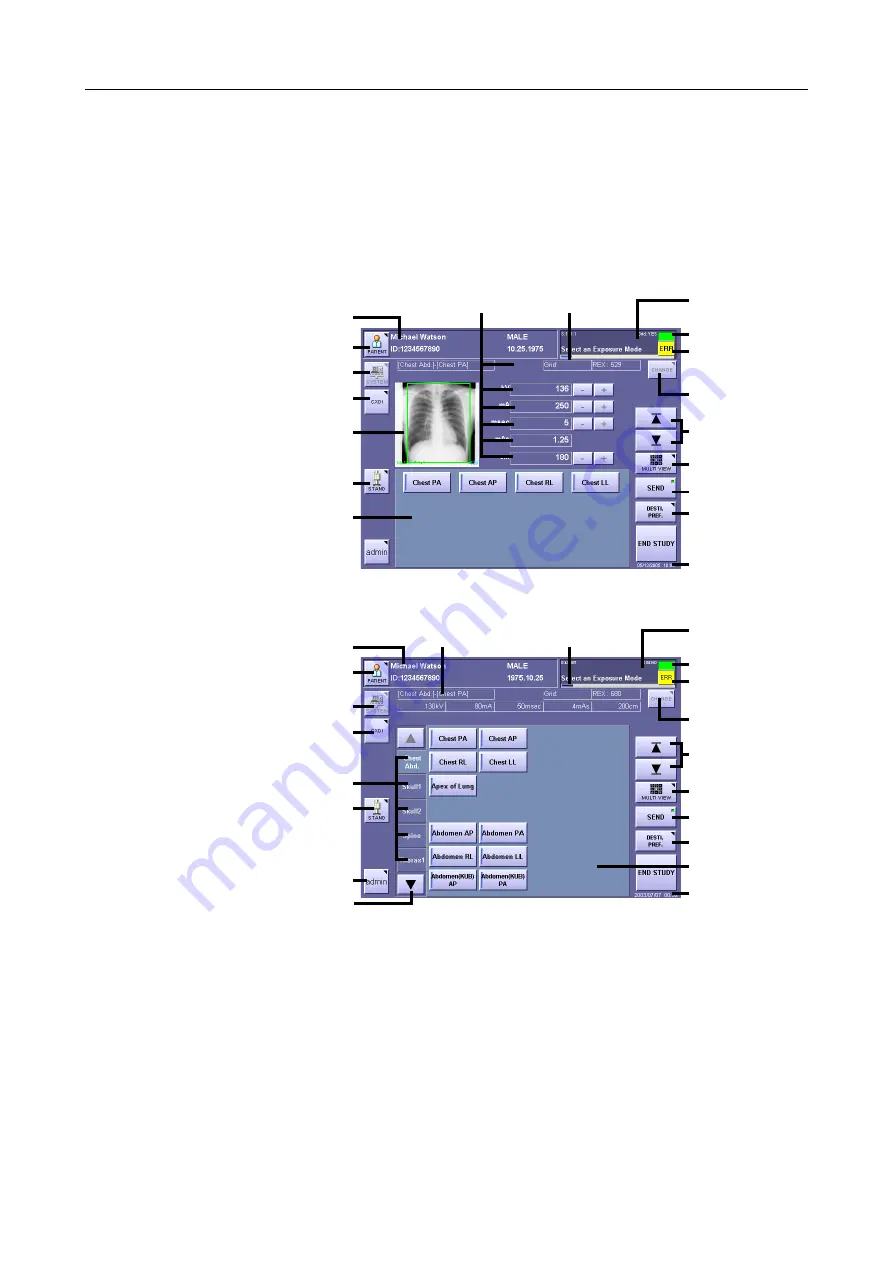
There are two types of exposure screen:
tray type
and
category type
. The exposure screen can
be switched depending on the setting
(
→
Setup Guide)
.
The
tray type
screen displays the exposure modes that you use most frequently, and the
category type
screen displays all available exposure modes for each area to be imaged.
(An example screen shot is shown below. Note that some items may not appear depending on
the user settings and other conditions.)
Tray Type Screen
Category Type Screen
*1 A unique ID issued by the CXDI system (“S:xxx...” and/or “I:yyy...”) is displayed in
the message area.
*2 Depending on the installation setup, it may not be displayed.
*3 Bucky msec (bucky time) is displayed only with sensor units CXDI-11, CXDI-12 and
CXDI-22.
*4 The progress bars are displayed when using a sensor unit which has a direct
Ethernet connection to a PC.
PATIENT button
Output indicator
Preview image
buttons
Present date
and time
MULTI VIEW button
Sending images
after exposure
DESTI. PREF.
button
CHANGE button
Patient data area
Exposure condition parameters (*3)
Message area (*1)
Study description
button
SYSTEM button
Image display area
(Density adjustment
area)
Sensor unit button
Exposure modes
on a “tray”
[ERR] (Error button)
Progress bar (*4)
PATIENT button
Output indicator
Preview image
buttons
Present date
and time
MULTI VIEW button
Sending images
after exposure
DESTI. PREF. button
CHANGE button
Patient data area
Message area (*1)
Study description
button
Exposure conditions parameters (*3)
SYSTEM button
Sensor unit button
[ERR] (Error button)
Exposure modes
on a “tray”
Logout (*2)
Category tabs
Progress bar (*4)
Tab scroll button
Summary of Contents for CXDI-1
Page 9: ...Starting Up Shutting Down 1 Starting Up Shutting Down the CXDI ...
Page 15: ...Exposure and Output 2 Taking an Image 3 Output Control Process Viewer ...
Page 38: ...2 Taking an Image 30 ...
Page 60: ...5 Viewing Multiple Images Multi View Screen 52 ...
Page 70: ...6 Browsing Completed Studies Study List 62 ...
Page 71: ...Processing the Image 7 Processing the Image QA Mode Screen ...
Page 103: ...CXDI Adjustment 8 Calibration 9 Self test ...
Page 110: ...8 Calibration 102 ...
Page 116: ...9 Self test 108 ...
Page 117: ...Troubleshooting 10 Before Calling a Service Engineer 11 Questions and Answers ...
Page 136: ...11 Questions and Answers 128 ...
Page 156: ...B Using the Rejection Reason Input Function 148 ...
Page 162: ...C Using the Sensor Unit Attach Detach Function 154 ...
Page 169: ......


