background image

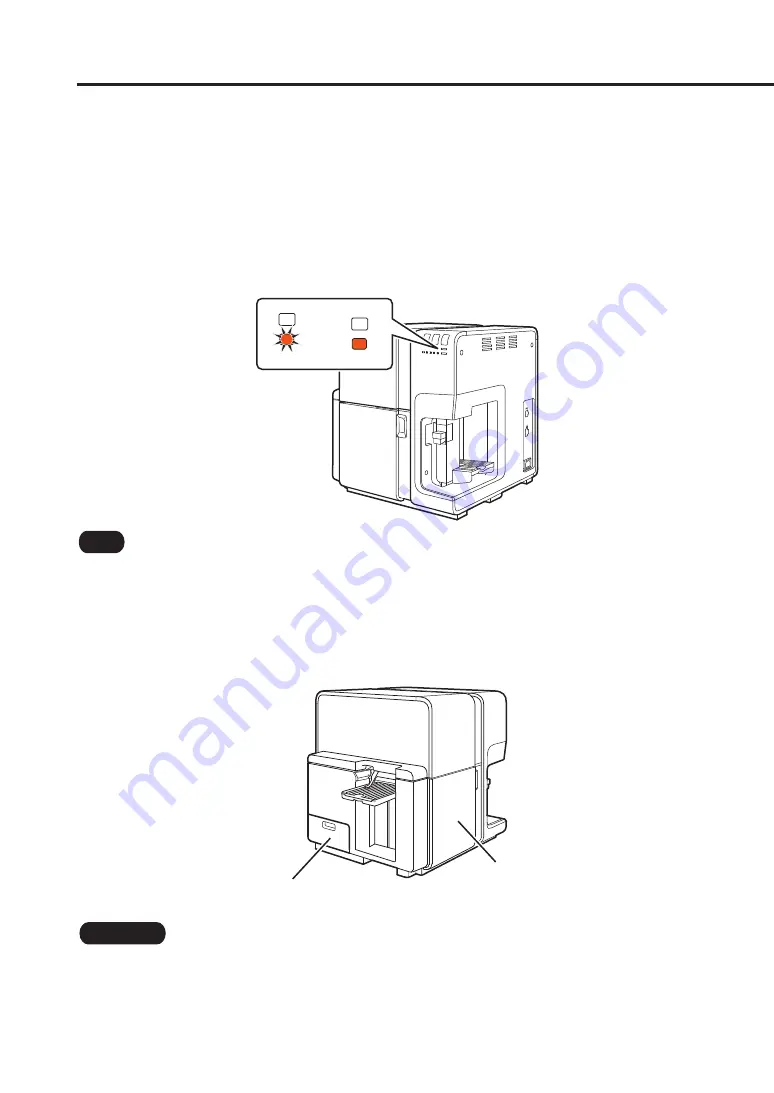
Check the maintenance cartridge warning lamp.

When the maintenance cartridge warning lamp is lit or blinking, replace the maintenance 
cartridge with a new one.

or

MC

MC

Note

•  To replace the maintenance cartridge, refer to "Replacing the Maintenance Cartridge" in the User's 

Guide.

10 

Make sure the maintenance cartridge door and ink tank door are closed.

Maintenance cartridge door

Ink tank door

Important

•  If the maintenance cartridge door or ink tank door is open, the auto stacker will not go down 

when the printer is powered off.

6

Summary of Contents for CX-G6400

Page 1: ...w to move or transport the printer to help you avoid injury and minimize ink leakage and or damage arising from ink leakage However these procedures do not guarantee the ink will not leak and cause in...

Page 2: ...18 Installing the Printer 23 Installation 23 How to Install 25 When moving the printer indoors Move the printer following the procedure described in Moving the Printer Indoors P 2 When transporting th...

Page 3: ...ons Note Instructions including notes for operation and additional explanations Sample Screens The sample CX G6400 printer driver screens displayed in this manual were created with Windows 10 Trademar...

Page 4: ...Preparation for Moving the Printer cannot be initiated Close the Status Monitor if it is running In a printer sharing environment do not launch the Status Monitor on the client when working on a serv...

Page 5: ...iary tray 3 Check the maintenance cartridge warning lamp When the maintenance cartridge warning lamp is lit replace the maintenance cartridge with a new one MC Note To replace the maintenance cartridg...

Page 6: ...he Desktop charms select Settings Control Panel Hardware and Sound Devices and Printers For Windows 7 Select the Start menu Devices and Printers 5 Open Printer Properties Right click on the printer ic...

Page 7: ...rtant While ink is being drained ensure the following precautions to avoid interrupting the procedure Do not turn off the printer Do not open close the ink tank door or maintenance cartridge door Do n...

Page 8: ...C MC Note To replace the maintenance cartridge refer to Replacing the Maintenance Cartridge in the User s Guide 10 Make sure the maintenance cartridge door and ink tank door are closed Maintenance car...

Page 9: ...confirm that the printer has stopped Press the power key for at least 1 second TRAY Important Do not press the power key after the printer has turned off Doing so will cause ink to refill in the prin...

Page 10: ...provided at the bottom of the printer Bend your knees and use your legs to lift the printer Bending your back to lift it can cause injury Ensure a good grip before raising the printer to avoid droppi...

Page 11: ...ving the printer to its destination connect the power cord 1 2 Warning Do not use any power cord other than those supplied with the printer This could cause a fire or electric shock 16 Turn the printe...

Page 12: ...curred Preparation for Transporting the Printer cannot be initiated Close the Status Monitor if it is running In a printer sharing environment do not launch the Status Monitor on the client when worki...

Page 13: ...1 Press the tray key to move the feeder lift tray downward Wait until it stops TRAY 2 Remove the paper from the feeder lift tray and then close the auxiliary tray 11...

Page 14: ...Guide 4 Open Devices and Printers For Windows 10 Right click on Start and then select Windows System Tools Control Panel Hardware and Sound Devices and Printers For Windows 8 1 From the Desktop charms...

Page 15: ...nk to drain from the printer Do not operate the printer before the specified message appears in step 8 Important While ink is being drained ensure the following precautions to avoid interrupting the p...

Page 16: ...ove the ink tanks Important If you click Cancel Preparation for Transporting the Printer will be interrupted If this occurs you will need to redo Preparation for Transporting the Printer again Remove...

Page 17: ...procedure Do not operate the printer before the message indicating that Preparation for Transporting the Printer has completed appears 10 Check that execution of Preparation for Transporting the Print...

Page 18: ...C MC Note To replace the maintenance cartridge refer to Replacing the Maintenance Cartridge in the User s Guide 12 Make sure the maintenance cartridge door and ink tank door are closed Maintenance car...

Page 19: ...cond TRAY Important Do not press the power key after the printer has turned off Doing so will cause ink to refill in the printer 14 Disconnect the power cord and interface cable Important When the pow...

Page 20: ...nk to leak inside the printer resulting in fire electric shock or machine failure Important To prevent the printer from being damaged or moving in the box during transporting pack it using the origina...

Page 21: ...2 Close the auto stacker 3 Open the ink tank door press the upper unit release lever to open the upper unit 1 3 2 19...

Page 22: ...4 Install the 4 protectors in the printer 5 Close the upper unit then close the ink tank door 2 1 20...

Page 23: ...printer Bend your knees and use your legs to lift the printer Bending your back to lift it can cause injury Ensure a good grip before raising the printer to avoid dropping it and causing damage In ad...

Page 24: ...xed parts Important After packing the printer do not lift the box or place the box with its upper or side surface down Ink could leak during transportation When transporting the printer ask the carrie...

Page 25: ...iners filled with water or liquids If such an object is brought into contact with the electrical parts inside the printer this could cause a fire or electric shock If an object enters the inside of th...

Page 26: ...all down or fall over resulting in personal injury Never place the printer where it will be exposed to rapid changes in temperature such as direct sunlight near an air conditioner or in a car on a hot...

Page 27: ...rried into a warm room on a cold day this could cause condensation inside the printer If this happens allow the printer to sit for at least 2 hour at room temperature to adapt to the ambient temperatu...

Page 28: ...2 Lift up the outer case then remove the accessory box and upper pads 3 Strip the plastic bag from top to bottom 26...

Page 29: ...to lift the printer Bending your back to lift it can cause injury Ensure a good grip before raising the printer to avoid dropping it and causing damage In addition if you hold the feeder area or auto...

Page 30: ...6 Remove the 4 protectors from the printer 7 Close the upper unit 28...

Page 31: ...ink tank cover 9 Load the ink tank Insert the ink tank into the ink tank slot with the correct side up Caution There are sharp pins in the ink tank slots To avoid injury never put your fingers into th...

Page 32: ...10 Close the ink tank cover securely 11 Install all the other ink tanks in the same way according to the color order indicated on the label 12 Close the ink tank door 30...

Page 33: ...13 Connect the power cord to the printer 1 2 Warning Do not use any power cord other than those supplied with the printer This could cause a fire or electric shock 31...

Page 34: ...is preparing to print Until the status lamp has gone from blinking to lit adhere to the follow precautions Do not turn off the printer Do not open close the maintenance cartridge door or ink tank doo...

Page 35: ...One Canon Park Melville NY 11747 U S A www usa canon com CANON U S A INC 4Y8 8175 030 CANON FINETECH NISCA INC 2019 2021 CANON SINGAPORE PTE LTD 1 Fusionopolis Place 14 10 Galaxis Singapore 138522 We...

Reviews: