background image

19

8

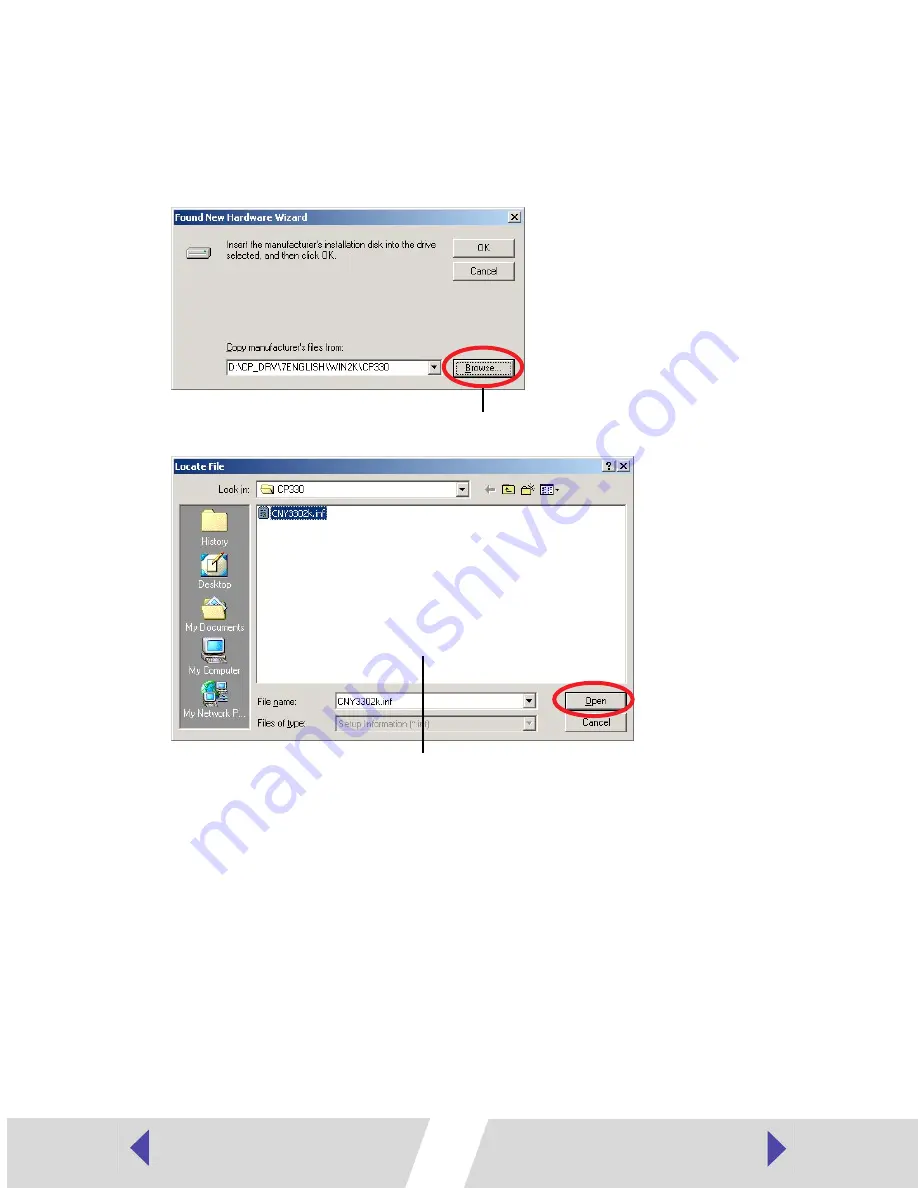
Click the [Browse] button, select the [CNY3302k.inf] file in the 
[\CP_DRV\7ENGLISH\WIN2K\CP330] folder on the CD-ROM, click 
the [OPEN] button, then click the [OK] button.

For the CP-220

, select the [CNY2202k.inf] file in the 

[\CP_DRV\7ENGLISH\WIN2K\CP220] folder.

This displays the Locate File dialog.

Specify the [CNY3302k.inf] file in the [\CP_DRV\7ENGLISH\WIN2K\CP330] 
folder or the [CNY2202k.inf] file in the [\CP_DRV\7ENGLISH\WIN2K\CP220] 
folder, and then click the [Open] button to enter the folder path at [Copy 
manufacturer’s files from:].

Summary of Contents for CP-330

Page 1: ...ion de I imprimante a un ordinateur et impression NOTICE Please be careful when installing the printer driver Do not install with out reading the Printer Driver User Guide included on the CD ROM as a PDF file jATENCION Tenga cuidado al instalar el controlador de la impresora No 10 instale sin leer el Manual del usuario del controlador de fa impresora incluido en el CD ROM como un archivo PDF ATTEN...

Page 2: ...nter 28 Printing 30 Battery Usage 32 Using the Battery Pack CP 330 Only 32 Using the Car Battery Adapter CP 330 CP 220 36 Troubleshooting 37 Error Messages 39 Specifications 41 Connecting the Printer to a Computer and Printing 43 Safety Precautions 43 Read Carefully Before Using 44 System Requirements 46 Printing Operations Overview 47 Installing the Software from the CP Printer Solution Disk Wind...

Page 3: ...per cassette sold separately Print easily at home Credit card size paper cassette sold separately Make label stickers Sper sheet Postcard size paper cassette Make original large size postcards Wide size paper cassette sold separately with the CP 220 Write your message in the blank portion Make original greeting cards ...

Page 4: ...D 7 CP Printer Solution Disk CompactPholo PrinterCP 330 CP 220 I Various types ofpaper cassettes You can design layouts as you like 3 ...

Page 5: ...ons and printing instructions This user guide is not supplied with certain camera models ZoomBrowser EX Software User Guide Windows ImageBrowser Software User Guide Macintosh Instructions on how to use ZoomBrowser EX and ImageBrowser These PDF format manuals are available on the Canon website Please download them from the following URL http web canon jp lmaging information e htmI Included with the...

Page 6: ... 200 mm 4 x 8 in Color Ink Paper Set KP 361P Postcard size 36 standard sheets Color Ink Paper Set KP 1 081P Postcard size 108 standard sheets Color Ink Paper Set KL 36IP L size 36 standard sheets Color Ink Paper Set KC 36IP Credit card size 36 standard sheets Color Ink Paper Set KW 24IP Wide Size 100 x 200 mm 24 standard sheets Color Ink Full sized Label Set KC 18IF Credit card size full size 18 L...

Page 7: ...P 330 or CP 220 If you have trouble understanding certain procedures please refer to the relevant reference pages for detailed instructions Canon camera Memory card containing the images you wish to print Camera User Guide or Direct Print User Guide Interface cable included with your camera kit Included with the printer f ili oading tHe Ink Cassette in the Printer p 24 6 oOpen the ink cassette com...

Page 8: ...aper cassette I Top Cover Cover oOpen the paper cassette s top and middle covers 8Placethe middle cover back to its original position and leave the top cover open 3 Loading the Paper Cassette into the Printer p H oOpen the paper cassette compartment cover 8 Push the paper cassette all the way into the paper cassette compartment with its top cover open and its middle cover closed Continued on the n...

Page 9: ...wer Source the printer s DC IN terminal At this point the CP 220 s power will turn on and the printer s indicator will light green i I I Direct Print Port Connect the interface 1 cable with its mark facing down 8 Connect the other end of the interface cable to the printer s direct print port If you are using the CP 220 go to step 7 ...

Page 10: ...pressed differs depending on the camera If the v button is pressed printing starts immediately 8 Select Print and press the SET or SELECT button Printing starts The color of the printer s display window changes CP 330 only With certain camera models the camera will power up and display its images when it is connected to the printer with the interface cable For detailed instructions please refer to...

Page 11: ... Support contacts please see the Canon Limited Warranty supplied with your printer Use of genuine Canon accessories is recommended This product is designed to perform optimally when used with genuine Canon accessories Canon shall not be liable for any damage to this product and or accidents such as fire etc caused by the malfunction of non genuine Canon accessories e g a leakage and or explosion o...

Page 12: ...ide size paper sold separately with the CP 220 Fast printing Postcard size images can be printed at the high speed of approximately 85 seconds per sheet Coated prints Applies a protective coating to each print Borderless prints Can produce borderless images that fill the paper completely Supports DPOF Digital Print Order Format Supports DPOF settings for print selection number of copies and shooti...

Page 13: ...ontact your dealer or the nearest canon Customer Support help desk Never rest small metallic objects or liquid containers on top of the devices If liquid splashes onto the devices wipe the devices dry using a soft absorbent cloth If liquid spills into the devices or an object falls into the devices immediately unplug the power cord from the power outlet Continued operation poses risk of fire or el...

Page 14: ...plug area Do not pull directly on the cord as this may damage or expose the cord s internal wiring resulting in risk of fire or electric shock Be sure that the power cord is plugged all the way in A loose connection may result in heat buildup fire or electric shock Do not damage modify or rest heavy objects on the power cord Damage to the cord may result in the exposure of live wires fire or elect...

Page 15: ... times during printing Placing your hand in the way of moving paper may result in injury Wait for printing to finish completely before removing the cassette Never place your hand into the paper cassette slot Do not reach into internal parts of the devices except as specified in the operating instructions Reaching into inappropriate parts of the devices may cause your hand to become caught or injur...

Page 16: ... of your area s humid season Do not leave the devices exposed to high temperatures Do not leave in direct sunlight or close to heating equipment or in a car with windows closed on a hot day High temperatures may cause deformation of the devices and pose risk of fire Do not use the devices near an open flame Sheets ejected from the printer onto the top of the paper cassette may fall into the flame ...

Page 17: ... set When the printer is not in use please remove the battery pack CP 330 only Unplug the printer when you are not using it But please note that you should plug in and run the printer at least once every six months to ensure that it remains functional Before transporting the printer remove the paper and ink cassettes and close the paper cassette cover and the ink cassette cover If dirt or foreign ...

Page 18: ...that come with it and observe all indicated precautions Keep the air vents clean and free of dust Clean the vents as necessary Dust that enters the printer through the vents may land on the ink sheet resulting in poor print quality and possibly leading to printer breakdown If the ink sheet becomes dusty remove the ink cassette and replace it with a new one Proper Handling of Ink Cassettes Please u...

Page 19: ...ed markings Always load paper into the cassette with the glossy side up Loading the paper the wrong way may result in poor print quality and in some cases may cause damage to the printer Do not tear or bend the paper s perforated edges before printing Tearing the paper s perforated edges will cause the ink sheet to wind up automatically and waste one print s worth of ink If this happens there will...

Page 20: ...s for prolonged periods Paper Storage If you wish to mount prints into an album select an album with nylon based sleeves or with propylene or cellophane sleeves Other types of sleeves may cause color loss or color bleeding Color change may occur over time in accordance with conditions of storage Canon assumes no liability for color changes To avoid print quality deterioration do not store your pri...

Page 21: ...assette is inserted into this compartment I Paper Cassette Slot The paper cassette loads into this compartment Paper Cassette Compartment Cover Back View Battery Cover Lever Used when the battery pack or battery cover is removed DC IN Terminal Connects to the Compact Power Adapter Air Vents _ V 4 1 USBPort Connects commercially 1 available USB cables to a I computer L Direct Print Port Connects th...

Page 22: ...t The paper cassette loads into this compartment Back View Air Vents Paper Cassette Compartment Cover DC IN Terminal Connects to the Compact Power Adapter I Paper handling Slot Paper extends out from this slot while printing is in progress I USB Port I I Connects commercially available USB cables to a computer Direct Print Port Connects the interface cable included with the camera to the camera 21...

Page 23: ...king Your Ink Paper Sets Printing on Postcard Size Paper 100 x 148 mm 4 x 6 in Paper Number of Sheets Paper Cassette Name Ink Cassette Name The design of the seal on your ink cassette may slightly differ from the examples below Postcard 4x6in size Canon 36 Printouts Made in Japan Japon Included in package Printing on L Size Paper 89 x 119 mm 3 5 x 4 7 in D 36 Paper Number of Sheets Paper Cassette ...

Page 24: ...s Made in Japan Japon The paper cassette PCW CP100 sold separately is required when printing on Wide size paper 100 x 200 mm 4 x 8 in with the CP 220 o Separately Sold Ink and Paper Products You can use the following color ink paper sets sold separately with the Canon Compact Photo Printer CP 330 CP 220 Paper Size Contents Product Name Postcard size Standard paper 36 sheets Color Ink Paper Set KP ...

Page 25: ...ompartment in the direction of the arrow Be careful to avoid touching or pulling on the ink sheet when inserting the cassette Push the cassette all the way in so that it clicks into place When you are ready to remove the ink cassette lift the clip and pull the cassette out Window Close the ink cassette compartment cover You can check the name of the ink cassette in the printer through the window o...

Page 26: ... cassette with the printable side glossy side facing up Insert the postcard size paper with the glossy side up and the address stamp side next to the middle cover as shown in the figure Do not touch the glossy side of paper to avoid fingerprints when you fan the paper stack Credit Card Size Standard Paper Full sized Label Insert the wide size paper 100 x 200 mm 4 x 8 in sold separately with the CP...

Page 27: ...s shown in the figure below Paper Glossy side up I 3 Place the middle cover back to its original position After pulling the middle cover down slide it in the direction of the arrows until it clicks back into place Do not close the top cover 26 ...

Page 28: ...tly before pushing the cassette in Insert the paper cassette evenly so that it slides over the bottom of the slot entrance The printer outputs the finished prints into the receptacle onto the top of the printer cassette top of the middle cover or inside of the top cover Be sure to close the middle cover and open the top cover so that output can proceed normally 27 ...

Page 29: ...et Camera s Compact Power Adapter sold separately or included with the camera Please use the camera s compact power adapter or a fully charged 2 battery pack or charged batteries I 3 Jl II Compact Power Adapter To Power Outlet PictBridge Compliant Non Canon Printers can also be connected The numbered steps in the following instructions refer to the numbers in the above illustration Place the print...

Page 30: ... printer Insert the cable in the left port with the mark on the cable facing down Press the ON OFF button until the indicator goes on CP 330 only The indicator lights green once the printer powers up Turning the Printer s Power Off CP 330 Press the ON OFF button until the indicator goes off CP 220 Unplug the cable of the compact power adapter from the printer The indicator will go off Some camera ...

Page 31: ...rinted and press the SET or SELECT button If your camera has the ltV Print Share button printing starts immediately after you press the ltV button Step 3 is not necessary Select Print and press the SET or SELECT button Printing starts The camera returns to the playback screen once printing is successfully completed The display window lights as explained below CP 330 The color changes in the follow...

Page 32: ...he 100 x 150 mm 4 x 6 in portion of the card Nothing is printed on this portion so you can write your message with an oil based pen When a Computer is Connected to the Printer Printed on the whole card If ra PictBridge mark appears on step 1 on page 30 select Default on the paper size setting screen When a computer is connected to the printer you can layout pictures and letters as you wish For det...

Page 33: ... 1 Press the battery cover lever down and remove the battery cover Remove the battery pack s terminal cover When the battery pack IS not in use always store it with its terminal cover on Install the battery pack Slide the battery pack into place in the direction of the arrow and push it in until it clicks into place To remove the battery pack push the battery cover lever down and pull the battery ...

Page 34: ...d battery charger included with the Battery Charge Adapter Kit BCA CP1 00 to charge the battery pack NB CP1 L before attaching it to the printer 1 Remove the battery pack s terminal cover Refer to step 1 of the Charging the Battery Pack in the Printer section p 32 2 3 Attach the battery pack to the charge adapter Attach it firmly in the direction of the arrow I Charge Adapter Attach the power cord...

Page 35: ...er section p 32 4 5 Compact Power Adapter Cable Connect the compact power adapter cable to the charge adapter The charge indicator lights orange while charging and turns green once the battery pack is fully charged Disconnect the cable from the charge adapter once charging is complete and detach the battery pack from the charge adapter 34 ...

Page 36: ...ce storing a fully charged battery pack for long periods of time about 1 year can shorten its lifecycie or affect performance you are recommended to discharge the battery pack fully in the printer before storing it in a cool place 30 C 86 of or less If you do not use the battery pack for long periods of time charge it fully and discharge it fully in the printer at least once a year before returnin...

Page 37: ...mately 72 sheets Wide size 100 x 200 mm 4 x 8 in paper Approximately 24 sheets Test conditions Normal temperature 23 C 73 OF Canon images continuous print The above data may vary according to the printing environment and the image to be printed At low temperatures the battery pack performance may diminish and the low battery icon may appear very rapidly In these circumstances the performance can b...

Page 38: ...e Canon BeBit incompatible with this printer website or your regional Canon website The printer is connected to a Wait until the print outputted by computer and printing is in the computer is complete progress The printer does not print The printer is not correctly Connect the cable correctly connected to the camera p 28 If the connection is correct the J or rzj mark will appear on the camera s LC...

Page 39: ...d slide it in and out of the printer 2 or 3 times Printed images are distorted The printer is too close to aTV Move the printer so that it is at video game machine or other least one meter 3 3 ft away electromagnetic source from the electromagnetic source The printer is too close to astereo Move the printer away from the speaker large motor or other istrong magnetic source strong magnetic source N...

Page 40: ...Wrong ink cassette size is loaded Use the designated ink cassette in the printer size Ink Cassette Error The ink cassette is not working Remove the ink cassette from the correctly printer take up the slack in the ink sheet and then reload the icassette If this does not solve the I problem replace with a new ink cassette If the ink cassette is stuck in the printer contact a Canon Customer Support h...

Page 41: ...opriate resize the image and convert as necessary so that the image is in aJPEG format that the camera can display Could not print xx images You have selected anumber of Check whether the image size images for DPOF printing but matches the camera s pixel some of these images cannot be capacity If sizes are not printed because they were taken i appropriate resize the images with adifferent camera r...

Page 42: ... connection 100 x 200 mm 4 x 8in Wide size 100 x 200 mm 4 x 8in print camera connection 100 x 150 mm 4 x 6in Print Speeds Postcard size print bordered borderless Approx 85 sec Lsize print bordered borderless Approx 70 sec Credit card size print full sized bordered borderless Approx 40 sec Credit card size multiple print 8 stickers Approx 40 sec Wide size 100 x 200 mm 4 x 8 in print computer connec...

Page 43: ... mAh Approx 300 110 0 x 40 7 x 37 5 mm 4 3 x 1 6 x 1 5 in Approx 230 g 8 1 oz Charge Adapter CG CP1 00 Supplied with the separately sold Battery charge Adapter Kit BCA CP100 Input voltage Rated output Charging time Operating temperatures Dimensions Weight DC 24 V 2A DC 24 V 0 7 A 2 5 hours o 40 ac 32 104 OF 136 7 x 46 5 x 41 1 mm 5 4 x 1 8 x 1 6 in Approx 120 g 4 2 oz 42 Car Battery Adapter CBA CP...

Page 44: ... loss from listening with headphones to the loud sounds of a CD ROM played on a music CD player Trademark Acknowledgments Canon and PowerShot are trademarks of Canon Inc Adobe is a trademark of Adobe Systems Incorporated CompactFlash is a trademark of SanDisk Corporation iBook and iMac are trademarks of Apple Computer Inc Macintosh PowerBook Power Macintosh and QuickTime are trademarks of Apple Co...

Page 45: ... UPDATES Neither Canon nor its subsidiaries dealers or distributors will be responsible for providing maintenance or support for use of the SOFTWARE No updates fixes or support will be made available for the SOFTWARE 4 LIMITED WARRANTY AND LIMITATION OF LIABILITY It is your responsibility to choose maintain and match the hardware and software components of your computer system Thus Canon does not ...

Page 46: ...in in full force and effect 9 CONTROLLING LAW The terms of this Agreement as it relates to purchases of the Software in the United States of America shall be governed and construed in all respects in accordance with the laws and regulations of the State of New York without reference to choice of law principles The terms of this Agreement as it relates to purchases of the Software in Canada shall b...

Page 47: ...ogram PhotoStitch 40 MB or more Canon CP 330 CP 220 Printer Driver 1 MB or more the amount of free space required for installation Display 800 x 600 pixels High Color 16 bit or better is required 1 024 x 768 pixels or better is recommended EMacintosh as Mac as 9 0 9 2 Mac as X v10 1 v10 2 v10 3 Computer Model The above as should be pre installed on computers with built in USB ports CPU PowerPC RAM...

Page 48: ...nstall the printer driver onto the computer GP Please besure toinstall the printerdriver accordingto the proc dures of the Rrint r DriVt JrUserGuide lf the printer driver is not installed properly you maynotbeabJetoprin See the Printer Driver User Guide Connect the printer to the computer Load the paper and ink cassettes in the printer turn the printer s power on and connect it to the computer usi...

Page 49: ... programs that are running Place the Canon CP Printer Solution Disk in the CD ROM drive The installer panel automatically appears CP PRINTER Solution Disk Installer Panel 48 If the installer panel does not automatically appear use the following procedure to start it For Windows 98 Me 2000 double click the My Computer icon on the desktop and double click the CD ROM icon in the next window For Windo...

Page 50: ... When the installation is over select Yes I want to restart my computer now and click Finish U rsof JVin9ows20Qo and Wind9wsxpmust logi n asah j drninirtra tor pomputersystemadministrator after restartillg tocarry outthesubseqllent procedures Remove the disk from the CD ROM drive when your normal desktop screen appears after restarting This concludes the software installation a computer to the pri...

Page 51: ...elect Programs All Programs for Windows XP Canon Utilities ZoomBrowser EX and ZoomBrowser EX Uninstall Uninstallation begins and ZoomBrowser EX is removed You can use the same procedure to uninstall PhotoStitch To uninstall PhotoRecord click the Start button and select Programs or All Programs Canon PhotoRecord and PhotoRecord Uninstall ...

Page 52: ...he CD ROM icon followed by the Mac OS X and Canon Digital Camera Installer icons With Mac OS 9 9 2 double click the CD ROM icon followed by the Mac OS 9 and Canon Digital Camera Installer icons CPPRfNTER s I ti Di k Installer Panel Click the Application Software Install button Select Easy Installation and click Next Select Custom Installation to select programs individually for installation Read t...

Page 53: ...stalling Uninstall the programs by dragging the application s folder the folder in which it was installed into the Trash and then empty the Trash Viewing the Printer Driver User Guide Windows Macintosh When connecting to your computer for printing be sure to read the Printer Driver User Guide and install the printer driver following the steps If the printer driver is not installed properly you may...

Page 54: ...uble click CP Printer User Guide pdf Macintosh Double click the following folders in order the CD ROM icon Mac as X Readme then the desired language folder Then double click CP Printer User Guide pdf Viewing the ZoomBrowser EX Software User Guide Windows lmageBrowser Software User Guide Macintosh PDF Manuals These PDF format manuals are available on the Canon Inc website from the following URL add...

Page 55: ...nal For details refer to the camera s user guide The printer s indicator blinks green several times once the printer and camera are correctly connected The indicator lights steadily green once it is ready to print If a problem occurs during a connection or during printing the printer s indicator lights or blinks red If this happens the error message that appears on the camera s LCD monitor may dif...

Page 56: ...ning the equipment off and on the user is encouraged to try to correct the interference by one or more of the following measures Reorient or relocate the receiving antenna Increase the separation between the equipment and receiver Connect the equipment into an outlet on a circuit different from that to which the receiver is connected Consult the dealer or an experienced radiolTV technician for hel...

Page 57: ...CDI M142 02A 0304Ni30 Canon 2004 CANON INC PRINTED IN JAPAN IMPRIME AU JAPON ...

Page 58: ... will be among the first ones to receive the notifications Protect your product We will keep the model number and date of purchase of your new Canon product on file to help you refer to this information in the event of an insurance claim such as loss or theft Receive information on new products and promotions Upon your request we will send you information on Canon new products and promotions CDX M...

Page 59: ...itte bewahren Sie diesen Zettel sicher auf da wichtige Information enthalten sind La garantia del producto 0 productos es valida s610 en el pais que aparece escrito en su certificado de garantia Guarde este impreso en lugar segura ya que contiene informacion importante La garantie de ce ou ces produits n est valide que dans Ie pays indique sur votre certificat de garantie Veuillez conserver cette ...

Page 60: ... Netherlands Canon UK Ltd Helpdesk Tel 08705143723 Calls may be recorded Fax 08705143340 Canon Communication Image France S A Tel 01 41 99 70 70 Fax 01 41 99 79 50 Canon Deutschland GmbH Customer Hotline 02151 349 555 Canon Italia S p A Pronto Canon 02 8249 2000 E mail supporto canon it Canon Belgium N V I S A Helpdesk 0900 10627 Tel 02 722 04 11 Fax 02 721 32 74 Canon Luxembourg S A Tel 352 48 47...

Page 61: ... performed by someone other than Canon or its Authorized Service Center Without limiting the foregoing water damage sand corrosion damage battery leakage dropping the printer scratches and abrasions will be presumed to have resulted from misuse abuse or failure to operate the Product as set forth in the operating instructions b Use of parts or supplies other than those sold by Canon that cause dam...

Page 62: ...s repaired by a Canon U S A or a Canon Canada Authorized Service Center You will be given the name address and phone number of an Authorized Service Center by contacting the Canon U S A Customer Care Center at 1 800 828 4040 or Canon Canada Customer Information Centre at 1 800 0K CANON 1 800 652 2666 It is your responsibility to properly package and send the defective Product together with a copy ...

Page 63: ...s Canon Utilities ZoomBrowser EX 4 6 PhotoRecord 2 1 PhotoStitch 3 1 CP 300 Prjnter Driver CP 200 Printer Driver 2 4 C86 1045 lit _ _ Solution Disk 1 11 lllfll fill II FnfTt r Iln llO r 2 4 ver 2 0 For Macintosh ...

Page 64: ...1 Compact Photo Printer CP 330 CP 220 Printer Driver User Guide Windows ...

Page 65: ...allation Windows 98 Me 23 Uninstalling 26 Turning On the Printer 28 Connecting the Printer to Your Computer 29 Printing 31 Printing with Standard Sheets or Full Size Label Sheets 32 Printing on 8 Label Sheets 39 Merging Images to Print a Panorama 40 Printing Part of an Image Trimming 42 Adjusting Color and Brightness Image Quality Adjustment 44 Appendices 45 About the Print Area and Pixels 45 Prin...

Page 66: ...aring loss from listening with headphones to the loud sounds of a CD ROM played on a music CD player Disclaimer While every effort has been made to ensure that the information contained in this guide is accurate and complete no liability can be accepted for any errors or omissions Canon reserves the right to change the specifications of the hardware and software described herein at any time withou...

Page 67: ...mation necessary for operating the printer Please read before using the printer This user guide Describes how to connect the printer to a computer printer driver installation functions and operating procedures Detailed explanations of operating procedures are given in the Help accompanying each software application If a problem occurs refer to the following Trouble with the printer itself See the ...

Page 68: ...are on your computer Install the necessary software on your computer from the CP Printer Solution disk See the Printer User Guide Install the printer driver Installation starts automatically when you turn on the printer and connect the printer to your computer To uninstall the printer driver See Uninstalling p 26 in this user guide See Installing the Printer Driver p 7 Turning On the Printer p 28 ...

Page 69: ...o a computer using a standard USB cable For details see Specifications Interface in the Printer User Guide Printing Print in a variety of layouts See Printing with Standard Sheets or Full Size Label Sheets p 32 Printing on 8 Label Sheets p 39 in this user guide ...

Page 70: ...stall the printer driver for the CP 220 in the same way If the printer driver is not installed correctly it is impossible to print You must install the printer driver as outline in the following procedure Using any other procedure to install the printer driver may lead to printing problems For details on how to uninstall the printer driver see Uninstalling p 26 If you have problems with the printe...

Page 71: ... the installer panel appears click Exit to close it 3 Turn the printer on p 28 4 Connect the printer to your computer using the USB cable p 29 After a moment the Add New Hardware Wizard dialog appears 5 Click the Next button 6 Select Search for the best driver for your device Recommended and then click the Next button ...

Page 72: ...e OK button Then click the Next button For the CP 220 select the CP_DRV 7ENGLISH WIN98 CP220 folder Do not select CD ROM drive This displays the Browse for Folder dialog Specify the CP_DRV 7ENGLISH WIN98 CP330 folder or CP_DRV 7ENGLISH WIN98 CP220 folder and then click the OK button to enter the folder path at Specify a location ...

Page 73: ...utton The USB driver for the printer is installed 9 When the following message appears click the Finish button Now you can continue and install the printer driver 10 When the following message appears click the Next button ...

Page 74: ...for the best driver for your device Recommended and then click the Next button 12 Because the folder specified in step 7 already appears here simply click the Next button Do not select CD ROM drive 13 Click the Next button ...

Page 75: ...12 14 Adjust any necessary settings and then click the Finish button The printer driver is installed 15 When the following message appears click the Finish button ...

Page 76: ...D ROM drive When the installer panel appears click Exit to close it 3 Turn the printer on p 28 4 Connect the printer to your computer using the USB cable p 29 After a moment the Add New Hardware Wizard dialog appears 5 Select Automatic search for a better driver Recommended and then click the Next button ...

Page 77: ...0U INF appears in Location then click the OK button For the CP 220 select Canon CP 220 so that CP_DRV 7ENGLISH WIN98 CP220 CNY220U INF appears The USB driver for the printer is installed 7 When the following message appears click the Finish button Now you can continue and install the printer driver ...

Page 78: ... then click the Next button 9 In the list of printer drivers select Canon CP 330 so that CP_DRV 7ENGLISH WIN98 CP330 CNY3309X INF appears in Location then click the OK button For the CP 220 select Canon CP 220 so that CP_DRV 7ENGLISH WIN98 CP220 CNY2209X INF appears ...

Page 79: ...16 10 Adjust any necessary settings and then click the Finish button The printer driver is installed 11 When the following message appears click the Finish button ...

Page 80: ...e When the installer panel appears click Exit to close it 3 Turn the printer on p 28 4 Connect the printer to your computer using the USB cable p 29 After a moment the Found New Hardware Wizard dialog appears 5 Click the Next button Log on to Windows 2000 with administrator privileges before installing the software ...

Page 81: ...18 6 Select Search for a suitable driver for my device recommended and then click the Next button 7 Select Specify a location and then click the Next button Do not select CD ROM drives ...

Page 82: ...utton For the CP 220 select the CNY2202k inf file in the CP_DRV 7ENGLISH WIN2K CP220 folder This displays the Locate File dialog Specify the CNY3302k inf file in the CP_DRV 7ENGLISH WIN2K CP330 folder or the CNY2202k inf file in the CP_DRV 7ENGLISH WIN2K CP220 folder and then click the Open button to enter the folder path at Copy manufacturer s files from ...

Page 83: ...20 9 Click the Next button The printer driver is installed 10 When the following message appears click the Finish button ...

Page 84: ...ars click Exit to close it 3 Turn the printer on p 28 4 Connect the printer to your computer using the USB cable p 29 After a moment the Found New Hardware Wizard dialog appears 5 Select Install the software automatically Recommended and then click the Next button Log on to Windows XP with administrator privileges before installing the software ...

Page 85: ...DRV 7ENGLISH WIN2K CP330 CNY3302k INF appears in Location then click the Next button For the CP 220 select Canon CP 220 so that CP_DRV 7ENGLISH WIN2K CP220 CNY2202k INF appears The printer driver is installed 7 When the following message appears click the Finish button ...

Page 86: ...ght is green and that the printer is connected to your computer with the USB cable 3 Click the Start button and select Settings and Control Panel 4 Double click the System icon Troubleshooting the Printer Driver Installation Windows 98 Me Use the following procedure to check the installation status of the USB driver delete any unnecessary USB driver and then install the printer driver again Also i...

Page 87: ...CP 330 or Canon CP 220 under Universal Serial Bus controllers or Other devices and then click the Remove button Example 1 Use the following screen examples as a reference and make sure you select the correct device for deletion If you delete other devices Windows may become inoperable ...

Page 88: ...on message appears click the OK button 8 Click the OK button to close the System Properties dialog 9 Close the Control Panel window 10 Disconnect the USB cable from your computer 11 Restart your computer 12 Reinstall the Printer Driver ...

Page 89: ...ck the CP_DRV 7ENGLISH UNINST folder on the CD ROM drive to open the folder 7 Double click CNYCPUN EXE icon to start the uninstaller The uninstaller starts Uninstalling Uninstall the software when it is no longer needed or if a problem occurs and uninstalling becomes necessary Note that if you uninstall the software you will not be able to use the printer to print When uninstalling under Windows 2...

Page 90: ...rinter name and then click the Yes button The printer driver is deleted and the CP Printer Driver Uninstaller window reappears 10 Click the Exit button 11 Restart your computer For Windows 98 or Windows Me If Canon CP 330 or Canon CP 220 does not appear it was probably not installed correctly In this case perform the procedure described in Troubleshooting the Printer Driver Installation Windows 98...

Page 91: ...er s indicator lights green 5 Press the ON OFF button only on the CP 330 When the printer is turned on the printer s indicator lights green To Turn the Printer Off With CP 330 Press the ON OFF button releasing it when the indicator turns off With CP 220 Unplug the Compact Power Adapter from the printer the indicator turns off When making connections confirm that the shape of the plug matches the s...

Page 92: ...ect the operation of the printer To delete a copy of the printer driver proceed as follows 1 Disconnect the USB cable from your computer 2 Delete the copy of the printer driver as follows Do not use the uninstaller 1 For Windows 98 Me 2000 click the Start button and select Settings and Printers For Windows XP click the Start button and select Control Panel Printers and Other Hardware and Printers ...

Page 93: ... ports on the printer and your computer For the location and direction of your computer s USB port refer to the documentation provided with your computer 2 The first time the printer is connected to your computer the Add New Hardware Wizard dialog Windows 98 p 8 Me p 13 or Found New Hardware Wizard dialog Windows 2000 p 17 XP p 21 appears and installation starts When disconnecting the USB cable yo...

Page 94: ...r is on the indicator on the printer is green and that the printer is properly connected to your computer with a USB cable Printers and computer displays use different color reproduction methods and lighting conditions and display settings affect the appearance of colors on your computer s display Therefore the colors in prints may differ from what you see on the screen This is not a printer probl...

Page 95: ...Size Label Sheets 1 Double click the ZoomBrowser EX icon on the desktop Or click the Start button and select Programs All Programs for Windows XP Canon Utilities ZoomBrowser EX and ZoomBrowser EX to start the program 2 Click Print Browser area ...

Page 96: ...33 3 Click Layout Print 4 Select an image to print and click the Next button at the window s bottom right ...

Page 97: ...d printing utility will start displaying the selected image To add a comment to an image select it in ZoomBrowser EX and click Properties For details about PhotoRecord see the descriptions displayed in the PhotoRecord Help menu Selecting this check mark enables you to add comments a file name or date to printouts Follow this order to print ...

Page 98: ...on One Photo Per Sheet Prints one image per sheet Free Form Allows free layout of the image for printing Contact Sheet Prints thumbnails and Shooting information 8 Sticker Label Prints 8 label sheets p 39 Fixed Size Photo Prints the image at the specified image ratio Mosaic Prints a specified number of arranged images When you select this check mark the image is automatically adjusted to fit the a...

Page 99: ...nd you want to change Clicking Add Title Captions allows you to attach text such as a title or caption to an image To add different images click the Fetch Photos button in step 1 Fetch Photos on the left of the window and then select the image To make copies of an image right click the image and select Make Copies Then input the number of copies you want to make and click OK to create the specifie...

Page 100: ...r protecting the print head If you interrupt printing while it is in progress be sure to check the printer status When the indicator light is green You can continue to print When the indicator light is red Temporarily remove paper from the paper handling slot Turn the printer off and then back on again Make sure the indicator light is now green and then print again Note that when printing is inter...

Page 101: ...ns after the album is saved Camera information such as scene and photographic conditions are embedded in images captured with cameras compatible with Exif 2 2 referred to as Exif Print PhotoRecord allows you to print clearer better looking images because it automatically optimizes print quality as the default setting for images captured with cameras that support Exif 2 2 as well as other images ...

Page 102: ... the screen and select Make Copies Then input the number of copies you want to make and click OK to create the specified number of image copies To add different images click the Fetch Photos button in 1 Fetch Photos and then select the image 3 Click 4 Print check print settings such as the number of copies and then click Print Loads different images Copies images ...

Page 103: ...y in the ZoomBrowser EX main window 2 On the menu that appears click Stitch Photos 3 In the browser area select a number of images and then click the Finish button at the bottom right of the window PhotoStitch starts When you use images captured with a Canon digital camera in Stitch Assist mode PhotoStitch determines the order and direction of the composition automatically facilitating the composi...

Page 104: ... the guidance panel at the top of the PhotoStitch window 5 Save your panoramic image and then click the to close PhotoStitch 6 Print the panoramic image To print the merged images see Printing with Standard Sheets or Full Size Label Sheets p 32 Guidance ...

Page 105: ... the part you are most interested in is not at the center of the image 1 Double click the image displayed in the Album window The Photo Viewer Control Panel appears Since a 1 3 mm border is trimmed from the image during printing we recommend that you select an area that is slightly larger than the part of the image you want to print Double click the image ...

Page 106: ...removed You can drag the edge of the trimming frame to change its size or drag inside the frame to move it Cases other than those above Click the Clip button and then hold down the left mouse button and drag to select the trimming area You can drag the edge of the trimming frame to change its size or drag inside the frame to move it 3 After making the settings click the Close button to close the P...

Page 107: ...ter Album Type click Properties 2 Click the Image Adjustment tab and adjust the color and brightness for printing For more details click or Help to display Help 3 When you have made the settings click OK to close the Properties dialog Adjust the brightness and contrast of prints Adjust the color of prints ...

Page 108: ...aded area in the following diagrams indicates the maximum printable area Note that because the print area is larger than the actual paper size a border is trimmed from the image when it is printed shown in millimeters Postcard size sheet 2 1 2 1 3 1 3 1 100 0 148 0 ...

Page 109: ...46 L size sheet Credit card size sheet full size label sheet 2 0 2 0 2 7 2 7 89 0 119 0 2 1 2 1 1 3 1 3 86 0 54 0 ...

Page 110: ...d from around an image during printing Paper Type Total number of pixels dots Effective number of pixels dots Postcard size sheet 1232 1823 approx 1180 1748 L size sheet 1100 1471 approx 1050 1406 Credit card size sheet full size label sheet 669 1066 approx 638 1016 Wide size sheet 1232 2416 approx 1180 2362 2 0 2 0 2 0 2 0 100 0 200 0 ...

Page 111: ... icon If Use Printer Offline is selected clear it Windows XP 1 Click the Start button and select Control Panel Printers and Other Hardware and Printers and Faxes 2 If the Canon CP 330 or Canon CP 220 is offline right click the printer icon and then click Use Printer Online If the problem still exists after trying these solutions restart your computer If the problem still persists uninstall the pri...

Page 112: ... This is not a malfunction Wait until the print head cools down and printing will automatically resume again Correction Printers and computer displays use different color reproduction methods and lighting conditions and display settings affect the appearance of colors on your computer s display However you can adjust color using Image Adjustment p 44 Printing stops while it is in progress Cause Th...

Page 113: ... the printer correctly Correction Remove the paper and then insert it back into the paper cassette correctly Correction Add more paper to the paper cassette If the error does not go away after you have tried the recommended solutions consult your nearest Canon Customer Support Help Desk Use the information in this section in conjunction with the Printer User Guide Paper feed error Check that paper...

Page 114: ...more ink in the ink cassette Ink cassette not installed You must insert an ink cassette before printing Press Resume to resume or Cancel to stop Cause The ink cassette is not inserted into the printer The printer is not ready for printing Check the printer power and printer connections Cause No power is supplied to the printer Cause The USB cable is not connected correctly No Paper Cassette has be...

Page 115: ...d Ink Cassette cannot be found Replace the Ink Cassette with the specified one Press Resume to resume or Cancel to stop Cause The ink cassette in the printer is not suitable for the print settings The specified Ink Cassette and Paper cannot be found Replace the Ink Cassette and Paper with the specified one Press Resume to resume or Cancel to stop Cause The ink cassette and paper in the printer are...

Page 116: ... the ink cassette from the printer Remove any slack from the ink sheet and then insert the ink cassette back into the printer If the problem still continues replace the ink cassette with a new one Paper jammed in printer Clear the jam as follows then try printing again 1 Remove the paper that caused the error 2 Turn printer off and back on Cause Paper is jammed inside the printer while printing or...

Page 117: ...w the messages on the screen Error occurred during communication Check the printer power and printer connections Cause Power to the printer goes off while printing is in progress Cause The cable came loose or was disconnected while printing was in progress If the USB cable is not properly connected communication problems may occur Make sure that the printer is connected to your computer s root hub...

Reviews: