background image

Quick Operation

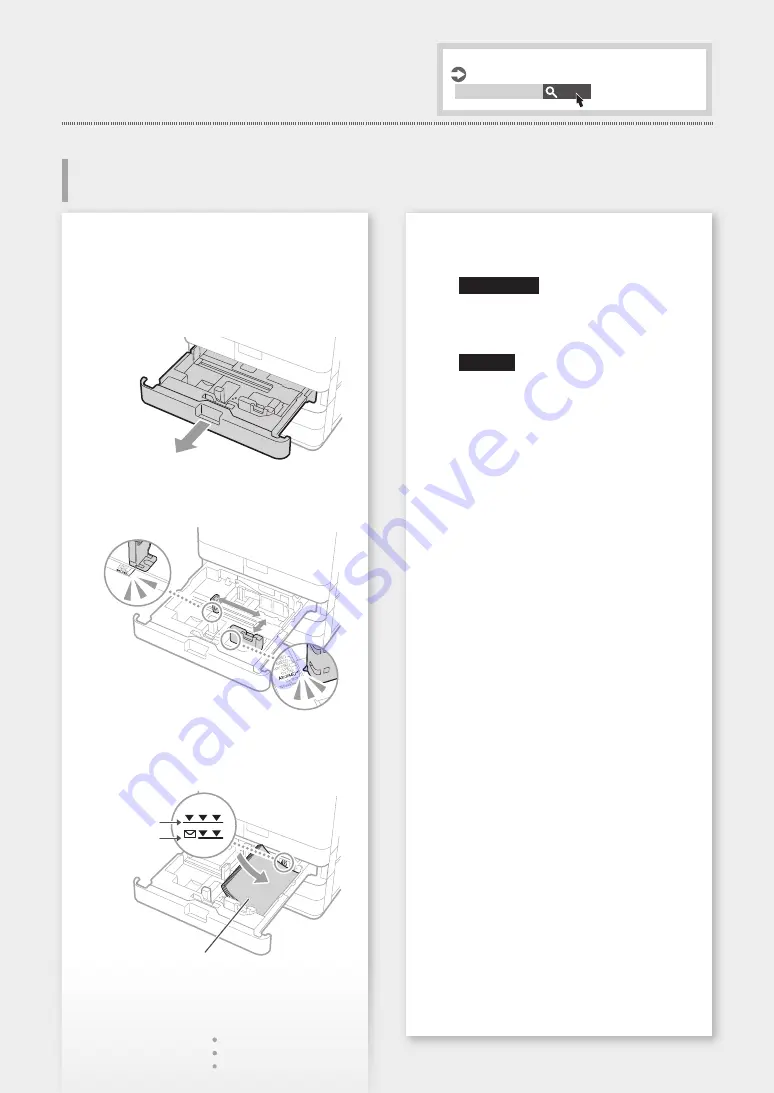
Loading Paper

In the following, the operations that are common 
to paper drawers 1 and 2 are described by taking 
drawer 2 as example.

Slide the light blue knobs to adjust the 
positions of the paper guides.

Align the protrusion to the 

appropriate paper size marking.

First fan the paper stack well and then load 
it.

Make sure that 

this line is not 

exceeded.

Paper 

Envelope

The print side face up

Loading in the Paper Drawer

Place the paper drawer back into the 
machine.

CAUTION!

Be careful not to get your fingers caught 

between the paper drawer and the 

machine.

NOTE

If you have changed the paper size, 

replace the label with one corresponding 

to the paper size as necessary.

If you have changed the paper type, be 
sure to change the paper settings.

Select <Settings/Regist. Shortcut> on the 
Home screen.

Select <Paper Settings>. 

Specify the size and type of paper, 
according to the screen.

Specifying Paper Size and Type in the Paper Drawer

User's Guide

Search

PMW-SPDR

9

Summary of Contents for C3226

Page 1: ...lease read Important Safety Instructions before operating this product After you finish reading this guide store it in a safe place for future reference The information in this document is subject to change without notice https oip manual canon User s Guide FAQ ...

Page 2: ...ings 2 Paper Size Type Settings Press Skip on the Authentication Login screen 3 Gradation Adjustment 4 Report Printing First Setup finished Now you can use a limited variety of functions including copying CASE1 If you want to use copy function first of all proceed to CASE1 If you want to use all functions of the machine proceed to CASE2 The Setup Guide screen is displayed automatically How to use ...

Page 3: ...sary CASE2 Setting up the Network Environment IP 192 168 User s Guide Search PMW STNW See this topic also when making connection via wireless LAN Installing Drivers User s Guide Search PMW INDR Setting E mail I Fax Communication User s Guide Search PMW STCM Setup finished Now you can use all functions including printing and sending faxes from a computer For more information about the Setup Guide U...

Page 4: ...Memo 4 4 ...

Page 5: ...Quick Operation 5 ...

Page 6: ... available only on models that have a feeder attached Place the document with the scan side face up Adjust the slide guides Suitable for scanning book pages magazine pages and newspaper clips Suitable for continuously scanning many pages of literature quotation etc Remember before You Start Operation Start the Operation from the Operation Panel Machine Operation Panel Energy Saver key Home key Sto...

Page 7: ...g Copying User s Guide Search PMW CPIG Printing 1 Open the document to print and select the print function of the application 2 Select the printer driver for the machine and select Preferences or Properties 3 Specify the paper size 4 Specify the paper source and paper type 5 Specify the print settings as necessary 6 Select OK 7 Select Print or OK Useful print settings 2 sided N on 1 Booklet Printi...

Page 8: ...unctions Sequential Broadcast Memory Reception PC Fax Faxing User s Guide Search PMW FXIG Scanning 1 Place the original document 2 Select Scan and Send or Scan and Store on the Home screen 3 Select the type of scan and enter the necessary information 4 Press Types of scan Store in USB memory device Send e mail Send to file server To scan from a computer Use the scanner driver supplied with the mac...

Page 9: ...he print side face up Loading in the Paper Drawer 4Place the paper drawer back into the machine CAUTION Be careful not to get your fingers caught between the paper drawer and the machine NOTE If you have changed the paper size replace the label with one corresponding to the paper size as necessary If you have changed the paper type be sure to change the paper settings 5Select Settings Regist Short...

Page 10: ...s line is not exceeded The print side face down Loading in the Multi Purpose Tray 4Adjust the paper guides to match the size of the loaded paper Align the paper guides to the paper size markings 5Check the paper size and type and press OK on the screen If the paper size type setting does not match the paper you have loaded on the screen shown in step 5 change the setting manually 6Press Standard S...

Page 11: ...onnected correctly If the problem persists see the User s Guide Toner Cartridge Canon genuine toner cartridge Canon NPG 67 Toner Black Canon NPG 67 Toner Cyan Canon NPG 67 Toner Magenta Canon NPG 67 Toner Yellow Canon NPG 67L Toner Cyan Canon NPG 67L Toner Magenta Canon NPG 67L Toner Yellow Not available in some regions Staple Staple P1 This can be used with the following options Inner Finisher L ...

Page 12: ...1 The paper may have absorbed moisture Replace it with paper that has not absorbed moisture Solution 2 Perform gradation adjustment 1 Press 2 Press Adjustment Maintenance Adjust Image Quality Auto Adjust Gradation on the screen Follow the instructions on the screen to perform gradation adjustment For more information see the User s Guide Adjusting gradation User s Guide Search PMW AJGR If a Proble...

Page 13: ...he stain proof coating 2 Close the feeder NOTE If black streaks still appear after dirt removal perform the following procedure to execute Clean Feeder For more information see the User s Guide White Streaks Color Streaks Appear in Images Solution Cleaning the dust proof glass 1 Turn the power OFF and remove the power plug from the power outlet 2 Open the front cover 3 Take out the cleaning stick ...

Page 14: ...tion and close the front cover 7 Insert the power plug into the power outlet and turn the power ON Bleed through Occurs Solution 1 Set the type of original properly If bleed through is observed in the copy result a button on the Home screen may be able to help you reduce the bleed through 1 Press Copy Prevent Bleed Thru on the Home screen 2 Press Yes Solution 2 Set a lower background density 1 Sel...

Page 15: ...ng holidays or other times when the machine will not be used for long periods turn the machine off and unplug it from the power supply IMPORTANT Install this machine near the power outlet and leave sufficient space around the power plug so that it can be quickly unplugged in an emergency Always ensure that the power plug is unplugged from the power outlet before starting work Do not connect the po...

Page 16: ...his equipment conforms with the essential EMC requirements of the relevant EC Directives We hereby declare that this product conforms with the EMC requirements of the EC Directives at a nominal mains input 230 V at 50 Hz although the rated input of the product is 220 to 240 V at 50 60 Hz Shielded cables must be used to comply with the technical EMC requirements of the EC Directives E Waste Rules I...

Page 17: ...way that prevents inhalation Do not use an ordinary vacuum cleaner to clean up spilled toner Only models with safeguards against dust explosions should be used CAUTION Observe the following precautions when handling consumables Improper handling may result in burns or be harmful to your health If any toner is ingested or gets into your eyes or mouth consult a physician immediately Keep toner and o...

Page 18: ...TWARE or create derivative works based on the SOFTWARE 8 You are not entitled to remove or make separate copies of the SOFTWARE from the PRODUCT 9 The human readable portion the source code of the SOFTWARE is not licensed to you Notwithstanding 1 through 9 above the PRODUCT includes third party software modules accompanying the other license conditions and these software modules are subject to the...

Page 19: ......

Page 20: ...U S A CANON CANADA INC 8000 Mississauga Road Brampton ON L6Y 5Z7 Canada CANON EUROPA N V Bovenkerkerweg 59 1185 XB Amstelveen The Netherlands See http www canon europe com for details on your regional dealer CANON AUSTRALIA PTY LTD Building A The Park Estate 5 Talavera Road Macquarie Park NSW 2113 Australia CANON SINGAPORE PTE LTD 1 Fusionopolis Place 15 10 Galaxis Singapore 138522 ...

Reviews: