background image

Try Scanning

9

English

3

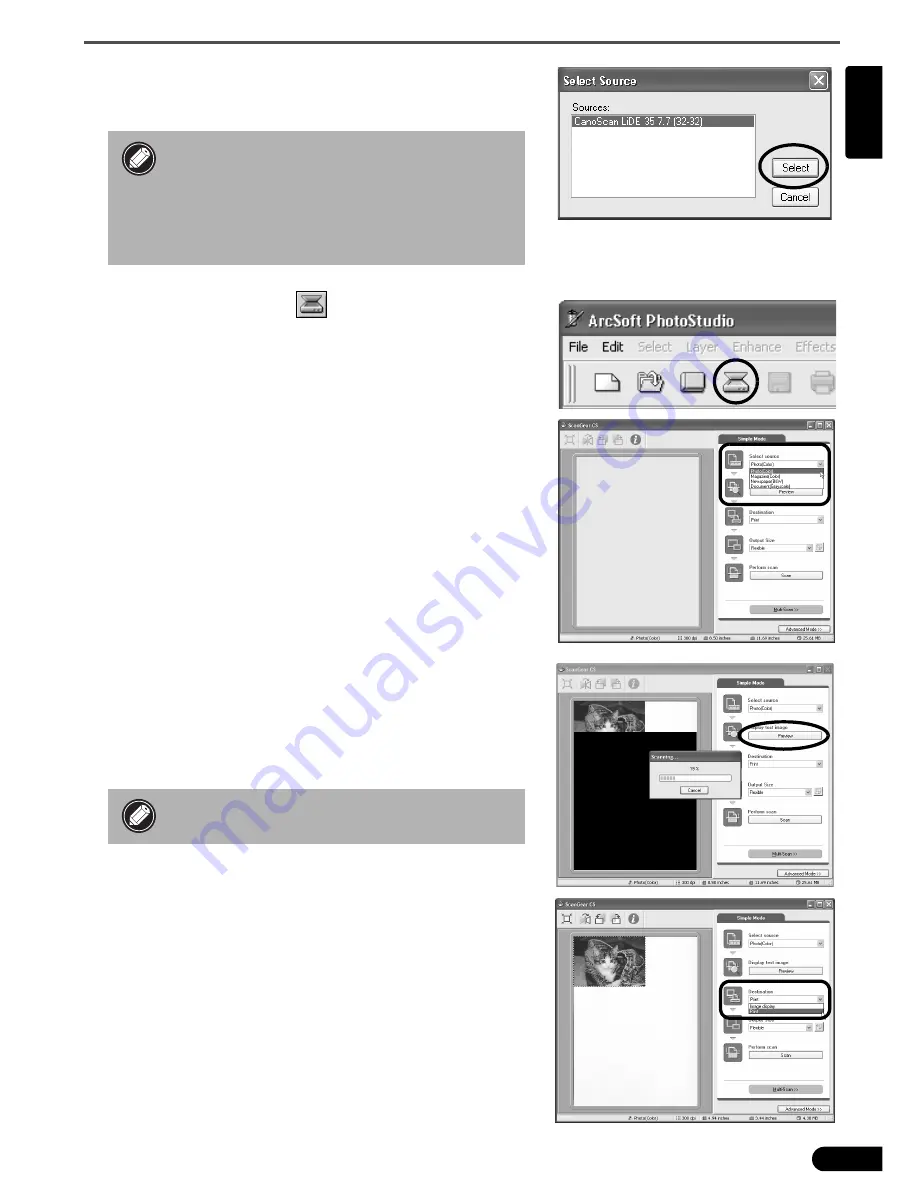
Click the [File] menu and choose [Select Source].

Select your scanner model name and click the [Select] button 
for Windows or the [OK] button for Macintosh.

4

Click the Acquire icon 

 or click the [File] menu 

and select [Acquire].

ScanGear CS will start.

5

Select the [Select Source].

You can select from the following options.

Photo (Color)/Magazine (Color)/Newspaper (B&W)/Document 

(Grayscale).

6

Click [Preview]. 

After calibration, the preview scan will start and gradually 

display the image.

The image is automatically cropped at its original size.

If you want to trim the image further, drag the mouse 

diagonally to select the area.

7

Select the [Destination].

You can select [Print] or [Image display].

When [Print] is selected, the output resolution is set to 300 dpi. 

When [Image display] is selected, it is set to 150 dpi.

[Print] is selected in this example.

• After you set this setting the first time, you 

do not need to set it from the second time 
onward with the same scanner.

• You will need to reset this setting if you 

select a different scanner or a digital 
camera.

• Do not open the document cover while a 

scan is in progress.

Summary of Contents for 9871A001 - CanoScan LiDE 35 Scanner

Page 1: ...g Unit Connect the Scanner Try Scanning p 3 p 4 p 5 p 6 p 7 p 8 Using the Scanner Buttons p 11 Using the USB 2 0 Interface expansion cards Windows Only p 12 Be sure to install the software programs before connecting the scanner to the computer Please read this guide before operating this scanner After you finish reading this guide store it in a safe place for future reference ...

Page 2: ...occur You can install this manual onto the hard disk together with the software programs When you install it the Scanning Guide icon will appear on the desktop Double click the icon to view it with a browser program such as Internet Explorer User s Guides for Application Programs PDF format manuals ArcSoft PhotoStudio ScanSoft OmniPage SE Select the View the Electronic Manuals menu on the CanoScan...

Page 3: ...and load images from the scanner CanoScan Toolbox 15 MB 10 MB Scanning Utility Program It enables you to scan images and copy print attach images to e mail messages or save images with simple steps It also works with the scanner buttons ArcSoft PhotoStudio 35 MB 20 MB Image Editing Program It allows you to load images from the scanner edit and retouch them and apply special effects and enhancement...

Page 4: ...ill start Follow the on screen message prompts and click Next or Yes to continue the installation 6 When the installation is complete click Yes The computer will restart 7 After Windows restarts remove the CD ROM from the drive and store it in a safe place Continue on P 6 With Windows XP 2000 you should log on with an administrator user name when you install or uninstall software programs If you a...

Page 5: ...menu will display 5 Click Install the Software Read the SOFTWARE USER LICENSE AGREEMENT Click Yes if you accept the terms The Install window will display 6 Click Start Installation You will install five software programs and the Scanning Guide HTML format manual 7 The installation procedure will start Follow the on screen message prompts and click Next Yes or Install to continue the installation I...

Page 6: ...the scanner to the computer If it is left locked a malfunction or other problem may occur Do not tilt the scanner more than 90 degrees from horizontal when releasing the lock When locking the scanner do not lift up the back and tilt the front scanner button location downward You may be unable to set the lock When carrying or transporting the scanner always lock the scanning unit by pushing the loc...

Page 7: ...nly use the USB interface cable provided with the scanner Use of other cables may lead to a malfunction The scanner does not have a power switch The power is activated as soon as the computer is turned on When the scanner is connected to the USB 1 1 port on Windows XP do not worry if the HI SPEED USB Device Plugged into non HI SPEED USB Hub message appears You can operate the scanner in this condi...

Page 8: ...ning its top edge with the alignment mark and close the document cover Alignment Mark Bottom Top 2 Select Start Programs or All Programs ArcSoft PhotoStudio 5 5 and PhotoStudio 5 5 PhotoStudio will start Windows 2 Double click the Applications folder followed by the PhotoStudio folder and the PhotoStudio icon PhotoStudio will start Macintosh ...

Page 9: ...rt and gradually display the image The image is automatically cropped at its original size If you want to trim the image further drag the mouse diagonally to select the area 7 Select the Destination You can select Print or Image display When Print is selected the output resolution is set to 300 dpi When Image display is selected it is set to 150 dpi Print is selected in this example After you set ...

Page 10: ... Step 7 you can select an output size in pixels to match the sizes used by computer monitors and digital cameras 9 Click Scan The final scan will start 10Click close box Windows or Macintosh in the ScanGear CS window to close it The scanned image will appear in the PhotoStudio window 11Save the scanned image Click the File menu and select Save As Select the folder where you wish to store the image...

Page 11: ...asy to create PDF files for your images by using the FILE Button on the scanner or the FILE Button in CanoScan Toolbox You can also make PDF files with multiple pages and create text searchable PDF files If you press the Cancel button while scanning you can change the default settings for scanning For changing settings refer to the Scanning Guide HTML format manual To use the E MAIL Button one of ...

Page 12: ...nGear CS window 3 Read the contents of the Interface category in the displayed window USB 1 1 will show as USB 1 1 and USB 2 0 as USB 2 0 4 Click the close box to close the window Troubleshooting the USB2 0 Hi Speed Interface If the scanner is not operating correctly via the USB2 0 Hi Speed interface follow the steps below to troubleshoot it 1 Ensure that you use the USB cable supplied with the sc...

Page 13: ...Preview Speed 2 Approximately 9 sec Interface USB 2 0 Hi Speed 3 USB USB 1 1 equivalent Maximum Document Size A4 Letter 216 x 297 mm Scanner Buttons 4 buttons COPY SCAN FILE E MAIL Operating Range Temperature 5 C to 35 C 41 F to 95 F Humidity 10 to 90 RH without condensation formation Power Requirements Supplied via USB port Power Consumption In operation 2 5 watts maximum Stand by 1 5 watts Maxim...

Page 14: ...safe location Guaranteed servicing for this equipment will expire five years after production ceases About the Computer Used Date of Purchase Dealer Tel Dealer Address Scanner Model CanoScan LiDE 35 Serial Number on the back of the equipment Manufacturer Model CPU Clock Speed MHz Memory Capacity RAM MB Space Available MB Hard Disk Capacity MB OS Windows XP Me 2000 98 Macintosh OS X v10 1 OS X v10 ...

Reviews: