

LV-CL05
Be sure to consult with a qualified installation specialist.
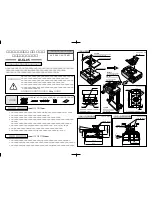
Mounting Hanger for Low Ceilings
Assembly and Installation Instructions
This mounting hanger is specifically for use with our projectors listed on above. Do not use for any
other equipment or purposes. Be especially careful that children do not hang from it. Perform proper
assembly and installation by following these instructions. Be sure to follow all precautions.
Compatible projector models
LV-7340U, LV-7345U
LV-7340E, LV-7345E
Precautions
When hanging a projector from the ceiling using this mounting hanger, the ceiling must have
adequate strength to support both the projector and the mounting hanger. Before
installation, check the combined weight of the projector and hanger, as well as the strength
of the ceiling based on that weight. If the strength is insufficient, provide adequate
reinforcement before proceeding.
●
Always mount on a level ceiling. Never install on an inclined ceiling.
●
During installation, take appropriate measures to prevent lateral swaying due to
earthquakes or vibration (using wires, etc.).
The total weight of the mounting hanger itself is
2.5
kg.
Fig. 1
…
Assembley
Fig. 2
…
Adjustment (front view)
(A)Screw…11 (B)Screw…4 (C)Screw…4 Fastening This Manual
Accessories
plate…2
…1
Fig. 3
…
Adjustment (side view)
15°
15°
120
10
14
80
10°
10°
210
180
103
174.5
230.5
127.5
331.5
350
89.3
10°
10°
230.5
122.7
Detailed view of ceiling bracket and
projector bracket
Ceiling bracket mounting dimensions
Unit:mm
Unit:mm
Unit:mm
Fastening
plate
2-
φ10
(C)screw
(4 locations)
(E)screw (4 locations)
(D)screw
(4 locations)
(C)screw
(B)screw
Inclination angle
adjustment
Vertical angle
adjustment
Left/right angle
adjustment
Projector
(C)screw
Phillips head hex bolt with
integrated spring washer
and flat washer M6
×
12 (
×
4)
(B)screw
Phillips head machine screw
with integrated spring washer
and flat washer M3
×
8 (
×
4)
(A)screw
Phillips head machine
screw with integrated
spring washer and flat
washer M4
×
10 (
×
8)
(A)screw
Phillips head machine screw with integrated
spring washer and flat washer M4
×
10 (
×
3)
Ceiling bracket (
×
1)
Projector bracket (
×
1)
[
Inclination angle
]
[
Left/right angle
]
[
Vertical angle
]
Assembly and Installation
See Fig. 1
Adjusting the Projection Position
See Figs. 2, 3
1. Turn the projector over, and mount the projector bracket using the three (A) screws.
2. Determine the projection distance, and then determine the mounting position of the ceiling bracket.
3. Mount the ceiling bracket to the ceiling. See the figures for bracket mounting dimensions.
4. Hang the projector by aligning the groove in the projector bracket (attached to the projector) with the ceiling
bracket already fastened in place.
Note) Be careful not to drop the projector. The projector is not yet securely mounted.
5. Mount the projector bracket and two fastening plates using the four (B) screws.
6. Tentatively fasten the four (C) screws to the ceiling bracket. (Tighten after determining the projection position.)
7. Mount the securing band to the projector bracket using the eight (A) screws.
1. Inclination angle adjustment :
After aligning the position with the screen, securely fasten the (C) screws in four locations.
2. Vertical angle adjustment :
Loosen the (D) screws, align the position with the screen, and then securely fasten the (D) screws.
3. Left/right angle adjustment :
Loosen the (E) screws, align the position with the screen, and then securely fasten the (E) screws.


