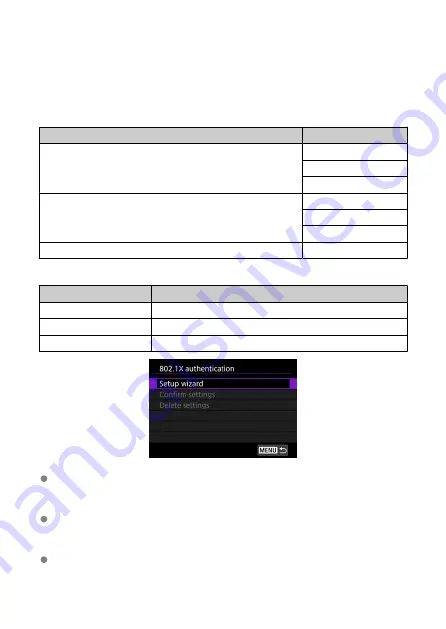
802.1X authentication
Selecting [
802.1X authentication
] enables you to set, check, or delete 802.1X
authentication settings, using a setup wizard.
Configure these settings when connecting to networks that require 802.1X authentication.
First, save the certificate for the type of 802.1X authentication used to a card in the camera.
File types and names that can be loaded using this function are as follows.
Type
File Name
Root certificate
8021X_R.CER
8021X_R.CRT
8021X_R.PEM
Client certificate
8021X_C.CER
8021X_C.CRT
8021X_C.PEM
Private key
8021X_C.KEY
Note that the camera supports following protocols.
Protocol
Supported Authentication
EAP-TLS
X.509
EAP-TTLS
MSCHAPv2
PEAP
MSCHAPv2
Setup wizard
• Follow the wizard to configure the authentication settings.
Confirm settings
• Select to check authentication settings.
Delete settings
• Select to delete authentication settings. Selecting [
OK
] on the screen displayed
deletes the settings.
693
Summary of Contents for 3829C002
Page 26: ... 1 2 3 4 5 6 7 8 9 10 11 12 13 14 20 21 15 16 17 18 19 26 ...
Page 28: ... 1 2 3 4 5 6 7 8 9 10 11 12 13 14 15 16 17 18 19 20 21 22 28 ...
Page 30: ... 1 2 3 4 5 6 7 8 9 10 11 12 13 14 15 16 22 23 17 18 19 20 21 30 ...
Page 34: ... 1 2 3 4 5 6 7 8 9 10 11 12 13 14 34 ...
Page 36: ...Top LCD panel 1 2 3 4 5 6 7 8 9 10 36 ...
Page 38: ... 1 2 3 4 5 6 7 9 8 10 11 12 38 ...
Page 45: ...3 3 Included interface cable 4 5 45 ...
Page 65: ...Changing the Interface Language To change the interface language see Language 65 ...
Page 78: ...Note The operations in 1 can be performed even when the power switch is set to 78 ...
Page 80: ...Note The operations in 1 can be performed even when the power switch is set to 80 ...
Page 100: ...Dragging Sample screen Menu screen Slide your finger while touching the screen 100 ...
Page 122: ...Shooting 4 1 Multiple exposure 2 HDR PQ settings 3 Live View shoot 122 ...
Page 263: ...ISO Speed in and Modes ISO speed is set automatically See ISO Speed in Movie Recording 263 ...
Page 333: ...1 Point AF Manual Selection Select one AF point for focusing 333 ...
Page 416: ... Displaying the Highlight Alert AF Point Display Playback Grid HDMI HDR Output 416 ...
Page 423: ...Magnified view Note You can also magnify display by double tapping with one finger 423 ...
Page 428: ...428 ...
Page 456: ...4 Erase the images Press the button then press OK 456 ...
Page 458: ...4 Erase the images Select OK 458 ...
Page 518: ...2 Select Network settings 3 Select Enable 4 Select Bluetooth settings 518 ...
Page 526: ...Note To check the camera s Bluetooth address select Bluetooth address 526 ...
Page 528: ...5 Select SET Unspecified 6 Select Create with wizard 7 Select Configure online Select OK 528 ...
Page 530: ...11 Select Camera access point mode 12 Select Easy connection Select OK 13 Select OK 530 ...
Page 536: ...4 Set Auto send to Enable If necessary specify Size to send 536 ...
Page 540: ...4 Select Size to send On the displayed screen select an image size 5 Select Send 540 ...
Page 548: ...4 Select Smartphone 5 Select Change 6 Select Viewable imgs 548 ...
Page 553: ...3 Select Enable 4 Select Connection settings 5 Select SET Unspecified 553 ...
Page 555: ...9 Select Wi Fi Select OK 10 Select New settings Select OK 11 Select Connect with WPS 555 ...
Page 557: ...15 Select Auto setting Select OK 16 Select Disable Select OK 17 Press 557 ...
Page 614: ...6 Select Transfer 7 Select OK The selected images are transferred to the FTP server 614 ...
Page 617: ...Select OK to transfer the selected images to the FTP server 617 ...
Page 633: ...7 Select OK The selected images are transferred to the computer 633 ...
Page 636: ...Select OK to transfer the selected images to the computer 636 ...
Page 688: ...Confirm settings Select to check function settings 688 ...
Page 702: ...GPS Settings 1 Select GPS settings 2 Configure GPS details 702 ...
Page 710: ...3 Select OK 710 ...
Page 745: ...3 Select Create folder 4 Select OK To rename the folder select Change folder name 745 ...
Page 768: ...Language 1 Select Language 2 Set the desired language 768 ...
Page 777: ...Quick Control Screen See Quick Control Screen in Viewfinder Shooting 777 ...
Page 778: ...Custom Quick Control Screen See Custom Quick Control 778 ...
Page 788: ...Grid 1 Select Shooting info disp 2 Select Grid display 3 Select an item 788 ...
Page 790: ...Clearing Settings 1 Select Shooting info disp 2 Select Reset 3 Select OK 790 ...
Page 795: ...Example 6 Multi function lock 795 ...
Page 796: ...Changing the Help Text Size 1 Select Help text size 2 Select an item 796 ...
Page 799: ...Note Touch activated shooting touch shutter is not supported 799 ...
Page 939: ...White balance AEB setting 939 ...


