background image

Canon Scanner WIA Driver User’s Guide


10

4.

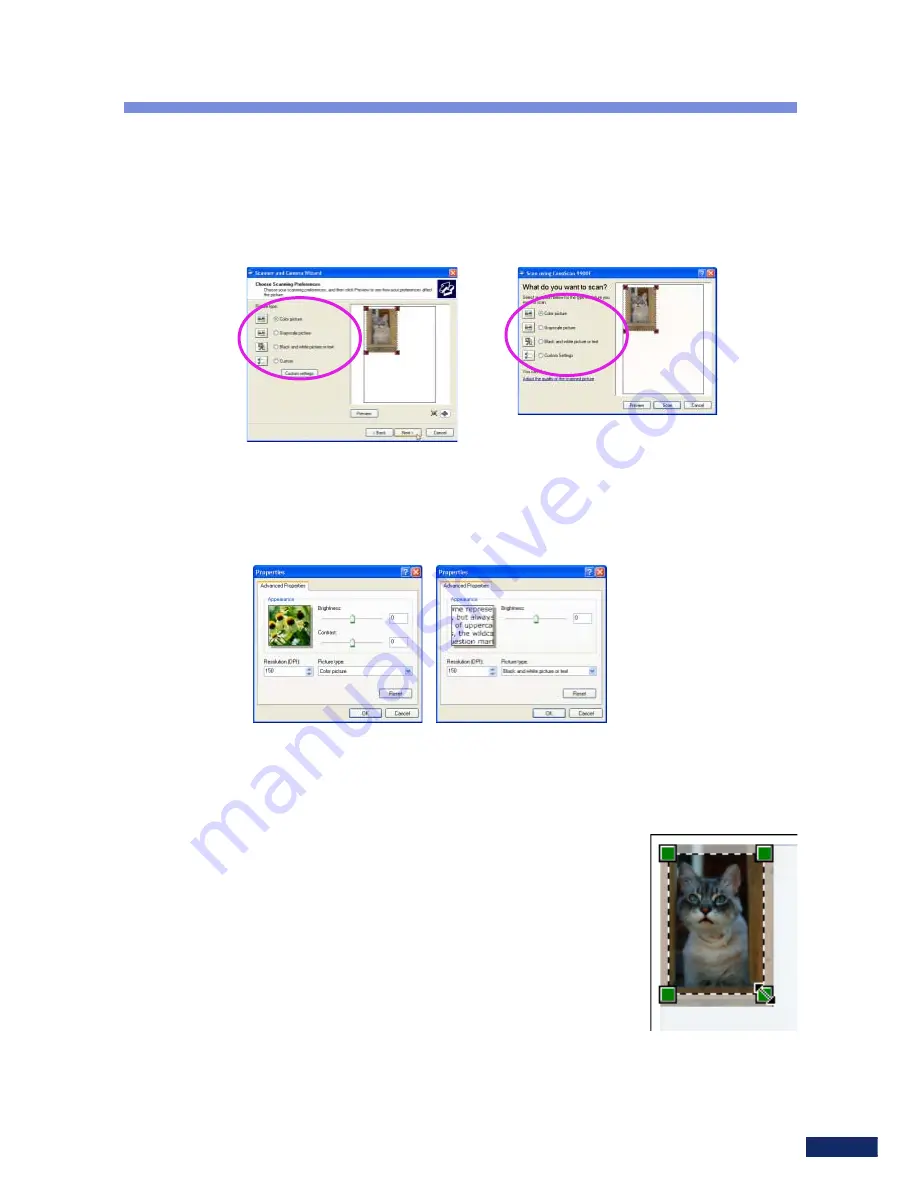
Select a scanning method according to the use to which the image
will be put.

• You can select from the [Color picture], [Grayscale picture] and [Black

and white picture or text] options.

• To manually adjust the image quality settings, click the [Custom

settings] or [Adjust the quality of the scanned picture] button and
adjust the settings in the dialog that appears 

(p. 13)

.

5.

Set the scan area as required.

• When you are scanning photos or other items smaller than the document

glass (platen) area, the entire item is automatically selected by default.

• You can change the scan area of the displayed

image by clicking and dragging the dotted lines or
any corner point. (Dragging refers to holding the
mouse button down while moving the mouse.)

• Clicking inside the scan area and dragging will

move the entire scan area selection frame without
changing its size.

• Clicking outside the scan area deletes the

selection and allows you to reselect a scan area.

• The easiest way to include the image’s upper left portion in the scan area

is to drag the mouse from the bottom right corner up toward the upper
left without releasing the mouse button until the cursor has passed
beyond the image.

Scanning

Started Directly

Started from within an
Application Program

Summary of Contents for 3000F - CanoScan Scanner

Page 1: ...Windows XP Canon ScannerWIA Driver User s Guide For Windows XP Introduction 2 Starting the WIA Driver 3 WIA Driver Scanning Window 7 Scanning 9 Adjusting the Image Quality 13 I OE 072A ...

Page 2: ...ion of the equipment or software mentioned herein 4 Please note that scanning copyrighted materials including documents and images without permission from the copyright holder is prohibited by law except for personal or household use Adobe and Acrobat are trademarks of Adobe Systems Incorporated Microsoft and Windows are registered trademarks of Microsoft Corporation in the United States and or ot...

Page 3: ...ct Start Use the following procedure to start the WIA Driver directly The Scanners and Cameras Wizard starts when the WIA Driver is started directly 1 Press one of the scanner buttons or open My Computer and double click the scanner icon 2 If a following dialog appears confirm that Microsoft Scanner and Camera Wizard is selected and click OK Starting theWIA Driver ...

Page 4: ...Canon Scanner WIA Driver User s Guide 4 3 This will display the Scanners and Cameras Wizard Follow the on screen instructions to scan Starting the WIA Driver ...

Page 5: ... the Select Scanner or Select Source menu option of the application program TWAIN compliant application programs only to select the WIA Driver This step is not required if only one scanner is connected as an input device for images In a WIA compliant application program such as the Windows Paint program the Select Device window will open when the From Scanner or Camera function is selected The nam...

Page 6: ...quire option from the application s pull down menu The name of the menu item and option will vary between application programs This will start the WIA Driver and display the scanning window ArcSoft PhotoStudio Menu Windows Paint Menu Starting the WIA Driver ...

Page 7: ... this option to scan text line art or similar images as black and white images 300 dpi resolution Select this option to scan photographs and printed materials as grayscale images 300 dpi resolution Select this option to scan photographs and printed materials as color images 150 dpi resolution Select this to adjust settings such as the resolution brightness or contrast yourself p 13 Click this to r...

Page 8: ...s and printed materials as grayscale images 300 dpi resolution Select this option to scan photographs and printed materials as color images 150 dpi resolution Select this to adjust settings such as the resolution brightness or contrast yourself p 13 Click this to preview the image Help Button If you do not understand a procedure click this button first and then click somewhere on the scanning wind...

Page 9: ...er icon in the My Computer window p 3 To start it from within an application program first start the application program then select the acquire function from its pull down menu p 5 3 Preview the image If you started the program directly click the Next button in the first dialog followed by the Preview button in the next dialog If it was started from within an application program click the Preview...

Page 10: ...tem is automatically selected by default You can change the scan area of the displayed image by clicking and dragging the dotted lines or any corner point Dragging refers to holding the mouse button down while moving the mouse Clicking inside the scan area and dragging will move the entire scan area selection frame without changing its size Clicking outside the scan area deletes the selection and ...

Page 11: ...bar will show the progress Scanning Type a file name here to give the image a name under which it can be saved Click the arrow on the right and select an option from the menu to change the file format You can select among the BMP JPEG TIF and PNG file formats Input a path here for the target folder or click the Browse button to select one with the Folder Browser dialog Started Directly Started fro...

Page 12: ...ease note that an image acquired with the WIA Driver started from within an application program has not been saved anywhere To save it use the application program s save function and specify a file name folder and file format as required Started Directly The image thumbnail will display if you click View on the menu bar and select Thumbnail View Started from within an Application Program ...

Page 13: ...ions Click this button to reset the settings back to the original values To set the resolution input a number here or select an option from the menu accessed by clicking the arrow to the right Resolution can be set from 50 to 600 dpi with CanoScan 9900F 50 to 800 dpi To adjust the quality of the scanned image click the Custom settings or Adjust the quality of the scanned picture button in the Scan...

Reviews: