background image

13

Scanning Film (for CanoScan 3000F only)

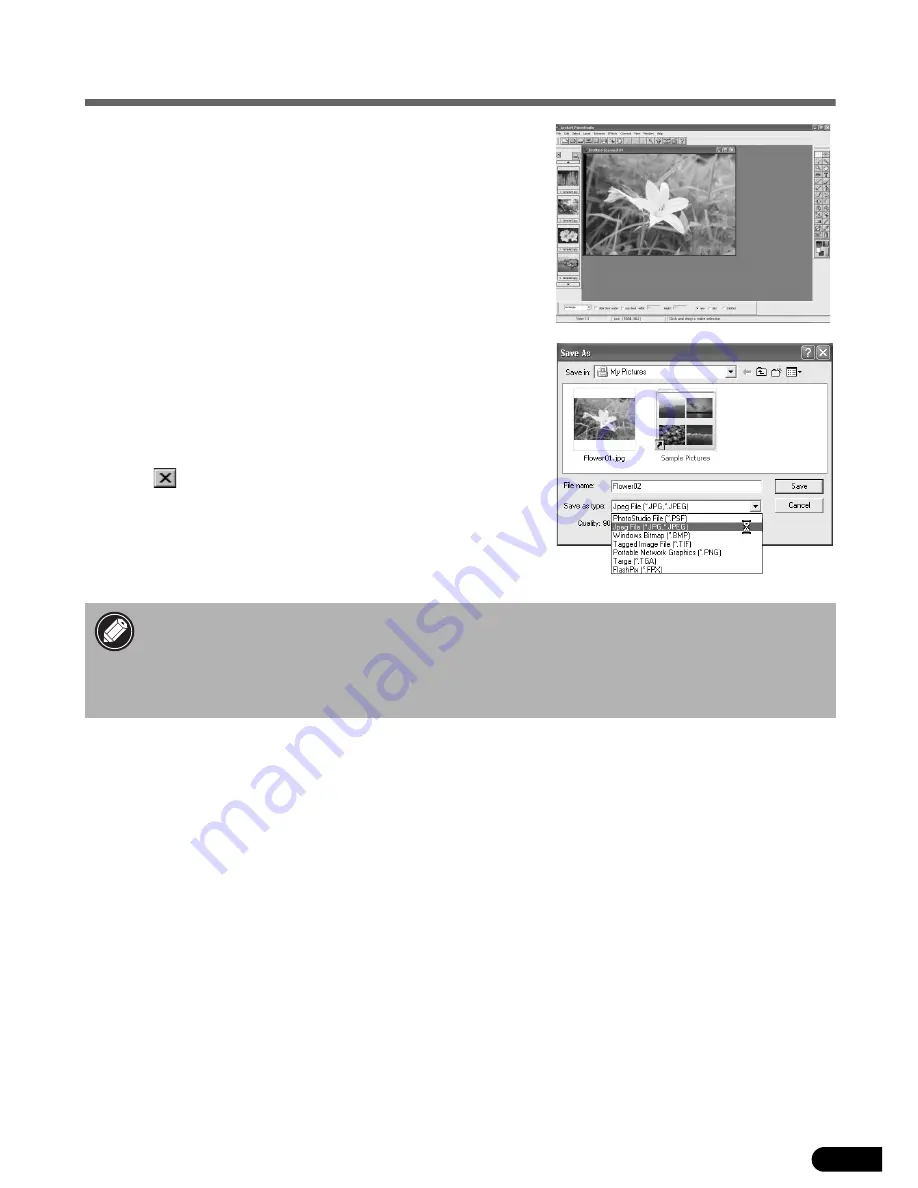
The scanned image will appear in ArcSoft PhotoStudio.

7

Save the scanned image.

Click the [File] menu and select [Save As]. Select the folder 

where you wish to store the image file, enter a file name, 

select a file type (JPEG format is recommended) and click 

[Save].

8

Click 

 (close box) in the PhotoStudio window to 

close it.

• If the scanner does not perform as described above, read the 

"

Troubleshooting

"

 section 

of the 

Scanning Guide

 (HTML format manual).

• For details about the bundled software programs, read the 

Scanning Guide

 or the 

User’s 

Guide

 (PDF format manual) for each software program on the CanoScan Setup Utility 

CD-ROM.

Summary of Contents for 3000ex - CanoScan Color Flatbed Scanner

Page 1: ...Check the Package Contents Install the Software Unlock the Scanning Unit Connect the Scanner Try Scanning p 2 p 3 p 4 p 5 p 6 Using the Scanner Buttons p 9 Scanning Film for CanoScan 3000F only p 10 Be sure to install the software programs before connecting the scanner to the computer ...

Page 2: ...ich the receiver is connected Consult the dealer or an experienced radio TV technician for help Use of shielded cable with the ferrite core provided with the scanner is required to comply with Class B limits Subpart B of Part 15 of the FCC rules Do not make any changes or modifications to the equipment unless otherwise specified in the manual If such changes or modifications should be made you cou...

Page 3: ...h the bundled software and how to solve problems when they occur You can install this manual onto the hard disk together with the software programs When you install it the Scanning Guide icon will appear on the desktop Double click the icon to view it with a browser program such as Internet Explorer User s Guides for Application Programs PDF format manuals ArcSoft PhotoStudio ArcSoft PhotoBase Omn...

Page 4: ... steps It also works with the scanner buttons ArcSoft PhotoStudio 30 MB Image Editing Program It allows you to load images from the scanner edit and retouch them and apply special effects and enhancements ArcSoft PhotoBase 75 MB Photo Album Program It allows you to create and edit image albums perform image searches and create slide shows ScanSoft OmniPage SE 65 MB OCR Optical Character Recognitio...

Page 5: ...installation procedure will start Follow the on screen message prompts and click Yes or Next to continue the installation 6 When the installation is complete click Yes The computer will restart 7 After Windows restarts remove the CD ROM from the drive and store it in a safe place With Windows XP 2000 you should log on with an administrator user name when you install or uninstall software programs ...

Page 6: ... scanner to a horizontal position Unlock the scanning unit before connecting the scanner to the computer If it is left locked a malfunction or other problem may occur When transporting the scanner always lock the scanning unit by pushing the lock switch toward the lock mark Carrying or transporting the scanner without locking the scanning unit may damage it Be particularly careful to lock the scan...

Page 7: ...to the scanner Make sure that the scanning unit is unlocked P 4 Only use the USB interface cable and the AC adapter provided with the scanner Use of other cables or adapters may lead to a malfunction The scanner does not have a power switch The power is activated as soon as the computer is turned on USB Interface Cable Wide Flat Connector Small Square Connector AC Adapter ...

Page 8: ...ument glass of the scanner by aligning its top edge with the alignment mark and close the document cover 2 Select Start Programs or All Programs ArcSoft PhotoStudio and PhotoStudio 5 PhotoStudio will start 3 Click the Acquire icon or click the File menu and select Acquire ScanGear CS will start Alignment Mark Top Bottom ...

Page 9: ... of original You can select Photo Magazine Newspaper or Document Photo Color 300 dpi Magazine Color 150 dpi Newspaper Black and White 300 dpi Document Grayscale 300 dpi 6 Click Preview After calibration the preview scan will start and gradually display the image The image is automatically cropped at its original size If you want to trim the image further drag the mouse diagonally to select the are...

Page 10: ...age file enter a file name select a file type JPG format is recommended and click Save 10 Click close box in the PhotoStudio window to close it If the scanner does not perform as described above read the Troubleshooting section of the Scanning Guide HTML format manual For details about the bundled software programs read the Scanning Guide or the User s Guide PDF format manual for each software pro...

Page 11: ...nstalled and the printer should be on line to use this function While scanning you can change the default settings for scanning by clicking the Cancel button For changing settings or arranging the scanner button assignments refer to the CanoScan Toolbox section of the Scanning Guide HTML format manual E MAIL Button To e mail the scanned image as an attached file 1 Press the E MAIL button 2 The sca...

Page 12: ...he film guide and remove the film holder 3 Place the film face down into the groove in the film guide Store the protective sheet in a safe place so that it will not get bent or broken Always replace the protective sheet when you are not scanning film to prevent the light source section from getting scratched Hold the film by the edges with your fingertips to avoid getting fingerprints or dirt on t...

Page 13: ...ner s document glass 6 Close the document cover The film guide has a calibration slot used by the scanner to calculate the color balance The film cannot be scanned with the correct color balance if this slot is obstructed Keep it clear You can purchase the Accessory Kit for CanoScan 3000F AK 3000F if the protective sheet or the film guide lost or damaged Calibration Slot Align the film guide s mar...

Page 14: ...lect source category select Film 4 In the Type of original category select Negative or Positive In Simple mode the settings for film scanning are pre set so that 35 mm film can be scanned and printed at the photo size 8 9 x 12 7 cm 3 5 x 5 in The Output Resolution is pre set to 300 dpi and the Scale to 400 5 Click Preview ScanGear CS will display the preview image 6 Click Scan The scanner will sta...

Page 15: ...file name select a file type JPEG format is recommended and click Save 8 Click close box in the PhotoStudio window to close it If the scanner does not perform as described above read the Troubleshooting section of the Scanning Guide HTML format manual For details about the bundled software programs read the Scanning Guide or the User s Guide PDF format manual for each software program on the CanoS...

Page 16: ... mm 8 5 x 11 7 in Film Type Number of Frames 35 mm strip negative positive 1 frame 35 mm slide negative positive 1 frame Scanner Buttons 3 buttons SCAN COPY E MAIL Operating Range Temperature 10 C to 35 C 50 F to 95 F Humidity 10 to 90 RH 20 to 80 RH when scanning film without condensation formation 10 to 90 RH Power Requirements AC adapter 100 120 230 240V 3 Power Consumption In operation 15 watt...

Page 17: ...e it in a safe location Guaranteed servicing for this equipment will expire five years after production ceases About the Computer Used Date of Purchase Dealer Tel Dealer Address Scanner Model CanoScan 3000 3000F Serial Number on the back of the equipment Manufacturer Model CPU Clock Speed MHz Memory Capacity RAM MB Space Available MB Hard Disk Capacity MB OS Windows XP Me 2000 98 Monitor Type Moni...

Page 18: ... canon ch CANON ESPAÑA S A C Joaquin Costa 41 28002 Madrid Spain Tel 91 538 4500 Fax 91 411 4176 Tel Atención al cliente 901 301 301 Help Desk 906 301255 E mail helpdesk btlink net CANON DANMARK A S 1 Kund Højgaards Vej1 DK 2860 Søborg Denmark Hotline 45 44 88 25 91 Forhandlerhenvisning http www canon dk CANON NORGE as Hallagerbakken 110 Postboks 33 Holmlia 1210 Oslo Norway Tlf 2262 9321 Faks 2262...

Reviews: