background image

Installing the Printer Driver and Software

65

Printing from a PC

Macintosh

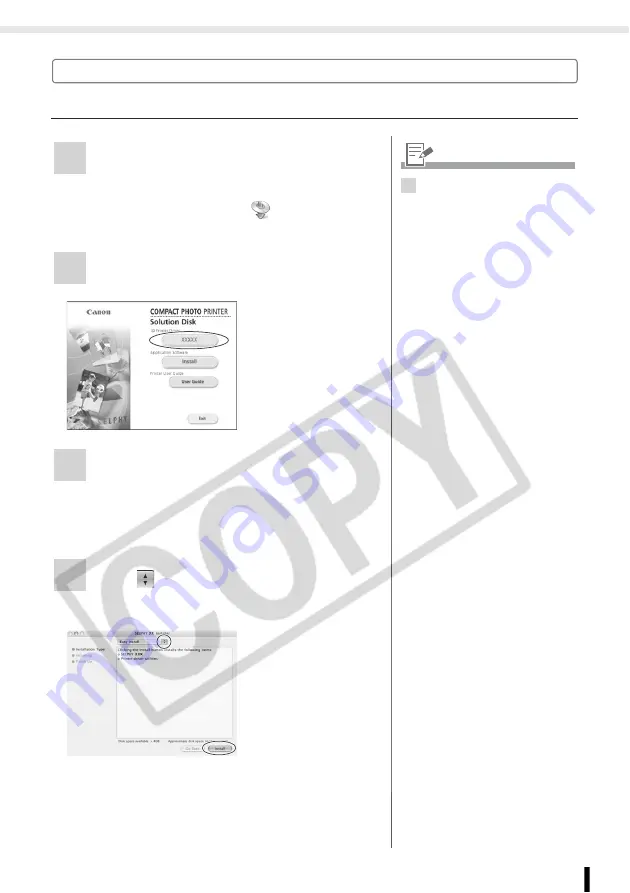
Installing the Printer Driver

1

Place the supplied Compact Photo 
Printer Solution Disk in the computer 
and double-click the 

 icon in the 

CD-ROM window.

2

Select the printer you are using.

3

Click [Agree] if you consent to all the 
conditions of the software license 
agreement.

• Installer starts.

4

Click 

 and select [Easy Install], then, 

click [Install].

• Installation starts. 

Follow the 
onscreen 
instructions until a 
dialog box 
informing you to 
restart appears.

1

• Close any programs that are 

running.

Summary of Contents for 2096B001 - SELPHY ES2 Photo Printer

Page 1: ...Printer User Guide CDP E059 010 2007 CANON INC ENGLISH ...

Page 2: ...ing images with your SELPHY printer Creative Print Add Frames p 33 Add Clip Art Stamps p 34 Create a Calendar p 35 Print a Picture Diary p 37 Add a Speech Bubble p 38 Create ID Photos p 39 Print a Movie p 41 Print with Effects SELPHY ES2 only p 42 ...

Page 3: ...e Number p 47 Add Borders to an Image p 47 Print after Selecting a Page Layout p 47 Print after Red Eye Correction p 47 Print after Adjusting the Brightness p 47 Print in Sepia or Black and White p 47 You can enlarge and print a portion of an image p 44 ...

Page 4: ...how you wish to use your SELPHY printer Digital Camera Images Camera Equipped Mobile Phone Images Images on Your PC Print on Location Memory Card 24 Infrared SELPHY ES2 only Bluetooth 55 USB Cable 59 Battery 72 USB Cable 52 ...

Page 5: ...PHY 2 About This Guide 6 Getting Started 7 Printing from Memory Cards 24 Printing from Camera 52 Printing from a Mobile Phone Wireless Printing 55 Printing from a PC 59 Using the Battery Pack SELPHY ES2 only 72 Appendix 77 Troubleshooting 92 Index 101 ...

Page 6: ...his guide primarily uses illustrations of the SELPHY ES2 and its LCD monitor Unless otherwise noted the instructions are the same for the SELPHY ES20 Similarly the screen shots from the LCD monitor show a P for the Postcard Size ink and paper integrated cartridge z Illustrations and screen examples shown in this guide may differ slightly from the actual printer 1 SD is an acronym for Secure Digita...

Page 7: ...7 Getting Started Getting Started ...

Page 8: ...there is anything missing please contact the store where you purchased this product Main Printer Unit 10 Print Trial Cartridge Postcard size Cleaner Unit Inserted prior to shipment Compact Photo Printer Solution Disk Compact Power Adapter CA ES100 Power Cord SELPHY Beginner s Guide Warranty Card ...

Page 9: ... You can print wirelessly from a Bluetooth enabled mobile phone p 57 Paper Size Ink Type Name Product No No of Sheets Color of Cartridge Postcard size 100 x 148mm 4 x 6 in Color Easy Photo Pack E P100 100 Green Easy Photo Pack E P50 50 BW Easy Photo Pack E P25BW 25 Gray L size 89 x 119mm 3 5 x 4 7 in Color Easy Photo Pack E L100 100 Blue Easy Photo Pack E L50 50 Card size 54 x 86mm 2 1 x 3 4 in Co...

Page 10: ...ed Data Receiver Receives infrared data from a mobile phone SELPHY ES2 only 6 Card Slot Cover Open to insert a memory card or card adapter with a memory card inserted 7 Print Receptacle Output Tray Paper is deposited here after printing 8 Cartridge Compartment The cartridge is inserted into this compartment 9 Cartridge Lever Slide down to eject a cartridge 10 Cartridge Cover Open to replace a cart...

Page 11: ...N Power Input Terminal Connects to the compact power adapter 5 Air Vents Dissipates heat inside the printer 6 USB Terminal for PC Connection For USB connection to your PC using a commercially available USB cable 7 USB Terminal for Camera Connection Connects to a camera using the interface cable or Bluetooth unit sold separately 8 Terminal Cover Open to connect a USB cable interface cable supplied ...

Page 12: ... Lit Orange Charging the battery pack SELPHY ES2 only Blinking Orange Battery pack depleted or temperature is not within the operating temperature range for charging p 74 SELPHY ES2 only Lit Red Error p 96 Blinking Red Error p 96 5 Button Turns the printer s power on when pushed until the power lamp lights green 6 Button Displays the Creative Print menu p 31 7 Button Displays the menu screen Print...

Page 13: ...sing in Single View Press to return to Single View Switching the View to 9 Images at a Time You can display the previous or next 9 images by pressing or after pressing in Multi View Press to return to Single View 8 LCD Monitor Displays images setting screens and error messages 9 Button Specify the number of prints for a selected image 10 Up Down Left Right Buttons Used for selecting images menu it...

Page 14: ...the date and time the image was shot 4 File Number Displays the image number 5 Memory Card Displays the slot in which a memory card is inserted CF microdrive slot SD miniSD MMC slot MS MS Duo slot 6 Number of Displayed Image Total Number of Images Displays the number of the currently displayed image and the total number of images on a memory card 7 Battery Status SELPHY ES2 only Displays the batte...

Page 15: ...l sheet BW Postcard size black and white 10 Paper Status Displays the remaining amount of paper in the cartridge 1 2 full or more The trial cartridge is different from the standard one and is not shown About 1 4 full or more About 1 8 full or more The cartridge is empty No Display The status is unknown 11 Operation Guides Displays operation guides Follow the instructions to use the printer Jump 10...

Page 16: ...f pressing or Image Scroll Function Giving the Easy Scroll Wheel a quick turn in Single View in the Main Display or in the Creative Print image selection screen will display 5 images with a magnified thumbnail of the center image being displayed You can scroll through the images one at a time by turning the wheel and select the center image by pressing If there are less than 5 images on a memory c...

Page 17: ... When opening a cartridge check the contents If something seems to be damaged contact the dealer for assistance Do not touch the ink sheet of the cartridge or pull out the ink sheet or papers There may not be enough ink left for the allotted sheets or paper jams or poor printing may result Do not handle the cartridge with wet or sweaty hands Please use only cartridges specified for use with the SE...

Page 18: ...it that is inside and remove it 4 Make sure that the cartridge is oriented as shown on the direction indicator on the inside of the printer and insert the cartridge until it clicks into place 5 Press the area marked PUSH to close the cover Protective paper Direction indicator ...

Page 19: ...wly to take up the slack It will not be possible to use all the paper for printing if you overwind the ink sheet 4 The colored paper on the top side of the cartridge is protective paper Load the cartridge with this paper still in place In the case of the E P50 E P100 E L50 or E L100 remove the orange colored stopper on the backside of the cartridge then insert it into the printer ...

Page 20: ...d into or ejected from the printer or while printing is in progress When replacing the cartridge remove all paper from the print receptacle Do not reuse empty cartridges Attempting to reuse an empty cartridge may result in malfunction or damage to the printer 2 You can check the type of cartridge and the amount of remaining paper ink loaded in the printer by the icons displayed in the print confir...

Page 21: ...Preparing Replacing the Cartridge 21 Getting Started Storing Cartridges When storing cartridges return the cartridge to its original package ...

Page 22: ...4 Connect the compact power adapter to the printer Do not place the equipment on an unstable or tilted surface There is risk that the equipment may fall and cause injury Do not block the air vents on the back of the printer The SELPHY ES2 can also be used with the separately sold battery pack NB ES1L p 73 To power outlet 15 cm 6 in 10 cm 4 in 15 cm 6 in Leave more than 15 cm 6 in of clearance at t...

Page 23: ... result in equipment damage z Do not allow more than 50 sheets to accumulate in the print receptacle Output Tray while printing z Do not raise the carrying handle when printing If the prints touch the carrying handle printing may not be done correctly z Do not close the print receptacle cover when printing If closed accidentally press the print receptacle button to open the print receptacle cover ...

Page 24: ...e for Camera File system Exif compliant and DPOF Ver 1 00 standard Use a memory card formatted in the camera A memory card formatted in the computer might not be recognized Images that have been edited on a computer might not be displayed or printed successfully An image that has been taken by a mobile phone depending on the size of the image when the image was taken might not be displayed or prin...

Page 25: ...diaCard MMCplus Card HC MMCplus microSD Card microSDHC Card MMCmobile Card MMCmicro Card RS MMC Card Memory Stick Memory Stick PRO Memory Stick Duo Memory Stick PRO Duo Memory Stick micro For memory cards requiring an adapter be sure to first insert the memory card into the adapter before inserting the adapter into the appropriate card slot If you insert the memory card into a card slot without fi...

Page 26: ...on the LCD monitor Label side 2 Insert a memory card fully into the appropriate slot When you remove a memory card from a card slot grasp the portion of the card protruding from the card slot and pull it out If the confirmation screen for whether or not to use DPOF for printing is displayed on the LCD monitor select OK or Cancel then follow the instructions below OK Step 3 on Page 29 Cancel Page 2...

Page 27: ...lected image 2 Press to switch the displayed image information p 14 Press to enlarge and print a portion of an image trimming p 44 3 You can specify up to 99 prints per image If you make settings with or after specifying the number of prints the number setting may be canceled Set borders dates and other functions in Print Settings in advance p 46 If you repeat Steps 2 and 3 you can specify the num...

Page 28: ...and insert the memory card into the appropriate memory card slot p 26 2 Press and select Print All Photos with or 3 Press and check the settings 4 Press Printing starts Print image Number of sheets required for printing Number of copies Number of images on memory card 3 Press or to specify the number of prints ...

Page 29: ...ileNo set with the camera The Print type set with the camera Number of standard prints Number of index prints Number of sheets required for printing 2 Insert a memory card that has already had DPOF settings made with the camera otherwise the printer will not display DPOF Print in the menu screen 3 The date and file number reflect the DPOF settings These settings cannot be changed with the printer ...

Page 30: ...card in the appropriate memory card slot p 26 2 Press and select Auto Play with or 3 Press Images are automatically played after they have finished being read 4 Press after displaying the image you wish to print Printing starts 3 Press during auto play to pause resume Press or while auto play is paused to return to the previous image or move forward to the next image Press or while auto play is pa...

Page 31: ...nted Calendar A one month calendar and images are printed after selecting one of the available layouts Multi Layout Images are printed as a picture diary You can enjoy writing your messages with a marker pen Speech Bubble Images are printed out overlaid with a speech bubble You can enjoy writing your messages in the speech bubble with a marker pen ID Photo The desired size of the final image is se...

Page 32: ...to pp 33 43 The Creative Print menu is displayed 2 Press or in Creative Print after pressing to display the Creative Print menu When there is no movie file on a memory card Movie Print is not displayed Image Effects displays only on the SELPHY ES2 3 Settings such as the page layout and speech bubbles are retained after turning the power off 4 The function settings are retained on the printer even ...

Page 33: ...he desired frame and press The print confirmation screen is displayed 4 Check the settings on the screen 5 Press Printing starts 1 Frames is available only for Postcard size When using L size or card size Frames is not displayed on the Creative Print menu 3 Depending on the frame may appear When you press you can rotate the frame 180 degrees and match the orientation of the image 4 Use or for spec...

Page 34: ...The print confirmation screen is displayed 4 Press to add clip art stamps and place it A single image can contain up to 10 clip art stamps Press or to rotate the clip art stamp If you press while selecting one or more clip art stamps the confirmation screen to clear clip art stamps appears Select OK and all clip art stamps are cleared and the display returns to the clip art stamp selection screen ...

Page 35: ...he screen 6 Press Printing starts 5 Use or for specifying the number of prints 1 Select Calendar in Creative Print For selecting Calendar refer to How to Use the Menu p 32 2 Press or to select the desired layout and press 3 Press or to select the desired background color and press ...

Page 36: ... in Highlight is printed in a different color from the other days of the week National holidays cannot be set The names of the days of the week on the calendar are printed in the language set in Language in Printer Setup 5 Press to enlarge and print a portion of an image trimming p 44 If you layout and trim the image the trimming frame has an arrow icon attached to it that allows you to determine ...

Page 37: ...is displayed 4 A preview of the layout is displayed on the right edge of the screen Select an image and press a frame number and are added on the image You can specify the same image to multiple frames You cannot make a blank frame Press to enlarge and print a portion of an image trimming p 44 When pressing or to set after assigning images to frames all assigned images are canceled If you layout a...

Page 38: ...on the screen 6 Press Printing starts 5 Use or for specifying the number of prints 1 Select Speech Bubble in Creative Print For selecting Speech Bubble refer to How to Use the Menu p 32 2 Press or to select an image and press 3 Press or to select the desired speech bubble and press ...

Page 39: ...e speech bubble where you wish and press 6 Check the settings on the screen 7 Press Printing starts ID Photo 1 Select ID Photo in Creative Print For selecting ID Photo refer to How to Use the Menu p 32 5 Press or to rotate the speech bubble You cannot enlarge or reduce the speech bubble 6 Use or for specifying the number of prints ...

Page 40: ... you have selected an image that cannot be printed as ID photo press to display the guidance 3 You can set Long Side and Short Side in the size setting screen The preview of the page layout displayed on the right side of the screen is used as an example 4 For detailed information on trimming refer to Enlarging and Printing a Portion of an Image Trimming p 44 The size of the trimming frame changes ...

Page 41: ...the image and press 3 Check the settings on the screen 4 Press Printing starts The print confirmation screen is displayed 1 Only movies shot with Canon digital cameras such as the PowerShot series can be printed You cannot playback movies 2 The first frame of a movie is displayed in the movie select screen A movie cannot be enlarged 3 Use or for specifying the number of prints ...

Page 42: ...e image being clear while the surrounding area is fainter and fading out Soft Edges Creates the effect of the center of the image being in focus with the surrounding area out of focus Soft Focus Creates the effect of a soft focus lens or soft focus filter to soften the image Star Lights Creates the effect of bright spots in an image being enlarged with a sparkle effect The example of the print eff...

Page 43: ...43 Printing from Memory Cards 3 Press or to select the image and press 4 Check the settings on the screen 5 Press Printing starts The print confirmation screen is displayed 4 Use or for specifying the number of prints ...

Page 44: ...rinting p 35 Multi Layout mode p 37 and ID Photo mode p 39 Basic Operation for Trimming 1 Press or to select the image you wish to trim 2 Press 3 Press to set the aspect of the rotated trimming frame The trimming setting screen is displayed on the printer s LCD monitor 1 You cannot trim an image smaller than 640 x 480 or narrower than aspect ratio 16 9 Maximum of 50 images can be trimmed ...

Page 45: ...set the trimming area 5 Press or to set the size of the trimming frame 6 Press The setting is completed 7 Press Printing starts 6 Press to print images set for trimming and other selected images at the same time only for Basic Printing p 27 7 The trim setting is canceled after printing has finished ...

Page 46: ...and press 2 Press or to select Print Settings and press 3 Press or to select an item and press or or to change the setting value 4 Press The setting value is saved The print setting menu is displayed For the settings of each item refer to pp 47 51 4 To cancel the settings and return to the menu screen press If you press or before you press the changed setting cannot be saved ...

Page 47: ... or to make an index print Refer to p 49 Correct Red Eye 1 Corrects Red eye occuring in images when taking photos with a flash in a dark area On Off Auto Optimize 1 Corrects the image quality automatically for optimum image quality On Off Adjust Image Corrects image brightness contrast or sharpness as desired Refer to p 50 My Colors 2 Changes the color of the image Refer to p 51 Date Format 3 Sets...

Page 48: ...print settings may not be available Check the table below Setting available Setting not available Basic Printing Print All Photos DPOF Print Auto Play Creative Print Date File No Borders Page Layout Print Type set to Standard in Print Settings when using a Canon digital camera Frames Clip Art Calendar Multi Layout Speech Bubble ID Photo Movie Print Image Effects ...

Page 49: ... Size can be set only when using L size and postcard size Index Prints a thumbnail index The page layout you can select differs according to the paper you use You can set bordered or borderless when the setting is 1 up 2 up 4 up or 8 up When the page layout is set to Index and the print mode is set to Print All Photos p 28 all of the images in memory card can be printed out as a thumbnail index Yo...

Page 50: ...s the image darker Makes the image lighter Contrast Corrects the difference between light and dark gradation areas of the image Reduces the difference between light and dark so that medium color stands out Increases the difference between light and dark Sharpness Corrects the outline of the image Softens the image outline Sharpens the image outline ...

Page 51: ... makes red green or blue colors more intense similar to the Vivid Red Vivid Green or Vivid Blue effects It produces intense yet natural looking colors such as those obtained with positive film Lighter Skin Skin tones are reproduced in a lighter tone Darker Skin Skin tones are reproduced in a darker tone Vivid Blue The color blue is enhanced This is good for printing subjects containing lots of blu...

Page 52: ...camera directly to a printer without using a computer Make sure that a memory card is not inserted in the printer or that no computer is connected to the printer before connecting a camera Make sure that the camera is PictBridge or Direct Print compliant Use the interface cable USB cable supplied with the camera to connect to the printer Ensure the camera s communication settings are configured co...

Page 53: ...nnection with the interface cable supplied with the camera Communication Settings for Camera Depending on the model of the camera it may be necessary to change the communication settings prior to connecting the camera to the printer For EOS 5D EOS 10D EOS 20D EOS 30D EOS 300D DIGITAL Rebel and EOS 350D DIGITAL Rebel XT cameras set Communication in the camera s menu to PTP or Print PTP or Print PC ...

Page 54: ...CD monitor which may differ depending on the model of the camera Before you disconnect the USB cable turn the printer s power off If the Direct Print icon is displayed on the LCD monitor of the camera the black and white cartridge Easy Photo Pack E P25BW cannot be used 6 If the camera does not feature the button perform the printing procedure with the camera The camera returns to the playback scre...

Page 55: ...arge Accordingly it may take some time before printing starts E mail and phone directories cannot be printed Downloaded contents or image data for example downloaded from a URL attached to mail may not be printable due to the security settings on the mobile phone Movies cannot be printed The printer may not be able to print images saved onto the memory card of certain mobile phones The position an...

Page 56: ...on is completed 3 Printing is done according to the setting value specified in Print Settings Setting of each item must be done in advance p 46 During transmission the power lamp blinks green If transmission is interrupted the power lamp stops blinking and lights green Check the message appearing on the mobile phone display if an error occurs Printing cannot be canceled by pressing during infrared...

Page 57: ... Profile or BIP Basic Imaging Profile For details on compatible profiles refer to the user manual of the mobile phone A built in camera capable of recording and saving JPEG images 1 Check that no memory cards are inserted in the printer and that no camera is connected to the printer via USB cable 2 Install Bluetooth Unit BU 20 sold separately 3 Press to turn the printer s power on until the power ...

Page 58: ...ccurs Printing cannot be canceled by pressing during Bluetooth printing For details on how to send or make Bluetooth connection refer to the Bluetooth manual Maximum communication distance is approx 10 m approx 33 ft However the following conditions sometimes cause this distance or printing speed to change Obstacles or radio wave conditions between communication devices Sites where magnetic fields...

Page 59: ... the exception of a USB mouse or USB keyboard are used at the same time as the printer Disconnect any other USB devices from your computer and then reconnect the printer Do not put your computer into the standby mode or sleep mode while the printer is connected to a USB port If you accidentally do so do not disconnect the USB cable from your computer while it is in standby mode Do not connect the ...

Page 60: ...lt in USB ports CPU Windows Vista Pentium 1 3 GHz or higher processor Windows XP Windows 2000 Pentium 500 MHz or higher processor RAM Windows Vista 512 MB or more Windows XP Windows 2000 256 MB or more Interface USB Free Hard Disk Space Canon Utility ZoomBrowser EX 200 MB or more Ulead Photo Express LE 300 MB or more Canon SELPHY Printer Driver 4 MB or more the amount of free space required for in...

Page 61: ...y ImageBrowser 300 MB or more Canon SELPHY Printer Driver 4 MB or more the amount of free space required for installation Display 1 024 x 768 pixels or more 32 000 colors or better A CD ROM drive is required to install the software Even when system requirements are met not all computer functions can be guaranteed Ulead Photo Express LE supported on Windows Vista and Windows XP only Macintosh softw...

Page 62: ...puter The instructions in this section are intended for Windows XP and Mac OS X v10 4 If you are using another version of OS actual screen contents and procedures may differ slightly from those indicated here 1 Place the supplied Compact Photo Printer Solution Disk in the computer The installer panel is displayed 2 Select the printer you are using 3 Click Yes if you consent to all the conditions o...

Page 63: ...ftware on your computer 4 When connecting the printer to the computer a commercially available USB cable is required The USB cable should be less than 3 meters long After connecting the printer to the computer the PC connection screen appears on the LCD monitor Press when the following screen appears Restart your computer when a dialog box appears instructing you to do so 5 If you wish to uninstal...

Page 64: ...ctions to proceed until a dialog box informing you that the installation is completed appears 6 If the CD ROM is already set and the installer panel does not appear remove and reinsert the CD ROM 7 Click Custom Installation to select programs for individual installation 9 If you wish to uninstall the software do as follows on your computer Click the Start button and select All Programs Canon Utili...

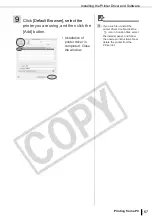
Page 65: ... and double click the icon in the CD ROM window 2 Select the printer you are using 3 Click Agree if you consent to all the conditions of the software license agreement Installer starts 4 Click and select Easy Install then click Install Installation starts Follow the onscreen instructions until a dialog box informing you to restart appears 1 Close any programs that are running ...

Page 66: ... s power on 7 Double click the Printer Setup Utility in Applications Utilities folder The printer list window appears 8 Click the Add button 6 When connecting the printer to the computer a USB cable is required The USB cable should be less than 3 meters long After connecting the printer to the computer the PC connection screen appears on the LCD monitor Press when the following screen appears ...

Page 67: ...nter you are using and then click the Add button Installation of printer driver is completed Close the window 9 If you wish to uninstall the printer driver double click the icon in Solution Disk select the installer panel and follow the onscreen instructions Next delete the printer from the Printer list ...

Page 68: ...nstall 12 Select Easy Installation and click Next 13 Click OK Software installation is complete Remove the CD ROM Follow the onscreen instructions to proceed until a dialog box informing you that the installation is complete appears 12 Click Custom Installation to select programs for individual installation 13 If you wish to uninstall the software drag the application s folder the folder in which ...

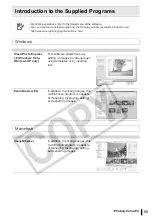
Page 69: ...maging information e html Ulead Photo Express LE Windows Vista Windows XP only This software allows the easy editing of images in various ways using templates or by inputting text ZoomBrowser EX In addition to printing images this multifunction program is capable of managing displaying editing and exporting images ImageBrowser In addition to printing images this multifunction program is capable of...

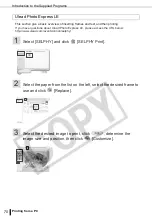
Page 70: ...inting If you have questions about Ulead Photo Express LE please access the URL below http www ulead com events canon selphy 1 Select SELPHY and click SELPHY Print 2 Select the paper from the list on the left select the desired frame to use and click Replace 3 Select the desired image to print click determine the image size and position then click Customize ...

Page 71: ...to print click adjust the position of the text then click Print 6 Determine the printer name paper size cartridge layout and copies then click 7 Printing completes 2 Frames can be assigned only when Postcard size or L size paper is selected 6 The image will not print correctly if you change the paper size setting ...

Page 72: ...uine Canon accessories Canon shall not be liable for any damage to this product and or accidents such as fire caused by the malfunction of non genuine Canon accessories e g a leakage and or explosion of a battery pack Please note that this warranty does not apply to repairs arising out of the malfunction of non genuine Canon accessories although you may request such repairs on a chargeable basis B...

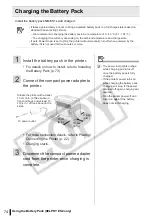
Page 73: ...nals are dirty it results in a poor connection Before recharging or using the battery polish the terminals with a slender soft tipped cotton swab When the battery pack is not used remove it from the printer and be sure to put the terminal cover on 2 To remove the battery cover slide the battery cover lever upwards and remove the cover 3 Push the battery pack until it clicks into place To remove th...

Page 74: ...etails on how to install refer to Installing the Battery Pack p 73 2 Connect the compact power adapter to the printer For more connection details refer to Placing Connecting the Printer p 22 Charging starts 3 Disconnect the compact power adapter cord from the printer once charging is complete Situate the printer with at least 15 cm 6 in of free space in front and back and at least 10 cm 4 in of fr...

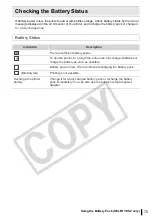
Page 75: ...a fully charged one Battery Status Indication Description There is sufficient battery power To use the printer for a long time either use fully charged batteries or charge the battery as soon as possible Battery power is low We recommend recharging the battery pack Blinking red Printing is not possible Recharge the printer battery Change it for a fully charged battery pack or recharge the battery ...

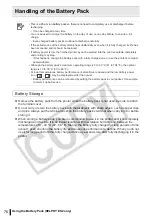
Page 76: ...discharging it in the printer This is a lithium ion battery pack so there is no need to completely use or discharge it before recharging It can be charged at any time You are advised to charge the battery on the day of use or one day before to ensure a full charge Even charged battery packs continue to discharge naturally If the performance of the battery diminishes substantially even when it is f...

Page 77: ...77 Appendix Appendix ...

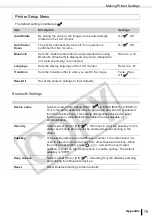
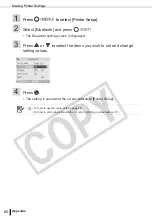
Page 78: ...2 Press or to select Printer Setup and press 3 Press or to select the item and change the setting value 4 Press The setting value is saved The printer setup screen is displayed For the settings of each item refer to pp 79 81 3 Bluetooth is displayed only when a Bluetooth unit is connected 4 If you press the setting is canceled and the screen returns to the menu screen ...

Page 79: ...settings to their defaults Device name Selects a name from Canon ES2 1 to ES2 9 ES20 1 to ES20 9 This is the name used when the target device this printer is selected from the mobile phone This setting distinguishes this device when there are two or more Bluetooth enabled devices capable of communication Security Selects either On or Off When set to On the passkey for the printer and mobile phone ...

Page 80: ...e Bluetooth setting screen is displayed 3 Press or to select the items you wish to set and change setting values 4 Press The setting is saved and the screen returns to Printer Setup 1 For how to use the menu refer to page 78 For how to print using a Bluetooth unit refer to Printing via Bluetooth p 57 ...

Page 81: ...h to set and press The selected language is set and the display returns to Printer Setup 1 For how to use the menu refer to page 78 When no memory card is inserted or when no camera or computer is connected to the printer press and hold down and then press to shortcut to the language set up screen Select the language and press The language is set and the display returns to the standby screen ...

Page 82: ... cloth Cleaning the Back of the Printer Clean the dust from the air vents on the back Dust will get on the ink sheet if it enters from the air vents preventing the printer from printing cleanly If dust becomes lodged on the ink sheet use a blower brush to remove it so that you do not touch the ink sheet Do not touch white parts of the cleaner as its performance may be affected Never use volatile s...

Page 83: ...Sticking any type of adhesive tape on a print surface Allowing print surfaces to come into contact with vinyl or plastic Applying alcohol or other volatile solvents to a print surface Leaving print surfaces tightly pressed against other surfaces or objects for prolonged periods If you wish to mount prints in an album select an album with photo covers made of nylon polypropylene or cellophane Carry...

Page 84: ...ropped or the casing becomes damaged do not continue operation Stop operating the equipment immediately if it emits smoke or noxious fumes Do not allow water or other liquids to enter the interior of the equipment If the equipment is subjected to water droplets or damp salty air gently wipe it with a soft absorbent cloth Do not insert or drop metallic objects or flammable substances into the equip...

Page 85: ...idge cover during printing If you do so printing will stop Paper moves back and forth in the printer during printing Placing your hand in the way of the moving paper may result in injury Unplug the equipment when you are not using it Leaving the equipment plugged in during prolonged periods of non use poses risk of electric shock or fire WARNING Do not place the battery pack near a heat source or ...

Page 86: ... it is left connected for a long period of time Before you discard a battery cover the terminals with tape or other insulators to prevent direct contact with other objects Contact with the metallic components of other materials in waste containers may lead to fire or explosions CAUTIONS RISK OF EXPLOSION IF BATTERY IS REPLACED BY AN INCORRECT TYPE DISPOSE OF USED BATTERIES ACCORDING TO LOCAL REGUL...

Page 87: ...er s power on and off needlessly as the printer initialization consumes ink There may not be enough ink left for the allotted sheets in the set Never use volatile compounds or insecticides on the printer and do not allow rubber or vinyl material to remain in prolonged contact with the printer These materials may cause deformation of the printer s casing If the printer overheats it will temporarily...

Page 88: ...rt foreign objects into the print receptacle zTo prevent malfunctions and damage caused by electromagnetic fields Never position the equipment close to motors or other devices that generate strong electromagnetic fields Moreover do not use near televisions or AM radio zTo prevent condensation You can avoid condensation by placing the equipment in an airtight sealable plastic bag and allow for adju...

Page 89: ...only Paper Dedicated paper Postcard size L size Card size including full sized label sheet Print size Borderless Bordered Postcard size 100 0 x 148 0 mm 3 9 x 5 8 in 91 0 x 121 9 mm 3 6 x 4 8 in L size 89 0 x 119 0 mm 3 5 x 4 7 in 78 2 x 10⁴ 9 mm 3 1 x 4 1 in Card size 54 0 x 86 0 mm 2 1 x 3 4 in 49 5 x 66 0 mm 2 0 x 2 6 in Printing Speed Printing from Memory Cards Connected to Cameras 1 Postcard ...

Page 90: ...ory Stick PRO Memory Stick Duo Memory Stick PRO Duo Memory Stick micro 4 Operating Temperatures 5 40 C 41 104 F Operating Humidity 20 80 Power Source Compact Power Adapter CA ES 100 Power Consumption 70 W or less 4 W or less on standby Dimensions 213 4 x 189 6 x 130 9 mm 8 4 x 7 5 x 5 2 in Weight printer only ES2 Approx 1955g 69 0 oz ES20 Approx 1865g 65 8 oz 1 When connected to a Canon digital ca...

Page 91: ... Voltage DC 22 2 V Nominal Capacity 2000 mAh Charge Cycles Approx 300 times Number of prints Postcard size paper Approx 50 sheets L size paper Approx 50 sheets Card size paper Approx 100 sheets Operating Temperatures 5 40 C 41 104 F Dimensions 140 0 x 60 0 x 22 0 mm 5 5 x 2 4 x 0 9 in Weight Approx 335 g 11 8 oz ...

Page 92: ...92 Troubleshooting Troubleshooting This section has solutions for when the printer does not function as expected or an error symbol is displayed ...

Page 93: ...ter Is the cartridge loaded correctly p 17 Is the ink sheet slack p 17 Has the printer overheated The printer will temporarily stop when it exceeds a certain temperature This is not a malfunction Wait until the temperature drops and the printer resumes A message will appear on the computer display if you are connected to a computer when this happens but you should wait until printing resumes witho...

Page 94: ...the way into the correct slot with the label facing up p 25 26 Do the images conform to the Design rule for Camera File system p 24 Some memory cards require a specific adapter Have you inserted the memory card directly into the card slot without first inserting the card into the adapter p 25 Cannot Print the Date Printing from Memory Cards Is the date imprint option set p 46 If you are using DPOF...

Page 95: ... Frequent Paper Jams Has too much paper been left in the print receptacle Do not leave more than 50 sheets in the print receptacle Has the ejected paper fallen over Paper jams occur if ejected paper falls over lean forward Remove the jammed paper Cannot Print the Specified No of Prints Is the printer s power being turned on and off repeatedly The printer initialization consumes ink There may not b...

Page 96: ...the printer SELPHY ES2 only Blinks orange Battery pack depleted Change it with a fully charged battery pack or recharge the current battery pack You can also use the printer s compact power adapter Temperature is not within the operating temperature range for charging SELPHY ES2 only Charge within 5 40 C 41 104 F Lights red Check the error message on the LCD monitor No paper ink Check that the car...

Page 97: ... image in the camera If the size is not appropriate resize the image and convert it as necessary to a JPEG image that the camera can display Limit the size of image files to less than 8000 x 8000 pixels No Image Check whether there are images recorded on the memory card Check whether readable image data are recorded on the memory card The image file name folder name sometimes cannot be recognized ...

Page 98: ...een made the printer automatically sets the trimming frame again to fit the paper size Cartridge not compatible Use a cartridge that is compatible with this printer Communication error Turn the printer camera and computer power off then turn on again Check the Printing Images When Connected with Camera section p 53 If the error message continues to display contact a Canon Customer Support center f...

Page 99: ...nserted remove the adapter and turn the printer s power off and on again Some memory cards require a specific adapter You have inserted the memory card directly into the card slot without first inserting the card into the adapter p 25 Unidentified Image You attempted to play back or print an image with corrupted data an image recorded in a foreign camera or data type or an image that has been edit...

Page 100: ...les to be set Device Not Supported This displays when you attempt to connect an unsupported USB device e g USB memory Disconnect the USB device This displays when you attempt to transfer an image from a mobile phone using IrSimple If your mobile phone supports another transfer method switch to that method and transfer the image Device Not Supported HUB You attempted to connect an unsupported USB c...

Page 101: ... Art 31 34 Compact Photo Printer Solution Disk 8 62 Compact Power Adapter CA ES100 8 22 Contrast 50 Controls 12 COPIES Button 13 27 Correct Red Eye 47 CREATIVE Button 12 Creative Print 31 D Darker Skin 51 Date 47 Date Format 47 DC IN power entry Terminal 11 Deny Access 79 Device name 79 Direct Print 54 DISP Button 12 14 DPOF Print 29 E Easy Photo Pack 9 Easy Scroll Wheel 13 16 EDIT Button 12 Enlar...

Page 102: ...rinter Driver 62 65 Printer Setup 78 R Reset 79 Reset All 79 S Safety Precautions 84 Security 79 Sepia 51 SET Button 13 Sharpness 50 Single View 13 Soft Edges 42 Soft Focus 42 Software 64 68 69 Specification 89 Speech Bubble 31 38 Star Lights 42 System Requirements 60 T Terminal Cover 11 Transition Effects 79 Trial Cartridge 8 Trimming 44 Troubleshooting 92 U Ulead Photo Express LE 69 Up Down Left...

Page 103: ...dent JPEG Group No part of this guide may be reproduced transmitted transcribed stored in a retrieval system or translated into any language in any form by any means without the prior written permission of Canon While every effort has been made to ensure that the information contained in this guide is accurate and complete no liability can be accepted for any errors or omissions Canon reserves the...

Reviews: