4
4
4-26
4-26
Disassembly/Assembly > External Cover/Internal System > Removing the Right Door Unit > Procedure
Disassembly/Assembly > External Cover/Internal System > Removing the Right Door Unit > Procedure
Removing the Right Rear Cover
■
Procedure
NOTE:
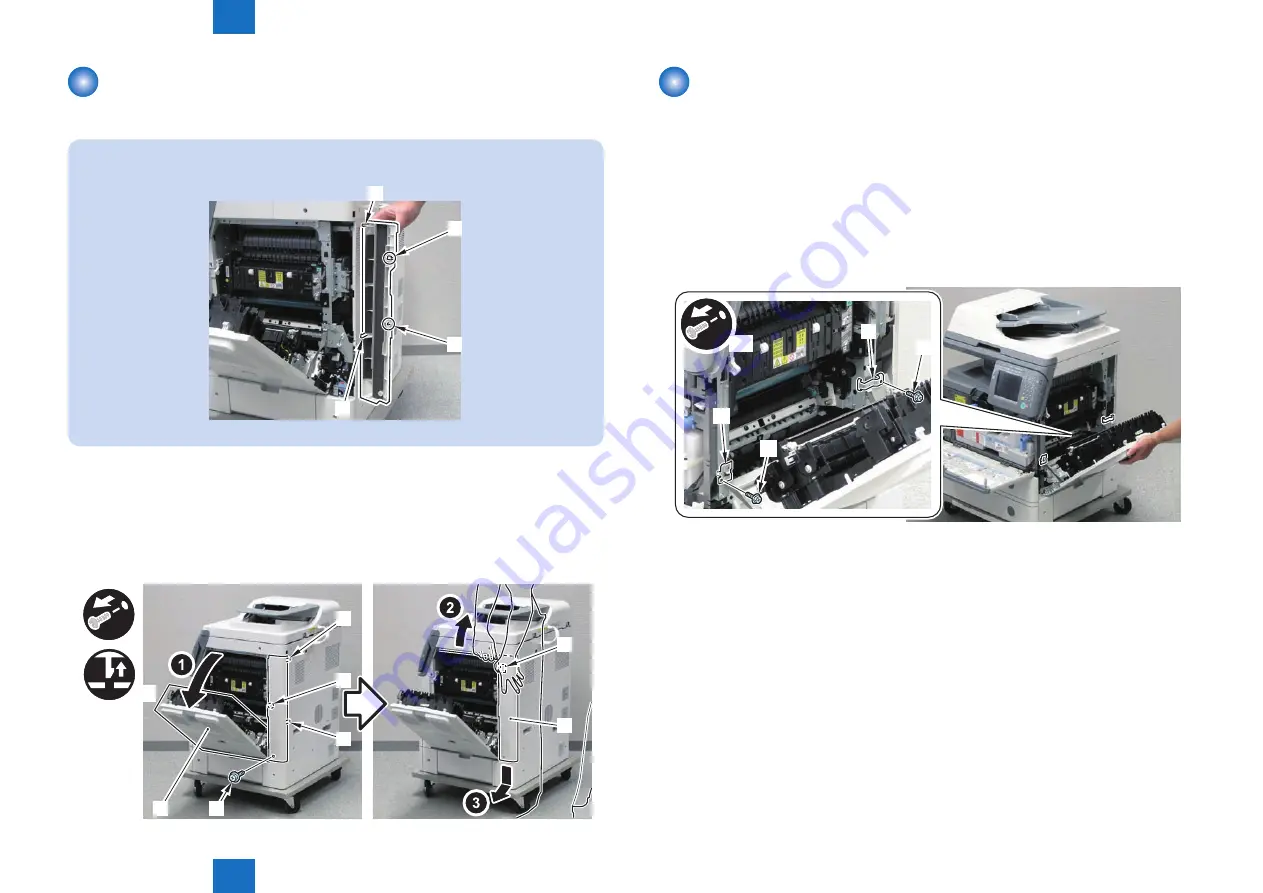
The following shows the 2 claws [1], 1 boss [2] and 1 hook [3].
[1]
[1]
[2]
[3]
F-4-33
1) Open the Right Door Unit [1].
2) Remove the Right Rear Cover [2].
• 1 Screw [3]
• 2 Claws [4]
• 1 Boss [5]
• 1 Hook [6]
[3]
[1]
[4]
[4]
[2]
[6]
[5]
x2
F-4-34
Removing the Right Door Unit
■
Preparation
1) Remove the Right Front Cover.(Refer to page 4-25)
2) Remove the Right Rear Cover.(Refer to page 4-26)
■
Procedure
1) Pull out the cassette.
2) While holding the Right Door Unit, remove the 2 Door Fixtures [1] on the Rear and Front.
• 2 Screws [2]
x2
[1]
[1]
[2]
[2]
F-4-35
Summary of Contents for 1750
Page 12: ...Update Firmware XXV Volume Control XXV Backup Data XXVI...
Page 17: ...1 1 Product Overview Product Overview Product Lineup Features Specifications Parts Name...
Page 235: ...7 7 Error Code Error Code Overview Error Code Jam Code Alarm Code...
Page 250: ...8 8 Service Mode Service Mode Outline Details of Service Mode...
Page 333: ...Service Tools General Timing Chart General Circuit Diagram List of User Mode Appendix...


