Canon 1449B002 User Manual Download Page 73

Chapter 9

Chapter 9 

71

Changing The Machine Settings

Changing The Machine Settings

Changing The Machine Settings

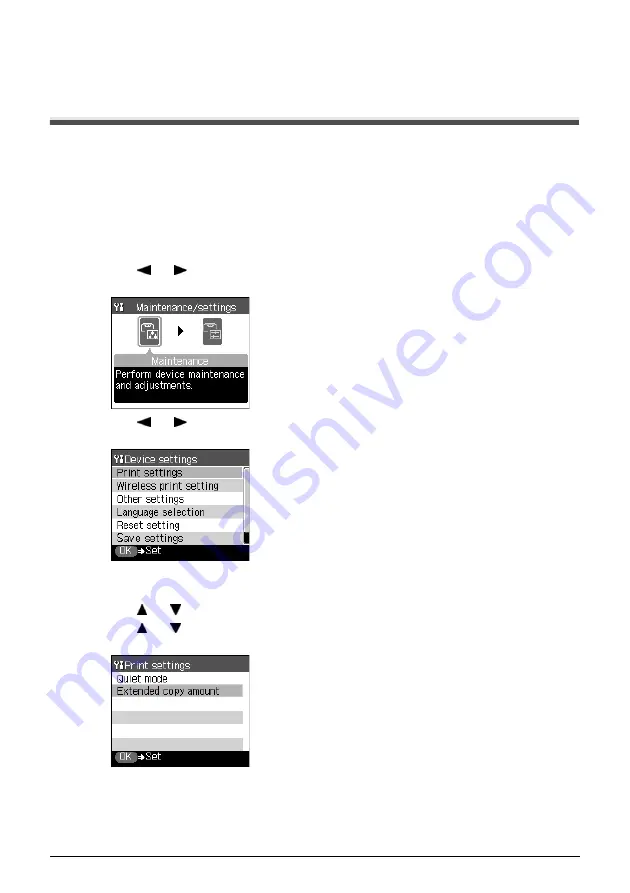
This section describes the procedure for changing the settings in the Device settings screen, using 
the steps to specify Extended copy amount as an example.

1

Press [ON/OFF] to turn ON the machine.

2

Display the Device settings screen.

(1)

Press [Menu].
The Menu screen is displayed.

(2)

Use [ ] or [ ] to select <Maintenance/settings>, then press [OK].
The Maintenance/settings screen is displayed.

(3)

Use [ ] or [ ] to select <Device settings>, then press [OK].
The Device settings screen is displayed. 

3

Select the menu. 

(1)

Use [ ] or [ ] to select <Print settings>, then press [OK].

(2)

Use [ ] or [ ] to select the menu, then press [OK].
Example: select <Extended copy amount>.

Summary of Contents for 1449B002

Page 1: ...FINE Cartridges Standard are compatible with this machine The following FINE Cartridges High Yield are also compatible with this machine For details on FINE Cartridge replacement refer to Replacing A FINE Cartridge in this guide QT5 0576 V06 ENG User s Guide User s Guide ...

Page 2: ...om Support program specifics are subject to change without notice Ordering Information For additional supplies use the following descriptions and order numbers Description Order FINE Cartridges PG 40 Black 0615B002 CL 41 Color 0617B002 PG 50 Black High Yield 0616B002 CL 51 Color High Yield 0618B002 Canon Specialty Papers Photo Paper Plus Glossy 4 x 6 20 sheets 7980A007 Photo Paper Plus Glossy 4 x ...

Page 3: ...mely high quality prints About Consumables Consumables ink tanks FINE Cartridges are available for 5 years after production has stopped Trademark Notices Windows is a registered trademark of Microsoft Corporation in the United States and other countries Macintosh and Mac are trademarks of Apple Computer Inc registered in the United States and other countries CompactFlash is a registered trademark ...

Page 4: ...he Machine Settings 71 Print Settings 72 Wireless Print Settings 72 Bluetooth Settings 73 Other Settings 73 Language Selection 74 Reset Setting 74 Save Settings 74 Load Settings 74 10 Routine Maintenance 75 Replacing A FINE Cartridge 75 When Printing Becomes Faint Or Color Is Incorrect 84 Printing The Nozzle Check Pattern 85 FINE Cartridge Cleaning 89 FINE Cartridge Deep Cleaning 90 Aligning The F...

Page 5: ...3 Specifications 126 Regulatory Information 129 FCC Notice U S A Only 129 Canon U S A INC LIMITED WARRANTY USA Only 130 Users In Canada 133 Customer Technical Supports 133 Index 134 ...

Page 6: ...t your local power company The shape of the plug and outlet may vary depending on the country of purchase Do not allow the power cord to be near objects that emit heat The outer cover of the power cord may melt resulting in fire or electrical shock Never use the machine if the power cord is bundled or knotted Knots in the cord may result in fire or electrical shock If you detect smoke unusual smel...

Page 7: ... If you place it near to them the machine may malfunction as a result of the noise emitted by the fluorescent lighting When turning OFF the power be sure to press ON OFF and confirm that the Alarm Lamp has shut off If you pull the power plug out of the wall outlet while the Alarm Lamp is on the FINE Cartridge is not protected and you may not be able to print later Caution You may cause injury or d...

Page 8: ... depending on local electrical requirements Do not plug the machine into the same circuit as appliances such as an air conditioner television or copier These devices generate electrical noise which may interfere with your machine s operation Whenever you turn OFF the power and unplug the machine wait at least five seconds before you plug it in again Use only the power cord that came with the machi...

Page 9: ...e be careful not to get ink on your hands or clothing If ink gets on your hands or clothing wash them soon in running water If you use hot water the ink may adhere and become difficult to remove After printing do not touch the electrical contacts of the FINE Cartridge They will be hot and may result in burns or electrical shock Do not subject the machine to strong physical shock or vibration This ...

Page 10: ...Cartridges Ink Cartridges out of the reach of small children If a child ingests any ink consult a doctor immediately Do not shake FINE Cartridges Ink Cartridges Ink may leak out and stain clothing or the surrounding area Never touch the nozzle and the gold terminal ...

Page 11: ...med correctly In order to use the machine safely always pay attention to these cautions Important Indicates operational warnings and restrictions Be certain to read these items to operate the machine correctly and to avoid damage to the machine Note Indicates notes for operation or additional explanations Reading these is highly recommended Read this when the machine is connected to a Windows syst...

Page 12: ...n loading paper ensure the left edge of the paper just touches this guide 5 Auto Sheet Feeder Load paper here Paper feeds automatically one sheet at a time 6 Card Slot Cover Covers the Card Slots Open this cover when inserting a memory card into the Card Slots 7 Paper Output Tray Printouts are output to this tray Open the tray before you start copying or printing When not being used keep it closed...

Page 13: ...rt a memory card or card adapter containing a memory card into these slots for photo printing The machine is equipped with two kinds of Card Slot 16 Access Lamp Lights when a memory card is inserted into the Card Slots This lamp flashes while the machine is reading data from the memory card 17 Scanning Unit Support Used to hold the Scanning Unit being opened 18 Paper Thickness Lever Used to adjust...

Page 14: ...your machine The power cannot be turned OFF with ON OFF when the machine is operating Your machine performs a print head cleaning every time you plug in the machine This ensures optimum print quality but also consumes a small amount of ink during the cleaning process 7 Settings Button Use to configure the page size media type and image correction settings 8 Stop Reset Button Cancels operations and...

Page 15: ...Chapter 1 13 Before Printing 14 Photo Index Sheet Button Switches the machine to Photo Index Sheet mode 15 COPY Button Switches the machine to copy mode ...

Page 16: ...n order to produce high definition prints In the same way that the tip of a felt tip or marker pen will naturally dry out over time and become unusable even with the cap in place the nozzles might become clogged Periodically printing or performing FINE Cartridge cleaning can help to prevent this kind of clogging Note z The power cannot be turned OFF with ON OFF while the machine is operating z You...

Page 17: ...Platen Glass Document Type z All types of paper documents z Photographs z Books catalogs or magazines Size W x L Max 8 1 2 in x 11 3 4 in 216 mm x 297 mm Thickness Max 3 4 in 20 mm Note Make sure any glue ink or correction fluid on the document is completely dry before loading Important z Do not place any objects weighing more than 4 4 lb 2 kg on the Platen Glass z Do not press or put weight on th...

Page 18: ...not to touch the print surface The print quality will deteriorate if the print surface is damaged or becomes dirty z Do not touch the print surface until the ink has dried z Some paper may curl and the print surface may smudge if you have used a large amount of ink for printing Paper that tends to curl is not recommended for printing photographs or graphics Use it for printing mainly text z If the...

Page 19: ...Thickness Lever Position Printer Driver Setting For Media Type Super White Paper SW 201 Approx 100 sheets Letter A4 Left Plain Paper High Resolution Paper HR 101N Approx 80 sheets Letter A4 Left High Resolution Paper Glossy Photo Paper GP 401 GP 501 10 sheets Letter A4 20 sheets 4 x 6 Credit Card Left Glossy Photo Paper Matte Photo Paper MP 101 10 sheets Letter A4 20 sheets 4 x6 Left Matte Photo P...

Page 20: ... portrait orientation You can use regular copier paper cotton bond paper or typical letterhead Your machine does not require special inkjet paper Legal size paper can only be used when printing from your computer We do not recommend using plain paper for photo printing Envelopes US Commercial No 10 9 1 2 in x 4 1 8 in 241 mm x 105 mm European DL 8 5 8 in x 4 3 8 in 220 mm x 110 mm Printing from yo...

Page 21: ...r than High Resolution Paper and has a glossy surface to produce near photographic quality printouts By using borderless printing you can print without any white borders Do not touch the printing surface until the ink has dried Load the paper with the whiter side facing up Do not use the loading support sheet included with this paper If the ink takes a long time to dry remove each sheet as soon as...

Page 22: ...g from your computer photo printing This is a thick paper with a glossy water resistant coating and provides superior color reproduction It is ideal for printing high quality photographs By using borderless printing you can print without any white borders Load the paper with the glossy side facing up Remove each sheet from the Paper Output Tray as soon as it is printed Photo Paper Plus Semi gloss ...

Page 23: ... the count reaches 20 For other than 4 x 6 cards remove the paper from the Paper Output Tray before the count reaches 10 For additional information on Photo Paper Pro see page 22 Photo Stickers 4 x 6 4 in x 6 in 101 6 mm x 152 4 mm Printing from your computer copying This is a peel and stick sheet that allows you to make original photo stickers using your own photographs On each sheet you can prin...

Page 24: ...m from direct exposure to air or sunlight z Do not mount printouts in an adhesive type album as you may not be able to remove them z Be aware that some types of clear plastic folders and albums may cause the edges of the paper to turn yellow T Shirt Transfers A4 8 1 4 in x 11 3 4 in 210 mm x 297 mm Printing from your computer This paper is used to produce iron on transfers Use mirror printing to p...

Page 25: ...uto Sheet Feeder 1 pinch the Paper Guide A and adjust it to the left side of the stack 2 z Set the Paper Thickness Lever to the correct position for the paper See page 17 Note Set the Lever to the left for most paper When the Lever is set to the right the confirmation message appears before the machine starts printing Important Make sure the stack does not exceed the Load Limit Mark B 1 2 A 2 1 B ...

Page 26: ...the envelopes to make the folds crisp Also press firmly on the area that corresponds to the edges of the back flap z Remove any curling by holding the edges diagonally and bending them gently z If the edges of the envelope are inflated or curled place the envelope on a flat surface With a pen press down while moving it from the center toward the edges of the envelope z Ensure that no curl or puff ...

Page 27: ... Auto Sheet Feeder 1 pinch the Paper Guide A and adjust it to the left side of the stack 2 z Load the envelopes in the Auto Sheet Feeder with the short side down z Set the Paper Thickness Lever to the right Important Make sure the stack does not exceed the Load Limit Mark B A B 1 2 ...

Page 28: ... such as page size media type bordered or borderless print etc z How to change the Settings screen This section describes the steps to specify the page size for Memory card mode to 4 x 6 101 6 x 152 4 as an example For information on each item see Print Setting Items on page 28 1 Press Settings 1 The Settings screen is displayed 2 Select the Setting tab 1 Use or to select the Setting tab Select ta...

Page 29: ...ing 3 Select the setting item 1 Use or to select the setting item Select A4 here 4 Change the setting 1 Use or to change the setting Change to 4 x 6 101 6 x 152 4 here 5 Complete setting 1 Press Settings Return to the Card menu ...

Page 30: ...py Fast Standard High 4 You can specify the reduction or enlargement method Same magnification Preset ratio Zoom 25 400 Fit to page Tab 2 You can specify Auto intensity 1 You can specify if Auto intensity is performed Auto intensity ON Auto intensity OFF Note Depending on the functions specified in the Copy or Memory card mode some setting items cannot be specified in combination Note Some of thes...

Page 31: ...edia type Plain paper Photo Paper Pro Photo Plus Glossy Matte Photo Paper Glossy Photo Paper 3 Select the printing quality Standard High 4 Select bordered or borderless print Bordered Borderless 5 Select whether to print the shooting date file number or not No date file no Print date only Print file no only Print date file no Note Some of these are not available depending on the country of purchas...

Page 32: ...eas like the sky as well as on black areas Noise reduction ON Noise reduction OFF 4 Activate deactivate Face brightener function This function brightens a darkened face on the photo taken against the light Face brightener ON Face brightener OFF 5 Choosing Image optimizer ON enables you to correct and smooth the jagged contours for printing Image optimizer ON Image optimizer OFF 6 Adjust brightness...

Page 33: ...splayed as well 3 Load the document on the Platen Glass 4 Press Color for color copying or Black for black white copying The machine starts copying Note Press Settings to check or change the page size media type or other settings See Changing The Print Settings on page 26 Intensity Pressing decreases the intensity and pressing increases the intensity You can also use the auto intensity See Print S...

Page 34: ...e cursor down and use or to select the setting value Holding down or steps through the values faster 3 Finalize your selection Press Settings to return to the Copy standby screen 4 Start copying See page 31 Same magnification Copies in the same size as an original Preset ratio Preset ratios are convenient when changing between standard page sizes for example when reducing A4 to A5 or enlarging B5 ...

Page 35: ...3 You can adjust the image quality for the document to be copied 4 You can specify the reduction enlargement method See Reducing Or Enlarging A Copy on page 32 5 You can specify if auto intensity is performed Specifying Auto intensity ON automatically changes the icon above the intensity slide bar on the LCD to Auto Important Even while Auto intensity ON is selected you can change the intensity by...

Page 36: ...ocedure 1 Display the Special copy screen See Special Copy on page 34 2 Use or to select Sticker copy then press OK 3 Use or to select Stickers x16 then press OK 4 Follow the on screen instructions to load the document on the Platen Glass then press OK 5 Specify the necessary items See Changing The Print Settings on page 26 6 Press Color for color copying or Black for black white copying Note z Yo...

Page 37: ... for black white copying Note z The copied image may need to be enlarged to fit onto the selected page size when making borderless copies Some cropping may occur z You can use this feature only when the page size is set to 8 5 x 11 215 9 x 279 4 A4 4 x 6 101 6 x 152 4 5 x 7 127 0 x 177 8 or Credit card z You can use this feature only when the paper is set to Photo Paper Pro Photo Plus Glossy Matte...

Page 38: ...r to set the vertical repeats 5 Press to move the cursor to the right 6 Use or to set the horizontal repeats then press OK 7 Follow the on screen instructions to load the document on the Platen Glass then press OK 8 Specify the necessary items See Changing The Print Settings on page 26 9 Press Color for color copying or Black for black white copying Important z The area read from the documents dep...

Page 39: ...dapter for xD Picture Card separately 2 Use the special adapter supplied with the card Memory Cards which can be inserted directly z CompactFlash CF Card Supports TYPE I TYPE II 3 3V z Microdrive z Memory Stick z Memory Stick PRO z SD Secure Digital Memory Card z MultiMedia Card ver3 31 z SmartMedia Card Supports 3 3V card only 1MB and 2MB cards not supported Memory Cards which can be used through...

Page 40: ...the memory card Memory card data formats may not be compatible with computer specific formats z Images edited on a computer may result in improper printing z Please use only one type of memory card at a time Note z When Read write mode is selected in the Read write attribute neither printing nor maintenance can be done After using the card slot as the memory card drive for your computer be sure to...

Page 41: ...re Card Install these cards into the left card slot z SmartMedia Card Install this card into the right card slot z Memory Stick z Memory Stick PRO z Memory Stick Duo z Memory Stick PRO Duo z SD Card z miniSD Card z MultiMedia Card ver3 31 Install these cards into the right card slot Note Do not try to insert the memory card into the Card Slot furthermore than as it stops otherwise the machine and ...

Page 42: ...nu 1 Press MEMORY CARD The Menu screen is displayed 2 Use or to select Single photo print and then press OK The photo selection screen is displayed 5 Select the photo to print 1 Use or to select the photo to print 2 Press Color The print confirmation screen is displayed Note The watch icon may appear when importing photos from a memory card Note Displaying Photos Automatically on the LCD Slide Sho...

Page 43: ...int For Each Photo Multi photo Print You can specify how many copies to print for each photo 1 Prepare to print 1 Turn ON the machine 2 Load the paper in the Auto Sheet Feeder See Loading Paper on page 23 3 Install the memory card into the Card Slot See Inserting A Memory Card on page 38 2 Select the print mode from the Menu 1 Press MEMORY CARD The Menu screen is displayed 2 Use or to select Multi...

Page 44: ...ted Printing By Using The Photo Index Sheet With this machine you can easily print photographs using a Photo Index Sheet by filling in the appropriate circles to select print options and photographs you want to print Simply scanning a Photo Index Sheet prints the selected photographs according to the selections you have made Follow this procedure 1 Turn ON the machine and load A4 or Letter sized p...

Page 45: ... 3 Go to step 6 z If you select Search 1 Press OK 2 Use or to select the first recorded date of photographs you want to print then press OK 3 Use or o select the last recorded date of photographs you want to print then press OK 4 Go to step 6 Print all photos Prints all image data stored on the memory card Set no of copies Prints image data stored on the memory card in chronological order beginnin...

Page 46: ...to print for each photograph those marks will be disregarded and one copy each of all photographs will be printed 4 Select the number of copies fill in the respective circle under the photograph you want to print 5 Follow the procedure as described 6 Mark this to print the same Photo Index Sheet again If you mark this all other marked settings will be disregarded Note If more than 37 photographs a...

Page 47: ...ft corner of the sheet with the alignment mark on the lower right corner of the Platen Glass Important z Be sure to fill in a circle for every setting item except options z If there is more than one Photo Index Sheet fill in all the sheets z If the filled circles on the Photo Index Sheet are not dark enough the machine may not read the settings Note When printing image data using a Photo Index She...

Page 48: ...in the Auto Sheet Feeder See Loading Paper on page 23 2 Insert the memory card into the Card Slot See Inserting A Memory Card on page 38 2 Select the print menu 1 Press MEMORY CARD 2 Use or to select Special photo print then press OK 3 Use or to select Layout print then press OK Important z If the LCD displays Failed to scan Photo Index Sheet press OK and ensure that a circle is filled in for each...

Page 49: ...ay the photo to be pasted then press OK 2 Repeat step 1 to paste photos Press Back to cancel the last pasted photo Press Stop Reset to cancel all pasted photos 3 Press Color after pasting all photos The print confirmation screen is displayed 6 Start printing 1 Press Color The machine starts printing Bordered 2 4 8 Half Half w lines Borderless 2 4 8 Half Half w lines Album 4 right 4 left Mixed 1 2 ...

Page 50: ...nt 1 Use or to select the photo you wish to print and then press OK 2 Use or to select the frame and then press OK 5 Start printing See page 47 Other Printing Functions The following print functions are also provided under the Special photo print menu z Print all photos You can print all photos saved on the memory card z Photo Index print You can print a list of all the photos saved on a memory ca...

Page 51: ...F function are printed Print type Index The photos for which you specified Index using the DPOF function are printed according to the index print layout Photos to Print Only the photos specified using the DPOF function are printed photos cannot be specified on the Operation Panel Copies Photos are printed according to the numbers of copies specified using the DPOF function numbers of copies cannot...

Page 52: ...r hard disk onto a memory card Enabling Writing Of Data To Memory Cards 1 Make sure no memory card is inserted in the machine 2 Press Menu 3 Use or to select Maintenance settings then press OK 4 Use or to select Device settings then press OK 5 Use or to select Other settings then press OK 6 Use or to select Read write attribute then press OK Important z When the write protection is disabled on the...

Page 53: ...ard Important z Windows 2000 when the write protection is enabled on the machine If the computer does not detect that the write protection is enabled a delayed write error might occur and data could be corrupted when attempting to copy data to a memory card z You cannot write to memory cards when the machine is in Memory Card mode Note To change the write protection setting while a card is inserte...

Page 54: ...elect Print from the application software s File menu The Print dialog box opens 2 Ensure that your machine is selected 1 3 Click Preferences or Properties 2 The Main tub of the Preferences screen is displayed Note z Menu and command names may differ between software applications and more steps may be required For details refer to the documentation for each software application you use z The steps...

Page 55: ... the On screen Manual Note z From the Page Setup tab select the correct document size to be printed z For details about other printer driver functions click Instructions or Help to view the Printer Driver Guide Instructions is only displayed when the On screen Manual is installed z Selecting the Preview before printing check box displays a preview screen that allows you to confirm the selected pri...

Page 56: ...ing Note z You can cancel a print job in progress by simply pressing Stop Reset on the machine z Click Cancel Printing on Canon IJ Status Monitor to stop printing To show Canon IJ Status Monitor click Canon MP460 Printer on the taskbar Canon IJ Status Monitor opens automatically when a machine error occurs 1 ...

Page 57: ...tup from the application software s File menu The Page Setup dialog box opens 2 Confirm that MP460 is selected in Format for 1 3 Select the desired paper size from Paper Size 2 4 Click OK 3 Note z Menu and command names may differ between software applications and more steps may be required For details refer to the documentation for each software application you use z The steps described in this s...

Page 58: ...ocuments consisting mainly of photographs and graphics featuring fine color gradation Printing tables and charts Select when printing documents consisting mainly of graphs and graphics illustrations with strong color definition Printing a composite document Select when printing documents consisting mainly of text Detailed Setting Select to fine tune the Print Quality and Halftoning setting z For d...

Page 59: ...nter Setup Utility When using Mac OS X 10 2 8 double clicking the name of your machine in the Printer List of the Print Center displays a dialog that prompts you to confirm the status of the print job To cancel a job in progress select the desired document then click Delete To temporarily stop a job in progress click Hold To stop all the jobs in the list click Stop Jobs when using Mac OS X v 10 3 ...

Page 60: ...ning Using The MP Navigator Using the MP Navigator you can scan process and save documents to your computer For details on using the MP Navigator see the Scanning Guide On the Windows desktop double click the MP Navigator 3 0 icon to open the MP Navigator On the Go menu select Applications Canon Utilities then double click the MP Navigator 3 0 icon to open the MP Navigator You can launch the follo...

Page 61: ...r button is pressed then click OK If you are using Macintosh OS X v 10 2 8 Select Applications from the Go menu then double click Image Capture Select Preferences from the Image Capture menu Select Others from When a scanner button is pressed open select MP Navigator 3 0 from Applications then click Open 1 Load the document on the Platen Glass See page 15 2 Press SCAN z The scan operation selectio...

Page 62: ...procedure varies depending on the application software For the detailed procedure refer to the manual of the application software you are using Important If with some types of original the position and size of the image is not scanned in correctly please refer to Selecting the Behavior of the Operation Panel with MP Navigator in the Scanning Guide On screen Manual and change the MP Navigator Docum...

Page 63: ...without the need to use a computer Hereafter the digital still cameras digital video camcorders and mobile phones are collectively called the PictBridge compliant device Caution Do not connect any equipment other than PictBridge compliant devices to the Direct Print Port of the machine Doing so may result in an electric shock fire or damage to the device Note z When printing photos with the digita...

Page 64: ...d on the LCD display of the device when the machine is correctly connected Confirming Or Changing The Device Settings To change the page size or media type operate the device to select the PictBridge print setup mode and confirm or change the settings The settings below can be changed by pressing Setting in Memory card mode when the PictBridge compliant device is connected However changes can only...

Page 65: ...dia type settings made using the controls of the machine The following sizes and types of paper can be loaded in the machine by selecting options in Page size and Media type 1 This paper is exclusively used to print photo stickers When printing on sticker paper select 10x15 cm 4 x 6 in Page size 2 This size can be selected only for Canon PictBridge compatible devices note that it cannot be selecte...

Page 66: ... 16 up use the following settings 1 Load Photo Stickers PS 101 in the Auto Sheet Feeder 2 Select 10 x 15 cm 4 x 6 for the Page size and Photo for the Media type 3 Select N up for layout then select 16 z Some PictBridge compliant devices display the Layout option 2 up 4 up 9 up and 16 up In this case always select 16 up If there are no options on the PictBridge compliant device that correspond to 2...

Page 67: ...When Printing From A Mobile Phone You can select the page size media type layout and borderless printing when printing from a mobile phone The initial setting is borderless printing on 4 x 6 Photo Paper Plus Glossy 1 Turn ON the machine 2 Display the Wireless print settings screen 1 Press Menu 2 Use or to select Maintenance settings then press OK 3 Use or to select Device settings then press OK 4 ...

Page 68: ...and smoothes out the jaggedness that occurs when a small sized photo is printed on large sized paper 4 Select the layout of the photo from Sticker print Stickers x16 Printing on paper other than sticker Bordered x1 x2 x4 x8 Borderless x1 x2 x4 x8 Mixed 1 2 3 Note Mixed 1 Mixed 2 and Mixed 3 can be selected only when the page size setting is 8 5 x 11 215 9 x 279 4 or A4 1 2 3 4 ...

Page 69: ...Start Infrared Communication 1 Oppose the infrared port of the mobile phone to that of the machine at a distance of less than 20 cm 7 87 in A Infrared port of machine B Less than 20 cm 7 87 in Do not block with any obstacle C Effective angle in both vertical and horizontal direction About 10 D Infrared port of mobile phone Note z The effective angle of the infrared port of the machine is about 10 ...

Page 70: ...cel printing on the mobile phone z Following limitations apply on transmittable data It does not support printing a downloaded content or photo and a photo attached to an email for security reason It does not support printing video files z Depending on your device the Fine print quality option may not be available due to the restriction on the infrared transfer capacity z Depending on your device ...

Page 71: ...necessary print settings See Changing The Print Settings on page 26 3 Install the Bluetooth unit BU 20 to the Direct Print Port 4 Display the Bluetooth settings screen 1 Press Menu 2 Use or to select Maintenance settings then press OK 3 Use or to select Device settings then press OK 4 Use or to select Bluetooth settings then press OK The Bluetooth settings screen is displayed 5 Confirm or change t...

Page 72: ...Setting a passkey will help prevent interference from other Bluetooth devices 3 Selecting ON will disable search and printing from Bluetooth devices 4 You can change the passkey The passkey refers to an identification number to be determined It is used to prevent interference from other Bluetooth devices Note For details and the procedure to print through Bluetooth communication refer to the Bluet...

Page 73: ...an example 1 Press ON OFF to turn ON the machine 2 Display the Device settings screen 1 Press Menu The Menu screen is displayed 2 Use or to select Maintenance settings then press OK The Maintenance settings screen is displayed 3 Use or to select Device settings then press OK The Device settings screen is displayed 3 Select the menu 1 Use or to select Print settings then press OK 2 Use or to select...

Page 74: ... Media type Specifies the media type for printing photos saved on a mobile phone Image optimizer When Image optimizer ON is selected corrects the jagged outline of a person s image and makes it smooth for printing Layout print Specifies the layout for the paper when printing photos saved on a mobile phone Note Depending on the functions you use some setting items cannot be specified in combination...

Page 75: ... Selects whether to allow data to be written onto memory cards from a computer Adjust contrast Use this to adjust the contrast of the LCD if it is too low or too high Note z When Print date only or Print date file no is selected in the Settings 1 tab on the Settings screen Memory card the shooting date is printed in the date display order you selected For Print settings see Changing The Print Sett...

Page 76: ...to the default except for the language for LCD messages and the position of the print head Save Settings Saves the current settings for the Settings screen Load Settings Loads the saved settings for the Settings screen Note When Image quality Std is selected images are displayed at 5 second intervals When Image quality High is selected images are displayed at different time intervals according to ...

Page 77: ...the model number very carefully The machine will not print properly if the wrong FINE Cartridge is used or installed incorrectly The FINE Cartridge PG 50 Black High Yield and CL 51 Color High Yield are also compatible with this machine Replacing A FINE Cartridge When a FINE Cartridge runs out of ink replace it using the following steps 1 Ensure that the machine is turned ON and then open the Scann...

Page 78: ...FINE Cartridge Important z Handle FINE Cartridges carefully to avoid staining your clothes or the surrounding work area z Discard empty FINE Cartridges according to local laws and disposal regulations Caution Do not touch the transparent film A film cable B ink absorber sponge part C or any metal parts 1 2 A B C ...

Page 79: ...ert a new FINE Cartridge on a slight tilt 2 Push the FINE Cartridge up until it clicks into place Important z Do not reattach the Protective Tape once you have removed it z Handle the removed Protective Tape carefully to avoid getting your hands dirty or staining the surrounding work area once you have removed it z Once the Protective Tape is removed do not touch the gold terminals of the FINE Car...

Page 80: ...Cartridge removed z When a FINE Cartridge runs out of ink replace the FINE Cartridge with a new one immediately If you replace it with the FINE Cartridge that has previously been removed the machine may not print properly due to clogged FINE Cartridge nozzles Furthermore the Low Ink Warning dialog box which advises when to exchange the FINE Cartridge will be inaccurate z To maintain optimal print ...

Page 81: ...hen printing is finished replace the FINE Cartridge immediately If you continue printing with an empty FINE Cartridge it will be a cause of trouble Be sure to press OK with all the FINE Cartridges installed Printing does not resume if any of the FINE Cartridges are left uninstalled If you continue to print with an empty FINE Cartridge the ink level on the LCD will not be displayed correctly z Chec...

Page 82: ...ter 10 Routine Maintenance Note If an error message is displayed on the LCD a FINE Cartridge error has occurred and the machine cannot continue to print See An Error Message Is Displayed On The LCD on page 98 ...

Page 83: ...ld FINE Cartridge is installed a message that the remaining level of ink cannot be detected appears z When the mark appears on the Low Ink Warning The ink level of the FINE Cartridge showing the mark is low You should ensure you have a new FINE Cartridge Note How to Check the Ink Level Open the Printer Properties dialog box Click the Maintenance tab and then click View Printer Status Canon IJ Stat...

Page 84: ...pen Printer Setup Utility or Print Center 2 Double click the model name from Name in the Printer List and then click Utility 3 Choose the name of your machine from Product and click the Maintenance button 4 Choose Ink Cartridge Settings from the pull down menu 5 Select Color only when the cartridge runs out of Black ink or select Black only when the cartridge runs out of Color ink and then click t...

Page 85: ...at you replace the FINE Cartridge with a new one If you try printing when mark appears the following message appears and printing stops In either case clicking OK cancels the error indication and enables continuation of printing However the error detection function is disabled after the error indication is canceled therefore Low Ink Warning message does not appear later on When you install a new F...

Page 86: ...may improve the print quality See Increase the Print Quality setting in the Printer Driver Guide Step 1 See Printing The Nozzle Check Pattern on page 85 After FINE Cartridge Cleaning print the nozzle check pattern If missing lines or white stripes appear Step 2 See FINE Cartridge Cleaning on page 89 If the problem persists after performing FINE Cartridge Cleaning twice Step 3 See FINE Cartridge De...

Page 87: ... are blurred or the color is incorrect Performing Maintenance 1 Press ON OFF to turn ON the machine 2 Press Menu 3 Display the Maintenance screen 1 Use or to select Maintenance settings then press OK The Maintenance settings screen is displayed 2 Use or to select Maintenance then press OK The Maintenance screen is displayed 3 Use or to select the setting item then press OK The setting screen for t...

Page 88: ...the Auto Sheet Feeder 2 Print the Nozzle Check Pattern 1 Display the Maintenance screen 2 Use or to select Nozzle check then press OK The pattern print confirmation screen is displayed 3 Use or to select Yes then press OK The nozzle check pattern is printed 3 Confirm the nozzle check pattern See Examining The Nozzle Check Pattern on page 87 ...

Page 89: ...erly Examine the nozzle check pattern output by the machine z If the lines are broken 1 or white lines 2 are present in the pattern A replace the relevant ink tank See Replacing A FINE Cartridge on page 75 z There are no white stripes All patterns are printed normally 1 Select All A and press OK The screen returns to the Maintenance screen A 1 2 ...

Page 90: ... 10 Routine Maintenance z A white stripe exists on any of the printed patterns 1 Select Also B and press OK The cleaning confirmation screen is displayed 2 Select Yes and press OK to start FINE Cartridge Cleaning ...

Page 91: ...Cleaning starts when the ON OFF lamp starts flashing 3 Check the FINE Cartridge condition 1 When the Nozzle check confirmation screen is displayed print the nozzle check pattern A nozzle check pattern will be printed Do not perform any other operation until the printing of the nozzle check pattern is finished 2 Look carefully at the printout of the nozzle check pattern to evaluate the condition of...

Page 92: ...ation message is displayed select Yes and press OK FINE Cartridge Deep Cleaning starts when the ON OFF lamp starts flashing 3 Check the FINE Cartridge condition 1 Print a nozzle check pattern to evaluate a FINE Cartridge condition See Printing The Nozzle Check Pattern on page 85 2 If the problem persists turn OFF the machine for at least 24 hours and perform step 2 again 3 If the problem persists ...

Page 93: ...ed 1 With the machine ON load a sheet of A4 or Letter sized plain paper in the Auto Sheet Feeder Move the Paper Thickness Lever to the left position 2 Print the pattern 1 Display the Maintenance screen 2 Use or to select Auto head align then press OK 3 When the confirmation message is displayed select Yes and press OK The head alignment sheet will be printed ...

Page 94: ... Least solid box 2 Load the checked sheet on the Platen Glass When loading the checked sheet place the front side down and align the upper left corner of the sheet with the alignment mark on the lower right corner of the Platen Glass 3 Press OK The machine scans the pattern and aligns the FINE Cartridge automatically Note If you select Head alignment print in step 2 2 the machine prints the curren...

Page 95: ...you have trouble getting the scanning area clean wipe with diluted mild detergent for dish washing Cleaning The Exterior Wipe the machine s exterior with a clean soft lint free damp cloth Caution z Be sure to turn OFF the power and disconnect the power cord before cleaning the machine z Do not use tissue paper paper towels or similar materials for cleaning they can stick to the components or gener...

Page 96: ... Display the Maintenance screen 2 Use or to select Roller cleaning then press OK The confirmation screen is displayed 3 Use or to select Yes then press OK The paper feed rollers are cleaned 3 Repeat step 2 twice 4 Open the Paper Output Tray 5 Load three or more of A4 or Letter sized paper in the Auto Sheet Feeder 6 Repeat step 2 three times The sheet of paper is automatically fed in and then out o...

Page 97: ...ing quality The parts can be cleaned in the following ways See Cleaning The Bottom Plate on page 95 See Cleaning The Protrusions Inside The Machine on page 96 1 Ensure that the machine is turned ON and there is no paper loaded in the Auto Sheet Feeder 2 Take a sheet of A4 or Letter sized plain paper and fold it in half widthwise Then open the paper 3 Load it into the Auto Sheet Feeder with the ope...

Page 98: ... The Machine If the protrusions inside the machine are stained wipe ink off the protrusions using a swab or something similar Note If the discharged paper still appears dirty after you have run this Cleaning process the inside of your machine is probably extremely dirty Clean the inside of the machine in accordance with the following directions See Cleaning The Protrusions Inside The Machine on pa...

Page 99: ...7 Cannot Print Properly From The Digital Camera See page 108 Cannot Print Properly Through Wireless Communication See page 110 Cannot Install The MP Driver See page 111 Cannot Connect To PC Properly See page 112 Problems With Scanning See page 113 An Error Message Appears On The Screen See page 117 For Windows Users See page 119 If You Cannot Solve The Problem See page 120 z If an error occurs whe...

Page 100: ...he ink absorber is almost full Press OK to continue printing Contact the service center The ink absorber is almost full Printing will no longer be possible once the ink absorber is full Contact the service center immediately Press OK to continue printing Incompatible device detected Depending on the model or brand of your device you may have to select a print mode compliant with PictBridge before ...

Page 101: ...chine back in and turn the machine back ON If the problem remains contact a Canon service representative Cause Action Cannot see the display properly on the LCD The display on the LCD is illegible Adjust the contrast of the LCD in the Adjust contrast menu in the Maintenance settings See Other Settings on page 73 Cannot see the display on the LCD z You have not pressed ON OFF The machine will power...

Page 102: ...ge 91 Print Quality is not set properly Be sure to set the Print Quality setting to High in Windows or Fine in Macintosh 1 Open the printer properties dialog box 2 On the Main tab click High for the Print Quality setting When you cannot choose the High setting or when the print quality does not improve select Custom click Set and then adjust the Quality bar for higher print quality 1 Open the Prin...

Page 103: ...running If you still cannot print restart Windows and try printing again The machine has been printing continuously over a long period If so the FINE Cartridge will overheat To protect the FINE Cartridge printing will stop temporarily and resume after a period of time Interrupt printing when appropriate turn OFF the machine and wait at least 15 minutes Caution The area around the FINE Cartridge no...

Page 104: ...ed correctly Check that the document is loaded correctly on the Platen Glass See Loading Documents on page 15 The quality image quality displayed on the LCD is not suitable for the document Set the image quality suitable for the document See Print Setting Items on page 28 The document is not loaded with the side to be copied face down When loading the document on the Platen Glass the side to be co...

Page 105: ...there is no paper loaded in the Auto Sheet Feeder 2 Place A4 Letter sized plain paper in landscape orientation horizontally fold it in half 3 Unfold the paper and load the paper in the Auto Sheet Feeder with the inverted V edge down 4 Select Bottom plate cleaning from Maintenance 5 Select Yes on the Bottom plate cleaning confirmation screen and then press OK Paper will be ejected If protrusions in...

Page 106: ...per Types You Cannot Use on page 16 z Note that smudging may occur at the top and bottom edges of the paper when using Borderless Printing Ensure that the paper you are using is compatible with Borderless Printing Thick paper is used When printing on thick paper set the Paper Thickness Lever to the right This widens the gap between the FINE Cartridge and the paper Try this maneuver if the printed ...

Page 107: ...r loaded Paper is loaded incorrectly Load in the portrait orientation regardless of the print direction of the Auto Sheet Feeder Ensure that paper is loaded correctly Slide the paper guides against the paper stack Cause Action Paper being used is too thin Use Photo Paper Pro or other Canon genuine media to print images that have a high color saturation See Paper Types You Cannot Use on page 16 The...

Page 108: ...inside the machine at this time After removing all paper close the Scanning Unit turn the machine OFF and turn it back ON z If you cannot pull the paper out turn the machine OFF and turn it back ON The paper will be ejected automatically 2 Reload the paper into the machine and press OK z If you have turned OFF the machine in step 1 you will need to retry printing because this operation cancels any...

Page 109: ...aten Glass See Printing By Using The Photo Index Sheet on page 42 Cause Action The language you want to be displayed is not selected Select the language you want to be displayed following the procedure below 1 Press Copy to enter the copy mode 2 Press Menu 3 Press then press OK 4 Press then press OK 5 Press three times then press OK to display Language Selection screen If the Bluetooth unit is con...

Page 110: ...ble device may need to be switched to printing mode before it is connected to the machine depending on the model of the device Also it may need to be turned on manually or switched to replay mode after being connected to the machine Refer to the instruction manuals supplied with your camera and take the necessary steps before connection z The FINE Cartridge nozzles may be clogged if printing becom...

Page 111: ...e the FINE Cartridge and close the Scanning Unit If printing is in progress and you want to continue printing press OK with the FINE Cartridge installed Then printing can continue under the ink out condition by selecting Continue 1 on the display on your camera Replace the empty FINE Cartridge immediately after this printout The machine may be damaged if printing is continued under the ink out con...

Page 112: ... proper communication During infrared communication infrared rays were interrupted or another infrared communication device is operating nearby If infrared communication between the infrared ports of the machine and the mobile phone is interrupted by any obstacle for about ten seconds or longer during printing the paper on which the data is being printed is ejected and the machine is reset Remove ...

Page 113: ...d on your computer can interfere with the installation routine Close all open software applications before reinstalling the MP driver Installation does not start automatically when the Setup CD ROM is inserted into the drive Click Start select My Computer and then double click the CD ROM icon For non Windows XP users open the My Computer window and then double click the CD ROM icon Double click th...

Page 114: ...2 0 the machine will operate at the lower speed provided under USB 1 1 In this case the machine operates properly but printing speed may be slower due to the communication speed Check the following to ensure that your Computer environment supports USB 2 0 Hi Speed connections z The USB port on your Computer supports USB 2 0 Hi Speed connection z Both the USB cable and USB hub support USB 2 0 Hi Sp...

Page 115: ... different USB port on the computer itself not a hub z If a USB hub is used for the connection do not use it Attach the cable directly to a USB port on the computer itself not the hub z The machine may not be selected Select your machine following the directions in Scanning with ScanGear in Initiating a Scan z Be sure to start ScanGear from within a TWAIN compatible program Cause Action Output Res...

Page 116: ...cument Cover of the machine taking special care not to press strongly on the Platen Glass The status of the original is poor Scan with certain functions such as Reduce Dust and Scratches Fading Correction or Grain Correction in the Image Settings section of the Advanced Mode of ScanGear Note If the printout of an image does not appear satisfactory or the same as what you see on the monitor you may...

Page 117: ...iginal is slightly crooked on the Platen Glass within 10 degrees of true the image will be automatically straightened z Originals that are irregularly shaped close cropped photos or smaller than 1 2 30 mm cannot be detected correctly Error arising from application software specifications Some application softwares do not support multiple image scanning Scan each item individually without using the...

Page 118: ...program supplied with the machine instead See the on screen manuals for each application program for the detailed procedures z Change the resolution setting in the scanner driver and rescan The higher the resolution the larger the resulting image will be z Some application programs do not display clear images at small image display settings Set the scale to 100 Scanned image won t open The file na...

Page 119: ...ntrol Panel Printers and Other Hardware and then Printers and Faxes For non Windows XP click Start select Settings and then Printers 2 Select the icon of your machine 3 Open the File menu and select Properties 4 Click the Ports tab or the Details tab to confirm the port settings A USB port is selected if either USBnnn Canon MP460 or MPUSBPRNnn Canon MP460 where n is a number is indicated If the po...

Page 120: ...owing the procedures described in the Easy Setup Instructions Cause Action The ink absorber is almost full Ink used for cleaning is absorbed in a ink absorber inside the machine Press OK to cancel the error so that you can continue printing Once the ink absorber becomes completely full printing cannot be done until the ink absorber is replaced Canon recommends that you contact a Canon service repr...

Page 121: ... are not installed Insert the Setup CD ROM into your computer and install the on screen manuals instruction manuals The Instructions button is displayed only on Main and Maintenance tabs The Scanning Guide cannot be displayed The button for displaying the scanner driver operating instruction is grayed out when the on screen manuals instruction manuals are not installed Insert the Setup CD ROM into...

Page 122: ...onfirm the following z Product name PIXMA MP460 z Serial number written on label at rear of machine z Details of the problem z What you tried to solve the problem and what happened Caution Attempts by customers to repair or take apart the machine will invalidate any warranty regardless of whether the warranty has expired Note If the machine emits any unusual sound smoke or odor turn it OFF immedia...

Page 123: ...g with no margins is possible This is available in A4 Letter 4 x 6 101 6 x 152 4 mm 4 x 8 101 6 x 203 2 mm and 5 x 7 127 0 x 177 8 mm and Credit Card paper sizes See A4 B5 A5 4 x 6 4 x 8 5 x 7 Credit Card on page 122 See Letter Legal on page 123 See Envelopes on page 123 Recommended printing area Canon recommends that you print within this area Printable area The area where it is possible to print...

Page 124: ... 2 x 169 8 mm 4 7 x 6 7 in Credit Card 47 2 x 78 0 mm 1 86 x 3 07 in Recommended printing area Printable area Note When Printing on Glossy Photo Paper GP 401 GP 501 Matte Photo Paper MP 101 Photo Paper Plus Double Sided PP 101D Photo Paper Plus Glossy PP 101 Photo Paper Plus Semi gloss SG 101 SG 201 and Photo Paper Pro PR 101 selection of Borderless Printing enables you to make prints with no marg...

Page 125: ... Photo Paper Plus Double Sided PP 101D Photo Paper Plus Glossy PP 101 Photo Paper Plus Semi gloss SG 101 SG 201 and Photo Paper Pro PR 101 selection of Borderless Printing enables you to make prints with no margins However Borderless Printing may reduce the print quality on the top and bottom edges of the paper or cause smudging on the paper Size Printable Area width x height European DL 180 8 x 1...

Page 126: ... click OK When the message prompting you to restart your computer is displayed click OK to restart your computer z Uninstall the Printer Driver Guide and Scanning Guide Delete the MP driver and scanner driver to uninstall the Printer Driver Guide and Scanning Guide z Uninstall the User s Guide and Photo Application Guide 1 Select Applications from the Go menu 2 Double click the Canon Utilities fol...

Page 127: ...lug the machine 2 Close the Paper Support and Paper Support Extension 3 Disconnect the USB cable from the computer and from the machine and then disconnect the power cord from the machine 4 To prevent the Scanning Unit or the Paper Support from opening secure them with tape 5 Cover the machine with protective materials attached on both sides and put it in a box Important To protect the machine fro...

Page 128: ...rt IrDA Bluetooth1 2 Option Acoustic noise level Approx 45 dB A when printing in the highest print quality mode on Photo Paper Pro Operating environment Temperature 5 to 35 C 41 to 95 F Humidity 10 to 90 RH no condensation Storage environment Temperature 0 to 40 C 32 to 104 F Humidity 5 to 95 RH no condensation Power supply AC 100 240 V 50 60 Hz Power consumption Standby minimum Approx 2 W Printin...

Page 129: ...ticker Printing on this paper is available only when the Layout function on your camera has a 16 up option See Recommended Paper on page 17 2 If using a Canon PictBridge compatible camera you can select it Media type Default Photo Paper Plus Glossy Photo Photo Paper Plus Photo Paper Plus Semi gloss Glossy Photo Paper Photo Stickers Fast Photo Photo Paper Pro Plain Paper Only A4 Letter Layout Defau...

Page 130: ...IJ Status Monitor cannot be used under the following conditions When sharing this machine on a network Windows Me Windows 98 z Use a Macintosh series computer equipped with USB interface on which Mac OS X v 10 2 8 or later can operate z USB 2 0 Hi Speed interface USB 2 0 Hi Speed operation can only be guaranteed under the environments below OS Mac OS X v 10 2 8 or later An internal USB 2 0 Hi Spee...

Page 131: ...ns However there is no guarantee that interference will not occur in a particular installation If this equipment does cause harmful interference to radio or television reception which can be determined by turning the equipment off and on the user is encouraged to try to correct the interference by one or more of the following measures z Reorient or relocate the receiving antenna z Increase the sep...

Page 132: ...A shall have no responsibility for such items except for compatible Canon brand peripheral equipment covered by a separate warranty Separate Warranty Repairs of such Canon brand peripheral equipment shall be governed by the terms of the Separate Warranty Non Canon brand equipment and software that may be distributed with the Product are sold as is and without warranty of any kind by Canon USA incl...

Page 133: ... OF THE PRODUCT CAUSING THE ALLEGED DAMAGE WITHOUT LIMITING THE FOREGOING YOU ASSUME ALL RISK AND LIABILITY FOR LOSS DAMAGE OR INJURY TO YOU AND YOUR PROPERTY AND TO OTHERS AND THEIR PROPERTY ARISING OUT OF THE POSSESSION USE MISUSE OR INABILITY TO USE THE PRODUCT SOLD BY CANON USA NOT CAUSED SOLELY AND DIRECTLY BY THE NEGLIGENCE OF CANON USA OR ITS ASF SOME STATES DO NOT ALLOW THE EXCLUSION OR LI...

Page 134: ...Exchange Service expedites usually by the second business day the exchange of a defective Product with a replacement Product which will normally be shipped the same day if your request for this service is by 3 p m E T Monday through Friday except holidays three 3 business day InstantExchange Service for Alaska and Hawaii Canon USA does not guarantee expedited shipping service in the event of the o...

Page 135: ...ON z The location of the authorized service facility nearest you 1 800 OK CANON If the problem cannot be corrected by using one of the above technical support options repair options are available at the time of your call to the Free live technical support number above or via the website at www canon ca Support program specifics are subject to change without notice CANON CANADA INC 1 800 OK CANON 1...

Page 136: ...E Cartridge 79 G General Paper Guidelines 16 I IrDA Port 10 L LCD Liquid Crystal Display 12 Loading Paper 23 Loading Envelopes 24 M Machine Parts 10 Memory Card 37 Inserting 38 Reading From Writing To 50 Removing 39 Write Protection 50 MEMORY CARD Button 12 Menu Button 12 N Nozzle Check Pattern 85 Examining 87 Printing 86 O OK Button 12 ON OFF Button 12 Operation Panel 12 P Paper Guide 10 Paper Ou...

Page 137: ...CAN Button 12 Scanning Images 58 From An Application Software 60 Using The MP Navigator 58 Using The SCAN Button 59 Scanning Unit 11 Scanning Unit Support 11 Setting Documents 15 Document Requirements 15 Loading Documents 15 Settings Button 12 Specifications 126 Stop Reset Button 12 T Troubleshooting 97 Paper Jams 106 U USB Port 11 Useful Copy Functions 34 Borderless Copy 35 Image Repeat 36 Sticke...

Page 138: ...terials related to such distribution and use acknowledge that the software was developed at Cygnus Support Inc Cygnus Support Inc may not be used to endorse or promote products derived from this software without specific prior written permission THIS SOFTWARE IS PROVIDED AS IS AND WITHOUT ANY EXPRESS OR IMPLIED WARRANTIES INCLUDING WITHOUT LIMITATION THE IMPLIED WARRANTIES OF MERCHANTABILITY AND F...

Page 139: ...om Support program specifics are subject to change without notice Ordering Information For additional supplies use the following descriptions and order numbers Description Order FINE Cartridges PG 40 Black 0615B002 CL 41 Color 0617B002 PG 50 Black High Yield 0616B002 CL 51 Color High Yield 0618B002 Canon Specialty Papers Photo Paper Plus Glossy 4 x 6 20 sheets 7980A007 Photo Paper Plus Glossy 4 x ...

Page 140: ...FINE Cartridges Standard are compatible with this machine The following FINE Cartridges High Yield are also compatible with this machine For details on FINE Cartridge replacement refer to Replacing A FINE Cartridge in this guide QT5 0576 V06 ENG User s Guide User s Guide ...

Reviews: